Sun Microsystems System Administration Guide, Volume 1 (2000) - page 13

TABLE 32-4
The analyze Menu Item Descriptions
(continued)
The Command ... Allows You To ...
setup
Specify the following analysis parameters
Analyze entire disk? yes
Starting block number: depends on drive
Ending block number: depends on drive
Loop continuously? no
Number of passes: 2
Repair defective blocks? yes
Stop after first error? no
Use random bit patterns? no
Number of blocks per transfer: 126 (0/n/nn)
Verify media after formatting? yes
Enable extended messages? no
Restore defect list? yes
Restore disk label? yes
Defaults are shown in bold.
config
View the current analysis parameters.
quit
Exit the analyze menu.
The defect Menu
The defect menu looks like this.
format> defect
DEFECT MENU:
primary
- extract manufacturer’s defect list
grown
- extract manufacturer’s and repaired defects lists
both
- extract both primary and grown defects lists
print
- display working list
dump
- dump working list to file
quit
defect>
The table below describes the defect menu items.
398
TABLE 32-5
The defect Menu Item Descriptions
The Command ... Allows You To ...
primary
Read the manufacturer’s defect list from the disk drive and update the
in-memory defect list.
grown
Read the grown defect list (defects that have been detected during
analysis) and update the in-memory defect list.
both
Read both the manufacturer’s and grown defect list and update the
in-memory defect list.
print
View the in-memory defect list.
dump
Save the in-memory defect list to a file.
Exit the defect menu.
quit
Files Used by format (format.dat)
The format data file, /etc/format.dat, contains:
Disk types
Default slice tables
The format.dat file shipped with the Solaris operating environment supports
many standard disks. If your disk drive is not listed in the format.dat file, you can
choose to add an entry for it or allow format to prompt you for the information it
needs while it is performing operations.
Adding an entry to the format.dat file can save time if the disk drive will be used
throughout your site. To use the format.dat file on other systems, copy the file to
each system that will use the specific disk drive you added to the format.dat file.
You should modify the data file for your system if you have one of the following:
A disk that is not supported by the Solaris operating environment
A disk with a slice table that is different from the Solaris operating environment
default configuration
The format Utility (Reference)
399
Note - Do not alter default entries. If you want to alter the default entries, copy the
entry, give it a different name, and make the modification to avoid confusion.
Structure of the format.dat File
The format.dat contains specific disk drive information used by the format
utility. Three items are defined in the format.dat file:
Search paths
Disk types
Slice tables
Syntax of the format.dat File
The following syntax rules apply to the data file:
The pound sign (#) is the comment character. Any text on a line after a pound
sign is not interpreted by format.
Each definition in the format.dat file appears on a single logical line. If the
definition is more than one line long, all but the last line of the definition must
end with a backslash (\).
A definition consists of a series of assignments that have an identifier on the left
side and one or more values on the right side. The assignment operator is the
equal sign (=). The assignments within a definition must be separated by a colon
(:).
White space is ignored by format. If you want an assigned value to contain white
space, enclose the entire value in double quotes ("). This will cause the white
space within the quotes to be preserved as part of the assignment value.
Some assignments can have multiple values on the right hand side. Separate
values by a comma.
Keywords in the format.dat File
The data file contains disk definitions that are read in by format when it is started.
Each definition starts with one of the following keywords: search_path,
disk_type, and partition, which are described in the table below.
400

TABLE 32-6
format.dat Keyword Descriptions
Keyword
Use
search_path
This keyword is no longer used in the format.dat file. Starting with the Solaris 2.0
release, the format utility searchs the logical device hierarchy (/dev) so there is no need
to set this keyword to find a system’s disks.
disk_type
Defines the controller and disk model. Each disk_type definition contains information
concerning the physical geometry of the disk. The default data file contains definitions for
the controllers and disks that the Solaris operating environment supports. You need to add
a new disk_type only if you have an unsupported disk. You can add as many
disk_type definitions to the data file as you want.
partition
Defines a slice table for a specific disk type. The slice table contains the slice information,
plus a name that lets you refer to it in format. The default data file contains default slice
definitions for several kinds of disk drives. Add a slice definition if you recreated slices on
any of the disks on your system. Add as many slice definitions to the data file as you need.
Disk Type (format.dat)
disk_type defines the controller and disk model. Each disk_type definition
contains the physical geometry of the disk. The default data file contains definitions
for the controllers and disks that the Solaris operating environment supports. You
need to add a new disk_type only if you have an unsupported disk. You can add
as many disk_type definitions to the data file as you want.
The keyword itself is assigned the name of the disk type. This name appears in the
disk’s label, and is used to identify the disk type whenever format is run. Enclose
the name in double quotes to preserve any white space in the name. The table below
describes the identifiers that must also be assigned values in all disk_type
definitions.
TABLE 32-7
Required disk_type Identifiers
Identifier
Description
ctlr
Valid controller type for the disk type. Currently, the supported values
for this assignment are SCSI and ISP-80 (IPI controller).
ncyl
The number of data cylinders in the disk type. This determines how
many logical cylinders of the disk the system will be allowed to access.
The format Utility (Reference)
401
TABLE 32-7
Required disk_type Identifiers
(continued)
Identifier
Description
acyl
The number of alternate cylinders in the disk type. These cylinders are
used by format to store information such as the defect list for the drive.
You should always leave at least two cylinders for alternates.
pcyl
The number of physical cylinders in the disk type. This number is used
to calculate the boundaries of the disk media. This number is usually
equal to ncyl plus acyl.
nhead
The number of heads in the disk type. This number is used to calculate
the boundaries of the disk media.
nsect
The number of data sectors per track in the disk type. This number is
used to calculate the boundaries of the disk media. Note that this is only
the data sectors, any spares are not reflected in the assignment.
rpm
The rotations per minute of the disk type. This information is put in the
label and later used by the file system to calculate the optimal placement
of file data.
Other assignments might be necessary depending on the controller. The table below
describes the assignments required for SCSI controllers.
TABLE 32-8
disk_type Identifiers for SCSI Controllers
Identifier
Description
fmt_time
A number indicating how long it takes to format a given drive. See the
controller manual for more information.
A number that controls the operation of the onboard cache while format is
cache
operating. See the controller manual for more information.
trks_zone
A number that specified how many tracks you have per defect zone, to be
used in alternate sector mapping. See the controller manual for more
information.
asect
The number assigned to this parameter specifies how many sectors are
available for alternate mapping within a given defect zone. See the controller
manual for more information.
Below are some examples of disk_type definitions:
402
disk_type = "SUN1.3G" \
: ctlr = SCSI : fmt_time = 4 \
: trks_zone = 17 : asect = 6 : atrks = 17 \
: ncyl = 1965 : acyl = 2 : pcyl = 3500 : nhead = 17 : nsect = 80 \
: rpm = 5400 : bpt = 44823
disk_type = "SUN2.1G" \
: ctlr = SCSI : fmt_time = 4 \
: ncyl = 2733 : acyl = 2 : pcyl = 3500 : nhead = 19 : nsect = 80 \
: rpm = 5400 : bpt = 44823
disk_type = "SUN2.9G" \
: ctlr = SCSI : fmt_time = 4 \
: ncyl = 2734 : acyl = 2 : pcyl = 3500 : nhead = 21 : nsect = 99 \
: rpm = 5400
Partition or Slice Tables (format.dat)
A partition definition keyword is assigned the name of the slice table. Enclose the
name in double quotes to preserve any white space in the name. The table below
describes the identifiers that must be assigned values in all slice tables.
TABLE 32-9
Required Identifiers for Slice Tables
Identifier
Description
disk
The name of the disk_type that this slice table is defined for. This name
must appear exactly as it does in the disk_type definition.
The disk controller type this slice table can be attached to. Currently, the
ctlr
supported values for this assignment are ISP-80 for IPI controllers and SCSI
for SCSI controllers. The controller type specified here must also be defined
for the disk_type chosen above.
The other assignments in a slice definition describe the actual slice information. The
identifiers are the numbers 0 through 7. These assignments are optional. Any slice
not explicitly assigned is set to 0 length. The value of each of these assignments is a
pair of numbers separated by a comma. The first number is the starting cylinder for
the slice, and the second is the number of sectors in the slice. Below are some
examples of slice definitions:
partition = "SUN1.3G" \
: disk = "SUN1.3G" : ctlr = SCSI \
: 0 = 0, 34000 : 1 = 25, 133280 : 2 = 0, 2672400 : 6 = 123, 2505120
partition = "SUN2.1G" \
: disk = "SUN2.1G" : ctlr = SCSI \
(continued)
The format Utility (Reference)
403
(Continuation)
: 0 = 0, 62320 : 1 = 41, 197600 : 2 = 0, 4154160 : 6 = 171, 3894240
partition = "SUN2.9G" \
: disk = "SUN2.9G" : ctlr = SCSI \
: 0 = 0, 195426 : 1 = 94, 390852 : 2 = 0, 5683986 : 6 = 282, 5097708
Specifing the Location of a format Data File
The format utility learns of the location of your data file by the following methods.
1. If a filename is given with the -x command line option, that file is always used as
the data file.
2. If the -x option is not specified, then format looks in the current directory for a
file named format.dat. If the file exists, it is used as the data file.
3. If neither of these methods yields a data file, format uses /etc/format.dat as
the data file. This file is shipped with the Solaris operating environment and
should always be present.
Rules for Input to format Commands
When using the format utility, you need to provide various kinds of information.
This section describes the rules for this information. See “Using format Help” on
page 406 for information on using format’s help facility when inputting data.
Inputting Numbers to format Commands
Several places in format require an integer as input. You must either specify the
data or select one from a list of choices. In either case, the help facility causes
format to print the upper and lower limits of the integer expected. Simply enter the
number desired. The number is assumed to be in decimal format unless a base is
explicitly specified as part of the number (for example, 0x for hexadecimal).
The following are examples of integer input:
404
Enter number of passes [2]: 34
Enter number of passes [34] Oxf
Specifying Block Numbers to format Commands
Whenever you are required to specify a disk block number, there are two ways to
input the information:
Block number as an integer
Block number in the cylinder/head/sector format
You can specify the information as an integer representing the logical block number.
You can specify the integer in any base, but the default is decimal. The maximum
operator (a dollar sign, $) can also be used here to let format select the appropriate
value. Logical block format is used by the SunOS disk drivers in error messages.
The other way to specify a block number is by the cylinder/head/sector designation.
In this method, you must specify explicitly the three logical components of the block
number: the cylinder, head, and sector values. These values are still logical, but they
allow you to define regions of the disk related to the layout of the media.
If any of the cylinder/head/sector numbers are not specified, the appropriate value
is assumed to be zero. You can also use the maximum operator in place of any of the
numbers and let format select the appropriate value. Below are some examples of
cylinder, head, and sector entries:
Enter defective block number: 34/2/3
Enter defective block number: 23/1/
Enter defective block number: 457//
Enter defective block number: 12345
Enter defective block number: Oxabcd
Enter defective block number: 334/$/2
Enter defective block number: 892//$
The format utility always prints block numbers, in both of the above formats. Also,
the help facility shows you the upper and lower bounds of the block number
expected, in both formats.
Specifying format Command Names
Command names are needed as input whenever format is displaying a menu
prompt. You can abbreviate the command names, as long as what you enter is
sufficient to uniquely identify the command desired.
For example, use p to enter the partition menu from the format menu. Then
enter p to display the current slice table.
The format Utility (Reference)
405
format> p
PARTITION MENU:
0
- change ‘0’ partition
1
- change ‘1’ partition
2
- change ‘2’ partition
3
- change ‘3’ partition
4
- change ‘4’ partition
5
- change ‘5’ partition
6
- change ‘6’ partition
7
- change ‘7’ partition
select - select a predefined table
modify - modify a predefined partition table
name
- name the current table
print
- display the current table
label
- write partition map and label to the disk
quit
partition> p
Specifying Disk Names to format Commands
There are certain times in format when you must name something. In these cases,
you are free to specify any string you want for the name. If the name has white
space in it, the entire name must be enclosed in double quotes ("). Otherwise, only
the first word of the name is used.
Using format Help
The format utility provides a help facility you can use whenever format is
expecting input. You can request help about what information is expected by
entering a question mark (?). The format utility displays a brief description of what
type of input is needed.
If you enter a ? at a menu prompt, a list of available commands is displayed.
Associated format Man Pages
The man pages associated with the format utility is format(1M), which describes
the basic format utility capabilities and provides descriptions of all command line
variables, and format.dat(4), which describes disk drive configuration information
for the format utility.
406
CHAPTER
33
Managing File Systems Topics
This section provides instructions for managing file systems in the Solaris operating
environment. This section contains these chapters.
Provides a high-level overview of file system concepts,
Chapter 34
including descriptions of the types of file systems,
commonly used administration commands, and the
basics of mounting and unmounting file systems.
Provides step-by-step procedures to create a UFS file
Chapter 35
system, create and preserve a temporary file system
(TMPFS), and create a loopback file system (LOFS).
Provides step-by-step procedures to determine what file
Chapter 36
systems are mounted, how to mount files listed in the /
etc/vfstab file, and how to mount UFS, NFS, and
PCFS (DOS) file systems.
Provides overview information and step-by-step
Chapter 37
instructions for using the Cache File System (CacheFSTM ).
Provides step-by-step procedures for configuring
Chapter 38
additional swap space, monitoring swap resources,
creating swap files and making them available, and
removing extra swap space.
407
Provides information on how the file system state is
Chapter 39
recorded, what is checked by the fsck program, how to
modify automatic boot checking, and how to use the
fsck program.
Provides file system reference information, including
Chapter 40
default directories for the root (/) and /usr file
systems, default directories contained within the /
kernel directory, and specifics for the mkfs and newfs
commands.
408
CHAPTER
34
Managing File Systems (Overview)
This is a list of the overview information in this chapter.
“What’s New in File Systems?” on page 409
“Types of File Systems” on page 416
“File System Administration Commands” on page 419
“The Default Solaris File Systems” on page 421
“Swap Space” on page 422
“The UFS File System” on page 423
“Mounting and Unmounting File Systems” on page 425
“Determining a File System’s Type” on page 430
What’s New in File Systems?
This section describes new file system features.
The /var/run File System
A new TMPFS-mounted file system, /var/run, is the repository for temporary
system files that are not needed across system reboots in this Solaris release and
future releases. The /tmp directory continues to be repository for non-system
temporary files.
409
Because /var/run is mounted as a memory-based file system rather than a
disk-based file system, updates to this directory do not cause unnecessary disk traffic
that would interfere with systems running power management software.
The /var/run directory requires no administration. You may notice that it is not
unmounted with the umount -a or the umountall command.
For security reasons, /var/run is owned by root.
Mount Table Changes (/etc/mnttab)
In previous Solaris releases, /etc/mnttab was a text-based file that stored
information about mounted file systems. The downside of being a file was that it
could get out of sync with the actual state of mounted file systems.
Now the /etc/mnttab file is a MNTFS file system that provides read-only
information directly from the kernel about mounted file systems for the local system.
Note the following mnttab behavior changes:
Programs or scripts attempting to write to /etc/mnttab will fail.
The mount -m option for faking mnttab entries no longer works.
No administration is required for the /etc/mnttab mount table.
See mnttab(4) for more information.
Using the Universal Disk Format (UDF)
File System
The UDF file system, the industry-standard format for storing information on the
optical media technology called DVD (Digital Versatile Disc or Digital Video Disc), is
included in this Solaris release.
The UDF file system is provided as dynamically loadable, 32-bit and 64-bit modules,
with system administration utilities for creating, mounting, and checking the file
system on both SPARC and IA platforms. The Solaris UDF file system works with
supported ATAPI and SCSI DVD drives, CD-ROM devices, and disk and diskette
drives. In addition, the Solaris UDF file system is fully compliant with the UDF 1.50
specification.
The UDF file system support is provided in the following new packages:
SUNWudfr — 32-bit kernel component
SUNWudfrx — 64-bit kernel component
410
SUNWudf — /usr component
UDF Features and Benefits
In this Solaris release, the UDF file system provides the following features:
Ability to access the industry standard CD-ROM and DVD-ROM media when they
contain a UDF file system.
Flexibility in exchanging information across platforms and operating systems.
A mechanism for implementing new applications rich in broadcast-quality video,
high-quality sound along with the richness in interactivity using the DVD video
specification based on UDF format.
The following features are not included in this UDF file system release:
Support for write-once media, CD-RW, and DVD-RAM, with either the sequential
disk-at-once and incremental recording.
UFS components such as quotas, ACLs, transaction logging, file system locking,
and file system threads, which are not part of the UDF 1.50 specification.
Hardware and Software Requirements
The UDF file system requires the following:
The Solaris 7 11/99 or the Solaris 8 release
Supported SPARC or Intel platforms
Supported CD-ROM or DVD-ROM device
UDF Compatibility Issues
This first Solaris UDF file system implementation provides:
Support for industry-standard read-write UDF version 1.50.
Fully internationalized file system utilities.
How to Connect a DVD-ROM Device
1. Become superuser.
2. Create the /reconfigure file.
# touch /reconfigure
Managing File Systems (Overview)
411

3. Shut down the system and turn off power.
# init 0
4. Connect the DVD-ROM device.
5. Turn on power to the system.
How to Access Files on a DVD-ROM Device
1. Verify the DVD-ROM device is automatically mounted.
$ ls /cdrom
Note - If the system has both a CD-ROM and DVD-ROM device, the CD-ROM
might be named /cdrom/cdrom0 and the DVD-ROM might be named
/cdrom/cdrom1. If the system only has a DVD-ROM device, then try using
/cdrom/cdrom0.
2. Display content with ls command.
$ ls /cdrom/cdrom1
Copyright filea fileb
Automatic display with the CDE file manager is not implemented yet. All other
CDE file manager functions—drag and drop for copying and imagetool
features—are available.
How to Display UDF File System Parameters
Display UDF file system parameters by using the mkfs command.
1. Become superuser.
2. Display UDF file system parameters.
412
# mkfs -F udfs -m /dev/rdsk/device-name
How to Create a UDF File System
Create a UDF file system by using the mkfs command.
1. Become superuser.
2. Create a UDF file system.
# mkfs -F udfs /dev/rdsk/device-name
3. Verify the UDF file system is created by mounting it. See “How to Mount a
UDF File System” on page 414 for more information.
See mkfs_udfs(1M) for more information.
How to Identify the UDF File System Type
Identify the UDF file system type by using the fstyp command.
1. Become superuser.
2. Determine whether a file system is a UDF file system.
# fstyp -v /rdev/dsk/device-name
How to Check a UDF File System
Check the integrity of a UDF file system by using the fsck command.
1. Become superuser.
2. Check a UDF file system.
# fsck -F udfs /dev/rdsk/device-name
See fsck_udfs(1M) for more information.
Managing File Systems (Overview)
413
How to Mount a UDF File System
Mount a UDF file system.
1. Become superuser.
2. Mount a UDF file system.
# mount -F udfs /dev/dsk/device-name /mount-point
3. Verify the UDF file system is mounted.
# ls /mount-point
See mount_udfs(1M) for more information.
How to Unmount a UDF File System
Unmount a UDF file system.
1. Become superuser.
2. Unmount a UDF file system.
# umount /dev/dsk/device-name
How to Label a Device with a UDF File System
and Volume Name
Create a file system and volume name for a UDF file system.
1. Become superuser.
2. Create a file system and volume name for the UDF file system.
# labelit -F UDFS /dev/rdsk/device-name fsname volume
See labelit_udfs(1M) for more information.
414
Overview of File Systems
A file system is a structure of directories used to organize and store files. The term
file system is used to describe:
A particular type of file system: disk-based, network-based, or virtual
The entire file tree from the root directory downward
The data structure of a disk slice or other media storage device
A portion of a file tree structure that is attached to a mount point on the main file
tree so that it is accessible
Usually, you can tell from context which meaning is intended.
The Solaris operating environment uses the virtual file system (VFS) architecture,
which provides a standard interface for different file system types. The VFS
architecture enables the kernel to handle basic operations, such as reading, writing,
and listing files; and makes it easier to add new file systems.
Administering file systems is one of your most important system administration
tasks. Read this chapter for file system background and planning information. Refer
to other chapters in the System Administration Guide for instructions about the
following tasks:
For This Task ...
See ...
Creating new file systems
Chapter 35 and Chapter 37
Making local and remote files available to
Chapter 36
users
Connecting and configuring new disk
Chapter 28
devices
Designing and implementing a backup
Chapter 42
schedule and restoring files and file systems
as needed
Checking for and correcting file system
Chapter 39
damage
Managing File Systems (Overview)
415
Types of File Systems
The Solaris operating environment supports three types of file systems:
Disk-based
Network-based
Virtual
To identify the type for a particular file system, see “Determining a File System’s
Type” on page 430.
Disk-Based File Systems
Disk-based file systems are stored on physical media such as hard disks, CD-ROMs,
and diskettes. Disk-based file systems can be written in different formats. The
available formats are:
Disk-Based File
System
Format Description
UFS
UNIX file system (based on the BSD Fast File system that was
provided in the 4.3 Tahoe release). UFS is the default disk-based
file system for the Solaris operating environment.
Before you can create a UFS file system on a disk, the disk must
be formatted and divided into slices. See Chapter 28 for complete
information on formatting disks and dividing disks into slices.
HSFS
High Sierra, Rock Ridge, and ISO 9660 file system. High Sierra is
the first CD-ROM file system; ISO 9660 is the official standard
version of the High Sierra File System. The HSFS file system is
used on CD-ROMs, and is a read-only file system. Solaris HSFS
supports Rock Ridge extensions to ISO 9660, which, when present
on a CD-ROM, provide all UFS file system features and file types
except for writability and hard links.
PCFS
PC file system, which allows read/write access to data and
programs on DOS-formatted disks written for DOS-based personal
computers.
UDF
The UDF file system, the industry-standard format for storing
information on the optical media technology called DVD (Digital
Versatile Disc or Digital Video Disc).
Each type of disk-based file system is customarily associated with a particular media
device:
416
UFS with hard disk
HSFS with CD-ROM
PCFS with diskette
UDF with DVD
These associations are not, however, restrictive. For example, CD-ROMs and
diskettes can have UFS file systems created on them.
Network-Based File Systems
Network-based file systems can be accessed over the network. Typically,
network-based file systems reside on one system, typically a server, and are accessed
by other systems across the network. NFSTM is the only available network-based or
distributed computing file system.
With NFS, you can administer distributed resources (files or directories) by exporting
them from a server and mounting them on individual clients. See “The NFS
Environment” on page 428 for more information.
Virtual File Systems
Virtual file systems are memory-based file systems that provide access to special
kernel information and facilities. Most virtual file systems do not use file system disk
space. However, the Cache File System (CacheFS) uses a file system on the disk to
contain the cache, and some virtual file systems, such as the Temporary File System
(TMPFS), use the swap space on a disk.
The Cache File System
The Cache File System (CacheFSTM ) can be used to improve performance of remote
file systems or slow devices such as CD-ROM drives. When a file system is cached,
the data read from the remote file system or CD-ROM is stored in a cache on the
local system. See Chapter 37 for detailed information on setting up and
administering CacheFS File Systems.
The Temporary File System
The Temporary File System (TMPFS) uses local memory for file system reads and
writes, which is typically much faster than a UFS file system. Using TMPFS can
improve system performance by saving the cost of reading and writing temporary
files to a local disk or across the network. For example, temporary files are created
when you compile a program, and the operating system generates a lot of disk or
Managing File Systems (Overview)
417
network activity while manipulating these files. Using TMPFS to hold these
temporary files can significantly speed up their creation, manipulation, and deletion.
Files in TMPFS file systems are not permanent. They are deleted when the file
system is unmounted and when the system is shut down or rebooted.
TMPFS is the default file system type for the /tmp directory in the Solaris operating
environment. You can copy or move files into or out of the /tmp directory, just as
you would in a UFS file system.
The TMPFS file system uses swap space as a temporary backing store. If a system
with a TMPFS file system does not have adequate swap space, two problems can
occur:
The TMPFS file system can run out of space, just as a regular file system can fill
up.
Because TMPFS allocates swap space to save file data (if necessary), some
programs might not execute because there is not enough swap space.
See Chapter 35 for information about creating TMPFS file systems. See Chapter 38
for information about increasing swap space.
The Loopback File System
The Loopback File System (LOFS) lets you create a new virtual file system, so you
can access files by using an alternative path name. For example, you can create a
loopback mount of root (/) on /tmp/newroot, which will make the entire file
system hierarchy look like it is duplicated under /tmp/newroot, including any file
systems mounted from NFS servers. All files will be accessible either with a path
name starting from root (/), or with a path name starting from /tmp/newroot.
See Chapter 35 for information on how to create LOFS file systems.
The Process File System
The Process File System (PROCFS) resides in memory. It contains a list of active
processes, by process number, in the /proc directory. Information in the /proc
directory is used by commands like ps. Debuggers and other development tools can
also access the address space of the processes by using file system calls.
Caution - Do not delete the files in the /proc directory. Deleting processes from the
/proc directory will not kill them. Remember, /proc files do not use disk space, so
there is little reason to delete files from this directory.
The /proc directory does not require system administration.
418

Additional Virtual File Systems
These additional types of virtual file systems are listed for your information. They do
not require administration.
Virtual File System
Description
FIFOFS (first-in first-out)
Named pipe files that give processes common access to
data
FDFS (file descriptors)
Provides explicit names for opening files using file
descriptors
NAMEFS
Used mostly by STREAMS for dynamic mounts of file
descriptors on top of files
SPECFS (special)
Provides access to character special and block devices
SWAPFS
File system used by the kernel for swapping
File System Administration Commands
Most file system administration commands have both a generic and a file
system-specific component. You should use the generic commands whenever
possible, which call the file system-specific component. The table below lists the
generic file system administrative commands, which are located in the /usr/sbin
directory.
TABLE 34-1
Generic File System Administrative Commands
Command
Description
Clears inodes
clri(1M)
Reports the number of free disk blocks and files
df(1M)
Lists file names and statistics for a file system
ff(1M)
Managing File Systems (Overview)
419
TABLE 34-1
Generic File System Administrative Commands
(continued)
Command
Description
Checks the integrity of a file system and repairs any damage
fsck(1M)
found
Debugs the file system
fsdb(1M)
Determines the file system type
fstyp(1M)
Lists or provides labels for file systems when copied to tape (for
labelit(1M)
use by the volcopy command only)
Makes a new file system
mkfs(1M)
Mounts local and remote file systems
mount(1M)
Mounts all file systems specified in the virtual file system table
mountall(1M)
(/etc/vfstab)
Generates a list of path names with their i-numbers
ncheck(1M)
Unmounts local and remote file systems
umount(1M)
Unmounts all file systems specified in a virtual file system table
umountall(1M)
(/etc/vfstab)
Makes an image copy of a file system
volcopy(1M)
420
How the File System Commands Determine the
File System Type
The generic file system commands determine the file system type by following this
sequence:
1. From the −F option, if supplied.
2. By matching a special device with an entry in /etc/vfstab file (if special is
supplied). For example, fsck first looks for a match against the fsck device
field; if no match is found, it then checks the special device field.
3. By using the default specified in /etc/default/fs for local file systems and in
/etc/dfs/fstypes for remote file systems.
Manual Pages for Generic and Specific Commands
Both the generic and specific commands have manual pages in the man Pages(1M):
System Administration Commands. The specific manual page is a continuation of the
generic manual page. To look at a specific manual page, append an underscore and
the file system type abbreviation to the generic command name. For example, to see
the specific manual page for mounting a UFS file system, type man mount_ufs.
The Default Solaris File Systems
The Solaris file system is hierarchical, starting with the root directory (/) and
continuing downwards through a number of directories. The Solaris installation
process enables you to install a default set of directories and uses a set of
conventions to group similar types of files together. The table below provides a
summary of the default Solaris file systems, and shows the type of each file system.
The root (/) and /usr file systems are both needed to run a system. Some of the
most basic commands from the /usr file system (like mount) are included in the
root (/) file system so that they are available when the system boots or is in
single-user mode and /usr is not mounted. See Chapter 40 for more detailed
information on the default directories for the root (/) and /usr file systems.
Managing File Systems (Overview)
421
TABLE 34-2
The Default Solaris File Systems
File System or
File System
Directory
Type
Description
root (/)
UFS
The top of the hierarchical file tree. The root directory
contains the directories and files critical for system
operation, such as the kernel, the device drivers, and
the programs used to boot the system. It also contains
the mount point directories where local and remote
file systems can be attached to the file tree.
/usr
UFS
System files and directories that can be shared with
other users. Files that run only on certain types of
systems are in the /usr directory (for example,
SPARC executables). Files (such as man pages) that can
be used on all types of systems are in /usr/share.
/export/home
NFS, UFS
The mount point for users’ home directories, which
or /home
store users work files. By default /home is an
automounted file system. On standalone systems, /
home might be a UFS file system on a local disk slice.
/var
UFS
System files and directories that are likely to change or
grow over the life of the local system. These include
system logs, vi and ex backup files, and uucp files.
/opt
NFS, UFS
Mount point for optional, third-party software. On
some systems, /opt might be a UFS file system on a
local disk slice.
/tmp
TMPFS
Temporary files, cleared each time the system is
booted or the /tmp file system is unmounted.
/proc
PROCFS
A list of active processes, by number.
Swap Space
The Solaris operating environment uses some disk slices for temporary storage rather
than for file systems. These slices are called swap slices, or swap space. Swap space is
used as virtual memory storage areas when the system does not have enough
physical memory to handle current processes.
422
Since many applications rely on swap space, it is important to know how to plan for,
monitor, and add more swap space when needed. For an overview about swap space
and instructions for adding swap space, see Chapter 38.
The UFS File System
UFS is the default disk-based file system in Solaris operating environment. Most of
the time, when you administer a disk-based file system, you will be administering
UFS file systems. UFS provides the following features:
UFS Feature
Description
State flags
Show the state of the file system: clean, stable, active,
logging, or unknown. These flags eliminate unnecessary
file system checks. If the file system is “clean,” “stable,”
or “logging,” file system checks are not run.
Extended fundamental types
32-bit user ID (UID), group ID (GID), and device numbers.
(EFT)
Large file systems
A UFS file system can be as large as 1 Tbyte (terabyte).
The Solaris operating environment does not provide
striping, which is required to make a logical slice large
enough for a 1-Tbyte file system. However, the SolsticeTM
DiskSuiteTM software, available from Sun, provides this
capability.
Large files
By default, a UFS file system can have regular files larger
than 2 Gbytes (gigabytes). You must explicitly use the
nolargefiles mount option to enforce a 2 Gbyte
maximum file size limit. This limit was removed in the
Solaris 2.6 release.
See Chapter 40 for detailed information about the UFS file system.
Parts of a UFS File System
When you create a UFS file system, the disk slice is divided into cylinder groups,
which are made up of one or more consecutive disk cylinders. The cylinder groups
are then further divided into addressable blocks to control and organize the structure
of the files within the cylinder group. Each type of block has a specific function in
the file system. See “The Structure of UFS File System Cylinder Groups” on page 538
for more detailed information about each type of block.
Managing File Systems (Overview)
423
If you want to customize a file system using arguments with the newfs command or
the mkfs command, see Chapter 40 for information about altering these parameters.
UFS Logging
UFS logging is the process of storing transactions (changes that make up a complete
UFS operation) in a log before the transactions are applied to the UFS file system.
Once a transaction is stored, the transaction can be applied to the file system later.
At reboot, the system discards incomplete transactions, but applies the transactions
for completed operations. The file system remains consistent because only completed
transactions are ever applied. This is true even when a system crashes, which
normally interrupts system calls and introduces inconsistencies into a UFS file
system.
UFS logging provides two advantages. It prevents file systems from becoming
inconsistent, therefore eliminating the need to run fsck. And, because fsck can be
bypassed, UFS logging reduces the time required to reboot a system if it crashes, or
after an unclean halt (see “What fsck Checks and Tries to Repair” on page 510 for
details on unclean halts). UFS logging can significantly reduce the boot time on
systems that have large file systems, which usually take a long time to read and
verify with fsck.
The log created by UFS logging is continually flushed as it fills up. The log is totally
flushed when the file system is unmounted or as a result of the lockfs -f
command.
UFS logging is not enabled by default. To enable UFS logging, you must specify the
−o logging option with the mount command in the /etc/vfstab file or when
mounting the file system. The log is allocated from free blocks on the file system,
and it is sized approximately 1 Mbyte per 1 Gbyte of file system, up to a maximum
of 64 Mbytes. Logging can be enabled on any UFS, including the root (/) file system.
Also, the fsdb command has been updated with new debugging commands to
support UFS logging.
Planning UFS File Systems
When laying out file systems, you need to consider possible conflicting demands.
Here are some suggestions:
Distribute the work load as evenly as possible among different I/O systems and
disk drives. Distribute /export/home and swap space evenly across disks.
Keep pieces of projects or members of groups within the same file system.
Use as few file systems per disk as possible. On the system (or boot) disk, you
should have three file systems: /, /usr, and swap space. On other disks, create
one or, at most, two file systems; one being additional swap space, preferably.
424
Fewer, roomier file systems cause less file fragmentation than many small,
over-crowded file systems. Higher-capacity tape drives and the ability of ufsdump
to handle multiple volumes make it easier to back up larger file systems.
If you have some users who consistently create very small files, consider creating a
separate file system with more inodes. However, most sites do not need to be
concerned about keeping similar types of user files in the same file system.
See Chapter 35 for information on default file system parameters as well as
procedures for creating new UFS file systems.
Mounting and Unmounting File Systems
Before you can access the files on a file system, you need to mount the file system.
Mounting a file system attaches that file system to a directory (mount point) and
makes it available to the system. The root (/) file system is always mounted. Any
other file system can be connected or disconnected from the root (/) file system.
When you mount a file system, any files or directories in the underlying mount point
directory are unavailable as long as the file system is mounted. These files are not
permanently affected by the mounting process, and they become available again
when the file system is unmounted. However, mount directories are typically empty,
because you usually do not want to obscure existing files.
For example, the figure below shows a local file system, starting with a root (/) file
system and subdirectories sbin, etc, and opt.
Managing File Systems (Overview)
425
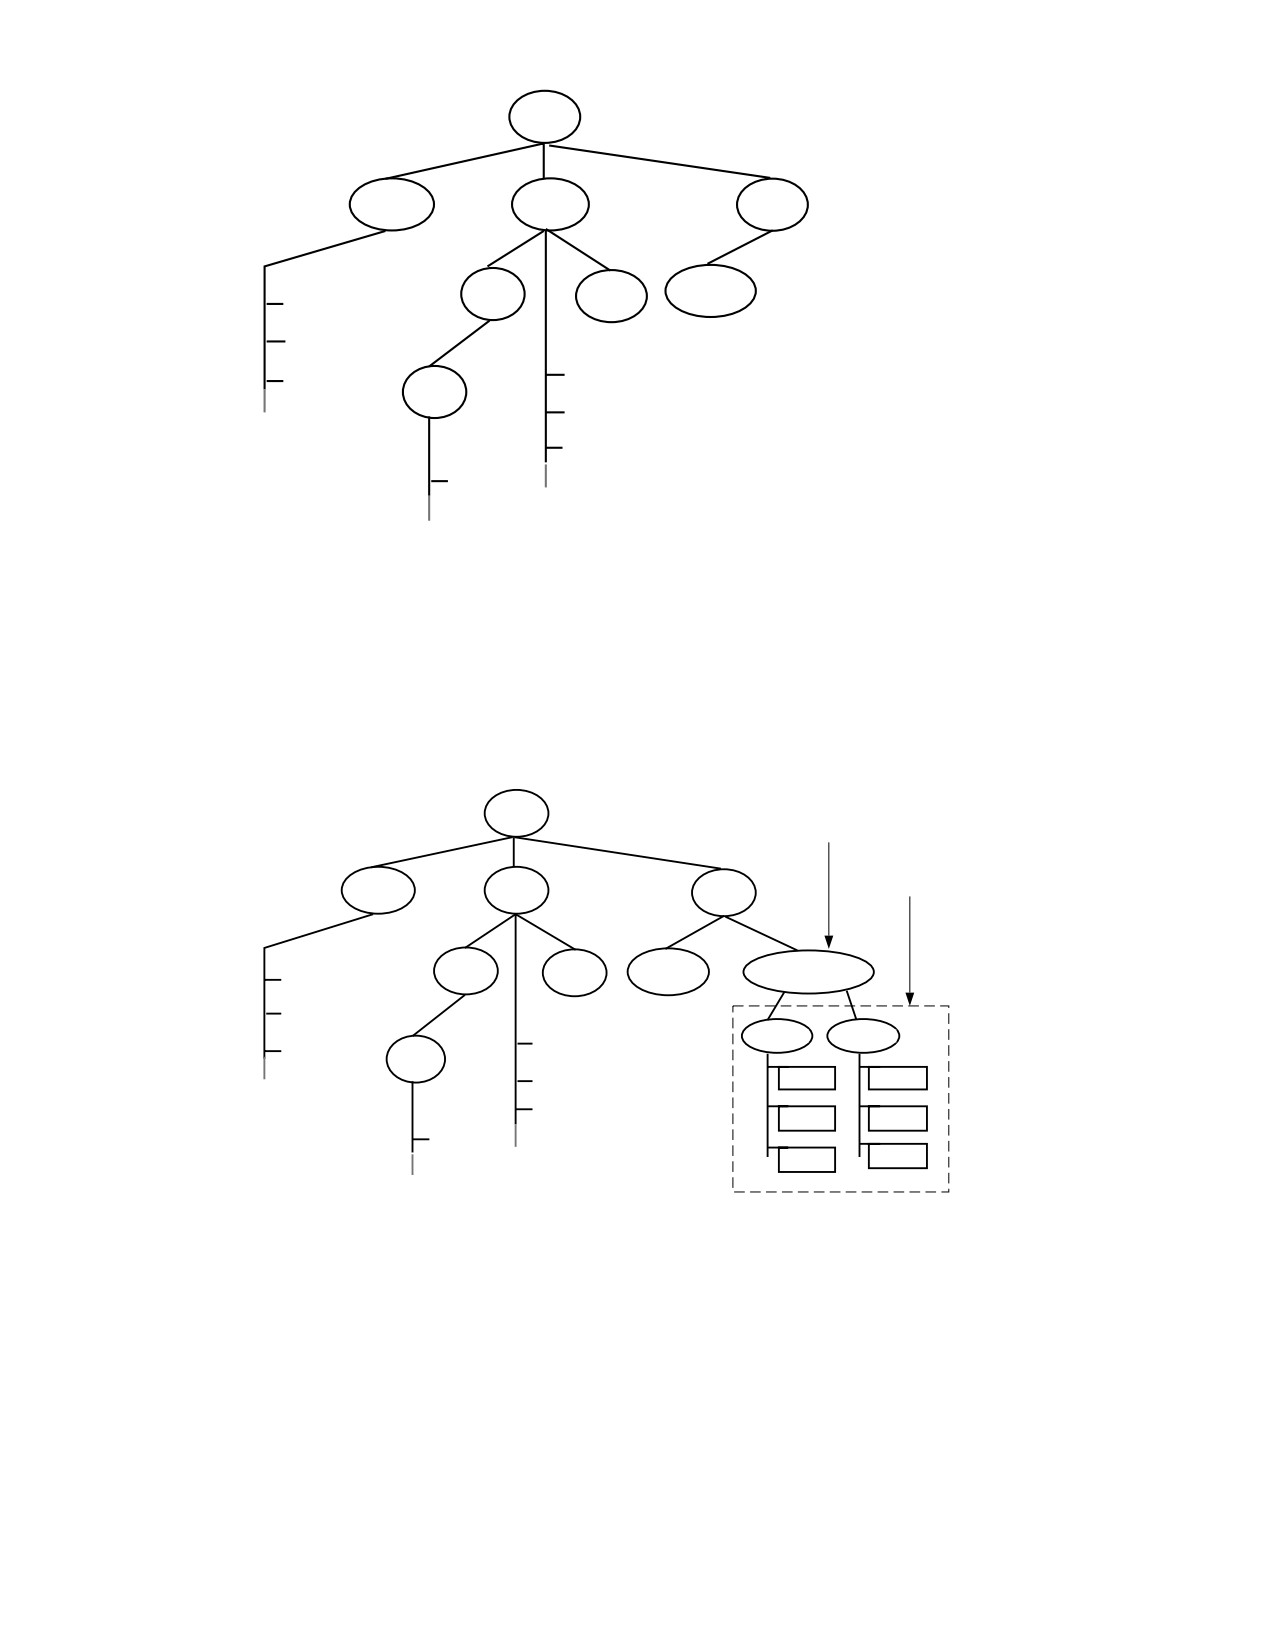
/
sbin
etc
opt
fs
opt
SUNWleo
mount
rc0
group
shutdown
ufs
system
ttydefs
mount
Figure 34-1
Sample root (/) File System
Now, say you wanted to access a local file system from the /opt file system that
contains a set of unbundled products.
First, you must create a directory to use as a mount point for the file system you
want to mount, for example, /opt/unbundled. Once the mount point is created,
you can mount the file system (by using the mount command), which makes all of
the files and directories in /opt/unbundled available, as shown in the figure below.
See Chapter 36 for detailed instructions on how to perform these tasks.
/
Mount Point
File System
sbin
etc
opt
fs
opt
SUNWleo
unbundled
mount
rc0
app1
app2
group
shutdown
ufs
system
file1
file1
ttydefs
file2
file2
mount
file3
file3
Figure 34-2
Mounting a File System
426
The Mounted File System Table
Whenever you mount or unmount a file system, the /etc/mnttab (mount table) file
is modified with the list of currently mounted file systems. You can display the
contents of this file with the cat or more commands, but you cannot edit it. Here is
an example of an /etc/mnttab file:
$ more /etc/mnttab
/dev/dsk/c0t0d0s0
/ ufs rw,intr,largefiles,onerror=panic,suid,dev=2200000 938557523
/proc
/proc
proc
dev=3180000
938557522
fd
/dev/fd fd
rw,suid,dev=3240000
938557524
mnttab
/etc/mnttab
mntfs
dev=3340000
938557526
swap
/var/run
tmpfs
dev=1
938557526
swap
/tmp
tmpfs
dev=2
938557529
/dev/dsk/c0t0d0s7 /export/
home ufs rw,intr,largefiles,onerror=panic,suid,dev=2200007 938557529
$
The Virtual File System Table
It would be a very time-consuming and error-prone task to manually mount file
systems every time you wanted to access them. To fix this, the virtual file system
table (the /etc/vstab file) was created to maintain a list of file systems and how to
mount them. The /etc/vfstab file provides two important features: you can
specify file systems to automatically mount when the system boots, and you can
mount file systems by using only the mount point name, because the /etc/vfstab
file contains the mapping between the mount point and the actual device slice name.
A default /etc/vfstab file is created when you install a system depending on the
selections you make when installing system software; however, you can edit the
/etc/vfstab file on a system whenever you want. To add an entry, the main
information you need to specify is the device where the file system resides, the name
of the mount point, the type of the file system, whether you want it to mount
automatically when the system boots (by using the mountall command), and any
mount options.
The following is an example of an /etc/vfstab file. Comment lines begin with #.
This example shows an /etc/vfstab file for a system with two disks (c0t0d0 and
c0t3d0).
$ more /etc/vfstab
#device
device
mount
FS
fsck
mount mount
#to mount
to fsck
point
type
pass
at boot options
/dev/dsk/c0t0d0s0 /dev/rdsk/c0t0d0s0 /
ufs
1
no
-
/proc
-
/proc
proc
-
no
-
/dev/dsk/c0t0d0s1 -
-
swap
-
no
-
swap
-
/tmp
tmpfs
-
yes
-
/dev/dsk/c0t0d0s6 /dev/rdsk/c0t0d0s6 /usr
ufs
2
no
-
/dev/dsk/c0t3d0s7 /dev/rdsk/c0t3d0s7 /test
ufs
2
yes
-
(continued)
Managing File Systems (Overview)
427
(Continuation)
$
In the above example, the last entry specifies that a UFS file system on the
/dev/dsk/c0t3d0s7 slice will be automatically mounted on the /test mount
point when the system boots. Note that, for root (/) and /usr, the mount at boot
field value is specified as no, because these file systems are mounted by the kernel as
part of the boot sequence before the mountall command is run.
See Chapter 36 for descriptions of each of the /etc/vfstab fields and information
on how to edit and use the file.
The NFS Environment
NFS is a distributed file system service that can be used to share resources (files or
directories) from one system, typically a server, with other systems across the
network. For example, you might want to share third-party applications or source
files with users on other systems.
NFS makes the actual physical location of the resource irrelevant to the user. Instead
of placing copies of commonly used files on every system, NFS allows you to place
one copy on one system’s disk and let all other systems access it across the network.
Under NFS, remote files are virtually indistinguishable from local ones.
A system becomes an NFS server if it has resources to share over the network. A
server keeps a list of currently shared resources and their access restrictions (such as
read/write or read-only).
When you share a resource, you make it available for mounting by remote systems.
You can share a resource in these ways:
By using the share or shareall command
By adding an entry to the /etc/dfs/dfstab (distributed file system table) file
and rebooting the system
See Chapter 36 for information on how to share resources. See System Administration
Guide, Volume
3 for a complete description of NFS.
428
AutoFS
You can mount NFS file system resources by using a client-side service called
automounting (or AutoFS), which enables a system to automatically mount and
unmount NFS resources whenever you access them. The resource remains mounted
as long as you remain in the directory and are using a file. If the resource is not
accessed for a certain period of time, it is automatically unmounted.
AutoFS provides the following features:
NFS resources don’t need to be mounted when the system boots, which saves
booting time.
Users don’t need to know the root password to mount and unmount NFS
resources.
Network traffic might be reduced, since NFS resources are only mounted when
they are in use.
The AutoFS service is initialized by automount, which is run automatically when a
system is booted. The automount daemon, automountd, runs continuously and is
responsible for the mounting and unmounting of the NFS file systems on an
as-needed basis. By default, the Solaris operating environment automounts /home.
AutoFS works with file systems specified in the name service. This information can be
maintained in NIS, NIS+, or local /etc files. With AutoFS, you can specify multiple
servers to provide the same file system. This way, if one of the servers is down,
AutoFS can try to mount from another machine. You can specify which servers are
preferred for each resource in the maps by assigning each server a weighting factor.
See System Administration Guide, Volume 3 for complete information on how to set
up and administer AutoFS.
The Cache File System (CacheFS)
If you want to improve the performance and scalability of an NFS or CD-ROM file
system, you should use the Cache File System (CacheFS). CacheFS is a general
purpose file system caching mechanism that improves NFS server performance and
scalability by reducing server and network load.
Designed as a layered file system, CacheFS provides the ability to cache one file
system on another. In an NFS environment, CacheFS increases the client per server
ratio, reduces server and network loads, and improves performance for clients on
slow links, such as Point-to-Point Protocol (PPP). You can also combine CacheFS
with the AutoFS service to help boost performance and scalability.
See Chapter 37 for detailed information about CacheFS.
Managing File Systems (Overview)
429
Deciding How to Mount File Systems
The table below provides guidelines on mounting file systems based on how you use
them.
TABLE 34-3
Determining How to Mount File Systems
If You Need to Mount ...
Then You Should Use ...
Local or remote file systems infrequently
The mount command entered manually
from the command line.
Local file systems frequently
The /etc/vfstab file, which will mount
the file system automatically when the
system is booted in multi-user state.
The /etc/vfstab file, which will
Remote file systems frequently, such as home
automatically mount the file system
directories
when the system is booted in multi-user
state.
AutoFS, which will automatically mount
or unmount the file system when you
change into (mount) or out of (unmount)
the directory.
To enhance performance, you can also cache
the remote file systems by using CacheFS.
You can mount a CD-ROM containing a file system by simply inserting it into the
drive (Volume Management will automatically mount it). You can mount a diskette
containing a file system by inserting it into the drive and running the volcheck
command. See Chapter 14 for more information.
Determining a File System’s Type
You can determine a file system’s type by using the following:
The FS type field in the virtual file system table (/etc/vfstab file)
The /etc/default/fs file for local file systems
The /etc/dfs/fstypes file for NFS file systems
How to Determine a File System’s Type
This procedure works whether the file system is mounted or not.
430