Sun Microsystems System Administration Guide, Volume 1 (2000) - page 3
68
CHAPTER
3
Setting Up and Maintaining User
Accounts and Groups (Tasks)
This chapter describes the procedures for setting up and maintaining user accounts
and groups.
This is a list of the step-by-step instructions in this chapter.
“How to Customize User Initialization Files” on page 72
“How to Start Admintool” on page 74
“How to Add a Group” on page 75
“How to Add a New User Account” on page 76
“How to Share a User’s Home Directory” on page 77
“How to Mount a User’s Home Directory” on page 79
“How to Modify a Group” on page 81
“How to Delete a Group” on page 82
“How to Modify a User Account” on page 82
“How to Disable a User Account” on page 84
“How to Change a User’s Password” on page 85
“How to Change Password Aging for a User Account” on page 86
“How to Delete a User Account” on page 88
“How to Restart Solaris User Registration” on page 91
“How to Disable User Registration” on page 91
For overview information about Managing User Accounts and Groups, see Chapter 2.
69
Becoming Superuser (root)
Most administrative tasks such as adding users require that you log in as root
(UID=0) first. The root account is also known as the superuser account because it’s
used to make system changes and can override user file protection in emergency
situations.
The superuser account should be used only to perform administrative tasks to
prevent indiscriminate changes to the system.
You can either log into the system as superuser or use the su(1M) command to
change to the superuser account.
If you are using role-based access control, you must assume a role (either superuser
or some other role) to perform administrative tasks. Roles are assumed by using the
su command; you cannot log in to a role directly. See “Role-Based Access Control”
in System Administration Guide, Volume
2 for more information.
How to Become Superuser (root)
Become superuser by one of the following methods. Both methods require that you
know the root password.
Change to the superuser account by using the su command.
% su
Password: root_password
#
The pound sign (#) is the Bourne shell prompt for the superuser account.
Log in as superuser on the system console.
hostname console: root
Password: root_password
#
This method is not enabled by default. You must modify the
/etc/default/login file to log in as superuser on the system console. See
“Securing Systems (Tasks)” in System Administration Guide, Volume
2 for
information on modifying this file.
70

Setting Up User Accounts Task Map
TABLE 3-1
Setting Up User Accounts Task Map
Task
Description
For Instructions, Go To
1. Customize User
Optional. Set up user initialization files
“How to Customize User
Initialization Files
(.cshrc, .profile, .login), so you can
Initialization Files” on page 72
provide new users with consistent
environments.
2. Add a Group
Optional. To help administer users, add
“How to Add a Group” on
groups by using the Groups main window.
page 75
3. Add a User Account
Add a user account by using Admintool’s
“How to Add a New User
Users main window.
Account” on page 76
4. Share the User’s Home
Share the user’s home directory, so the
“How to Share a User’s Home
Directory
directory can be remotely mounted from the
Directory” on page 77
user’s system.
5. Mount the User’s Home
Manually mount the user’s home directory
“How to Mount a User’s Home
Directory
on the user’s system by using the mount
Directory” on page 79
command.
User Information Data Sheet
You might find it useful to create a form like the one below to gather information
about users before adding their accounts.
If you are using role-based access control, you will also need to list any roles,
profiles, or authorizations intended for the user account. See “Role-Based Access
Control” in System Administration Guide, Volume 2 for more information.
Item
Description
User Name:
UID:
Setting Up and Maintaining User Accounts and Groups (Tasks)
71

Primary Group:
Secondary Groups:
Comment:
Default Shell:
Password Status and Aging:
Home Directory Server Name:
Home Directory Path Name:
Mounting Method:
Permissions on Home Directory:
Mail Server:
Department Name:
Department Administrator:
Manager:
Employee Name:
Employee Title:
Employee Status:
Employee Number:
Start Date:
Add to These Mail Aliases:
Desktop System Name:
How to Customize User Initialization Files
1. Become superuser on the system where the users’ home directories are created
and shared.
2. Create a skeleton directory for each type of user.
72
# mkdir /shared-dir/skel/user-type
shared-dir
The name of a directory that is available to other
systems on the network.
The name of a directory to store initialization files for a
user-type
type of user.
3. Copy the default user initialization files into the directories you created for
different types of users.
# cp /etc/skel/local.cshrc /shared-dir/skel/user-type/.cshrc
# cp /etc/skel/local.login /shared-dir/skel/user-type/.login
# cp /etc/skel/local.profile /shared-dir/skel/user-type/.profile
Note - If the account has profiles assigned to it, then the user has to launch a
special version of the shell called a profile shell to use commands (with any
security attributes) that are assigned to the profile. There are three profile shells
corresponding to the types of shells: pfsh (Bourne shell), pfcsh (C shell), and
pfksh (Korn shell).
4. Edit the user initialization files for each user type and customize them based
on your site’s needs.
See “Customizing a User’s Work Environment” on page 56 for a detailed
description on the ways to customize the user initialization files.
5. Set the permissions for the user initialization files.
# chmod 744 /shared-dir/skel/user-type/.*
6. Verify the permissions for the user initialization files are correct with the
ls -la command.
Example—Customizing User Initialization Files
The following example customizes the C-shell user initialization file in the
/export/skel/enduser directory designated for a particular type of user.
Setting Up and Maintaining User Accounts and Groups (Tasks)
73
# mkdir /export/skel/enduser
# cp /etc/skel/local.cshrc /export/skel/enduser/.cshrc
(Edit .cshrc file-see
“Example—.cshrc File ” on page 66)
# chmod 744 /export/skel/enduser/.*
How to Start Admintool
1. Verify that the following prerequisites are met. To use Admintool, you must:
Have a bit-mapped display monitor. The Admintool software can be used only
on a system with a console that has a bit-mapped screen such as a standard
display monitor that comes with a Sun workstation.
Be running an X Window environment such as CDE.
Be a member of the sysadmin group (group 14).
If you want to perform administration tasks on a system with an ASCII terminal
as the console, use Solaris commands instead. See useradd(1M) for more
information.
2. Start Admintool.
$ admintool &
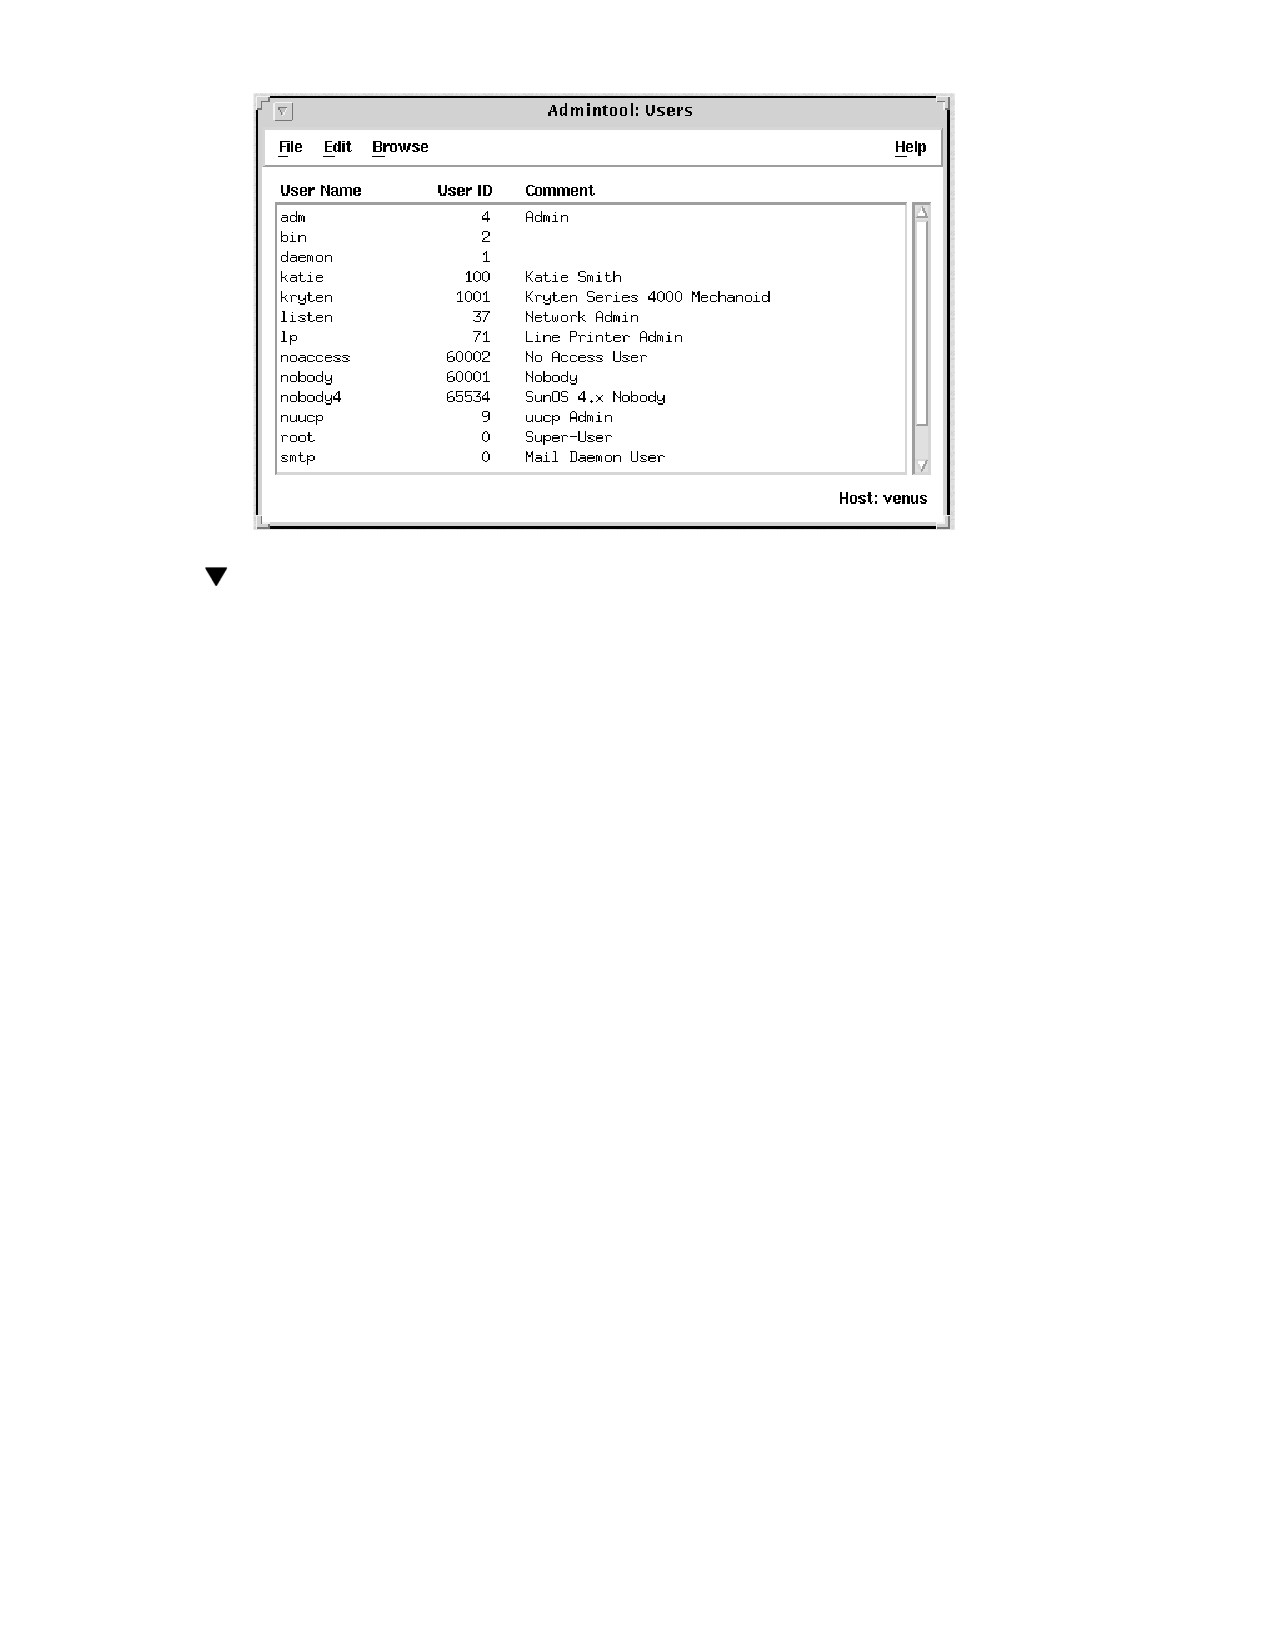
The Users main window appears.
Example—Starting Admintool
The Users main window enables you to manage user account information.
74
How to Add a Group
1. Start Admintool, if it’s not already running.
See “How to Start Admintool” on page 74 for more information on starting
Admintool.
2. Choose Groups from the Browse menu.
The Groups window appears.
3. Select Add from the Edit menu.
The Add window has several fields. If you need information to complete a field,
click the Help button to see field definitions for this window.
4. Type the name of the new group in the Group Name text box.
5. Type the group ID for the new group in the Group ID text box.
The group ID should be unique.
6.
(Optional) Type user names in the Members List text box.
The list of users will be added to the group. User names must be separated by
commas.
7. Click OK.
The list of groups displayed in the Groups window is updated to include the new
group.
Setting Up and Maintaining User Accounts and Groups (Tasks)
75
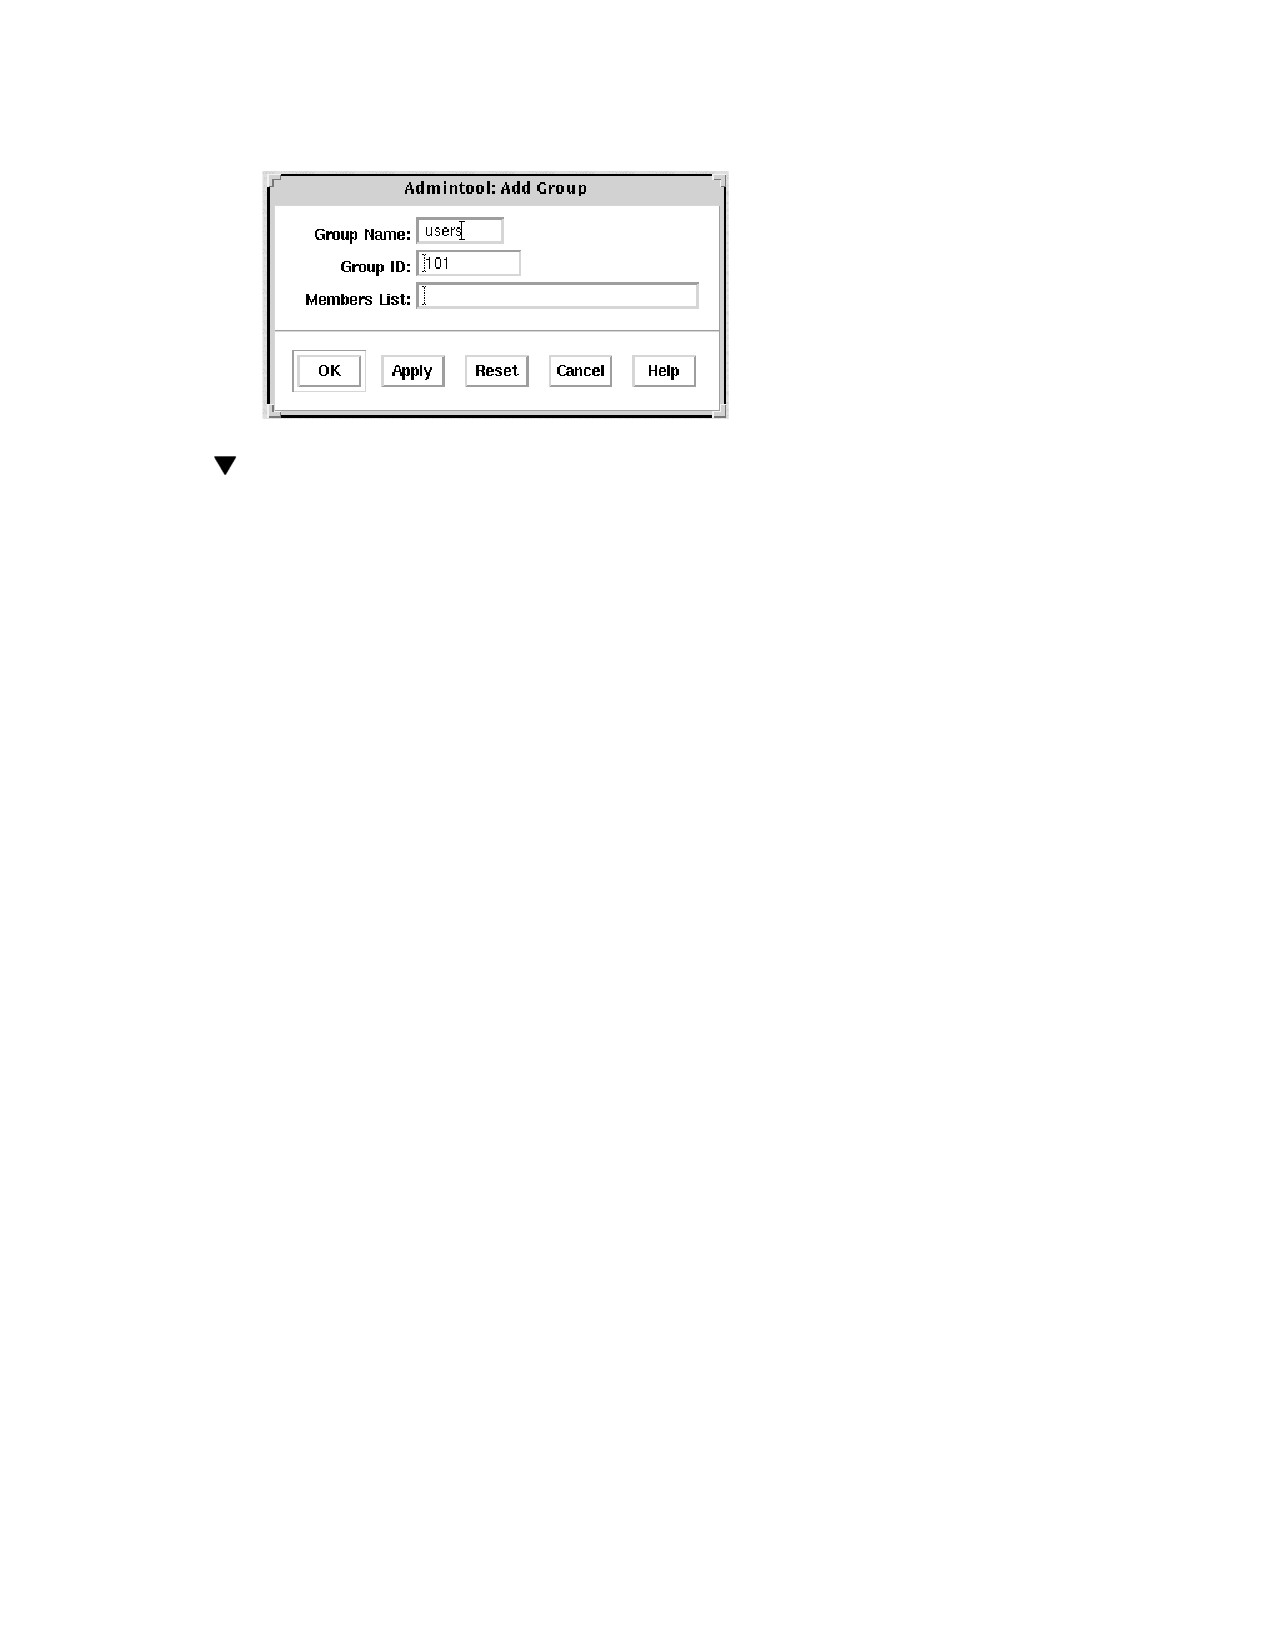
Example—Adding a Group
The following example adds a group named users that has a group ID of 101.
How to Add a New User Account
1.
(Optional) Fill out the user information data sheet on “User Information Data
Sheet” on page 71.
2. Start Admintool, if it’s not already running.
See “How to Start Admintool” on page 74 for more information.
3. Choose Add from the Edit menu.
The Add User window is displayed.
4. Fill in the Add User window.
If you need information to complete a field, click the Help button to see field
definitions for this window.
5. Click OK.
The list of user accounts displayed in the Users main window is updated to
include the new user account.
Where to Go From Here
If you created a user’s home directory, you must share the directory so the user’s
system can remotely mount it. See “How to Share a User’s Home Directory” on page
77 for detailed instructions.
If disk space is limited, you can set up a disk quota for the user in the file system
containing the user’s home directory. See “Managing Quotas (Tasks)” in System
Administration Guide, Volume
2 for information on setting disk quotas.
76
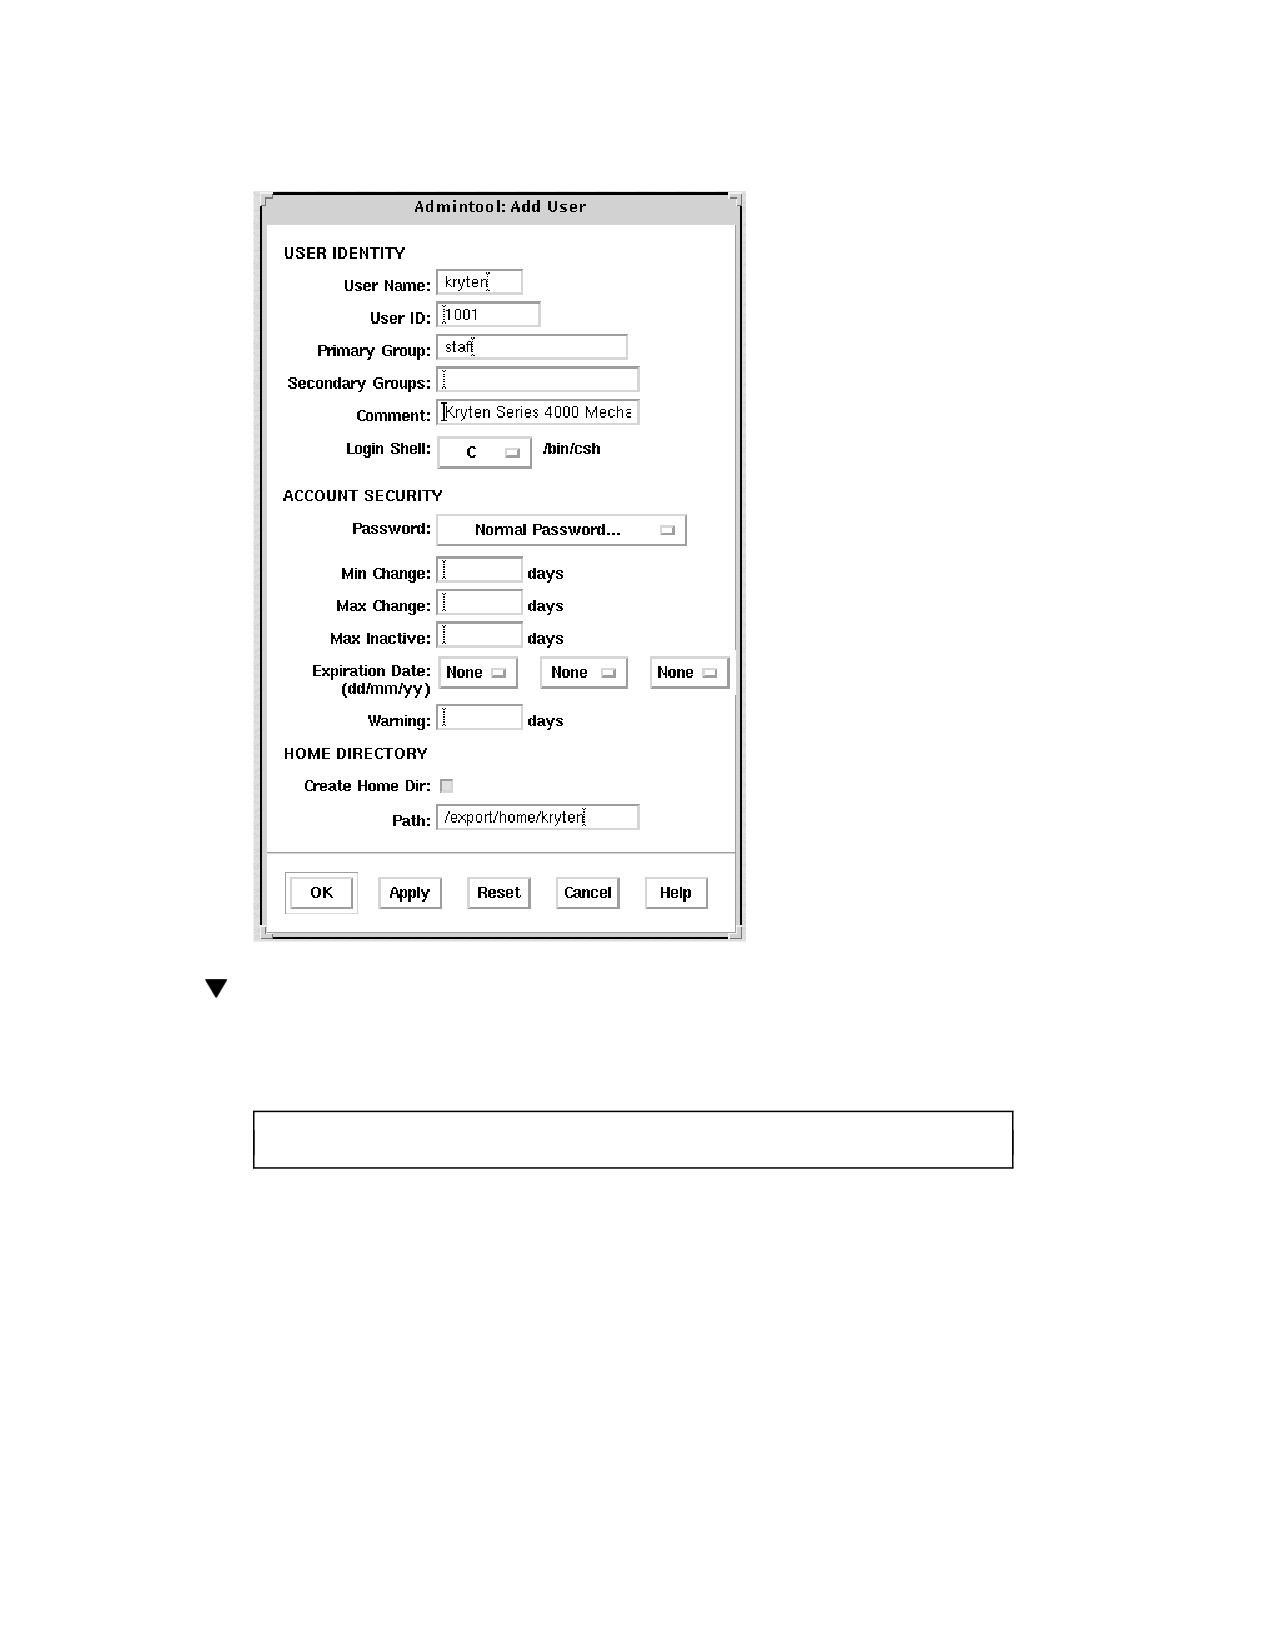
Example—Adding a New User Account
The following example adds the user kryten to the system.
How to Share a User’s Home Directory
1. Become superuser on the system that contains the home directory.
2. Verify that the mountd daemon is running.
# ps -ef | grep mountd
root
176
1
0
May 02 ?
0:19 /usr/lib/nfs/mountd
Setting Up and Maintaining User Accounts and Groups (Tasks)
77
The /usr/lib/nfs/mountd line shows whether the mountd daemon is running.
3. If the mountd daemon is not running, start it.
# /etc/init.d/nfs.server start
4. List the file systems that are shared on the system.
# share
5. Determine your next step based on whether the file system containing the
user’s home directory is already shared.
If the File System Containing the User’s
Home Directory Is ...
Then ...
Already shared
Go to the verification step below.
Not shared
Go to Step 6 on page 78
6. Edit the /etc/dfs/dfstab file and add the following line.
share -F nfs /file-system
Is the file system containing the user’s home directory
file-system
that you need to share. By convention, the file system is
/export/home.
7. Share the file systems listed in the /etc/dfs/dfstab file.
# shareall -F nfs
This command executes all the share commands in the /etc/dfs/dfstab file,
so you do not have to wait to reboot the system.
8. Verify that a user’s home directory is shared, as follows:
# share
78
Where to Go From Here
If the user’s home directory is not located on the user’s system, you have to mount
the user’s home directory from the system where it is located. See “How to Mount a
User’s Home Directory” on page 79 for detailed instructions.
Example—Sharing a User’s Home Directory
# ps -ef | grep mountd
# /etc/init.d/nfs.server start
# share
# vi /etc/dfs/dfstab
(The line share -F nfs /export/home is added.)
# shareall -F nfs
# share
-
/usr/dist
ro
""
-
/export/home/user-name
rw
""
How to Mount a User’s Home Directory
1. Make sure that the user’s home directory is shared. See “How to Share a User’s
Home Directory” on page 77 for more information.
2. Log in as superuser on the user’s system.
3. Edit the /etc/vfstab file and create an entry for the user’s home directory.
system-name:/export/home/user-name - /export/home/user-name nfs - yes rw
The name of the system where the home directory is
system-name
located.
/export/home/user-name
The name of the user’s home directory that will be
shared. By convention, /export/home contains user’s
home directories; however, this could be a different file
system.
Required placeholders in the entry.
-
The name of the directory where the user’s home
/export/home/user-name
directory will be mounted.
Setting Up and Maintaining User Accounts and Groups (Tasks)
79

See Chapter 36 for more information about adding an entry to the /etc/vfstab
file.
4. Create the mount point for the user’s home directory.
# mkdir -p /export/home/user-name
5. Mount the user’s home directory.
# mountall
All entries in the current vfstab file (whose mount at boot fields are set to
yes) are mounted.
6. Use the mount command to verify that the home directory is mounted.
Example—Mounting a User’s Home Directory
# vi /etc/vfstab
(The line venus:/export/home/ripley - /export/home/ripley
nfs - yes rw is added.)
# mkdir -p /export/home/ripley
# mountall
# mount
/ on /dev/dsk/c0t0d0s0 read/write/setuid/intr/largefiles/onerror=panic on Fri ...
/usr on /dev/dsk/c0t0d0s6 read/write/setuid/intr/largefiles/onerror=panic on Fri ...
/proc on /proc read/write/setuid on Fri Sep 10 16:09:48 1999
/dev/fd on fd read/write/setuid on Fri Sep 10 16:09:51 1999
/etc/mnttab on mnttab read/write/setuid on Fri Sep 10 16:10:06 1999
/var/run on swap read/write/setuid on Fri Sep 10 16:10:06 1999
/tmp on swap read/write/setuid on Fri Sep 10 16:10:09 1999
/export/home/ripley on venus:/export/home/ripley /read/write/remote on ...
Maintaining User Accounts Task Map
80

TABLE 3-2
Task Map: Maintaining User Accounts
Task
Description
For Instructions, Go To
Modify a Group
Modify a group’s name or the users in a
“How to Modify a Group” on
group by choosing Modify from the Edit
page 81
menu in the Groups window.
Delete a Group
Delete a group by choosing Delete from the
“How to Delete a Group” on
Edit menu in the Groups window.
page 82
Modify a User Account
Disable a User Account
“How to Disable a User
Account” on page 84
If you want to temporarily disable a user
account, lock the user account from the
Password menu in the Modify window.
Change a User’s Password
“How to Change a User’s
Password” on page 85
If you want to change a user’s password, use
the Password menu in the Modify window.
Change Password Aging
“How to Change Password
Aging for a User Account” on
If you want to force users to change their
page 86
passwords periodically, change the Password
Aging fields in the Modify window (Account
Security category).
Delete a User Account
Delete a user account by choosing Delete
“How to Delete a User
from in the Edit menu in the Users window.
Account” on page 88
How to Modify a Group
1. Start Admintool, if it is not already running. Select Groups from the Browse
menu.
See “How to Start Admintool” on page 74 for more information.
2. Select the group entry you want to modify from the Groups window.
3. Choose Modify from the Edit menu.
The Modify Group window contains the selected group entry.
4. Modify either the group’s name or the users in the group.
Setting Up and Maintaining User Accounts and Groups (Tasks)
81
User names must be separated by commas. If you need information to complete a
field, click the Help button to see field definitions for this window.
5. Click OK.
The group information displayed in the Groups window is updated.
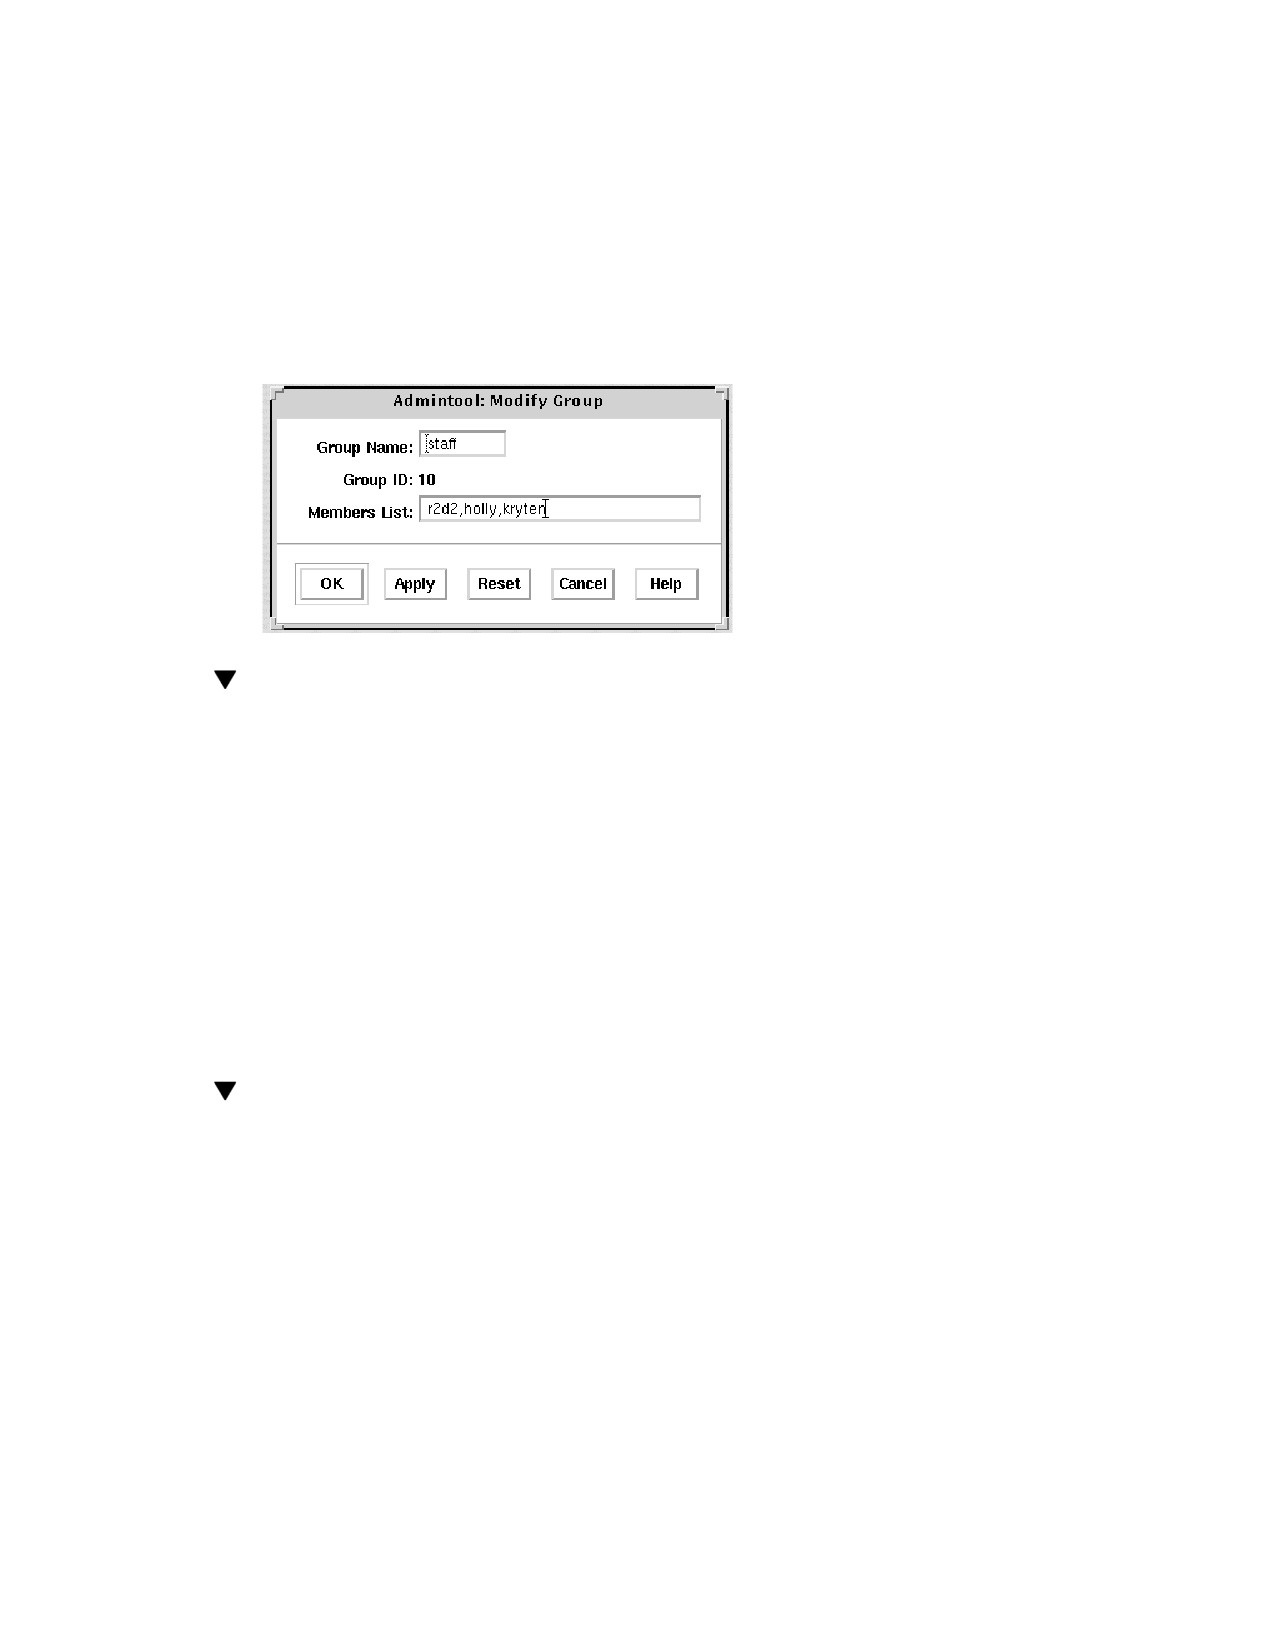
Example—Modifying a Group
The following example adds the users r2d2, holly, and kryten to the staff
group.
How to Delete a Group
1. Start Admintool, if it’s not already running. Select Groups from the Browse
menu.
See “How to Start Admintool” on page 74 for more information.
2. Select the group entry you want to delete from Groups window.
3. Choose Delete from the Edit menu.
A window asks you to confirm the deletion.
4. Click OK.
The group entry is deleted from the Groups window.
How to Modify a User Account
1. Start Admintool, if it’s not already running. Select Users from the Browse menu.
See “How to Start Admintool” on page 74 for more information.
2. Select the user account entry to modify from the Users window.
82
3. Choose Modify from the Edit menu.
The Modify window contains the selected user account entry.
4. Modify the user account.
If you need information to complete a field, click the Help button to see field
definitions for this window. You can change any of the Account Security fields,
which includes changing a password or changing password aging. See the
following tasks for detailed step-by-step instructions:
“How to Disable a User Account” on page 84
“How to Change a User’s Password” on page 85
“How to Change Password Aging for a User Account” on page 86
5. Click OK.
6. To verify that the modifications were made, double-click the modified user
account entry in the Users window, then click Cancel to close the window
without making any modifications.
Example—Modifying a User Account
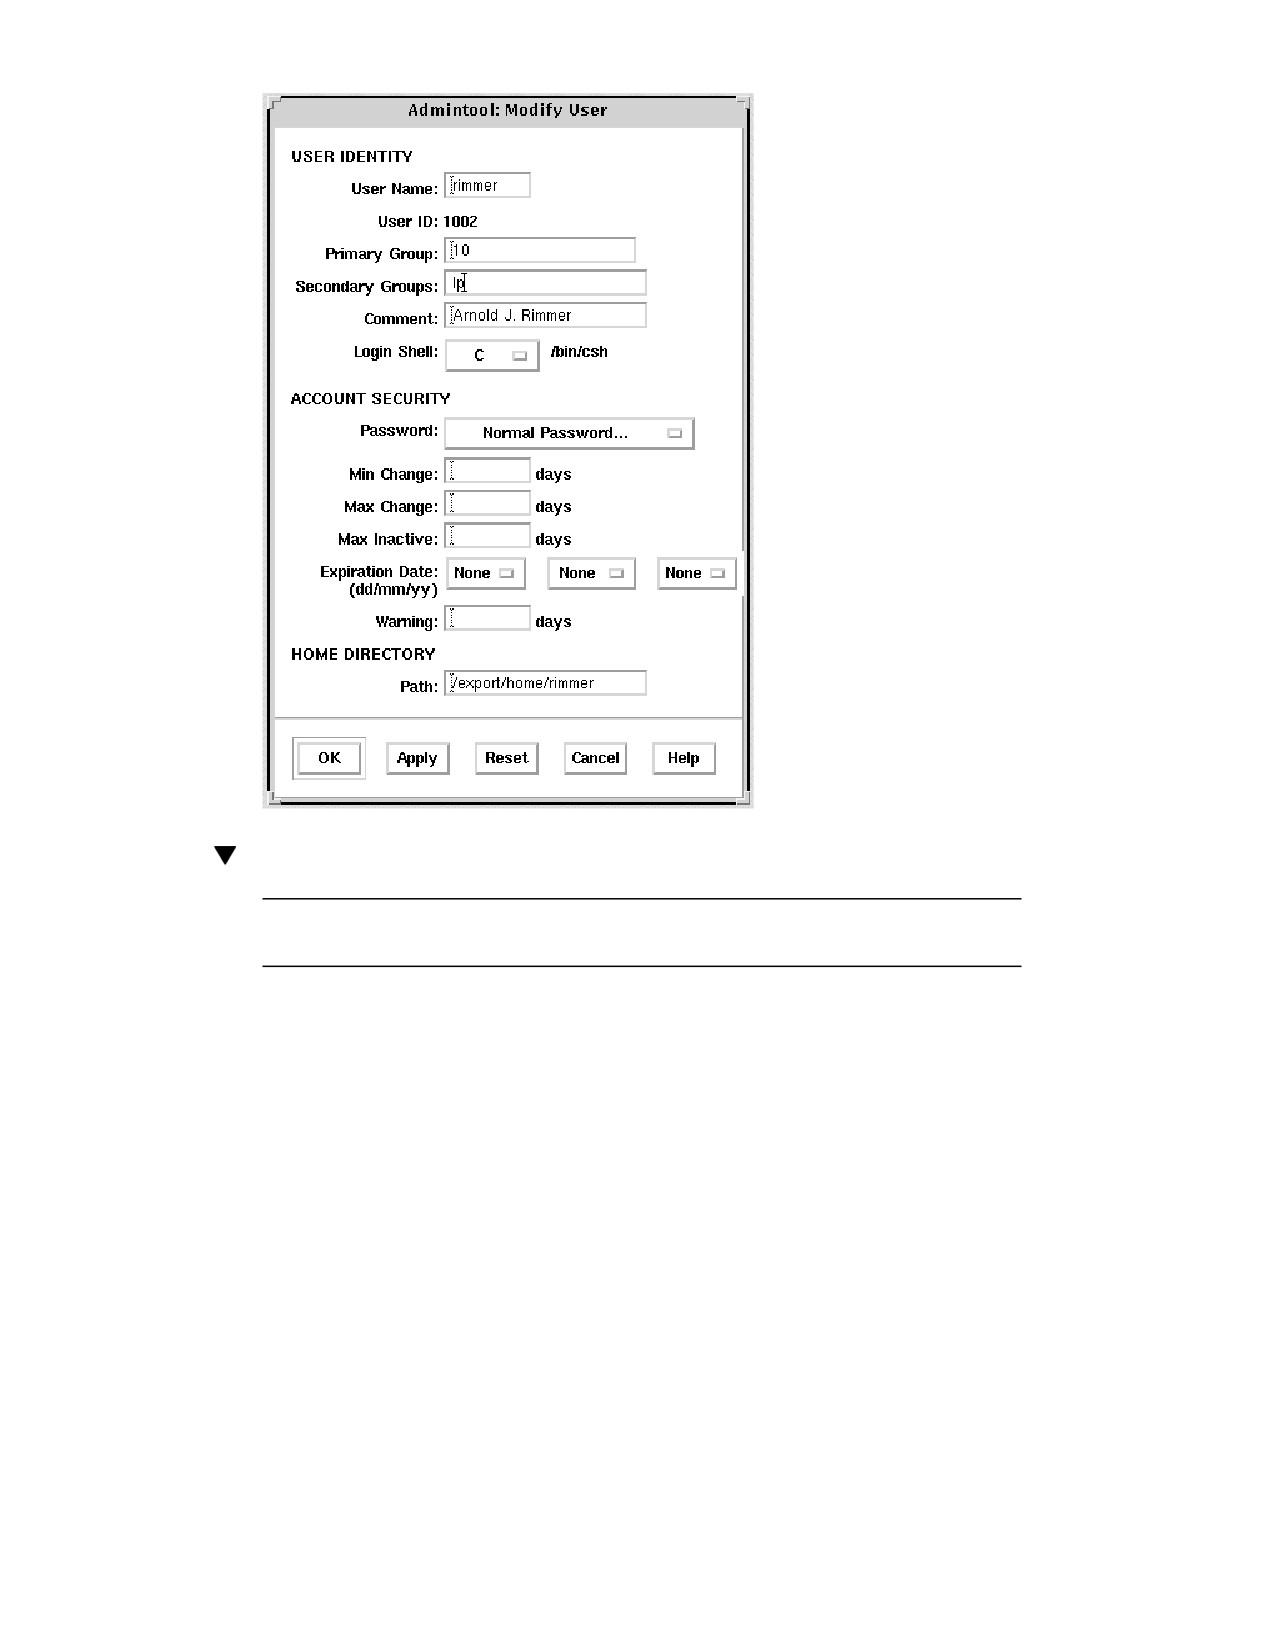
The following example adds the secondary group membership lp to the rimmer
user account.
Setting Up and Maintaining User Accounts and Groups (Tasks)
83
How to Disable a User Account
Note - You can enable the user account by changing the password status to Normal
Password or Cleared Until First Login.
1. Start Admintool, if it’s not already running. Select Users from the Browse
menu, if necessary.
See “How to Start Admintool” on page 74 for more information.
2. Select the user account entry to be disabled.
3. Choose Modify from the Edit menu.
The Modify Users window contains the selected user account entry.
84
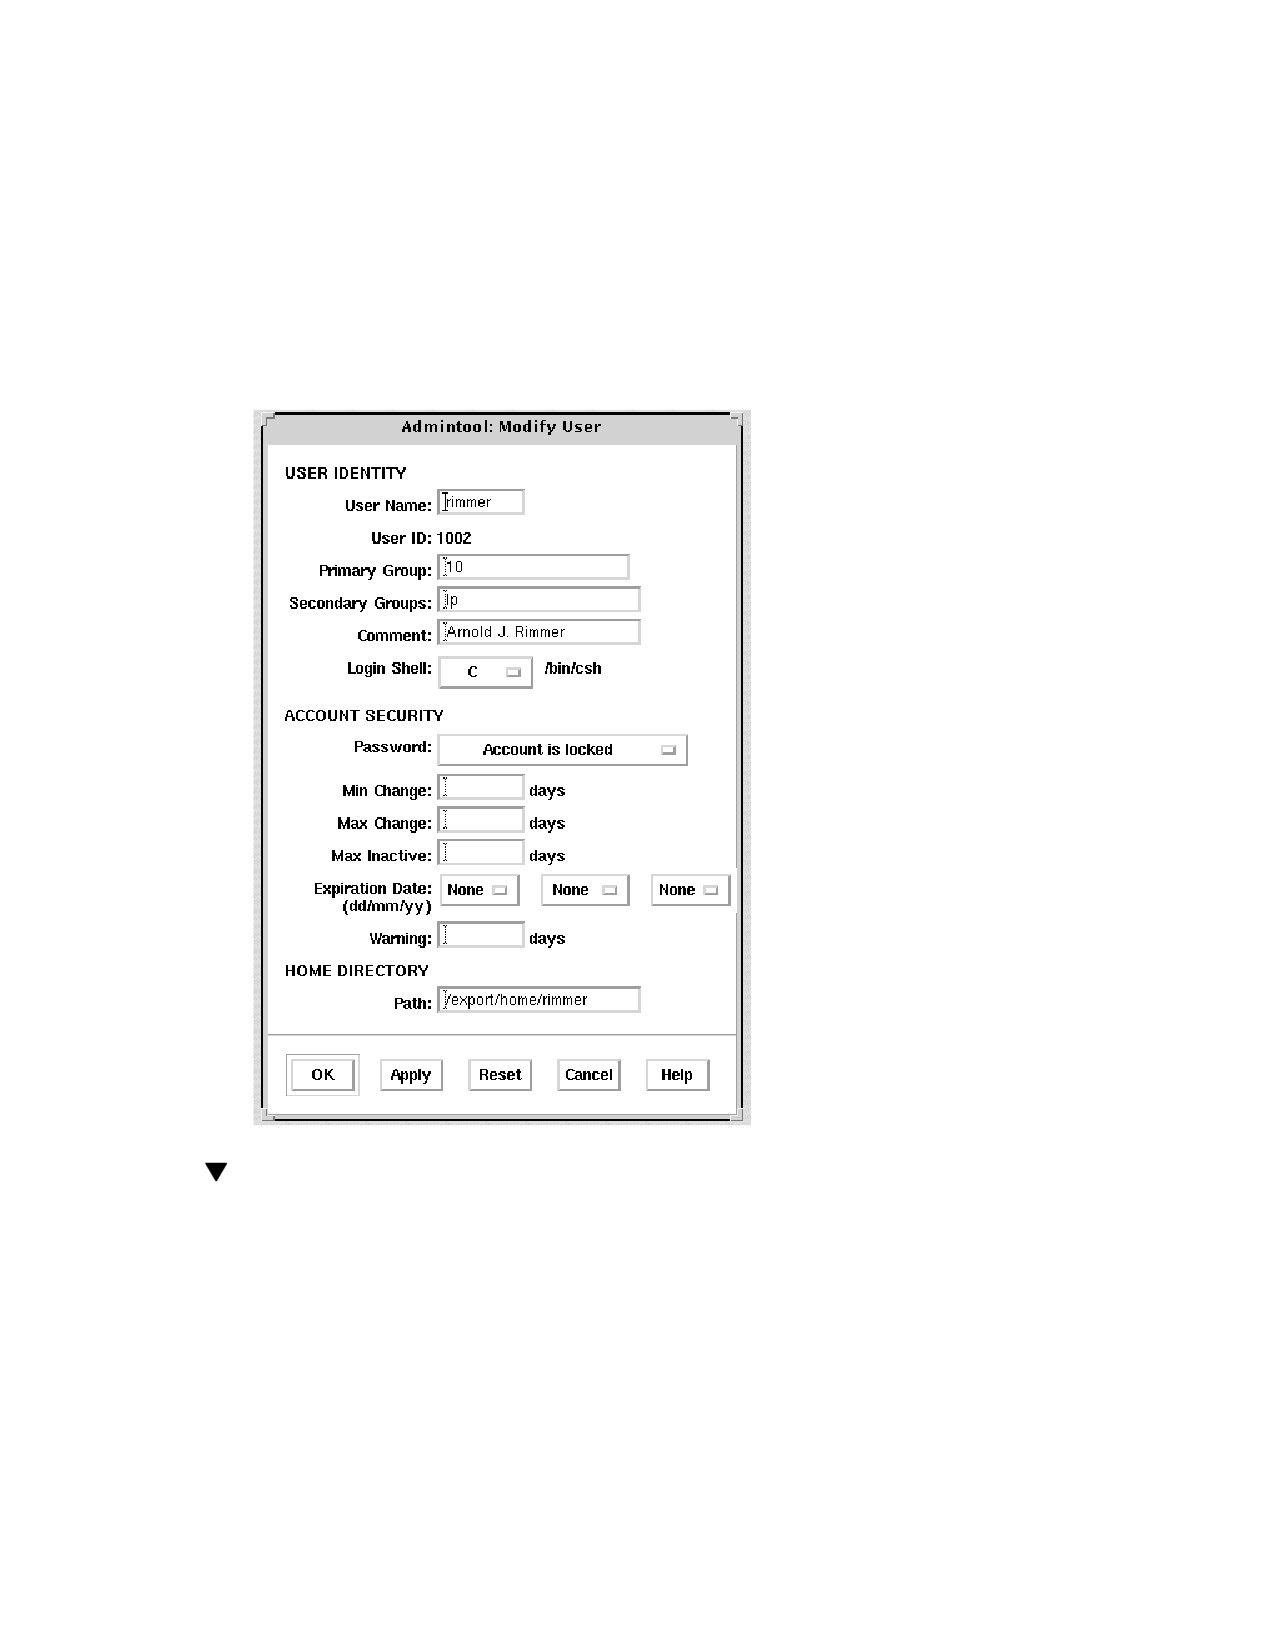
4. Choose Account Is Locked from the Password menu.
This selects the locked password status, which disables the user account.
5. Click OK.
6. Verify that you have disabled the user account by attempting to log in with the
disabled user account.
Example—Disabling a User Account
The following example disables the rimmer user account.
How to Change a User’s Password
1. Start Admintool, if it’s not already running. Select Users from the Browse menu.
Setting Up and Maintaining User Accounts and Groups (Tasks)
85
See “How to Start Admintool” on page 74 for more information.
2. Select the user account entry that needs the password changed.
3. Choose Modify from the Edit menu.
The Modify User window is displayed containing the selected user account entry.
4. Choose Normal Password from the Password menu.
5. Click OK.
Example—Changing a User’s Password
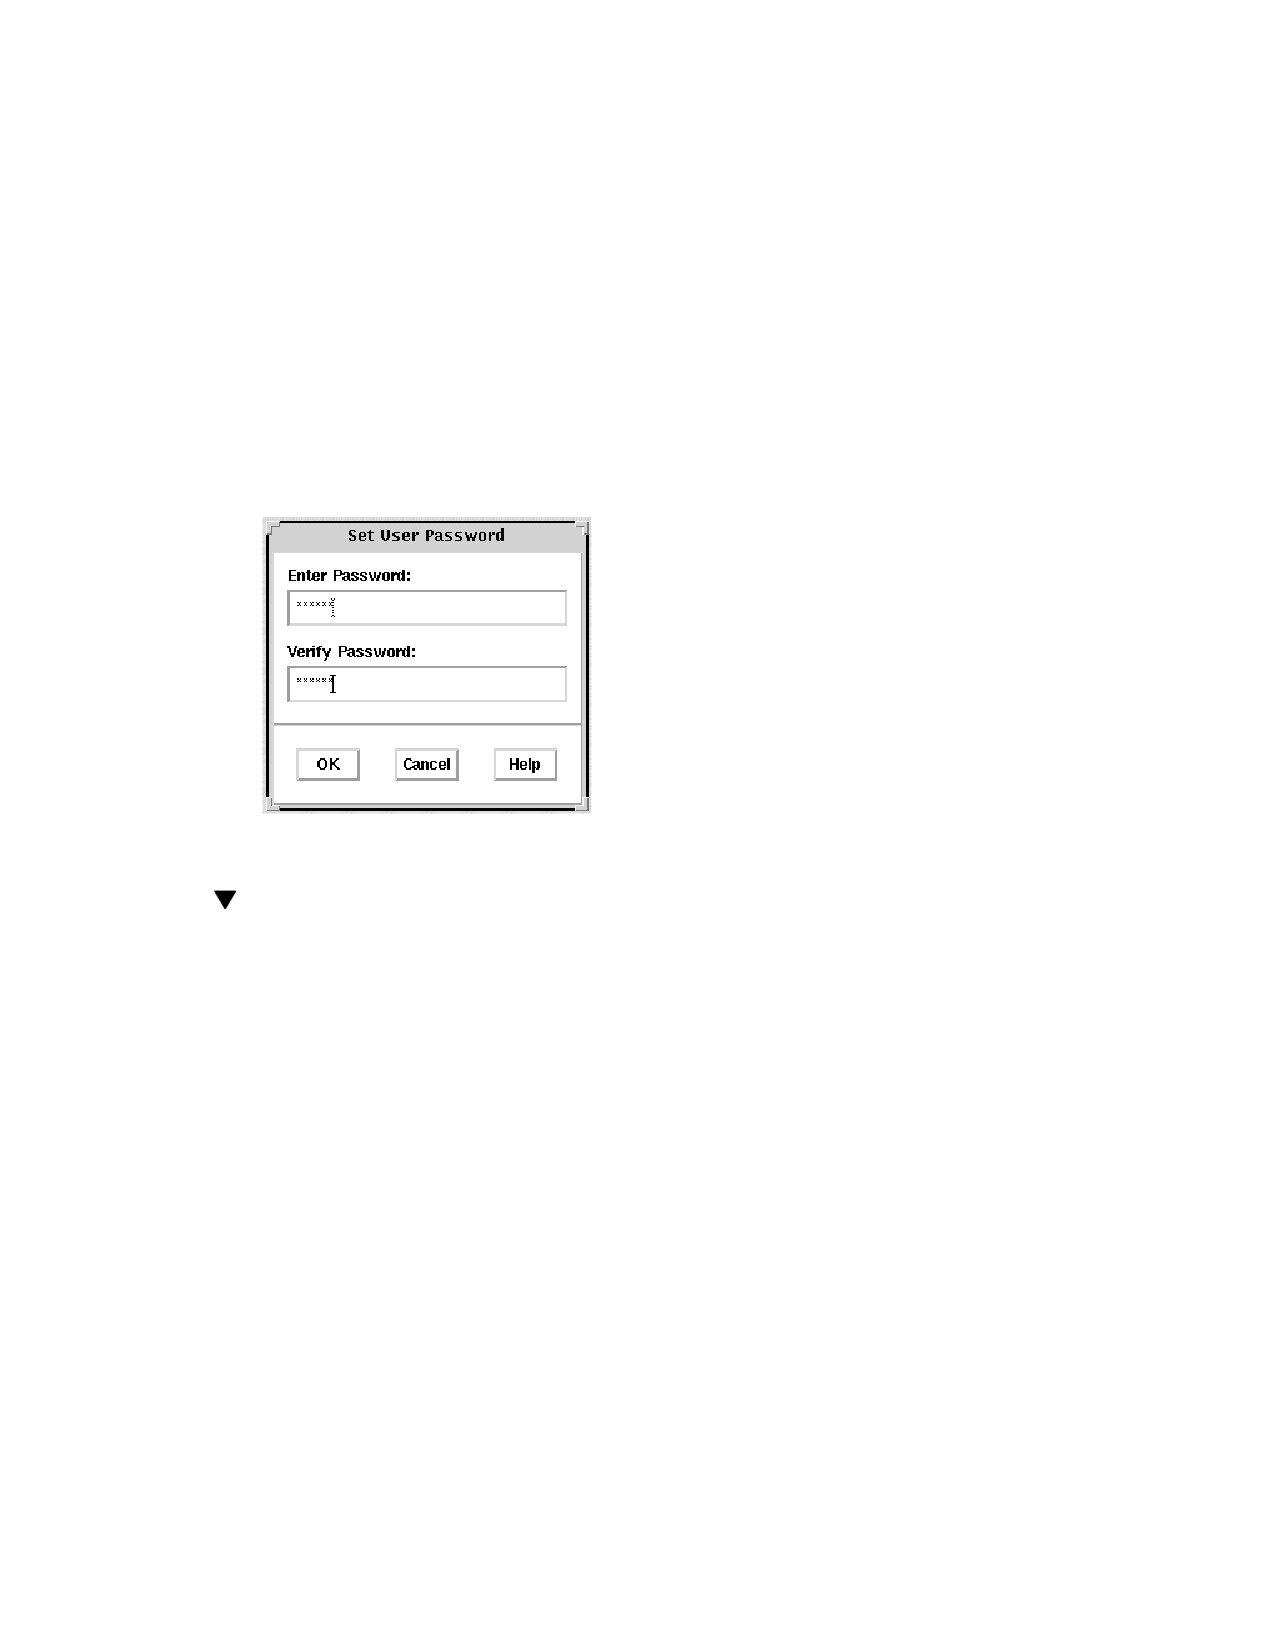
This is the pop-up window used to change user’s passwords which is available from
the Add User or Modify User windows.
How to Change Password Aging for a User
Account
1. Start Admintool, if it is not already running. Select Users from the Browse
menu.
See “How to Start Admintool” on page 74 for more information.
2. Select the user account entry that needs its password aging changed.
3. Choose Modify from the Edit menu.
The Modify window contains the selected user account entry.
4. Change the following fields that affect password aging:
86
Min Change
Max Change
Max Inactive
Expiration Date
Warning
If you need information about the password aging fields that are part of the
Account Security category, click the Help button.
5. Click OK.
Example—Changing Password Aging for a User Account
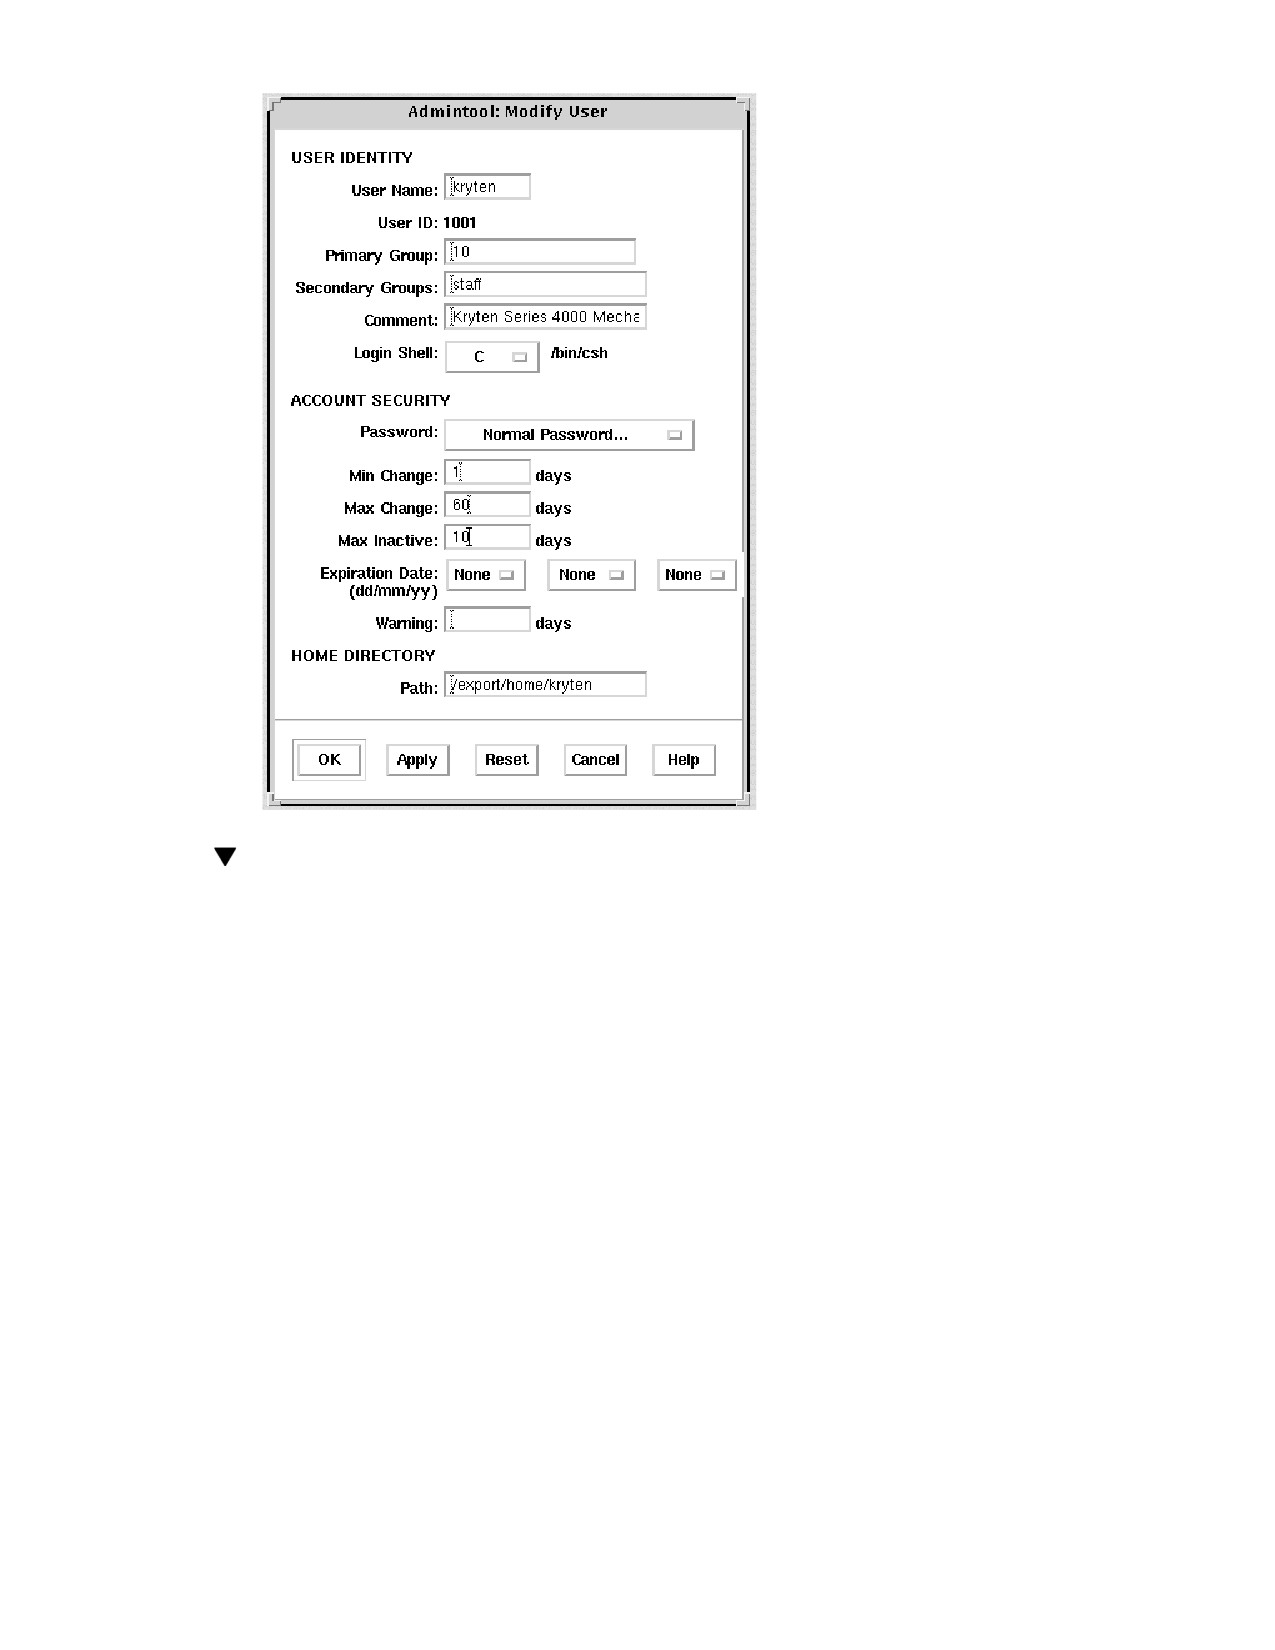
In the following example, the user must keep a new password for at least one day
(Min Change) , and must change the password every 60 days (Max Change). The
user must change the password if the account is inactive for more than 10 days (Max
Inactive).
Setting Up and Maintaining User Accounts and Groups (Tasks)
87
How to Delete a User Account
1. Start Admintool, if it’s not already running. Select Users from the Browse
menu, if necessary.
See “How to Start Admintool” on page 74 for more information.
2. Select the user account entry to remove from the Users window.
3. Choose Delete from the Edit menu.
The Delete window is displayed to confirm the removal of the user account.
4.
(Optional) Click the check box to delete the user’s home directory and its
contents.
88
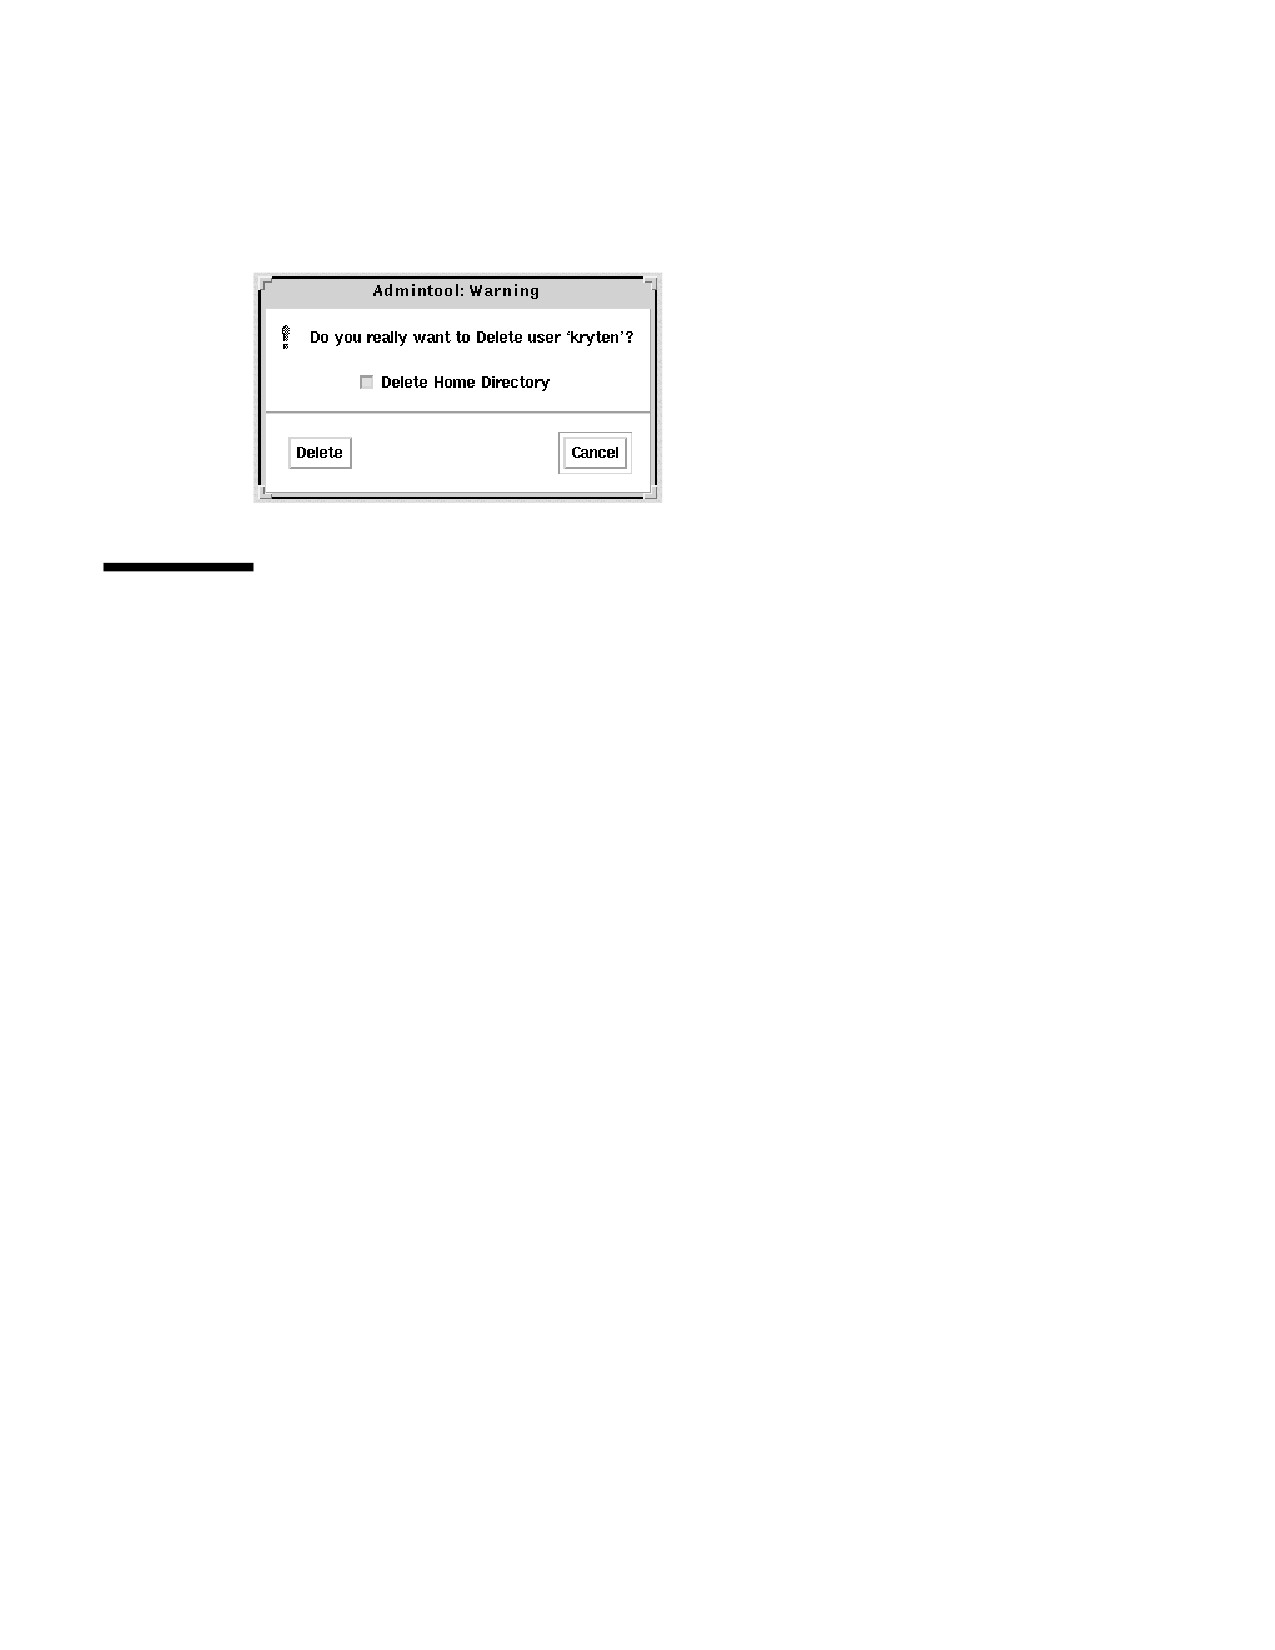
5. Click OK when you are ready to delete the user account. The user account
entry is deleted from the Users main window.
Example—Deleting a User Account
The account for user kryten and the /export/home/kryten directory is removed.
Solaris User Registration
Solaris User Registration is a tool for getting information about new Solaris releases,
upgrade offers, and promotions. This graphical user interface (GUI) starts
automatically when you first log into your desktop. The GUI lets you register now,
later, or never. The registration process also provides Sun with the user’s Solaris
version, survey type, platform, hardware, and locale.
Accessing Solaris SolveSM
Completing the Solaris User Registration process provides access to Solaris Solve, an
exclusive web site that offers valuable Solaris product information and solutions—all
in one convenient location. It provides a quick and easy method for getting the most
recent information on what’s happening around the latest Solaris release. Solaris
Solve also provides a preview to additional Sun contract and service opportunities.
Basically, the steps for completing Solaris User Registration and accessing Solaris
Solve are:
1. Fill in the electronic Solaris User Registration profile.
2. Submit the profile by email or print the profile to fax or mail.
3. Create your login ID and password to access the Solaris Solve site.
Even if you do not access the Solaris Solve site immediately, we recommend that
you create your Solaris Solve login ID and password during the Solaris User
Setting Up and Maintaining User Accounts and Groups (Tasks)
89
Registration process. A Solaris Solve login ID and password should contain six to
eight alphanumeric characters without spaces and colons.
4. Access the Solaris Solve site.
Note - Solaris User Registration is not invoked if the system administrator or user is
logged in as superuser.
If you choose to register, a copy of the completed form is stored in
$HOME/.solregis/uprops. If you choose to never register and change your mind
later, you can start User Registration by:
Typing /usr/dt/bin/solregis at any command line prompt
Clicking the Registration icon in the Application Manager’s desktop tools folder
(Common Desktop Environment desktop only)
See solregis(1) for more information.
Troubleshooting Solaris User Registration
Problems
This section provides troubleshooting tips for solving Solaris User Registration
problems.
The following table describes problems that might occur when you try to register,
and actions required to resolve these conflicts.
TABLE 3-3
Registration Problem Descriptions and Suggested Resolutions
Problem Description
How to Resolve the Problem
The registration form failed to initialize: Web
Check for missing registration files.
page window displays and requests that
user see system administrator to resolve
problem preventing registration setup.
The form could not be emailed: Dialog box
Check to see if email is configured correctly.
displays and requests that user see system
Also check if CDE is on user’s system since
administrator to resolve problem.
it must be present to email completed
registration form. Alternatively, users can
print the form and fax or mail it.
The form could not be printed: Dialog box
Check to see if the printer is configured
displays and requests that user see system
correctly. Alternatively, the user can email
administrator to resolve problem.
form.
90

TABLE 3-3
Registration Problem Descriptions and Suggested Resolutions
(continued)
Problem Description
How to Resolve the Problem
The form could not be saved: Dialog box
Check the user’s home directory. Required
displays and verifies that registration
action depends on the system’s
succeeded; however, the registration
configuration.
information cannot be recalled when
updating registration in the future.
You forgot your Solaris Solve login ID and
Send a mail message describing the problem
password.
to SolarisSolve@sun.com or see “How to
Restart Solaris User Registration” on page 91
You want to restart the registration process.
“How to Restart Solaris User Registration”
on page 91
How to Restart Solaris User Registration
Use the following procedure to restart the Solaris User Registration process.
1. Change to the $HOME/.solregis directory.
% cd $HOME/.solregis
2. Remove the uprops file.
% rm uprops
3. Restart the registration process.
% /usr/dt/bin/solregis &
How to Disable User Registration
The table below shows how to disable User Registration before and after installing
Solaris software. Before disabling Solaris User Registration, system administrators
should register for their organization.
Setting Up and Maintaining User Accounts and Groups (Tasks)
91
TABLE 3-4
Ways to Disable User Registration
To Disable User
You Can ...
For More Information
Registration ...
See ...
Deselect the SUNWsregu
Before Solaris software is
package (interactive
Solaris
8 Advanced
installed
installation)
Installation Guide
Modify a custom JumpStart
profile to not install the
solregis(1)
SUNWsregu package
Create and run a finish script
that creates a file named
solregis in the /etc/
default directory on one or
more systems with the
following line in it: DISABLE=1
After Solaris software is
Use the pkgrm command to
Chapter 21
installed
remove the SUNWsregu
package
Add the solregis file in the /
Solaris
8 Advanced
etc/default directory
Installation Guide
(custom JumpStart installation
only)
solregis(1)
92
CHAPTER
4
Managing Server and Client Support
Topics
This section provides a conceptual overview for managing server and client support
in the Solaris environment. This section contains this chapter.
Provides a high-level overview about managing server
Chapter 5
and client support on a network. This chapter describes
the different system types for which you can add
support, and guidelines for choosing a system type to
use.
93
94
CHAPTER
5
Managing Server and Client Support
(Overview)
This chapter describes managing server and client support on a network, and it
provides overview information about each system configuration (referred to as a
system type) supported in the Solaris environment. This chapter also includes
guidelines for selecting the appropriate system type to meet your needs.
This is a list of the overview information in this chapter.
“What Are Servers and Clients?” on page 95
“What Does Support Mean?” on page 96
“Overview of System Types” on page 96
Note - AutoClientTM and diskless systems are not supported in the Solaris 8 release.
See Solstice AdminSuite
2.3
Administration Guide for information on managing
existing client systems.
What Are Servers and Clients?
Systems on the network can usually be described as one of the following:
Server - A system that provides services to other systems in its network. There are
file servers, boot servers, database servers, license servers, print servers,
installation servers, and even servers for particular applications. This chapter uses
the term server to mean a system that provides file systems and installation
software for other systems on the network.
95
Client - A system that uses remote services from a server. Some clients have
limited disk storage capacity, or perhaps none at all, and they have to rely on
remote file systems from a server to function.
Other clients might use remote services (such as installation software) from a
server, but they don’t rely on a server to function. A standalone system, which has
its own hard disk containing the root (/), /usr, and /export/home file systems
and swap space, is a good example of this type of client.
What Does Support Mean?
Providing support for a system means providing software and services to help
another system function. Support can include:
Making a system known to the network (i.e., host name and ethernet address
information)
Providing installation services to remotely boot and install a system
Providing operating system (OS) services to a system with limited or no disk space
Overview of System Types
System types are basically defined by how they access the root (/) and /usr file
systems, including the swap area. For example, standalone and server systems
mount these file systems from a local disk, while other clients mount the file systems
remotely, relying on servers to provide these services. The table below lists these and
other differences for each system type.
96
TABLE 5-1
System Type Overview
Local File
Remote File
Relative
System Type
Systems
Local Swap?
Systems
Network Use
Performance
Server
root (/)
Yes
- none -
high
high
/usr
/home
/opt
/export/home
/export/root
Standalone
root (/)
Yes
- none -
low
high
System
/usr
/export/home
JavaStationTM
- none -
No
/home
low
high
Servers
A server system has the following file systems:
The root (/) and /usr file systems, plus swap space
The /export, /export/swap, and /export/home file systems, which support
client systems and provide home directories for users
The /opt directory or file system for storing application software
Servers can also contain the following software to support other systems:
Solaris CD image and boot software for networked systems to perform remote
installations
JumpStartTM directory for networked systems to perform custom JumpStart
installations
Managing Server and Client Support (Overview)
97
Standalone Systems
A networked standalone system can share information with other systems in the
network, but it could continue to function if detached from the network.
A standalone system can function autonomously because it has its own hard disk
containing the root (/), /usr, and /export/home file systems and swap space. The
standalone system thus has local access to operating system software, executables,
virtual memory space, and user-created files.
Note - A standalone system requires sufficient disk space to hold the four necessary
file systems.
A non-networked standalone system is a standalone system with all the characteristics
listed above except it is not connected to a network.
JavaStation Client
The JavaStationTM is a client designed for zero administration. This client optimizes
JavaTM ; the JavaStation client takes full advantage of the network to deliver
everything from Java applications and services to complete, integrated system and
network management. The JavaStation has no local administration; booting,
administration, and data storage are handled by servers.
98
CHAPTER
6
Shutting Down and Booting a System
Topics
This section provides instructions for shutting down and booting systems running
the Solaris release. This section contains these chapters.
Provides an overview and guidelines for shutting down
Chapter 7
and booting a system.
Provides information about run levels and boot files.
Chapter 8
Provides step-by-step instructions for shutting down a
Chapter 9
system.
Provides step-by-step instructions for booting a SPARC
Chapter 10
based system.
Provides step-by-step instructions for booting an IA based
Chapter 11
system.
Provides a high-level overview of the boot process,
Chapter 12
including a description of the platform-specific hardware
used to boot SPARC based and IA based systems.
99
100