Seat Toledo. Service Manual - part 2


  Index      Seat     Seat Toledo. Service Manual


Search            copyright infringement  


Content      ..      1      2      3      ..


Seat Toledo. Service Manual - part 2


-------------------------------------------------------------------------------------------------------------------------------------------------------------

The essentials

Easy Connect

CAR menu settings (Setup)
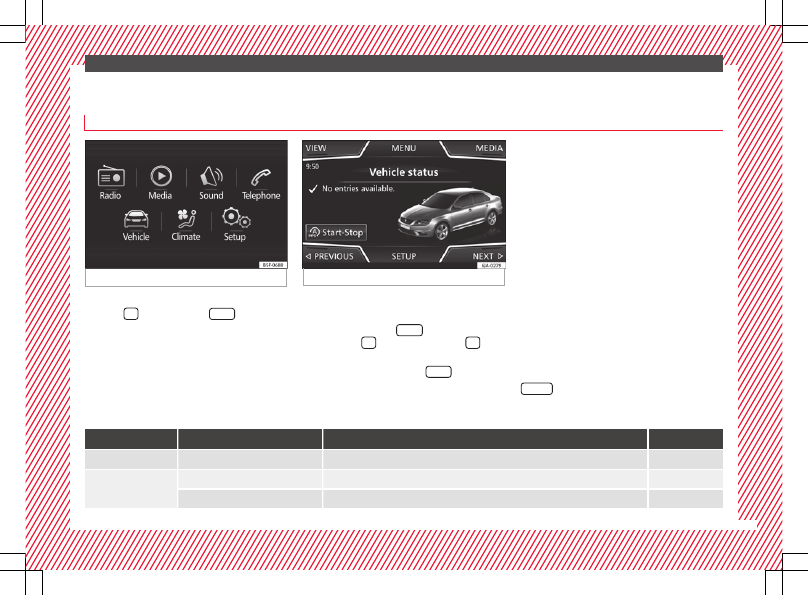
Fig. 33 

Easy Connect: Main menu

Fig. 34 

Easy Connect: CAR menu

To select the settings menus, press the Easy
Connect 



 button and the 

Setup

 function

button.

The actual number of menus available and
the name of the various options in these me-
nus will depend on the vehicle’s electronics
and equipment.

Switch the ignition on.

If the Infotainment System is off, switch it

on.

Press the system's 

MENU

 button and then

the system's 




››› 

Fig. 33

 button or 



 but-

ton to go to the 

CAR

 menu 

››› 

Fig. 34

.

Press the function button 

Setup

 to open the

menu 

Vehicle settings


››› 

Fig. 34

.

To select a function in the menu, press the

desired button.

When you press the menu button, the last se-
lected menu will always be displayed.

When the function button check box is activa-
ted , the function is active.

Any changes made using the settings menus
are automatically saved on closing the

BACK

 menus.

Menu

Submenu

Possible setting

Description

ESC system

Activation of the Electronic Stability Programme (ESC)

››› 

page 154

Tyres

Tyre pressure monitoring

Tyre pressure storing (Calibration)

››› 

page 219

Winter tyres

Activation and deactivation of the speed warning. Setting the speed warning value

››› 

page 220

»

21

-------------------------------------------------------------------------------------------------------------------------------------------------------------

-------------------------------------------------------------------------------------------------------------------------------------------------------------

The essentials

Menu

Submenu

Possible setting

Description

Driver assistance

Front Assist (ambient traffic
monitoring system)

Activation/deactivation: monitoring system, advance warning, distance warning display

››› 

page 176

City emergency braking func-
tion

Activation/deactivation of the City emergency braking function.

››› 

page 180

Fatigue detection

Activation/deactivation

››› 

page 182

Parking and ma-
noeuvring

ParkPilot

Automatically activate, front volume, front sound settings, rear volume, rear sound settings,
adjust volume

››› 

page 167

Vehicle lights

Vehicle interior lighting

Instrument and switch lighting, footrest lighting

››› 

page 122

Coming home/Leaving home
function

Start time for “Coming home” function, start time for “Leaving home” function

››› 

page 121

Daytime driving light

Activation/deactivation

››› 

page 118

Mirrors/wind‐
screen wipers

Mirrors

Synchronised regulation, lower the rear-view mirror when reversing, fold in after parking

››› 

page 126

Windscreen wipers

Automatic windscreen wipers, wipe when reversing

››› 

page 124

Opening and clos-
ing

Radio-operated remote control

Convenience open function

››› 

page 104

Central locking system

Unlocking doors, automatic locking/unlocking, audible confirmation

››› 

page 107

Multifunction
display

Current consumption, average consumption, volume to fill up, convenience consumers,
ECOAdvice, travelling time, distance travelled, digital speed display, average speed, speed-
ing warning, oil temperature, coolant temperature, restore data “from start”, restore data
“total calculation”

››› 

page 23

Date and time

Time source, set the time, automatic summer time (DST) setting, select time zone, time for-
mat, set the date, date format

Measurement units

Distance, speed, temperature, volume, consumption

Service

Chassis number, date of next SEAT service inspection, date of next oil change service

››› 

page 30

Factory settings

All settings can be reset: driver assistance, parking and manoeuvring, lights, rear view mir-
rors and windscreen wipers, opening and closing, multi-function display

22

-------------------------------------------------------------------------------------------------------------------------------------------------------------

-------------------------------------------------------------------------------------------------------------------------------------------------------------

The essentials

››› 

 in CAR menu (Setup) on page 99

››› 

page 99

Driver information system

Introduction

With the ignition switched on, it is possible
to read the different functions of the display
by scrolling through the menus.

In vehicles with multifunction steering wheel,
the multifunction display can only be operat-
ed with the steering wheel buttons.

The number of menus displayed on the in-
strument panel will vary according to the ve-
hicle electronics and equipment.

A specialised workshop will be able to pro-
gramme or modify additional functions, ac-
cording to the vehicle equipment. SEAT rec-
ommends visiting a SEAT Official Service.

Some menu options can only be read when
the vehicle is at a standstill.

As long as a priority 1 warning is displayed, it
will not be possible to read the menus. Some
warning messages can be confirmed and
made to disappear with the windscreen wiper

lever button or the multifunction steering
wheel button.

The information system also provides the fol-
lowing information and displays (depending
on the vehicle's equipment):

Driving data 

››› 

page 26

Vehicle status

MFD from departure

MFD from refuelling

MFD total calculation

Assist systems 

››› 

table on page 24

Reverse (optional)

Navigation 

››› 

Booklet Navigation system

Audio 

››› 

Booklet Radio

 or 

››› 

Booklet Naviga-

tion system

Telephone 

››› 

Booklet Radio

 or 

››› 

Book-

let Navigation system

Vehicle 

››› 

table on page 24

WARNING

Any distraction may lead to an accident, with
the risk of injury.

Do not operate the instrument panel con-

trols when driving.

Operating the instrument panel me-
nus

Fig. 35 

Windscreen wiper lever: control but-

tons.

Fig. 36 

Right side of multifunction steering

wheel: control buttons.

The driver information system is controlled
with the multifunction steering wheel buttons

››› 

Fig. 36

 or with the windscreen wiper lever

››› 

Fig. 35

 (if the vehicle is not equipped with

multifunction steering wheel).

»

23

-------------------------------------------------------------------------------------------------------------------------------------------------------------

-------------------------------------------------------------------------------------------------------------------------------------------------------------

The essentials

Enabling the main menu

Switch the ignition on.

If a message or vehicle pictogram appears,

press button 

››› 

Fig. 35


1

 on the windscreen

wiper lever or button 



 on the multifunction

steering wheel 

››› 

Fig. 36

.

If managed from the windscreen wiper lev-

er: to display the main screen 

››› 

page 24

 or

to return to the main menu from another
menu hold down the rocker button 

››› 

Fig. 35

2

.

If managed from the multifunction steering

wheel: the main menu list is not displayed.
To go from point to point in the main menu,
press button 


 or 


 several times

››› 

Fig. 36

.

Select a submenu

Press the rocker switch 

››› 

Fig. 35


2

 on the

windscreen wiper lever up or down or turn
the thumbwheel of the multifunction steering
wheel 

››› 

Fig. 36

 until the desired option ap-

pears marked on the menu.

The selected option is displayed between

two horizontal lines. In addition, a triangle is
displayed on the right: 

To consult the submenu option, press but-

ton 

››› 

Fig. 35


1

 on the windscreen wiper

lever or button 



 on the multifunction steer-

ing wheel 

››› 

Fig. 36

.

Making changes according to the menu

With the rocker switch on the windscreen

wiper lever or the thumbwheel of the multi-
function steering wheel, make the desired
changes. To increase or decrease the values
more quickly, turn the thumbwheel faster.

Mark or confirm the selection with button

››› 

Fig. 35


1

 on the windscreen wiper lever

or button 



 on the multifunction steering

wheel 

››› 

Fig. 36

.

Menu

Menu

Function

Driving
data

Information and possible configurations
of the multifunction display (MFD)

››› 

page 26

››› 

page 99

.

Assist
systems

Information and possible configurations
of the driver assistance systems

››› 

page 99

.

Naviga-
tion

Information instructions from the activa-
ted navigation system: when a route guid-
ance is activated, the turning arrows and
proximity bars are displayed. The appear-
ance is similar to the Easy Connect sys-
tem.
If route guidance is not activated, the di-
rection of travel (compass) and the name
of the street along which you are driving
are shown 

››› 

Booklet Navigation system

.

Menu

Function

Audio

Station display on the radio.
Track name on the CD.
Track name in Media mode 

››› 

Booklet Ra-

dio

 or 

››› 

Booklet Navigation system

.

Tele-
phone

Information and possible configurations
of the mobile phone preinstallation

››› 

Booklet Radio

 or 

››› 

Booklet Navigation

system

.

Lap tim-
er

*

In a racing circuit, measurement and
memorisation of lap times by the vehicle
and comparison with previously measured
best times 

››› 

page 28

.

Vehicle
status

Display of the current warning or informa-
tion texts and other system components,
depending on the equipment

››› 

page 99

.

Outside temperature display

When the outside temperature is below +4°C
(+39°F), the symbol “ice crystal” (warning of
risk of freezing) is also displayed. At first, this
symbol flashes and then it remains lit until
the outside temperature rises above +6°C
(+43°F) 

››› 

 in Indications on the display on

page 96

.

When the vehicle is at a standstill or when
travelling at very low speeds, the tempera-
ture displayed may be higher than the true

24

-------------------------------------------------------------------------------------------------------------------------------------------------------------

-------------------------------------------------------------------------------------------------------------------------------------------------------------

The essentials

outside temperature as a result of the heat
produced by the engine.

The temperatures measured range from
-40°C to +50°C (-40°F to +122°F).

Gear-change indicator

Fig. 37 

Instrument panel: gear-change indica-

tor (manual gearbox).

A gear change will be recommended if the
gear you are in is not the most economical
choice. If no gear-change is recommended, it
means that you are already in the most eco-
nomical gear.

Vehicles with a manual gearbox
The following display symbols 

››› 

Fig. 37

mean:


Change to a higher gear: the suggested

gear appears to the 

right of the current gear

when a 

higher gear is recommended.


Change to a lower gear: the suggested

gear appears to the 

left of the current gear

when a 

lower gear is recommended.

The gear recommendation may occasionally
skip a gear (2nd  4th).

Vehicles with an automatic gearbox*
The display is only visible in tiptronic mode

››› 

page 159

.

The following display symbols mean:


Shifting up a gear


Shifting down a gear

CAUTION

The gear-change indicator is intended to help
save fuel, but it is not intended to recom-
mend the right gear for all driving situations.
In certain situations, only the driver can
choose the correct gear (for instance when
overtaking, driving up a steep gradient or
towing a trailer).

Note

The display disappears from the instrument
panel when you press the clutch pedal.

Bonnet, rear lid and doors open

Fig. 38 

A: bonnet open; B: rear lid open; C:

front left door open; D: rear right door open
(5-door vehicles only).

When the ignition is switched on or when
driving, the bonnet, rear lid or doors that are
open will be indicated on the instrument pan-
el display, and, as applicable, this will be in-
dicated audibly. The display may vary accord-
ing to the type of instrument panel fitted.

»

25

-------------------------------------------------------------------------------------------------------------------------------------------------------------

-------------------------------------------------------------------------------------------------------------------------------------------------------------

The essentials

Illustra-

tion

Key to 

››› 

Fig. 38

A


Do not continue driving!

The bonnet is open or is not properly
closed 

››› 

page 202

.

B


Do not continue driving!

The rear lid is open or is not properly
closed 

››› 

page 10

.

CD


Do not continue driving!

A vehicle door is open or is not properly
closed 

››› 

page 107

.

Warning and information messages

The system runs a check on certain compo-
nents and functions when the ignition is
switched on and while the vehicle is moving.
Faults in the operation are displayed on the
screen using red and yellow symbols and
messages on the instrument panel display
(

››› 

page 32

››› 

page 32

) and, in some ca-

ses, with audible warnings. The display may
vary according to the type of instrument pan-
el fitted.

Priority 1 warning (red symbols)

Symbol flashing or lit; partly combined with audible
warnings.


Stop the vehicle! It is dangerous 

››› 

 in Warning

and control lamps on page 98

 !

Check the function that is faulty and repair it. If necessa-
ry, request assistance from specialised personnel.

Priority 2 warning (yellow symbols)

Symbol flashing or lit; partly combined with audible
warnings.
A faulty function, or fluids which are below the correct
levels may cause damage to the vehicle! 

››› 

 in Warn-

ing and control lamps on page 99

Check the faulty function as soon as possible. If neces-
sary, request assistance from specialised personnel.

Informative text

Information relating to different vehicle processes.

Submenu 

Assist systems

Assist
systems

menu

Function

Front As-
sist

Switching the monitoring system on
and off 

››› 

page 176

.

Fatigue
detection

*

Switching the fatigue detection on or
off (pause recommendation)

››› 

page 182

.

Driving data

Memory

The MFD (multifunction display) shows differ-
ent values for the journey and the consump-
tion.

Changing between display modes on the
MFD

In vehicles without multifunction steering

wheel: Press the rocker switch 



 on the

windscreen wiper lever 

››› 

Fig. 35

.

Vehicles with a multifunction steering

wheel: turn the thumbwheel 

››› 

Fig. 36

.

Multifunction display memory
The multifunction display is equipped with
three memories that work automatically: MFD
from departure, MFD from refuelling and MFD
total calculation. On the screen display, you
can read which memory is currently dis-
played.

Toggle between memories with the ignition

on and the memory displayed: Press the



 button on the windscreen wiper lever

or the 



 button of the multifunction steering

wheel.

26

-------------------------------------------------------------------------------------------------------------------------------------------------------------

-------------------------------------------------------------------------------------------------------------------------------------------------------------

The essentials

Menu

Function

MFD from
departure

Display and storage of the values for
the journey and the consumption from
when the ignition is switched on to
when it is switched off.
If the journey is continued in less than
2 hours after the ignition is switched
off, the new data is added to the data
already stored in the memory. The
memory will automatically be deleted if
the journey is interrupted for more than
2 hours.

MFD from
refuelling

Display and storage of the values for
the journey and the consumption. By
refuelling, the memory will be erased
automatically.

MFD total
calcula-
tion

The memory records the values for a
specific number of partial trips, up to a
total of 19 hours and 59 minutes or 99
hours and 59 minutes, or 1999.9 km or
9999 km, depending on the model of
instrument panel. On reaching either of
these limits

a)

, the memory is automati-

cally erased and starts to count from 0
again.

a)

It varies according to the instrument panel version.

Erasing a memory manually

Select the memory that you wish to erase.

Hold the 



 button of the multifunction

steering wheel or the 



 button of the multi-

function wheel pressed down for about 2 sec-
onds.

Personalising the displays
In the Easy Connect system you can adjust
which of the possible displays of the MFD can
be shown on the instrument panel display
with the button 



 and the function button

Setup


››› 

page 99

.

Data summary

Menu

Function

Current fuel
consumption

The current fuel consumption dis-
play operates throughout the jour-
ney, in litres/100 km; and with the
engine running and the vehicle
stopped, in litres/hour.

Average fuel
consumption

After turning on the ignition, aver-
age fuel consumption in li-
tres/100 km will be displayed after
travelling about 100 metres. Other-
wise horizontal lines are displayed.
The value shown is updated approxi-
mately every 5 seconds.
ACT

®

*: Depending on the equip-

ment, number of active cylinders.

Operating
range

Approximate distance in km that can
still be travelled with the fuel re-
maining in the tank, assuming the
same style of driving is maintained.
This is calculated using the current
fuel consumption.

Menu

Function

Travelling
time

This indicates the hours (h) and mi-
nutes (min) since the ignition was
switched on.

Distance
covered

Distance covered in km (m) after
switching on the ignition.

Average
speed

The average speed will be shown af-
ter a distance of about 100 metres
has been travelled. Otherwise hori-
zontal lines are displayed. The value
shown is updated approximately ev-
ery 5 seconds.

Digital dis-
play of
speed

Current speed displayed in digital
format.

Speed warn-
ing at ---
km/h

 or 

Speed

warning at
--- mph

If the stored speed is exceeded (be-
tween 30 - 250 km/h, or 19 -
155 mph), an audible warning is
given together with a visual warn-
ing.

Oil tempera-
ture

Updated engine oil temperature dig-
ital display

Coolant tem-
perature
gauge

Digital display of the current temper-
ature of the liquid coolant.

Storing a speed with the speed warning

Select the display 

Speed warning at

--- km/h (--- mph)

»

27

-------------------------------------------------------------------------------------------------------------------------------------------------------------

-------------------------------------------------------------------------------------------------------------------------------------------------------------

The essentials

Press the button 



 on the windscreen

wiper lever or the button 



 on the multifunc-

tion steering wheel to store the current speed
and activate the warning.

To switch system on: adjust to the desired

speed within 5 seconds using the rocker
switch 



 on the windscreen wiper lever or

by turning the thumbwheel on the multifunc-
tion steering wheel. Next, press the button



 or 



 again or wait several seconds.

The speed is stored and the warning activa-
ted.

To switch system off: press the but-

ton 



 or 



. The stored speed is de-

leted.

Engine oil temperature display

Vehicles without multifunction steering
wheel

Press the rocker switch 

››› 

Fig. 35


2

 until

the main menu appears. Enter into 

Driving

data

. With the button 

2

 move to the oil

temperature gauge.

Vehicles with multifunction steering wheel

Enter the submenu 

Driving data

 and

turn the thumbwheel until the oil tempera-
ture display appears.

The engine reaches its operating temperature
when in normal driving conditions, the oil

temperature is between 

80°C (180°F)

 and

120°C (250°F)

. If the engine is required to

work hard and the outside temperature is
high, the engine oil temperature can in-
crease. This does not present any problem as
long as the warning lamps 


››› 

table on

page 33

 or  

››› 

table on page 33

 do not

appear on the display.

Additional electrical appliances

Operation with the windscreen wiper lever*:

Press the rocker switch 

››› 

Fig. 35


2

 until the

main menu appears. Enter into the section

Driving data

. With the rocker switch,

move to the display 

Convenience con-

sumers

.

Operation with the multi-function steering

wheel*: Move with the buttons 

1

 or 

2

 to

Driving data

 and enter with 

OK. Turn the

thumbwheel to the right until the 

Conven-

ience consumers

 display appears.

In addition, a scale will inform you of the cur-
rent sum of all the additional appliances.

Saving tips

Tips on how to save fuel will be displayed in
conditions that increase fuel consumption.
Follow them to reduce consumption. The indi-
cations appear automatically only with the ef-

ficiency programme. After a time, the tips will
disappear automatically.

If you wish to hide a saving tip immediately
after it appears, press any button on the
windscreen wiper lever*/multifunction steer-
ing wheel*.

Note

If you hide a saving tip, it will reappear af-

ter you switch the ignition on again.

The saving tips do not appear in all situa-

tions, but rather with a large separation of
time.

Timer*

You can access the timer via the selection
menu 

››› 

page 24

.

It allows you to manually time lap times on a
racing circuit, memorise them and compare
them to the vehicle's previous best times.

The following menus can be displayed:

Stop

Lap

Pause

Partial time

Statistics

28

-------------------------------------------------------------------------------------------------------------------------------------------------------------

-------------------------------------------------------------------------------------------------------------------------------------------------------------

The essentials

Change from one menu to another

Vehicles without multifunction steering

wheel: press the rocker switch 



 in the

windscreen wiper lever.

Vehicles with multifunction steering wheel:

press 

 or 

.

Menu “Stop”

Start

The timer starts.
If there are existing laps and they are in-
cluded in the statistics, it will begin with
the number of laps in question.
It is only possible to begin with a new first
lap if the statistics have been reset first in
the 

Statistics

 menu.

Since
start

The timer begins when the vehicle sets
off.
If the vehicle is already moving, the timer
begins once the vehicle has stopped.

Statis-
tics

The 

Statistics

 menu is displayed on

the screen.

Menu “Lap”

New lap

The timer of the current lap stops and a
new lap starts immediately. The time for
the lap you have just completed is inclu-
ded in the statistics.

Partial
time

For about 5 seconds a partial time is dis-
played. The timer continues in parallel.

Stop

The current lap timer will be interrupted.
The lap does not end. The 

Pause

 menu is

displayed.

Menu “Pause”

Continue

The interrupted timer continues.

New lap

A new timer starts. The halted lap ends
and is included in the statistics.

Interr.
lap

The timer of the current lap ends and is
cancelled. It is not included in the statis-
tics.

End

The current timer ends. The lap is inclu-
ded in the statistics.

Menu “Partial time”

Partial
time

For about 5 seconds a partial time is dis-
played. The timer continues in parallel.

New lap

The timer of the current lap stops and a
new lap starts immediately. The time for
the lap you have just completed is inclu-
ded in the statistics.

Stop

The current lap timer will be interrupted.
The lap does not end. The 

Pause

 menu is

displayed.

Menu “Long-term Statistics”


View of the latest lap times:
– total time
– best lap time
– worst lap time
– average lap duration
A maximum of 10 laps is possible, and a
total duration of 99 hours, 59 minutes
and 59 seconds.
If one of the 2 limits is reached, you will
have to reset the statistics in order to be-
gin a new timer.

Back

This returns to the previous menu.

Reset-
ting to
zero

All the memorised statistical data are re-
set.

WARNING

Do your best to avoid handling the timer
while driving.

Only set the timer or consult statistics

when the vehicle is stationary.

While driving, do not handle the timer in

complicated driving situations.

Speed warning device

The speed warning device warns the driver
when they have exceeded the pre-set speed
limit by 3 km/h (2 mph). An audible warning
signal sounds, and the warning lamp  and

»

29

-------------------------------------------------------------------------------------------------------------------------------------------------------------

-------------------------------------------------------------------------------------------------------------------------------------------------------------

The essentials

the driver message 

Speed limit excee-

ded!

 will be displayed simultaneously on the

instrument panel. The warning lamp 
switches off when reducing speed below the
stored maximum limit.

Speed warning programming is recommen-
ded if you wish to be reminded of a maxi-
mum speed, such as when travelling in a
country with different speed limits or for a
maximum speed for winter tyres.

Setting speed limit warning
You can use the radio or the Easy Connect* to
set, alter or cancel the speed limit warning.

Vehicles with radio: press the button 

SETUP

> control button  

Driver Assistant

 >

Speed warning

.

Vehicles with Easy Connect: press the but-

ton 

Systems

 or else 

Vehicle systems

 >

Driver assistant

 > 

Speed warning

.

The warning limit can be set from 30 to
240 km/h (20 to 149 mph). The adjustment
is made at 10 km/h (5 mph) intervals.

Note

Please bear in mind that, even with the

speed warning function, it is still important
to keep an eye on the vehicle speed with the
speedometer and to observe the legal speed
limits.

The speed limit warning function in the ver-

sion for some countries warns you at a speed
of 120 km/h (75 mph). This is a factory-set
speed limit.

Service intervals

The service interval indication appears on the
instrument panel display 

››› 

Fig. 110


3

.

SEAT distinguishes between services with en-
gine oil change (e.g. Oil change service) and
services without engine oil change (e.g. In-
spection).

In vehicles with 

Services established by time

or mileage, the service intervals are already
pre-defined.

In vehicles with 

LongLife Service, the inter-

vals are determined individually. Thanks to
technological progress, maintenance work
has been greatly reduced. Because of the
technology used by SEAT, with this service
you only need to change the oil when the ve-
hicle so requires. To calculate this change
(max. 2 years), the vehicle's conditions of
use and individual driving styles are consid-
ered. The advance warning first appears 20
days before the date established for the cor-
responding service. The kilometres (miles)
remaining until the next service are always
rounded up to the nearest 100 km (miles)
and the time is given in complete days. The
current service message cannot be viewed

until 500 km after the last service. Prior to
this, only lines are visible on the display.

Inspection reminder
When the Service date is approaching, when
the ignition is switched on a 

Service remind-

er is displayed.

Vehicles without text messages: a span-
ner  will be displayed on the instrument
panel plus an indication in 

km

.

The kilometres indicated are the maximum
number of kilometres that can be travelled
until the next service. After a few seconds,
the display mode changes. A clock symbol
appears and the number of days until the
next service is due.

Vehicles with text messages

Service in

--- km or --- days

 will be shown on the

instrument panel display.

Service due
When 

the service date is due, an audible

warning is given when the ignition is switch-
ed on and the spanner displayed on the
screen flashes for a few seconds .

Vehicles with text messages

Service now

will be shown on the instrument panel dis-
play.

30

-------------------------------------------------------------------------------------------------------------------------------------------------------------

-------------------------------------------------------------------------------------------------------------------------------------------------------------

The essentials

Reading a service notification
With the ignition switched on, the engine off
and the vehicle at a standstill, the current
service notification can be read:

Press and hold the button 

4

 for more than 5

seconds to consult the service message.

When the 

service date has passed, a minus

sign is displayed in front of the number of kil-
ometres or days.

Vehicles with text messages

Service

since --- km or --- days ago

 will be

shown on the display.

The time can also be set via the 



 key and

Setup

 function button in the Easy Connect

system 

››› 

page 99

.

Resetting service interval display
If the service was not carried out by a SEAT
dealership, the display can be reset as fol-
lows:

Switch off the ignition, press and hold but-

ton 

››› 

Fig. 110 

4

.

Switch ignition back on.

Release the 

4


››› 

Fig. 110

 button and

press it again for the next 20 seconds.

Note

The service message disappears after a few

seconds, when the engine is started or when

OK/RESET

 is pressed on the windscreen wiper

lever, or 

OK

 on the multifunction steering

wheel.

In vehicles with the LongLife system in

which the battery has been disconnected for
a long period of time, it is not possible to cal-
culate the date of the next service. Therefore
the service interval display may not be cor-
rect. In this case, bear in mind the maximum
service intervals permitted in the 

››› 

Book-

let Maintenance Programme

.

Cruise control

Operating the cruise control system
(CCS)*

Fig. 39 

On the left of the steering column:

switches and controls for operating the CCS

Switching on the CCS: Move switch

››› 

Fig. 39


1

 to . The system is on. If no

speed has been programmed, the system will
not control it.

Activating the CCS: Press button 

››› 

Fig. 39

2

 in the  area. The current speed is

memorised and controlled.

Temporarily switching off the CCS: Move

switch 

››› 

Fig. 39


1

 to  or push the

brake. The cruise control system is switched
off temporarily.

Reactivating the CCS: Press button

››› 

Fig. 39


2

 in . The memorised speed

is saved and controlled again.

Increasing stored speed during CCS regula-

tion: press button 

2

 in . The vehicle ac-

celerates until the new stored speed.

Reducing stored speed during CCS regula-

tion: press button 

2

 in  to lower the

speed by 1 km/h (1 mph). Speed is reduced
until reaching the new stored speed.

Switching off the CCS: Move switch

››› 

Fig. 39


1

 to . The system is disconnec-

ted and the memorised speed is deleted.

››› 

 in Introduction on page 174

››› 

page 174

31

-------------------------------------------------------------------------------------------------------------------------------------------------------------

-------------------------------------------------------------------------------------------------------------------------------------------------------------

The essentials

Warning lamps

On the instrument panel

Fig. 40 

Instrument panel, on dash panel

Red warning lamps

Central warning lamp: additional
information on the instrument pan-
el display

Parking brake on.

››› 

page 

154

››› 

page 

153


Do not continue driving!

The brake fluid level is too low or
there is a fault in the brake system.

Lit up or flashing:


Do not continue driving!

Fault in the steering.

››› 

page 

150

Driver or passenger has not fas-
tened seat belt.

››› 

page 

61

Use the foot brake!


Yellow warning lamps

Central warning lamp: additional
information on the instrument pan-
el display

32

-------------------------------------------------------------------------------------------------------------------------------------------------------------

-------------------------------------------------------------------------------------------------------------------------------------------------------------

The essentials

Front brake pads worn.

››› 

page 

154

it lights up: Fault in the ESC, or dis-
connection caused by the system.

flashes: ESC or ASR activated.

ASR manually deactivated.

ABS faulty or does not work.

Rear fog light switched on.

››› 

page 

18

lights up or flashes: fault in the
emission control system.

››› 

page 

164

it lights up: pre-heating of diesel
engine.

››› 

page 

165

flashes: fault in the diesel engine
management.



fault in the petrol engine manage-
ment.

››› 

page 

165

lights up or flashes: fault in the
steering system.

››› 

page 

150

Tyre pressure too low, or fault in
the tyre pressure monitoring sys-
tem.

››› 

page 

219

Fuel tank almost empty.

››› 

page 

98

Fault in airbag system and seat
belt tensioners.

››› 

page 

66

Other warning lamps

Left or right turn signal.

››› 

page 

19

Hazard warning lights on.

››› 

page 

121

Trailer turn signals

››› 

page 

184

it lights up: Press the foot brake!
flashes: the selector lever locking
button has not engaged.

››› 

page 

157

it lights up: cruise control activated
or speed limiter switched on and
active.

››› 

page 

31

flashes: the speed set by the
speed limiter has been exceeded.

Main beam on or flasher on.

››› 

page 

19

On the instrument panel display

Fig. 41 

On the instrument panel display: door

open.


Do not continue driving!

With the corresponding indica-
tion: door(s), rear lid or bonnet
open or not properly closed.

››› 

page 

25

Ignition: 


Do not carry on driv-

ing! Engine coolant level too low,
coolant temperature too high

››› 

page 

208

Flashing: Fault in the engine
coolant system.


Do not continue driving!

Engine oil pressure too low.

››› 

page 

205

»

33

-------------------------------------------------------------------------------------------------------------------------------------------------------------

-------------------------------------------------------------------------------------------------------------------------------------------------------------

The essentials

Fault in the battery.

››› 

page 

212

Driving light totally or partially
faulty.

››› 

page 

83

Fault in the cornering light sys-
tem.

››› 

page 

116

Diesel particulate filter blocked

››› 

page 

164

Level of windscreen washer fluid
too low.

››› 

page 

210

Flashing: Fault in the oil level de-
tection. Control manually.

››› 

page 

205

Ignition: Insufficient engine oil.

Fault in the gearbox.

››› 

page 

160



Immobiliser active.

››› 

page 

150

Service interval display

››› 

page 

30

Mobile telephone is connected
via Bluetooth to the original tele-
phone device.

››› 

Book-

let Radio

or

››› 

Book-

let Navi-
gation
system

Mobile telephone battery charge
meter. Available only for devices
pre-installed in factory.

Freezing warning. The outside
temperature is lower than +4°C
(+39°F).

››› 

page 

24

Start-Stop system activated.

››› 

page 

181

Start-Stop system unavailable.



Low consumption driving status

››› 

page 

24

On the instrument panel




Front passenger front airbag is
disabled (  


 ).

››› 

page 

66

››› 

 in Warning and control lamps on

page 98

››› 

page 98

Gearbox lever

Manual gearbox

Fig. 42 

Gear shift pattern of a 5 or 6-speed

manual gearbox

The position of the gears is indicated on the
gearbox lever 

››› 

Fig. 42

.

Press the clutch pedal and keep your foot

right down.

Move the gearbox lever to the required po-

sition.

Release the clutch.

Selecting reverse gear

Press the clutch pedal and keep your foot

right down.

With the gearbox lever in neutral, push it

upwards, move it to the left as far as it will go
and then forwards to select reverse 

››› 

Fig. 42

R

.

34

-------------------------------------------------------------------------------------------------------------------------------------------------------------

-------------------------------------------------------------------------------------------------------------------------------------------------------------

The essentials

Release the clutch.

››› 

 in Changing gears on page 157

››› 

page 156

Automatic gearbox*

Fig. 43 

Automatic gearbox: selector lever po-

sitions.

Parking lock
Reverse gear

P
R

Neutral (idling)
Drive (forward)
Sport programme: drive (forward)
Tiptronic mode: pull the lever forwards
(

+) to go up a gear or backwards () to

go down a gear.

››› 

 in Basic information on page 157

››› 

page 157

››› 

page 35

Manual release of selector lever

Fig. 44 

Manual release of the selector lever.

N
D
S
+/–

If there is a fault in the power system to the
electronic selector lever lock system (flat bat-
tery, blown fuse) or the system itself is faulty,
the selector lever cannot be moved from po-
sition 

P in the normal manner, which pre-

vents the vehicle from being moved. The se-
lector lever must be unlocked using the man-
ual release.

Apply the handbrake.

Pull gently on both sides at the front of the

selector lever cover.

Also loosen the cover at the rear.

Press the yellow plastic part with your fin-

ger in the direction indicated by the arrow

››› 

Fig. 44

.

Press the interlock button on the selector

lever knob at the same time and move the se-
lector lever to position 

N (if the selector lever

is moved back to position 

P, it will lock

again).

35

-------------------------------------------------------------------------------------------------------------------------------------------------------------

-------------------------------------------------------------------------------------------------------------------------------------------------------------

The essentials

Air conditioning

How does Climatronic* work?

Fig. 45 

In the centre console: Climatronic con-

trols

Buttons/controls

Interior temperature setting

Display

Selected interior temperature
Degrees Centigrade or Fahrenheit
Automatic air conditioning mode
Defrost or demist windscreen
Air flow direction
Air recirculation

1

2

3

4

5

6

7

Cooling on/off
Selected blower speed

Buttons/controls

Set blower speed
Interior temperature sensor
Defrost or demist windscreen
Automatic mode
Air distribution to windows
Air distribution to upper body

8

9

10

11

12

13

14

15

Air distribution to footwells
Air recirculation
Cooling on/off

››› 

 in General notes on page 142

››› 

page 147

16

17

18

36

-------------------------------------------------------------------------------------------------------------------------------------------------------------


Content      ..      1      2      3      ..