Seat Leon 1M. Service Manual - part 6


  Index      Seat     Seat Leon 1M. Service Manual


Search            copyright infringement  


Content      ..     4      5      6      7     ..


Seat Leon 1M. Service Manual - part 6


-------------------------------------------------------------------------------------------------------------------------------------------------------------

2.46

––––––––––––––––––––––––––––––––––––––––––––––––––––––––––––––––––

LIGHTS AND VISIBILITY

HANDLING INSTRUCTIONS

2

2 –

– IIn

ns

sttrru

um

me

en

ntt lliig

gh

httiin

ng

g

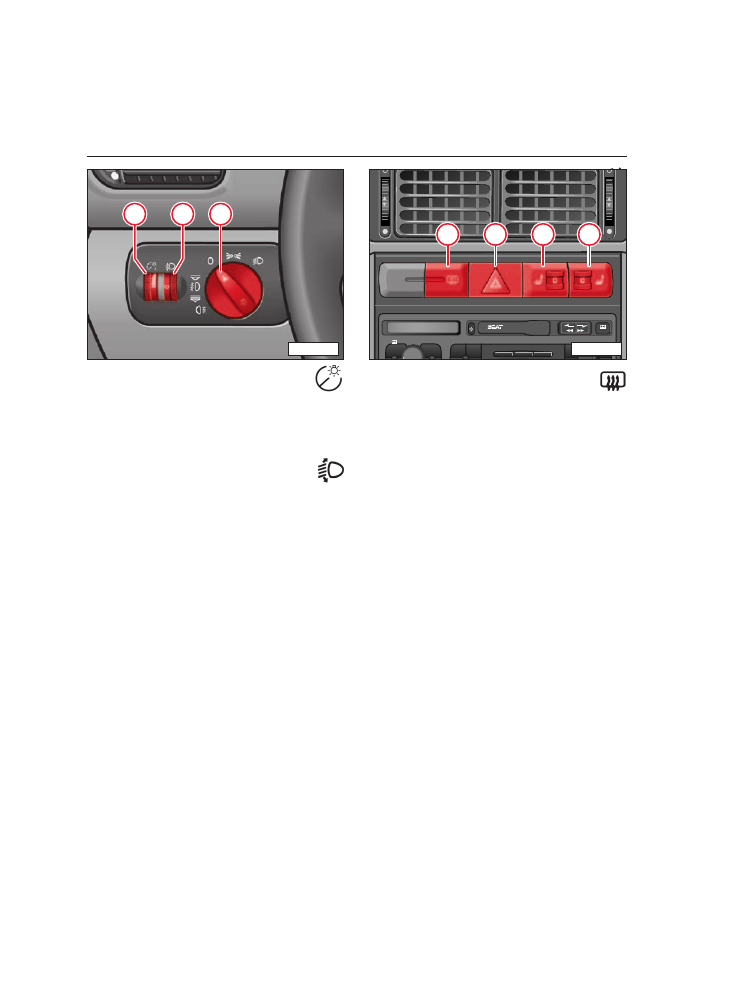
When  the  lights are  on,  the  level of the
instrument lighting  can  be  set to  any
intensity by turning  the  knurled  wheel
next to the light switch.

3

3 –

– H

He

ea

ad

dlliig

gh

htt rra

an

ng

ge

e c

co

on

nttrro

oll*

*

With the electric adjustment of the head-
lamp  range,  headlights can  be  matched
exactly to  the  load  condition  of vehicle.
This prevents oncoming traffic from being
dazzled more than is unavoidable. At the
same  time  the  correct headlight beam
adjustment provides the  best possible
visibility for the driver.

The headlights can only be regulated with
the dipped headlights switched on.

To  lower  the  beams,  turn  knurled  disc
from the basic position (

0) downwards.

4

4 –

– H

He

ea

atte

ed

d rre

ea

arr w

wiin

nd

do

ow

w

The  heating  works only when  ignition  is
on. When heater is on a lamp in the switch
lights up.

A

As

s  s

so

oo

on

n  a

as

s  w

wiin

nd

do

ow

w  iis

s  c

clle

ea

arr,,

s

sw

wiittc

ch

h  e

elle

em

me

en

ntt  o

offff..  T

Th

he

e  rre

ed

du

uc

ce

ed

d

c

cu

urrrre

en

ntt  c

co

on

ns

su

um

mp

pttiio

on

n  h

he

ellp

ps

s  tto

o  rre

ed

du

uc

ce

e

ffu

ue

ell c

co

on

ns

su

um

mp

pttiio

on

n –

– s

se

ee

e p

pa

ag

ge

e 3

3..2

20

0..

On  vehicles with  electrically adjustable
exterior mirrors the mirrors are heated as
long  as the  rear  window  heating  is
switched on.

1

3

2

TO8-014A

BAL

FAD

R.D.S

E-O-N

LOUD

MONO

TAPE

CD

CHANGER
CONTROL

FM
AM

RDS

TP
AS

SCAN

CD

AURA

1

2

3

SCAN

TRACK

SOUND SYSTEM

Cr

4

5

6

7

TO8-015

-------------------------------------------------------------------------------------------------------------------------------------------------------------

-------------------------------------------------------------------------------------------------------------------------------------------------------------

LIGHTS AND VISIBILITY 

––––––––––––––––––––––––––––––––––––––––––––––––––––––––––––––––––

2.47

HANDLING INSTRUCTIONS

5

5 –

– H

Ha

az

za

arrd

d w

wa

arrn

niin

ng

g lliig

gh

htts

s

The  system  also  works when  the  ignition
is switched off.

Switch on the hazard warning lights if, for
example:

– Your vehicle stops because of a techni-

cal defect,

– You have an emergency

– You reach the tail end of a traffic jam.

When  the  hazard  warning  lights are
switched  on,  all turn  signal lights flash
simultaneously.  The  warning  lamps for
the  indicators and  a  warning  lamp  in  the
switch will also flash.

O

Ob

bs

se

errv

ve

e  lle

eg

ga

all  rre

eq

qu

uiirre

em

me

en

ntts

s  w

wh

he

en

n

e

em

mp

pllo

oy

yiin

ng

g s

su

uc

ch

h s

sa

affe

etty

y m

me

ea

as

su

urre

es

s..

6

6 –

– S

Se

ea

att h

he

ea

attiin

ng

g*

* ffo

orr lle

efftt s

se

ea

att

For  further  information  on  its functions
see "Heated seats" chapter.

7

7 –

– S

Se

ea

att h

he

ea

attiin

ng

g*

* ffo

orr rriig

gh

htt s

se

ea

att

For  further  information  on  its functions
see "Heated seats" chapter.

S

Sw

wiittc

ch

he

es

s iin

n d

drriiv

ve

err’’s

s d

do

oo

orr

E

Elle

ec

cttrriic

c w

wiin

nd

do

ow

ws

s

To  use  the  electric windows switches see
"Electric windows" chapter.

C

Ce

en

nttrra

all llo

oc

ck

kiin

ng

g b

bu

utttto

on

n

To  use  this switch  see  "Central locking"
chapter.

W

Wiin

ng

g m

miirrrro

orr a

ad

djju

us

sttm

me

en

ntt

See "Rear-view mirrors" chapter.

-------------------------------------------------------------------------------------------------------------------------------------------------------------

-------------------------------------------------------------------------------------------------------------------------------------------------------------

2.48

––––––––––––––––––––––––––––––––––––––––––––––––––––––––––––––––––

LIGHTS AND VISIBILITY 

HANDLING INSTRUCTIONS

S

Su

un

n v

viis

so

orrs

s

S

Sw

wiittc

ch

he

es

s iin

n tth

he

e c

ce

en

nttrra

all c

co

on

ns

so

olle

e

U

Un

nllo

oc

ck

kiin

ng

g tth

he

e tta

an

nk

k fflla

ap

p

You must press the key to unlock the tank
flap.  It can  only be  unlocked  when  the
ignition is off.

A

An

nttii--s

sk

kiid

dd

diin

ng

g s

sy

ys

stte

em

m o

off tth

he

e d

drriiv

ve

e

w

wh

he

ee

ells

s ((T

TC

CS

S))*

*.. E

Elle

ec

cttrro

on

niic

c S

Stta

ab

biilliitty

y

P

Prro

og

grra

am

m ((E

ES

SP

P))*

*

The  TCS or  ESP  connect automatically
when the engine is switched on. If neces-
sary,  they may be  switched  off briefly by
pressing corresponding switch.

The  pilot light will light up  if it is discon-
nected. See "Warning lamps" chapter.

For  further  information  see  pages 3.11,
3.12 and 3.13.

The  sun  visors can  be  pulled  out of the
side  mountings and  swung  towards the
doors.

The vanity mirrors have a sliding cover.

ESP

LEO-011

-------------------------------------------------------------------------------------------------------------------------------------------------------------

-------------------------------------------------------------------------------------------------------------------------------------------------------------

LIGHTS AND VISIBILITY 

––––––––––––––––––––––––––––––––––––––––––––––––––––––––––––––––––

2.49

HANDLING INSTRUCTIONS

IIn

nd

diic

ca

atto

orrs

s a

an

nd

d d

diip

pp

pe

ed

d b

be

ea

am

m lle

ev

ve

err

The turn signals only work when the igni-
tion is switched on.

Right turn signals – lever up (1

1)

Left turn signals – lever down (2

2)

When the turn signals are switched on the
pilot light will light up simultaneously. See
"Warning lamps" chapter.

The  turn  signals switch  off automatically
when the steering wheel returns to its nor-
mal position.

T

To

o s

siig

gn

na

all a

a lla

an

ne

e c

ch

ha

an

ng

ge

e

Move  the  lever  up  (1

1)  or  down  (2

2)  to  the

pressure point and hold in this position –
the  warning  lamp  should  flash  at the
same time.

H

He

ea

ad

dlliig

gh

htt fflla

as

sh

he

err

Pull the  lever  towards the  steering  wheel
(3

3)  –  the  main  beam  warning  lamp  will

light up.

S

Sh

ho

orrtt o

orr llo

on

ng

g b

be

ea

am

ms

s

With  the  long  or  short beam  connected
push the lever towards the steering wheel
(4

4).  When  main  beam  is on,  the  main

beam pilot light will light up. 

P

Pa

arrk

kiin

ng

g lliig

gh

htts

s*

*

The  parking  lights only work when  igni-
tion is switched off.

Right parking lights – lever up (1

1)

Left parking lights – lever down (2

2)

If the  ignition  key has been  removed,  a
buzzer* will sound when the driver’s door
is open.

N

No

otte

e

T

Th

he

e  u

us

se

e  o

off  tth

he

e  s

siig

gn

na

alls

s  a

an

nd

d  lliig

gh

httiin

ng

g

d

de

es

sc

crriib

be

ed

d h

he

erre

e iis

s s

su

ub

bjje

ec

ctt tto

o llo

oc

ca

all rre

eg

g--

u

ulla

attiio

on

ns

s..

1

2

4

3

TO8-016A

-------------------------------------------------------------------------------------------------------------------------------------------------------------

-------------------------------------------------------------------------------------------------------------------------------------------------------------

2.50

––––––––––––––––––––––––––––––––––––––––––––––––––––––––––––––––––

LIGHTS AND VISIBILITY

HANDLING INSTRUCTIONS

IIn

ntte

erriio

orr lliig

gh

htts

s

A

A –

– F

Frro

on

ntt iin

ntte

erriio

orr lliig

gh

htt 

Switch positions:

0 – Off
Left – Light on continuously

Right –  Door contact switch

Interior  lights with  delayed  switch  off*
remain  on  for  about 30  seconds after
doors are closed.

B

B –

– F

Frro

on

ntt rre

ea

ad

diin

ng

g lliig

gh

htt*

*

The  reading  light is turned  on  or  off by
pressing the appropriate switch B

B.

B

Bo

oo

ott lliig

gh

htt

The  light is on  when  the  tailgate  is open
(including  with  lights and  ignition  off).
You must therefore always make sure you
close  the  boot,  as well as when you  park
the car.

R

Re

ea

arr iin

ntte

erriio

orr lliig

gh

htts

s

Switch positions:

0 – Off
Intermediate  position  –  Door  contact
switch

Left – Light on continuously

C

Co

on

nttrro

oll o

off iin

ntte

erriio

orr lliig

gh

htts

s

The  interior  light is switched  on  for
approx.  30  seconds when  the  vehicle  is
unlocked,  a  door  opened  or  the  ignition
key removed.  The  switch  must be  in  the
door contact position for this function.

It is however  switched  off as soon  as the
vehicle  is locked  or  the  ignition  switched
on.

With the door open, the interior light will
remain on for a maximum of ten minutes.
This prevents the  battery from  discharg-
ing.

G

Gllo

ov

ve

e b

bo

ox

x lliig

gh

htt*

*

The light in the glove box on the passen-
ger side only comes on when the ignition
is on and the lid is open.

B45-146C

-------------------------------------------------------------------------------------------------------------------------------------------------------------

-------------------------------------------------------------------------------------------------------------------------------------------------------------

LIGHTS AND VISIBILITY 

––––––––––––––––––––––––––––––––––––––––––––––––––––––––––––––––––

2.51

HANDLING INSTRUCTIONS

W

Wiin

nd

ds

sc

crre

ee

en

n w

wiip

pe

errs

s a

an

nd

d w

wa

as

sh

he

errs

s

W

Wa

arrn

niin

ng

g

T

Th

he

e w

wiin

nd

ds

sh

hiie

elld

d w

wiip

pe

err b

blla

ad

de

es

s m

mu

us

stt

b

be

e  iin

n  p

pe

errffe

ec

ctt  c

co

on

nd

diittiio

on

n  tto

o  e

en

ns

su

urre

e

g

go

oo

od

d  v

viis

siib

biilliitty

y  ((s

se

ee

e  "

"W

Wiin

nd

ds

sc

crre

ee

en

n

w

wiip

pe

errs

s"

" c

ch

ha

ap

ptte

err))..

Wipers and washers only work when igni-
tion is switched on.

W

Wh

he

en

n  iitt  iis

s  ffrre

ee

ez

ziin

ng

g,,  c

ch

he

ec

ck

k  tth

ha

att  tth

he

e

w

wiip

pe

err  b

blla

ad

de

es

s  a

arre

e  n

no

ott  ffrro

oz

ze

en

n  tto

o  tth

he

e

g

glla

as

ss

s  b

be

effo

orre

e  s

sw

wiittc

ch

hiin

ng

g  tth

he

e  w

wiip

pe

errs

s  o

on

n

ffo

orr tth

he

e ffiirrs

stt ttiim

me

e..

The  heated  windscreen  washer  jets*  are
switched on when the ignition is switched
on  and  the  amount of heat is regulated
automatically according  to  the  outside
temperature.

N

No

otte

e

Fill container.  See  "Windscreen  washer"

chapter.

Replace  wiper  blades.  See  "Wiper

blades" chapter.

W

Wiin

nd

ds

sc

crre

ee

en

n

• 

W

Wiin

nd

ds

sc

crre

ee

en

n w

wiip

pe

errs

s o

offff

Lever at position 0

0.

• 

IIn

ntte

errm

miitttte

en

ntt w

wiip

pe

e

Lever at position 1

1.

Use lever A

A to change the intervals of the

intermittent wipe.  Four  levels are  avail-
able.

Lever to the right – brief intervals

Lever to the left – long intervals

The intervals of each level are set in func-
tion  of the  time  that elapses between
each sweep of the wipers.

• 

W

Wiip

pe

err s

sllo

ow

w

Lever at position 2

2.

• 

W

Wiip

pe

err ffa

as

stt

Lever at position 3

3.

• 

F

Flliic

ck

k w

wiip

pe

e

Lever at position 4

4.

• 

A

Au

utto

om

ma

attiic

c w

wa

as

sh

h/

/w

wiip

pe

e ffa

ac

ciilliitty

y

To  turn  on  wipers and  washer,  pull lever
towards steering wheel to position 5

5. 

Release lever –

The washer stops and the wipers carry on
for about 4 seconds.

R

Ra

aiin

n s

se

en

ns

so

orr*

*

If the  vehicle  is fitted  with  a  rain  sensor
and the intermittent wipe is activated this
sensor is in charge of adjusting automati-
cally the  duration  of the  intervals to  the
amount of rain.

Position A

A of the lever for the windscreen

wipers is used  to  individually adjust the
sensitivity of the rain sensor.

After  switching  off the  ignition,  the  rain
sensor needs to be switched on again. To
do that the intermittent wipe needs to be
switched off and switched on again.

A

0

1

2

3

4

5

LEO-027

-------------------------------------------------------------------------------------------------------------------------------------------------------------

-------------------------------------------------------------------------------------------------------------------------------------------------------------

2.52

––––––––––––––––––––––––––––––––––––––––––––––––––––––––––––––––––

LIGHTS AND VISIBILITY

HANDLING INSTRUCTIONS

R

Re

ea

arr w

wiin

nd

ds

sc

crre

ee

en

n

IIn

ntte

errm

miitttte

en

ntt w

wiip

pe

e

T

Tu

urrn

n o

on

n::

Push lever to position 6

6.

The  wipers wipe  approximately every 6
seconds.

T

Tu

urrn

n o

offff::

Move  the  lever  towards the  steering
wheel.  If you  turn  off the  windscreen
wiper while wiping, the windscreen wiper
will function until the wipe is completed.

A

Au

utto

om

ma

attiic

c w

wa

as

sh

h/

/w

wiip

pe

e ffa

ac

ciilliitty

y

T

Tu

urrn

n o

on

n::

Push the lever forward to position 7

7:

The  washer/wipe  facility keeps working
intermittently. To turn off completely move
the lever towards the steering wheel.

H

He

ea

ad

dlliig

gh

htt w

wa

as

sh

he

err s

sy

ys

stte

em

m*

*

When the main or dipped beam is on, the
lenses are  washed  every time  the  wind-
screen is washed.

At regular  intervals,  such  as when  filling
the  tank,  the  dirt on  the  lenses (insects)
should be removed.

7

6

LEO-012

-------------------------------------------------------------------------------------------------------------------------------------------------------------

-------------------------------------------------------------------------------------------------------------------------------------------------------------

LIGHTS AND VISIBILITY 

––––––––––––––––––––––––––––––––––––––––––––––––––––––––––––––––––

2.53

HANDLING INSTRUCTIONS

W

Wiip

pe

err b

blla

ad

de

es

s

W

Wa

arrn

niin

ng

g

T

Th

he

e  w

wiip

pe

err  b

blla

ad

de

es

s  m

mu

us

stt  b

be

e  iin

n

g

go

oo

od

d c

co

on

nd

diittiio

on

n ffo

orr c

clle

ea

arr v

viis

siib

biilliitty

y..

IIn

n  o

orrd

de

err  tto

o  p

prre

ev

ve

en

ntt  s

sttrre

ea

ak

ks

s  o

on

n

tth

he

e  w

wiin

nd

ds

sc

crre

ee

en

n  y

yo

ou

u  s

sh

ho

ou

ulld

d  c

clle

ea

an

n

tth

he

e  w

wiip

pe

err  b

blla

ad

de

es

s  rre

eg

gu

ulla

arrlly

y  w

wiitth

h  a

a

w

wiin

nd

do

ow

w  c

clle

ea

an

niin

ng

g  p

prro

od

du

uc

ctt..  IIff  tth

he

e

w

wiin

nd

do

ow

ws

s a

arre

e p

pa

arrttiic

cu

ulla

arrlly

y d

diirrtty

y,, e

e..g

g..

iin

ns

se

ec

ctt  rre

em

ma

aiin

ns

s,,  a

a  s

sp

po

on

ng

ge

e  o

orr  c

cllo

otth

h

s

sh

ho

ou

ulld

d  b

be

e  u

us

se

ed

d  tto

o  c

clle

ea

an

n  tth

he

e

b

blla

ad

de

es

s..

C

Ch

ha

an

ng

ge

e  tth

he

e  w

wiip

pe

err  b

blla

ad

de

es

s  o

on

nc

ce

e

o

orr  ttw

wiic

ce

e  a

a  y

ye

ea

arr  ffo

orr  s

sa

affe

etty

y  rre

ea

as

so

on

ns

s..

W

Wiip

pe

err  b

blla

ad

de

es

s  m

ma

ay

y  b

be

e  p

pu

urrc

ch

ha

as

se

ed

d

ffrro

om

m T

Te

ec

ch

hn

niic

ca

all S

Se

errv

viic

ce

e C

Ce

en

nttrre

es

s..

W

Wh

he

en

n  iitt  iis

s  ffrre

ee

ez

ziin

ng

g,,  c

ch

he

ec

ck

k  tth

ha

att  tth

he

e

w

wiip

pe

err  b

blla

ad

de

es

s  a

arre

e  n

no

ott  ffrro

oz

ze

en

n  tto

o  tth

he

e

g

glla

as

ss

s  b

be

effo

orre

e  s

sw

wiittc

ch

hiin

ng

g  tth

he

e  w

wiip

pe

errs

s  o

on

n

ffo

orr tth

he

e ffiirrs

stt ttiim

me

e..

If the wiper blades drag, it may be caused
by one of the following:

• 

If the  vehicle  has been  washed  in  an

automatic car wash, residual wax may be
left on the windscreen. This wax can only
be  removed  with  special detergent.
Consult a  Technical Service  Centre  for
more information.

The  blades will not drag  if you  use  a  wax
dissolving  windscreen  cleaner.  Grease
solvents will not work.

• 

Damaged  wiper  blades can  also  drag.

In  this case  the  blades should  be
renewed.

• 

The blades are set at an incorrect angle.

Have the angle checked and, if necessary,
adjusted by a Technical Service Centre.

C

Ch

ha

an

ng

giin

ng

g w

wiip

pe

err b

blla

ad

de

es

s

T

Ta

ak

kiin

ng

g tth

he

e w

wiip

pe

err b

blla

ad

de

e o

offff

• 

Hinge  the  wiper  arm  up  and  position

the blade perpendicular to the wiper arm.

• 

Press the retaining spring in the direc-

tion of arrow A

A.

• 

Detach the wiper blade in the direction

of arrow B

B and then remove from the arm

in the opposite direction.

S

Se

ec

cu

urriin

ng

g tth

he

e w

wiip

pe

err b

blla

ad

de

e

The retaining spring must engage audibly
in the wiper arm.

When  fitting  wiper  blades with  moulded
wind  deflectors one  should  ensure  that
the deflector is pointing downwards.

B1H-052

-------------------------------------------------------------------------------------------------------------------------------------------------------------

-------------------------------------------------------------------------------------------------------------------------------------------------------------

2.54

––––––––––––––––––––––––––––––––––––––––––––––––––––––––––––––––––

LIGHTS AND VISIBILITY

HANDLING INSTRUCTIONS

To remove the rear wiper blade, do the fol-
lowing:

Before  you  follow  the  aforementioned
steps,  remove  cover  A

A  by pressing  in  the

direction of arrow 1

1 and then as indicated

by arrow 2

2.  Proceed  as indicated  in  the

before  mentioned  chapter  (change of
wiper blades).

A

1

2

LEO-013

-------------------------------------------------------------------------------------------------------------------------------------------------------------

-------------------------------------------------------------------------------------------------------------------------------------------------------------

LIGHTS AND VISIBILITY 

––––––––––––––––––––––––––––––––––––––––––––––––––––––––––––––––––

2.55

HANDLING INSTRUCTIONS

R

Re

ea

arr--v

viie

ew

w m

miirrrro

orrs

s

A

Ad

djju

us

sttiin

ng

g m

miirrrro

orrs

s

The  rear  view  mirrors should  always be
adjusted  properly before  moving  off so
that good vision to the rear is obtained.

A

An

nttii--d

da

az

zz

zlle

e iin

ntte

erriio

orr m

miirrrro

orr

The lever on the lower edge of the mirror
should  be  pointing  to  the  rear  when  the
basic setting is made.

To  set the  anti-dazzle  position,  pull lever
forwards.

E

Ex

xtte

erriio

orr  m

miirrrro

orrs

s  c

co

on

nttrro

olllle

ed

d  m

me

ec

ch

ha

an

nii--

c

ca

alllly

y  ffrro

om

m  iin

ns

siid

de

e are  adjusted  with  the

knob in the door trim panel.

A

Au

utto

om

ma

attiic

c*

* a

an

nttii--d

da

az

zz

zlle

e m

miirrrro

orr

Adjust interior mirror by hand.

If the  ignition  is switched  on  the  interior
mirror  automatically darkens depending
on the light from behind (i.e. a headlight).

When you engage the reverse gear or put
the  selector  lever  on  R

R the  mirror  returns

to its original position (is no longer dark).

E

Elle

ec

cttrriic

ca

alllly

y a

ad

djju

us

stta

ab

blle

e m

miirrrro

orrs

s*

*

Electrically adjustable mirrors* are set by
pressing the edge of the knob A

A in the dri-

ver’s door trim.

The  surface  of the  mirror  may be  angled
upwards,  downwards,  to  the  left or  the
right, as required.

With  swivel knob  (A

A)  select the  driver  or

passenger wing mirrors.

N

N – Neutral position

R

R – Driver’s mirror

L

L – Passenger’s mirror

When  you  adjust the  lle

efftt mirror  the  right

one moves in time, and a separate adjust-
ment of the right mirror should not normally
be necessary. If you wish to adjust it sepa-
rately, activate the right mirror. You should
now be able to adjust it.

If the electric adjustment fails, the mirrors
can be adjusted manually by pressing on
the surface.

A

L

N

R

LEO-014C

-------------------------------------------------------------------------------------------------------------------------------------------------------------

-------------------------------------------------------------------------------------------------------------------------------------------------------------

2.56

––––––––––––––––––––––––––––––––––––––––––––––––––––––––––––––––––

LIGHTS AND VISIBILITY

HANDLING INSTRUCTIONS

N

No

otte

e ffo

orr v

ve

eh

hiic

clle

es

s w

wiitth

h c

co

on

nv

ve

ex

x o

orr

a

as

sp

ph

he

erriic

ca

all o

ou

utts

siid

de

e m

miirrrro

orrs

s *

*

C

Co

on

nv

ve

ex

x

(curved 

outwards) 

mirrors

enlarge  the  field  of view  but they make
objects look smaller.  T

Th

he

es

se

e  m

miirrrro

orrs

s  a

arre

e

o

on

nlly

y  o

off  lliim

miitte

ed

d  u

us

se

e  iin

n  e

es

sttiim

ma

attiin

ng

g  h

ho

ow

w

ffa

arr a

aw

wa

ay

y a

a ffo

ollllo

ow

wiin

ng

g v

ve

eh

hiic

clle

e iis

s..

A

As

sp

ph

he

erriic

ca

all exterior mirrors have a mirror

surface  with  different curvature.  This
wide-angle  mirror  increases the  area  of
vision  even  more  so  than  conventional
convex mirrors. T

Th

he

eiirr u

us

se

effu

ulln

ne

es

ss

s iis

s a

alls

so

o

lliim

miitte

ed

d  w

wh

he

en

n  jju

ud

dg

giin

ng

g  tth

he

e  d

diis

stta

an

nc

ce

e  tto

o

v

ve

eh

hiic

clle

es

s a

ap

pp

prro

oa

ac

ch

hiin

ng

g ffrro

om

m b

be

eh

hiin

nd

d..

M

Miirrrro

orr h

he

ea

attiin

ng

g*

*

The  electrically operated  outside  mirrors
are heated as long as the heated rear win-
dow is switched on. The ignition must be
switched on for this purpose.

F

Fo

olld

diin

ng

g e

ex

xtte

erriio

orr m

miirrrro

orrs

s iin

n

The exterior mirrors can be folded in.

To  do  this pull mirror  housing  towards
vehicle.

N

No

otte

e

• 

Before  putting  the  vehicle  through  an

automatic washing  plant,  the  mirrors
should be folded in to prevent them from
becoming damaged.

F

Fo

olld

diin

ng

g e

ex

xtte

erriio

orr m

miirrrro

orrs

s b

ba

ac

ck

k

W

Wa

arrn

niin

ng

g

W

Wh

he

en

n  ffo

olld

diin

ng

g  tth

he

e  m

miirrrro

orr  b

ba

ac

ck

k  o

ou

utt

e

en

ns

su

urre

e  tth

ha

att  y

yo

ou

urr  ffiin

ng

ge

errs

s  a

arre

e  n

no

ott

ttrra

ap

pp

pe

ed

d  b

be

ettw

we

ee

en

n  tth

he

e  m

miirrrro

orr  a

an

nd

d

tth

he

e b

brra

ac

ck

ke

ett –

– D

Da

an

ng

ge

err o

off iin

njju

urry

y!!

-------------------------------------------------------------------------------------------------------------------------------------------------------------

-------------------------------------------------------------------------------------------------------------------------------------------------------------

LIGHTS AND VISIBILITY 

––––––––––––––––––––––––––––––––––––––––––––––––––––––––––––––––––

2.57

HANDLING INSTRUCTIONS

E

Elle

ec

cttrriic

c ffo

olld

diin

ng

g w

wiin

ng

g m

miirrrro

orrs

s*

*

Use  control A

A to  select the  passenger  or

driver’s wing mirror, or the fold-away func-
tion,  as well as mirror  adjustment (see
diagram).

N

N – Neutral position

R

R – Driver’s wing mirror

L

L – Passenger’s wing mirror

P

P – Folding away of wing mirrors

The  fold-away position  is recommended,
for  example,  when  parking  or  driving  in
cramped conditions.

To ffo

olld

d  a

aw

wa

ay

y  tth

he

e  w

wiin

ng

g  m

miirrrro

orrs

s,  starting

from positions L

L, R

R or N

N, select position P

P

with control A

A.

T

To

o  u

un

nffo

olld

d  tth

he

e  w

wiin

ng

g  m

miirrrro

orrs

s  ((u

us

se

e  p

po

os

sii--

ttiio

on

n)), do the opposite, from P

P to L

L, R

R or N

N.

N

No

otte

e

If the mirror housing is moved by an exter-
nal force  (e.g.  knocked  when  maneuver-
ing)  the  mirrors must be  folded  right in
electrically.  U

Un

nd

de

err  n

no

o  c

ciirrc

cu

um

ms

stta

an

nc

ce

es

s

m

mu

us

stt  tth

he

e  m

miirrrro

orr housing  be  adjusted  by

hand  as the operation of the mirror might
be  affected.  To  place  the  mirrors in  use
position,  using  control A

A,  they will not

work for about 15 seconds.

Be  careful not to  damage  the  mirrors
when using control A

A.

P

A

L

N

R

LEO-014B

-------------------------------------------------------------------------------------------------------------------------------------------------------------

-------------------------------------------------------------------------------------------------------------------------------------------------------------

2.58

–––––––––––––––––––––––––––––––––––––––––––––––––––

SEATS AND LUGGAGE COMPARTMENT

HANDLING INSTRUCTIONS

F

Frro

on

ntt s

se

ea

atts

s

The  correct adjustment of the  seats is
important for:

– reaching the controls safely and quickly

– relaxed low-fatigue body position

– m

ma

ax

xiim

mu

um

m  p

prro

otte

ec

cttiio

on

n  ffrro

om

m  tth

he

e  s

se

ea

att

b

be

elltts

s a

an

nd

d tth

he

e A

Aiirr B

Ba

ag

g S

Sy

ys

stte

em

m..

W

Wa

arrn

niin

ng

g

F

Fo

orr  tth

hiis

s  rre

ea

as

so

on

n  tth

he

e  ffrro

on

ntt  s

se

ea

atts

s

s

sh

ho

ou

ulld

d n

no

ott b

be

e p

pu

us

sh

he

ed

d tto

oo

o c

cllo

os

se

e tto

o

tth

he

e  s

stte

ee

erriin

ng

g  w

wh

he

ee

ell  o

orr  tth

he

e  iin

ns

sttrru

u--

m

me

en

ntt p

pa

an

ne

ell..

Y

Yo

ou

urr  ffe

ee

ett  s

sh

ho

ou

ulld

d  rre

em

ma

aiin

n  iin

n  tth

he

e

ffo

oo

ottw

we

ellll  w

wh

hiille

e  tth

he

e  v

ve

eh

hiic

clle

e  iis

s  iin

n

m

mo

ottiio

on

n  –

–  n

ne

ev

ve

err  rre

es

sttiin

ng

g  o

on

n  tth

he

e

iin

ns

sttrru

um

me

en

ntt p

pa

an

ne

ell o

orr s

se

ea

atts

s..

Please adjust your seat as detailed on the
next pages.  Please  also  note  the  basic
positions for  the  driver’s and  passenger
seats on this page.

D

Drriiv

ve

err’’s

s s

se

ea

att

We  recommend  that you  position  the  dri-
ver’s seat as follows:

– Set the  driver’s seat forwards/back-

wards in such a way that the pedals can
be  fully depressed  with  a  slightly
angled leg.

– Set the backrest in such a way that it is

fully against your back and that you can
reach  the  upper  point of the  steering
wheel with your arms at a slight angle.

W

Wa

arrn

niin

ng

g

N

No

o  iitte

em

ms

s  s

sh

ho

ou

ulld

d  b

be

e  k

ke

ep

ptt  iin

n  tth

he

e

ffo

oo

ottw

we

ellll,,  a

as

s  tth

he

ey

y  c

co

ou

ulld

d  b

bllo

oc

ck

k  tth

he

e

p

pe

ed

da

alls

s  iin

n  tth

he

e  c

ca

as

se

e  o

off  a

a  s

su

ud

dd

de

en

n

b

brra

ak

kiin

ng

g m

ma

an

no

oe

eu

uv

vrre

e..

Y

Yo

ou

u  w

wo

ou

ulld

d  n

no

o  llo

on

ng

ge

err  b

be

e  a

ab

blle

e  tto

o

b

brra

ak

ke

e,, c

ch

ha

an

ng

ge

e g

ge

ea

arr o

orr a

ac

cc

ce

elle

erra

atte

e!!

F

Frro

on

ntt p

pa

as

ss

se

en

ng

ge

err s

se

ea

att

We recommend that you position the front
passenger seat as follows:

– Backrest in an upright position.

– Place  the  feet in  the  footwell in  a  com-

fortable position.

– At the same time p

pu

us

sh

h tth

he

e s

se

ea

att b

ba

ac

ck

k a

as

s

ffa

arr a

as

s p

po

os

ss

siib

blle

e..

-------------------------------------------------------------------------------------------------------------------------------------------------------------

-------------------------------------------------------------------------------------------------------------------------------------------------------------

SEATS AND LUGGAGE COMPARTMENT 

–––––––––––––––––––––––––––––––––––––––––––––––––––

2.59

HANDLING INSTRUCTIONS

D

Drriiv

ve

err a

an

nd

d ffrro

on

ntt p

pa

as

ss

se

en

ng

ge

err s

se

ea

atts

s

((m

ma

an

nu

ua

all a

ad

djju

us

sttm

me

en

ntt))

1

1 –

– T

To

o m

mo

ov

ve

e s

se

ea

att b

ba

ac

ck

kw

wa

arrd

ds

s a

an

nd

d

ffo

orrw

wa

arrd

ds

Lift lever  and  move  seat.  Then  release
lever  and  move  seat further  so  that the
catch engages.

W

Wa

arrn

niin

ng

g

F

Fo

orr s

sa

affe

etty

y rre

ea

as

so

on

ns

s tth

he

e d

drriiv

ve

err’’s

s s

se

ea

att

m

mu

us

stt o

on

nlly

y b

be

e m

mo

ov

ve

ed

d b

ba

ac

ck

kw

wa

arrd

ds

s o

orr

ffo

orrw

wa

arrd

ds

s  w

wh

he

en

n  tth

he

e  v

ve

eh

hiic

clle

e  iis

s  s

stta

a--

ttiio

on

na

arry

y..

2

2 –

– A

Ad

djju

us

sttiin

ng

g b

ba

ac

ck

krre

es

stt

Take weight off backrest and turn knob by
hand.

W

Wa

arrn

niin

ng

g

D

Do

o  n

no

ott  llo

ow

we

err  tth

he

e  b

ba

ac

ck

krre

es

stt  tto

oo

o  ffa

arr

w

wh

he

en

n  o

on

n  tth

he

e  m

mo

ov

ve

e  b

be

ec

ca

au

us

se

e  tth

he

e

s

se

ea

attb

be

elltts

s a

arre

e n

no

o llo

on

ng

ge

err ffu

ulllly

y e

effffe

ec

c--

ttiiv

ve

e..

3

3 –

– A

Ad

djju

us

sttiin

ng

g llu

um

mb

ba

arr s

su

up

pp

po

orrtt*

Turning  the  wheel will arch  the  lumbar
support cushion  to  greater  or  lesser
degree.  This prevents the  fatigue  that
accompanies long journeys.

4

4 –

– A

Ad

djju

us

sttiin

ng

g s

se

ea

att h

he

eiig

gh

htt*

*

By “pumping”  the  lateral lever  the  seat
can be lifted or lowered.

L

Liiffttiin

ng

g:: Lift/pump  lever  up  from  base

position.

L

Lo

ow

we

erriin

ng

g::  Press/pump  the  lever  down

from the base position.

W

Wa

arrn

niin

ng

g

F

Fo

orr s

sa

affe

etty

y rre

ea

as

so

on

ns

s tth

he

e h

he

eiig

gh

htt o

off

tth

he

e  d

drriiv

ve

err’’s

s  s

se

ea

att  m

mu

us

stt  o

on

nlly

y  b

be

e

a

ad

djju

us

stte

ed

d  w

wh

he

en

n  tth

he

e  v

ve

eh

hiic

clle

e  iis

s  s

stta

a--

ttiio

on

na

arry

y..

B

Be

e  c

ca

arre

effu

ull  w

wh

he

en

n  a

ad

djju

us

sttiin

ng

g  tth

he

e

s

se

ea

att  h

he

eiig

gh

htt!!  C

Ca

arre

elle

es

ss

s  a

an

nd

d  u

un

nc

co

on

n--

ttrro

olllle

ed

d  a

ad

djju

us

sttm

me

en

ntt  c

ca

an

n  c

ca

au

us

se

e

iin

njju

urriie

es

s..

T

Th

he

e e

elle

ec

cttrriic

ca

all a

ad

djju

us

sttm

me

en

ntt o

off tth

he

e

s

se

ea

atts

s  w

wiillll  a

alls

so

o  ffu

un

nc

cttiio

on

n  w

wh

he

en

n  tth

he

e

iig

gn

niittiio

on

n iis

s o

offff o

orr w

wh

he

en

n tth

he

e k

ke

ey

y h

ha

as

s

b

be

ee

en

n w

wiitth

hd

drra

aw

wn

n ffu

ulllly

y..

F

Fo

orr  tth

hiis

s  rre

ea

as

so

on

n  c

ch

hiilld

drre

en

n  s

sh

ho

ou

ulld

d

n

ne

ev

ve

err  b

be

e  lle

efftt  u

un

na

atttte

en

nd

de

ed

d  iin

n  tth

he

e

v

ve

eh

hiic

clle

e..

B45-017C

-------------------------------------------------------------------------------------------------------------------------------------------------------------

-------------------------------------------------------------------------------------------------------------------------------------------------------------

2.60

–––––––––––––––––––––––––––––––––––––––––––––––––––

SEATS AND LUGGAGE COMPARTMENT

HANDLING INSTRUCTIONS

D

Drriiv

ve

err a

an

nd

d ffrro

on

ntt p

pa

as

ss

se

en

ng

ge

err s

se

ea

atts

s

((e

elle

ec

cttrriic

ca

all a

ad

djju

us

sttm

me

en

ntt))*

*

The  seats are  electrically adjusted  using
the switches A

A and B

B.

The seats can also be adjusted in this way
when the ignition is switched off.

Using  the  handwheel C

C the  llu

um

mb

ba

arr  s

su

up

p--

p

po

orrtt is set mechanically. Please also refer

to  the  description  (Pos.  3)  of the  manual
adjustment.

W

Wa

arrn

niin

ng

g

F

Fo

orr s

sa

affe

etty

y rre

ea

as

so

on

ns

s tth

he

e h

he

eiig

gh

htt o

off

tth

he

e  d

drriiv

ve

err’’s

s  s

se

ea

att  m

mu

us

stt  o

on

nlly

y  b

be

e

a

ad

djju

us

stte

ed

d  w

wh

he

en

n  tth

he

e  v

ve

eh

hiic

clle

e  iis

s  s

stta

a--

ttiio

on

na

arry

y..

B

Be

e  c

ca

arre

effu

ull  w

wh

he

en

n  a

ad

djju

us

sttiin

ng

g  tth

he

e

s

se

ea

att  h

he

eiig

gh

htt..  C

Ca

arre

elle

es

ss

s  a

an

nd

d  u

un

nc

co

on

n--

ttrro

olllle

ed

d  a

ad

djju

us

sttm

me

en

ntt  c

ca

an

n  c

ca

au

us

se

e

iin

njju

urriie

es

s..

T

Th

he

e e

elle

ec

cttrriic

ca

all a

ad

djju

us

sttm

me

en

ntt o

off tth

he

e

s

se

ea

atts

s  w

wiillll  a

alls

so

o  ffu

un

nc

cttiio

on

n  w

wh

he

en

n  tth

he

e

iig

gn

niittiio

on

n  iis

s  s

sw

wiittc

ch

he

ed

d  o

offff  o

orr  w

wh

he

en

n

tth

he

e  k

ke

ey

y  h

ha

as

s  b

be

ee

en

n  w

wiitth

hd

drra

aw

wn

n  c

co

om

m--

p

plle

ette

elly

y..

F

Fo

orr  tth

hiis

s  rre

ea

as

so

on

n,,  c

ch

hiilld

drre

en

n  s

sh

ho

ou

ulld

d

n

ne

ev

ve

err  b

be

e  lle

efftt  u

un

na

atttte

en

nd

de

ed

d  iin

n  tth

he

e

v

ve

eh

hiic

clle

e..

S

Sw

wiittc

ch

h A

A*

*

The seat is adjusted in the corresponding
arrow direction by pressing the switch:

1

1 – Seat forwards / back

2

2 – Front seat cushion up / down

3

3 – Rear seat cushion up / down

2

2 and 3

3 at the same time – Seat up / down

B45-180C

B45-182C

-------------------------------------------------------------------------------------------------------------------------------------------------------------

-------------------------------------------------------------------------------------------------------------------------------------------------------------

SEATS AND LUGGAGE COMPARTMENT 

–––––––––––––––––––––––––––––––––––––––––––––––––––

2.61

HANDLING INSTRUCTIONS

S

Sw

wiittc

ch

h B

B*

*

The  backrest is adjusted  in  the  corre-
sponding arrow direction by pressing the
switch:

Arrow 1

1: Backrest comes forward

Arrow 2

2: Backrest moves back

W

Wa

arrn

niin

ng

g

D

Do

o  n

no

ott  h

ha

av

ve

e  tth

he

e  b

ba

ac

ck

krre

es

stt  tto

oo

o  ffa

arr

ffo

orrw

wa

arrd

d  w

wh

hiille

e  tth

he

e  v

ve

eh

hiic

clle

e  iis

s  iin

n

m

mo

ottiio

on

n  a

as

s  tth

hiis

s  m

ma

ay

y  a

affffe

ec

ctt  tth

he

e

e

effffe

ec

cttiiv

ve

en

ne

es

ss

s o

off tth

he

e s

se

ea

att b

be

elltts

s..

B45-181C

-------------------------------------------------------------------------------------------------------------------------------------------------------------


Content      ..     4      5      6      7     ..