Ferrari 456M GT and GTA (2003 year). Manual - part 8
 

  Index      Ferrari     Ferrari 456M GT and GTA (2003 year) - manual in english


Search            copyright infringement  


Content      ..     6      7      8      9     ..


Ferrari 456M GT and GTA (2003 year). Manual - part 8


H

13

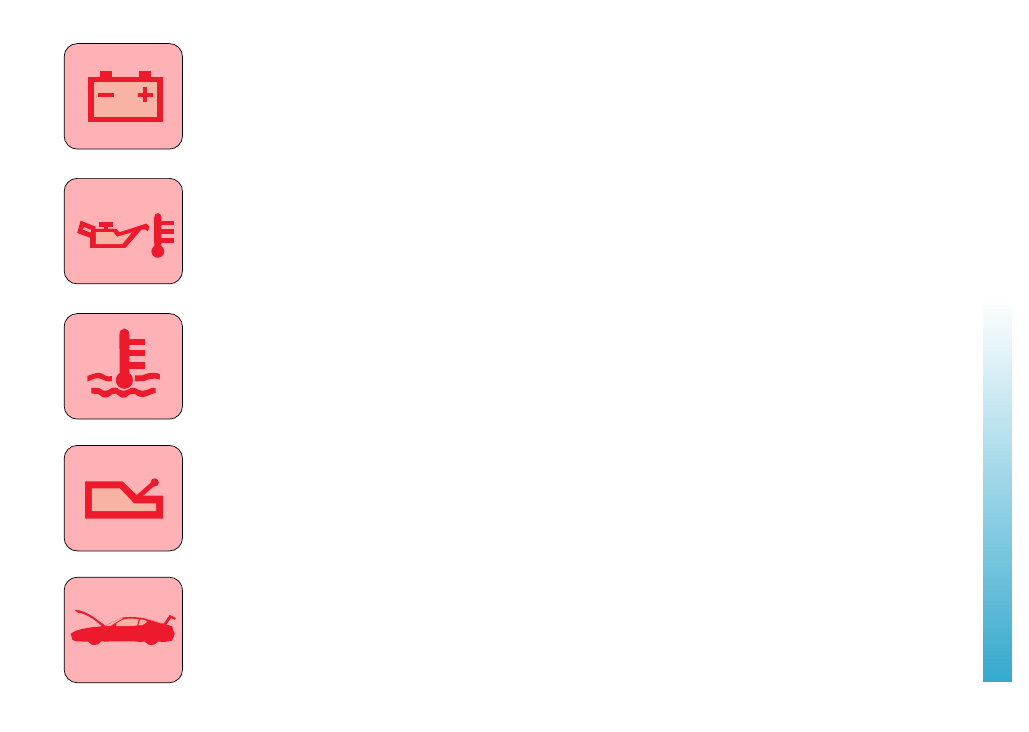
Batteria scarica
La sua accensione si ha quando:
la batteria deve essere ricaricata
oppure in presenza di un’anoma-
lia nell’impianto di generazione di
corrente.

Elevata temperatura olio
La sua accensione segnala che la
temperatura dell’olio è troppo ele-
vata ed è consigliabile ridurre il
regime di rotazione del motore.

Elevata temperatura acqua
La sua accensione segnala che la
temperatura dell’acqua  è troppo
elevata ed è necessario spegnere
immediatamente il motore.

Avaria cambio automatico

La sua accensione segnala un’ano-
malia nel sistema di gestione cam-
bio. (GTA)

Cofano motore e baule aperti

La sua accensione segnala l’aper-
tura o la non corretta chiusura del
baule e del cofano.

Down battery
When this symbol is displayed,
the following could have occurred:
the battery needs recharging or
there is a failure in the power
generating system.

High oil temperature
This symbol is displayed to sig-
nal that the oil temperature is too
high and the engine rpm should
be reduced.

High water temperature
This symbol is displayed to sig-
nal that the water temperature is
too high and the engine should
be stopped immediately.

Automatic transmission failure

This symbol is displayed to sig-
nal a failure in the transmission
management system. (GTA)

Open engine hood and luggage
compartment cover
When this symbol is displayed,
the engine hood and luggage
compartment cover are open and/
or incorrectly closed.

Batterie déchargée
Ce témoin s’éclaire dans les cas
suivants:
la batterie doit être rechargée ou
une anomalie de l’installation du
générateur de courant a été dé-
tectée.

Température d’huile excessive
Ce témoin signale que la tempé-
rature de l’huile est trop élevée.
Il convient donc de réduire le ré-
gime de rotation du moteur.

Température d’eau excessive
Ce témoin signale que la tempé-
rature de l’eau est trop élevée;
dans ce cas, il faut arrêter immé-
diatement le moteur.

Panne de boîte automatique

Ce témoin s’illumine en cas de
panne du système de gestion de
la boîte de vitesses. (GTA)

Capot avant et capot de coffre
ouverts
L’allumage de ce témoin signale
l’ouverture ou la fermeture non
correctes du capot avant et du
capot de coffre.

Batterie entladen
Dieses Symbol könnte unter folgen-
den Umständen aufleuchten: Die
Batterie muß neu geladen werden;
Fehlbetrieb des Stromalternators.

Zu hohe Öltemperatur
Leuchtet dieses Symbol auf, so
bedeutet dies, daß die Öltempera-
tur zu stark gestiegen ist und es
empfiehlt sich, die Motordrehzahl
zu drosseln.

Hohe Wassertemperatur
Leuchtet dieses Symbol  so bedeu-
tet dies, daß die Wassertemperatur
zu hoch ist und daß der Motor so-
fort abgestellt werden muß.

Fehlbetrieb des automatischen
Getriebes
Leuchtet dieses Symbol  so bedeu-
tet dies, daß im Getriebesystem ein
Fehler aufgetreten ist. (GTA)

Motor- und Kofferraum geöffnet

Wenn dieses Symbol leuchtet, so
ist eine Haube offen oder nicht
korrekt geschlossen.

-------------------------------------------------------------------------------------------------------------------------------------------------------------

H

14

Cofano baule aperto

La sua accensione segnala l’aper-
tura o la non corretta chiusura del
cofano baule.

Cofano motore aperto

La sua accensione segnala l’aper-
tura o la non corretta chiusura del
cofano motore.

Porta sinistra e destra aperte

La sua accensione segnala l’aper-
tura o la non corretta chiusura delle
porte.

Porta sinistra aperta

La sua accensione segnala l’aper-
tura o la non corretta chiusura della
porta Sx.

Porta destra aperta

La sua accensione segnala l’aper-
tura o la non corretta chiusura della
porta Dx.

Open luggage compartment
cover

When this symbol is displayed,
the luggage compartment cover
is open and/or incorrectly closed.

Open engine hood

When this symbol is displayed,
the engine hood is open and/or
incorrectly closed.

Left and right door open

When this symbol is displayed,
the doors are open and/or incor-
rectly closed.

Left door open

When this symbol is displayed,
the left door is open and/or in-
correctly closed.

Right door open

When this symbol is displayed,
the right door is open and/or in-
correctly closed.

Capot de coffre ouvert

L’allumage de ce témoin signale
l’ouverture ou la fermeture non
correctes du capot du coffre à
bagages.

Capot avant ouvert

L’allumage de ce témoin signale
l’ouverture ou la fermeture non
correctes du capot avant.

Portes gauche et droite ouver-
tes

L’allumage de ce témoin signale
l’ouverture ou la fermeture non
correctes des portes.

Porte gauche ouverte

L’allumage de ce témoin signale
l’ouverture ou la fermeture non
correctes de la porte gauche.

Porte droite ouverte

L’allumage de ce témoin signale
l’ouverture ou la fermeture non
correctes de la porte droite.

Kofferraum geöffnet

Wenn dieses Symbol leuchtet, so
ist der Kofferraum offen oder nicht
richtig geschlossen.

Motorraum geöffnet

Wenn dieses Symbol leuchtet, so
ist der Motorraum offen oder nicht
richtig geschlossen.

Rechte und linke Türen geöffnet

Wenn dieses Symbol leuchtet, so
sind die Türen offen oder nicht richtig
geschlossen.

Linke Tür geöffnet

Wenn dieses Symbol leuchtet, so
ist die linke Tür offen oder nicht
richtig geschlossen.

Rechte Tür geöffnet

Wenn dieses Symbol leuchtet, so
ist die rechte Tür offen oder nicht
richtig geschlossen.

-------------------------------------------------------------------------------------------------------------------------------------------------------------

H

15

RODAGE

Ne pas dépasser un régime de
5.000 tr/mn pendant les 1.000 pre-
miers km.

Après le démarrage, éviter de dé-
passer 4.000 tr/mn avant que le
moteur ne soit suffisamment chaud
(température de l’eau 65 

÷

 70

°

C).

Eviter de maintenir le moteur
à un régime élevé et constant
pendant une période prolon-
gée.

Avant d’utiliser la voiture pour
de longs voyages, contrôler:

– le niveau du liquide de refroidis-

sement dans le réservoir d’ex-
pansion;

– le niveau d’huile dans le réser-

voir: si celui-ci se situe au-des-
sous de la moitié entre les repè-
res “Min” et “Max”, faire l’appoint;

– la pression et l'état d’usure des

pneus;

– le niveau du liquide de freins et

d’embrayage.

Normalement, ces contrôles
doivent être effectués tous les
800 km.

EINFAHRVORSCHRIFTEN

Während der ersten 1.000 km sollte
eine Drehzahl von 5.000 U/min
nicht überschritten werden.

Drehzahlen über 4.000 U/min sind
erst bei ausreichend warmem Mo-
tor (Wassertemperatur 65 

÷

 70 

°

C)

zulässig.

Eine konstant hohe Drehzahl
nur für kurze Zeit halten.

Bei Antritt längerer Reisen ist
folgendes zu überprüfen:

– Den Kühlflüssigkeitsstand im

Ausgleichbehälter;

– Den  Ölstand im Behälter; sollte

er im Bereich der “Min.” -Kerbe
liegen, Öl nachfüllen;

– Den Fülldruck und den Ver-

schleißzustand der Reifen;

– Den Brems- und Kupplungsflüs-

sigkeitsstand.

Diese Kontrollen sollten alle
800 km durchgeführt werden.

RODAGGIO

Nei primi 1.000 km di percorso evi-
tare di superare i 5.000 giri/1 min.

Dopo l’avviamento evitare di su-
perare i 4.000 giri/1 min prima che
il motore si sia sufficientemente
riscaldato (temperatura acqua 65

÷

 70

°

C).

Evitare di mantenere il moto-
re ad un regime elevato e co-
stante per un tempo prolun-
gato.

Prima di usare la vettura per lun-
ghi viaggi controllare:

– il livello del liquido di raffredda-

mento nel serbatoio di espan-
sione;

– il livello olio nel serbatoio; se si

trova sotto la metà tra il “Min” e
il “Max” ristabilire il livello;

– la pressione dei pneumatici ed il

loro stato di usura;

– il livello liquido per freni/frizione.

E’ comunque consigliabile
eseguire questi controlli ogni
800 km.

RUNNING-IN

Do not exceed 5,000 rpm for the
first 1,000 km (600 miles).

After starting a cold engine, do not
exceed 4,000 rpm until the engine
warms up (i.e. until the water
reaches a temperature of 65 

÷

70

°

C) (150 

÷

 160

°

F).

Do not maintain high engine
speeds for prolonged periods
of time.

Perform the following checks be-
fore using the car for long jour-
neys:

– check the coolant level in the

expansion tank;

– check the oil level in the tank

and top up if it is below half be-
tween the “Min.” and “Max.”
marks;

– check tire pressures and wear;

– check the level of the brake and

clutch fluids.

It is good practice to perform
these checks every 800 km
(500 miles) in any case.

-------------------------------------------------------------------------------------------------------------------------------------------------------------

H

16

E

F

C

G

D

A

B

H 0503

H 0503

Fig. 3 - Accessori porta
A
 - Maniglia esterna apertura porta; B - Serra-
tura blocco/sblocco porta; - Maniglia interna
per apertura porte; - Bracciolo per chiusura
porte dall’interno; - Levetta per bloccaggio
serratura; - Lampada segnalatrice ingombro
porta aperta; - Plafoniera sottoporta.

Fig. 3 - Door accessories
A
 - External door release lever; - External
door lock; - Internal door release lever; -
Arm rest and door pull; - Internal door lock;
F  - Door edge light; G  - Sidewalk courtesy
light.

Fig. 3 - Accessoires de la porte
A
 - Levier extérieur;  B - Serrure de ver-
rouillage/déverrouillage de la porte; C - Le-
vier intérieur; D - Bras de fermeture de l’in-
térieur; E - Levier de verrouillage; F - Lampe
de côté; G - Lampe sous-porte.

Abb. 3 - Türbetätigungen
A
 - Äußerer Türgriff;  B - Schloß  für das
Verriegeln/Entriegeln der Tür;  C - Innerer
Türhebel;  D - Armlehne für das Schließen
der Tür von innen; E - Hebel für das Blockie-
ren des Schlosses; F - Umrißleuchte für of-
fene Tür; G - Untere Türleuchte.

PORTE

Il blocco/sblocco centralizzato è con-
sentito dall’esterno, su entrambe le
porte, mediante azionamento del ra-
diocomando oppure agendo sulle ser-
rature B.

Agendo con il radioco-
mando, con porte bloc-
cate, il vetro si abbas-
sa di circa 2 cm per un

tempo complessivo di circa 20
sec.; se trascorso questo perio-
do non vengono aperte le porte,
il vetro ritorna al 

“fine corsa

superiore”.

DOORS

The centralized door locking/
release can be made from outside
- on both doors - through the
wireless control or the relevant
locks B.

By the wireless control,
when the doors are
locked, the window
glass lowers by about

2 cm for a total time of about 20
seconds; if, after this interval,
the doors aren’t opened, the win-
dow goes back to the “

upper

threshold”.

PORTES

Le verrouillage/déverrouillage cen-
tralisé des portes de l’extérieur est
possible en manoeuvrant la com-
mande à distance ou les serrures
B.

Lors de l’actionnement
de la commande à dis-
tance, avec les portes
verrouillées, la glace

baisse d’environ 2 cm pendant
environ 20 secondes; ce délai
écoulé, si le portes ne peuvent
pas  être ouvertes, la glace re-
vient à la 

“butée supérieure”.

TÜREN

Die Zentralverriegelung-/-entriege-
lung ist von außen auf beiden Tü-
ren über Betätigen der Fernsteue-
rung oder über die entsprechen-
den Schlösser B möglich.

Durch Betätigen der
Fernsteuerung geht bei
blockierten Türen die
Scheibe um ca. 2 cm

nach unten und bleibt etwa 20
sec in dieser Stellung. Sollte
nach Ablauf dieser Zeit die Tü-
ren nicht geöffnet werden, so
kehrt die Scheibe bis zum 

“obe-

ren Endanschlag” zurück.

ATTENTION

ACHTUNG

WARNING!

WARNING!

ATTENZIONE

ATTENZIONE

-------------------------------------------------------------------------------------------------------------------------------------------------------------

H

17

Con le porte

 “sbloccate” 

se si aziona

la maniglia esterna A oppure la ma-
niglia interna C per apertura porta, il
vetro si abbassa di circa 2 cm; richiu-
dendo la porta il vetro ritorna al 

“fine

corsa superiore”

.

Dall’interno della vettura, con le por-
te chiuse, è possibile eseguire il bloc-
caggio/sbloccaggio centralizzato,
azionando la levetta 

“LOCK”

 E posta

nella maniglia interna per apertura
portiera.

Azionando una delle maniglie, senza
aprire la porta, il vetro scende di 2 cm
ma dopo 10 sec., se non si procede
all’apertura della porta, il cristallo ri-
sale al 

“fine corsa superiore”

.

Luci porte

Le porte sono dotate di una luce
rossa F per segnalarne l’apertura e
una luce bianca G per l’illuminazione
della zona di accesso all’interno del-
la vettura.
Entrambe le luci si accendono auto-
maticamente all’apertura delle por-
te.

With

 “released” 

doors, if the outer

lever  A or the inner lever C for
door release are operated, the win-
dow lowers by about 2 cm; until
the “preset threshold”; closing the
door, the window goes back to the

“upper threshold”

.

From inside the car, with closed
doors, the centralized locking/re-
lease can be operated by the lever

“LOCK”

 E inside the door arm rest.

Operating either lock, without open-
ing the door, the window lowers by
2 cm; but if the door isn’t opened
within 10 seconds, the window lifts
again until the 

“upper threshold”

.

Door lights

The doors have a red light F
signaling the door opening and a
white light  G for lighting the door
sill.

Both lights are operated simulta-
neously in case of door opening.

Lorsque les portes sont déver-
rouillées, si l’on agit sur le levier
extérieur  A ou sur la poignée inté-
rieure C, la glace baisse d’environ 2
cm, tandis que lors de la fermeture
de la porte, la glace revient à la butée
supérieure.
De l’intérieur de la voiture, avec
les portes fermées, le verrouillage/
déverrouillage centralisé est pos-
sible en agissant sur le levier

“LOCK”

  E situé sur le levier inté-

rieur de la porte.

Si l’on actionne l’un des leviers
sans ouvrir la porte, la glace baisse
d’environ 2 cm, mais, après 10 se-
condes, si la porte n’est pas
ouverte, la glace monte jusqu’à la
butée supérieure.

Lampes des portes

Les portes sont dotées d’une lampe
rouge  F, qui en signale l’ouver-
ture, et d’une lampe blanche  G,
pour l’éclairage de la zone d’ac-
cès à l’intérieur de la voiture.
Les deux lampes s’illuminent auto-
matiquement lors de l’ouverture des
portes.

Mit

  “entblockten” 

Türen geht die

Scheibe bei Betätigung des äußeren
Hebels A oder des inneren Hebels C
für das Öffnen der Tür um ca. 2 cm
nach unten, und nach Schließen der
Tür geht die Scheibe zum

  “oberen

Anschlag” 

zurück.

Bei geschlossenen Türen hat man
aus dem Innern des Fahrzeuges die
Möglichkeit, durch Betätigung des
Hebels mit der Aufschrift “

LOCK

” E in

der inneren Armlehne für das Öffnen
der Türen die Zentralverriegelung zu
betätigen.
Durch Betätigung eines Hebels, ohne
die Tür zu öffnen, sinkt die Fenster-
scheibe um ca. 2 cm, aber falls die
Tür binnen 10 sec nicht geöffnet wird,
geht die Scheibe wieder bis zum

oberen Anschlag

” hoch.

Türlichter

An den Türen ist eine rote Leuchte
F angebracht, die meldet, daß die
Tür geöffnet ist, und ein weißes
Licht  G, das die Zutrittszone im
Fahrzeug erhellt.
Beide Lampen gehen automatisch
an, wenn die Tür geöffnet wird.

ALZACRISTALLI

ELETTRICI

Il funzionamento degli alza-
cristalli viene attivato con la
chiave di accensione in posi-
zione “II”.

LEVE-GLACES
ELECTRIQUES

Le fonctionnement des lève-
glaces est validé lorsque la
clé se trouve dans la position
“II”.

ELEKTRISCHE

FENSTERHEBER

Der Betrieb der Scheiben-
mechanik ist aktiv, wenn der
Zündschlüssel auf “II” steht
bzw.

ELECTRIC

WINDOW CONTROLS

The electric window controls
are operated when the igni-
tion key is in position “II”.

-------------------------------------------------------------------------------------------------------------------------------------------------------------

H

18

A

B

H 0547

Fig. 4 - Interruttori alzacristalli

A - Pulsante comando alzacristallo lato pilo-
ta;  B - Pulsante comando alzacristallo lato
passeggero.

Fig. 4 - Window control push buttons

A - Driver’s side window push button; B  -
Passenger’s side window push button.

Fig. 4 - Boutons lève-glaces

A - Bouton côté conducteur; B - Bouton côté
passager.

Abb. 4 - Schalter für Fensterheber

A - Schalter für Fahrerseite; B - Schalter für
Beifahrerseite.

I pulsanti per l’azionamento degli
alzacristalli porte sono posizionati
sul tunnel centrale (Fig. 4).
Utilizzando l’apposito pulsante  A
è consentita la movimentazione 

au-

tomatica 

manuale 

del cristallo

lato pilota.
Con porta aperta la movimentazione
del cristallo è possibile solamente
fino a 2 cm dal 

“fine corsa superiore”

,

questo per evitare che la portiera
interferisca con la guarnizione supe-
riore durante la chiusura.
Per il cristallo lato passeggero è
consentita 

“solamente”

 la movimen-

tazione manuale agendo sul pul-
sante B.

Alzacristallo porta lato pilota

– La salita e/o discesa del cristal-

lo è comandata dal pulsante A.

The window control push buttons
are placed on the central tunnel
(Fig. 4).
Using the suitable push button A
the driver’s side window can be
moved 

manually 

or 

automatically

.

When the door is open, the win-
dow can be moved only to 2 cm
from the 

“upper threshold”

, to avo-

id any interference with the upper
weatherstrip during door closing.

The passenger’s side window can
be operated

  “only” 

manually by

push button B.

Driver’s side window control

– Press push button A to operate

the driver’s side window.

Les boutons de commande des
lève-glaces se trouvent sur le tun-
nel central (Fig. 4).
Le bouton spécial A permet la ma-
noeuvre 

manuelle 

ou 

automatique

de la glace côté conducteur.

Avec la porte ouverte, la glace peut
être manoeuvrée uniquement jus-
qu’à 2 cm de la 

“butée supérieu-

re”

, ce qui empêche l’interférence

de la porte avec le joint supérieur
lors de la fermeture.
La glace côté passager peut être
manouvrée

 “uniquement” 

de façon

manuelle en agissant sur le bou-
ton B.

Lève-glace porte côté conducteur

– La montée et/ou descente de la

glace est commandée par le bou-
ton A.

Die Fensterheberschalter befinden
sich auf dem Mitteltunnel (Abb. 4).

Über die eigens dafür vorgesehe-
nen Schalter A kann die fahrersei-
tige Scheibe 

automatisch 

oder

manuell

 betätigt werden.

Bei geöffneter Tür ist die Betätigung
der Scheibe nur bis ca. 2 cm vom

“oberen Anschlag”

 möglich; auf die-

se Weise wird vermieden, daß die
Tür während des Schließens mit der
oberen Dichtung in Berührung kommt.
Für die beifahrerseitige Scheibe ist

“nur” 

die manuelle Betätigung  über

den Schalter B möglich.

Fensterheber Fahrertür

– Die Fenster lassen sich durch

Schalter A öffnen und schließen.

-------------------------------------------------------------------------------------------------------------------------------------------------------------

H

19

– There is no need to hold the

push button. Lifting and lower-
ing movements continue auto-
matically.

– You can stop window movement

at any point by pressing push
button A again.

– To move the window up to the

wished position, press on the
push button A continuously.

Passenger’s side window control

– The passenger’s side window can

be operated by means of push
button B.

– Simply release the push button

to stop the window.

Improper use of the
power windows can be
dangerous. Before us-
ing them, always en-

sure that they are clear of per-
sons or objects.

Use caution when the driver’s
seat window is being opened or
closed automatically.

To protect a passenger
remaining alone in the
car from any acciden-
tal movement of the

windows, always remove the key
from the ignition.

– Une légère pression sur le bou-

ton permet la montée ou la des-
cente qui, ensuite, s’effectuera
automatiquement.

– Lorsque l’on appuie une deuxiè-

me fois sur le bouton A, la glace
s’arrête à la position voulue.

– Pour amener une glace dans

la position voulue, la pression
sur le bouton doit être conti-
nue.

Lève-glace porte côté passager

– La montée et/ou la descente de

la glace peuvent être comman-
dées par le bouton B.

– La glace s’arrête  à la position

désirée lorsqu'on relâche le bou-
ton.

Une mauvaise utilisa-
tion des lève-glaces
électriques peut s’avé-
rer dangereuse. Tou-

jours tenir à distance de sécu-
rité les personnes ou objets
avant de les actionner.

Faire particulièrement attention
lorsque l’opération de lève-glace
automatique s’effectue côté con-
ducteur.

Pour  éviter au passa-
ger resté dans la voi-
ture toute manoeuvre
accidentelle des lève-

glaces,  ôter toujours la clé du
bloc de démarrage.

– Den Schalter leicht antippen, das

Öffnen bzw. Schließen läuft dann
automatisch weiter.

– Durch weiteren Druck auf den

Schalter  A  hält das Fenster in
der gewünschten Stellung.

– Damit die Scheibe die ge-

wünschte Position erreicht,
muß man kontinuierlich auf
den Schalter drücken.

Fensterheber Beifahrerseite

– Das Fenster kann durch Schal-

ter B geöffnet oder geschlossen
werden.

– Beim Loslassen des Schalters

bleibt das Fenster in der ge-
wünschten Stellung stehen.

Der unsachgemäße Ge-
brauch der Fensterhe-
ber kann Gefahrensitua-
tionen verursachen.

Vergewissern Sie sich vor der Be-
tätigung stets, daß sich Perso-
nen und Sachgegenstände in si-
cherem Abstand befinden.
Besondere Vorsicht ist bei der
automatischen Betätigung des
Fensterhebers auf der Fahrersei-
te erforderlich.

Um die unbeabsichtig-
te Betätigung der Fen-
sterheber durch den im
Auto verbliebenen Bei-

fahrer zu vermeiden, den Zünd-
schlüssel aus dem Zündschloß
abziehen.

– È sufficiente una leggera pres-

sione sul pulsante per iniziare la
salita o discesa che poi, prose-
gue automaticamente.

– Il cristallo, si arresta nella posi-

zione voluta con una seconda
pressione sul pulsante A.

– Per condurre il cristallo fino

alla posizione desiderata, la
pressione deve essere conti-
nua.

Alzacristallo porta lato passeggero

– La salita e/o discesa del cristal-

lo è comandata dal pulsante B.

– Il cristallo si arresta nella posi-

zione desiderata eliminando la
pressione sul pulsante.

L’uso improprio degli
alzacristalli elettrici può
essere pericoloso. As-
sicurarsi sempre prima

dell’azionamento che persone o
cose siano a distanza di sicu-
rezza.

Fare particolare attenzione du-
rante l’azionamento automatico
dell’alzacristallo lato pilota.

Per salvaguardare dal-
l’azionamento acciden-
tale degli alzacristalli,
il passeggero rimasto

in vettura, togliere sempre la
chiave dal blocchetto di avvia-
mento.

ATTENTION

ACHTUNG

ACHTUNG

WARNING!

WARNING!

ATTENZIONE

ATTENTION

ACHTUNG

ACHTUNG

WARNING!

WARNING!

ATTENZIONE

-------------------------------------------------------------------------------------------------------------------------------------------------------------

H

20

3

2

1

0

LEVIERS

DE VOLANT

Levier de feux extérieurs

Lorsque la clé de contact est sur
“II”, le levier de commande des
feux extérieurs assure les fonctions
suivantes:

Position 0

Tirer le levier vers le volant: les feux
des appels de phare sont actionnés.

Position 1

En tournant la bague en position
1, le tableau de bord, les feux de
position avant et arrière et les feux
de la plaque d’immatriculation s’il-
luminent simultanément.

LEVE

AL VOLANTE

Leva per luci esterne

Con la chiave di avviamento in po-
sizione  “II” la leva di comando il-
luminazione esterna può effettua-
re le seguenti funzioni:

Posizione 0

Tirando la leva verso il volante si
azionano le luci per il lampeggio.

Posizione 1

Girando la ghiera in posizione 1,
contemporaneamente si illumina-
no il quadro strumenti, le luci di
posizione anteriori e posteriori e le
luci targa.

LEVERS ON

THE STEERING WHEEL

Lever for outside lights

With the ignition key in the “II”
position, the light switch operates
as follows:

Position 0

Pull the lever towards the steering
wheel to flash the lights.

Position 1

Turn the knob to position 1 to illu-
minate the instrument panel and
switch on the front and rear posi-
tion lights and license plate lights.

HEBEL

AM LENKRAD

Außenlichterhebel

Bei eingeschalteter Zündung  “II”
kann der Lichthebel in folgende
Funktionspositionen gebracht wer-
den:

Position 0

Beim Ziehen des Lichthebels zum
Lenkrad wird die Lichthupe betätigt.

Position 1

Beim Drehen des Lichthebels in
Position 1 werden Standlicht vorn/
hinten, Kennzeichenbeleuchtung
und Kontrolleuchte auf der Instru-
mententafel eingeschaltet.

H 0505

H 0416

Fig. 5 - Leva di commutazione luci ester-
ne.

Fig. 5 - Light switch lever.

Fig. 5 - Levier de commande des feux
extérieurs.

Abb. 5 - Außenlichterhebel.

-------------------------------------------------------------------------------------------------------------------------------------------------------------

H

21

S

D

Posizione 2

Ruotando la ghiera in posizione 2,
si ha l’accensione delle luci anab-
baglianti.
Tirando la leva verso il volante, si
azionano le luci abbaglianti e la
relativa spia di controllo (Fig. 2  -
rif. 9) sul quadro strumenti.

Posizione 3

Spingendo la leva in avanti si ot-
tiene l’accensione contemporanea
delle luci anabbaglianti e abbaglian-
ti. Sul quadro strumenti si illumina
la spia di controllo (Fig. 2 rif. 9).

Leva per indicatori di direzione

- svolta a destra.
- svolta a sinistra.

Position 2

Turn the knob to position 2 to switch
on the low beams.

Pulling the lever towards the steer-
ing wheel, the high beams are
switched on, with the relevant in-
dicator (9, Fig. 2) on the instru-
ment panel.

Position 3

Push the lever forwards to switch
on the high beams and the low
beams and the relevant indicator
(9, Fig. 2) on the instrument panel.

Lever for direction indicators

D - right turn.
S - left turn.

Position 2

Lorsque la bague est placée en
position 2, les feux de croisement
s’illuminent.
Lorsque l’on tire le levier vers le
volant, les feux de croisement et
les feux de route s’illuminent. Le
témoin correspondant (Fig. 2 - réf.
9) situé sur le tableau de bord s'il-
lumine.

Position 3

Lorsque l’on pousse le levier vers
l'avant, les feux de croisement et de
route et le témoin correspondant
(Fig. 2 - réf. 9) sur le tableau de bord
s’illuminent.

Levier des clignotants

D - virage à droite.
S - virage à gauche.

Position 2

Beim Drehen des Knopfes in Posi-
tion 2 wird das Abblendlicht einge-
schaltet.
Beim Ziehen des Lichthebels zum
Lenkrad, werden Fernlicht und ent-
sprechende Kontrollleuchte (Abb.
2 - Pos. 9) auf der Instrumententa-
fel eingeschaltet.

Position 3

Beim Drücken des Lichthebels zum
Armaturenbrett werden Fernlicht und
die Kontrolleuchte Abblendlicht (Abb.
2 - Pos. 9) auf der Instrumententafel
eingeschaltet.

Richtungsanzeigerhebel

D - Blinker rechts.
S - Blinker links.

H 0532

Fig. 6 - Leva comando indicatori di dire-
zione.

Fig. 6 - Direction indicator control lever.

Fig. 6 - Levier de commande des cligno-
tants.

Abb. 6 - Richtungsanzeigerhebel.

-------------------------------------------------------------------------------------------------------------------------------------------------------------

H

22

I

II

0

A

B

C

D

Gli indicatori di direzio-
ne funzionano solo con
chiave di accensione in
posizione “II”.

Contemporaneamente all’aziona-
mento della leva, nel quadro stu-
menti si illuminano, ad intermitten-
za, le relative spie (Fig. 2, rif. 9).
Il ritorno della leva nella posizione
centrale si ottiene riportando il vo-
lante in posizione di marcia rettili-
nea.

Leva comando tergicristallo e
lavacristallo

Il suo funzionamento avviene con
chiave di accensione in posizione
“II”.

The direction indicators
operate only when the
ignition key is in posi-
tion “II”.

While the lever is operated, the
relevant indicators (9,  Fig.  2) on
the instrument panel switch on and
flash.
The lever returns to the middle
when the steering wheel is placed
in straight ahead position.

Windscreen wiper/washer lever

With the ignition key in “II”, the
windscreen wiper/washer lever can
have the following positions.

Les clignotants ne
fonctionnent qu’avec la
clé de contact en posi-
tion “II”.

Lors de l’actionnement du levier,
les indicateurs relatifs (Fig. 2 - réf.
9) sur le tableau de bord commen-
cent à clignoter.
Le retour du levier dans la position
centrale est réalisé en tournant le
volant dans la position de marche
rectiligne.

Levier de commande d’essuie/
lave-glace

L’essuie/lave-glace peut être ac-
tionné en plaçant la clé de contact
dans la position “II”.

Die Richtungsanzeiger
sind nur aktivierbar,
wenn der Zündschlüs-
sel in die Position “II”

gedreht wird.

Mit der Betätigung des Hebels blin-
ken in der Instrumententafel die
entsprechenden Leuchten (Abb. 2
- Pos. 9).
Die Rückstellung des Hebels in die
mittlere Stellung erfolgt automa-
tisch, wenn man das Lenkrad wie-
der in die Stellung für Geradeaus-
fahrt dreht.

Schalthebel für Scheibenwisch-
und -waschanlage

Der Betrieb des Hebels ist aktiv, wenn
der Zündschlüssel in Position “II”
steht.

Fig. 7 - Leva tergicristallo/lavacristallo.

Fig. 7 - Windscreen wiper/washer lever.

Fig. 7 - Levier d’essuie/lave-glace.

Abb. 7 - Schalthebel für Scheibenwisch-
und -waschanlage.

H 0507

ATTENTION

ACHTUNG

WARNING!

WARNING!

ATTENZIONE

ATTENZIONE

-------------------------------------------------------------------------------------------------------------------------------------------------------------

H

23

- tergicristallo fermo.
- funzionamento intermittente.

- funzionamento a bassa velocità.
- funzionamento alta velocità.

In posizione B  (intermittenza)  è
possibile aumentare la frequenza
delle  “battute” ruotando la ghiera
posta sulla leva.
In posizione A tirando la leva ver-
so il volante si aziona il lavacristallo.

Il getto d’acqua sul parabrezza ces-
sa qualora venga rilasciata la leva.
Il tergicristallo funzionerà per al-
cune “battute” poi si arresterà.

- windscreen wiper stopped;
- intermittent operation;

- low speed operation;
- high speed operation.

With the lever in position (inter-
mittent), you can increase wipe fre-
quency by turning the knob on the
end of the lever.
With the lever in position A, pull it
towards the steering wheel to op-
erate the windshield washer.
The wash spray stops as soon as
the lever is released.
The wash function also operates
the wipers for a few strokes.

- essuie-glace arrêté.
- fonctionnement intermittent.

- fonctionnement à basse vitesse.
- fonctionnement à haute vitesse.

En position (mouvement intermit-
tent), la fréquence des “battements”
peut être augmentée en tournant la
bague située sur le levier.
En position A, lorsque l’on tire le
levier vers le volant, le lave-glace
est activé.
Le jet d’eau sur le pare-brise cesse
dès que l’on relâche le levier.
L’essuie-glace effectuera encore
quelques battements puis s’arrêtera.

- Scheibenwischer steht still.
- Scheibenwischer funktioniert in-

termittierend.

- Scheibenwischer läuft langsam.
- Scheibenwischer läuft schnell.

In Position B (Intervallwischen) kann
durch Drehen des sich am Hebel
befindlichen Knopfes des Schaltrings
die Frequenz verändert werden.
In Position A wird durch Ziehen
des Hebels zum Lenkrad die
Waschanlage betätigt.
Die Waschdüsen stoppen bei Los-
lassen des Hebels.
Die Wischer arbeiten noch einige
Male und stoppen dann ebenfalls.

PULSANTI

LUCI ESTERNE

Luci di emergenza

Premendo il pulsante A (Fig. 8), indi-
pendentemente dalla posizione del-
la chiave di avviamento, entrano con-
temporaneamente in funzione, a luce
pulsante, tutti gli indicatori di direzio-
ne e le spie (Fig. 2 rif. 9) poste nel
quadro strumenti.
Per disattivare le luci di emergen-
za, premere nuovamente il pulsante
A.

OUTSIDE LIGHTS

PUSH BUTTON

Hazard warning lights

Press push button A (Fig. 8) to
operate the hazard warning lights.
All the direction indicators and
warning lights on the instrument
panel (Fig. 2) flash. The hazard
warning lights can be switched on
regardless of ignition key position.
Press push button A again to switch
the hazard warning lights off.

BOUTONS

DE FEUX EXTERIEURS

Feux de détresse

Lorsque l’on appuie sur le bouton A
(Fig. 8), indépendamment de la posi-
tion de la clé de contact, tous les
clignotants et les indicateurs (Fig. 2 -
réf. 9) situés sur le tableau de bord
commencent à clignoter.

Afin d'éteindre les feux de détresse,
appuyer de nouveau sur le bouton
A.

SCHALATER

DER AUSSENLICHTER

Warnblinkanlage

Beim Druck von  Schalter A (Abb.
8) schalten sich unabhängig von
der Zündschlüsselposition alle Blin-
ker und die Kontrolleuchten (Abb.
2 - Pos. 9) der Instrumententafel
ein.

Zur Ausschaltung der Warnblink-
anlage den Schalter A erneut be-
tätigen.

-------------------------------------------------------------------------------------------------------------------------------------------------------------

H

24

B

A

H 0506

Fig. 8 - Pulsante per luci di emergenza.

Fig. 8 - Hazard warning light push button.

Fig. 8 - Bouton de feux de détresse.

Abb. 8 - Warnblinkschalter.

Fig. 9 - Pulsante per luci fendinebbia.

Fig. 9 - Fog light push button.

Fig. 9 - Bouton pour feux antibrouillard
arrière.

Abb. 9 - Schalter für Nebelleuchten.

Luci fendinebbia

Agendo sul pulsante B (Fig. 9) po-
sto sulla consolle centrale, si ac-
cendono le luci fendinebbia, con
le luci anabbaglianti inserite.

Fog lights

By the push button B (Fig. 9) placed
on the central control panel, the
fog lights are switched on with op-
erating low headlights.

Feux antibrouillard

L’interrupteur  B (Fig. 9) situé sur
la console centrale, permet, avec
les feux de croisement allumés,
d’allumer également les feux anti-
brouillard arrière.

Nebelleuchten

Über den Schalter B  (Abb.  9) auf
der Mittelkonsole gehen bei ein-
geschalteten Abblendlichtern, die
Nebelleuchten an.

H 0548

-------------------------------------------------------------------------------------------------------------------------------------------------------------

H

25

C

When the ignition key is turned to
“0”, they are switched off and do
not operate at the next switching
on.

Light switching on is signaled by
the relevant indicator on the in-
strument panel.

Parking lights

If you wish to park the car with
switched-on position lights, press
the push button C placed on the
central tunnel.
Light switching on is signaled by
the relevant indicator on the in-
strument panel.
To switch lights off, use switch C
again.

Quando si ruota la chiave di ac-
censione in posizione “0”, si di-
sinseriscono e non si reinserisco-
no al successivo avviamento.

L’inserimento delle luci viene se-
gnalato dall’accensione della spia
posta nel quadro strumenti.

Luci di parcheggio

Se si desidera lasciare la vettura
in sosta con le luci di posizione
inserite, premere il pulsante C po-
sizionato sul tunnel centrale.
Il loro inserimento viene segnalato
dall’accensione della spia posta nel
quadro strumenti
Per spegnere le luci agire nuova-
mente sul pulsante C.

H 0536

Lorsque l’on tourne la clé de con-
tact dans la position “0”, les feux
sont éteints et il n’est pas possible
de les rallumer en cas de nouvel
démarrage.
L’allumage des feux est signalé par
l’allumage du témoin correspondant
situé sur le tableau de bord.

Feux de stationnement

En cas de stationnement avec les
feux de position allumés, presser
le bouton C situé sur le tunnel cen-
tral.
L’allumage des feux est signalé par
l’allumage du témoin correspondant
sur le tableau de bord.
Pour éteindre les feux, agir à nou-
veau sur le bouton C.

Wenn man den Zündschlüssel in
die Position “0” dreht, so werden
sie ausgeschaltet und beim näch-
sten Start des Motors schalten sie
sich nicht automatisch wieder ein.
Wenn die Lichter an sind, so leuch-
tet die entsprechende Anzeige im
Armaturenbrett.

Parklichter

Wenn man das Fahrzeug mit ein-
geschaltetem Standlicht stehen las-
sen will, so betätige man den Schal-
ter C im Mitteltunnel.
Diese Einschaltung wird durch die
Einschaltung des Schalters in der
Instrumententafel angezeigt.
Um die Lichter auszuschalten, wir-
ke man erneut auf den Schalter C.

Fig. 10 - Pulsante per luci di parcheggio.

Fig. 10 - Parking light push button.

Fig. 10 - Bouton pour feux de stationne-
ment.

Abb. 10 - Schalter für Parklicht.

-------------------------------------------------------------------------------------------------------------------------------------------------------------

H

26

A

COMMUTATORE A CHIAVE

Non estrarre mai la
chiave con vettura in
movimento! Il volante si
bloccherà automatica-

mente alla prima sterzata.

IGNITION SWITCH

Do not remove the ig-
nition key unless the
car is stationary! The
steering wheel will lock

at the first maneuver!

COMMUTATEUR A CLE

Ne jamais enlever la clé
si la voiture est en mou-
vement! Le volant se
bloquerait automatique-

ment à la première manoeuvre de
braquage.

ZÜNDSCHLOSS

Den Schlüssel erst ab-
ziehen, wenn das Fahr-
zeug zum Stillstand ge-
kommen ist.  Das Lenk-

rad sperrt bei der geringsten Lenk-
bewegung.

Posizione “0” - Stop
Motore spento, chiave estraibile.

Nelle le vetture GTA è
possibile estrarre la
chiave di accensione
solo con la leva del

cambio in posizione “P”.
In caso di avaria della vettura è
possibile estrarre la chiave ti-
rando verso il basso il fermo
come indicato in Fig. 11.

Key position “0” - Stop
Engine off, the key can be removed.

On GTA cars the igni-
tion key can be re-
moved only when the
transmission lever is in

position “P”.
In case of car failure, the key
can be removed pulling the lock
downwards, as shown in Fig. 11.

Position “0” - Stop
Moteur arrêté, clé amovible.

Concernant les voitures
GTA, la clé de contact
peut  être extraite uni-
quement avec le levier

de changement de vitesses dans
la position P.
En cas de pannes, la clé de con-
tact peut être extraite en tirant vers
le bas l’élément prévu à cet effet,
comme indiqué sur la Fig. 11.

Position “0” - Stop
Der Motor ist abgestellt, der Schlüs-
sel kann abgezogen werden.

In den GTA’s kann man
den Zündschlüssel nur
abziehen, wenn der
Getriebeschalthebel in

der Position “P” steht.
Im Falle eines Fehlbetriebes des
Fahrzeug kann man den Schlüs-
sel abziehen, indem man den
Halter wie in der Abb. 11 gezeigt
nach unten zieht.

GTA

0

III

II

H 0508

H 0508

Fig. 11 - Commutatore a chiave.

Fig. 11 - Ignition switch.

Fig. 11 - Commutateur à clé.

Abb. 11 - Zündschloß.

ATTENTION

ACHTUNG

WARNING!

WARNING!

ATTENZIONE

ATTENZIONE

ATTENTION

ACHTUNG

WARNING!

WARNING!

ATTENZIONE

ATTENZIONE

-------------------------------------------------------------------------------------------------------------------------------------------------------------

H

27

A chiave estratta, anche parzial-
mente, lo sterzo è bloccato.

Possono essere accese le luci di
emergenza.
Per facilitare lo sbloccaggio dello ster-
zo, mentre si effettua la rotazione
della chiave, ruotare leggermente nei
2 sensi il volante di guida.

Posizione “II” - Marcia
Portando la chiave in questa posi-
zione la multispia esegue il con-
trollo dei segnali provenienti dagli
impianti montati in vettura e, se
non riscontra anomalie si illumina
la scritta “CHECK OK”.

Posizione “III” - Avviamento

Scendendo dalla vettu-
ra, togliere sempre la
chiave dal blocchetto di
avviamento.

Non lasciare mai bambini soli in
vettura.

The steering lock is engaged as soon
as the key is drawn out, even par-
tially.
The hazard warning lights can be
switched on.
Turn the steering wheel gently in
both directions while turning the
ignition key to unlock the steering.

Key position “II” - Ignition on
By putting the key in this position,
the multi-function display checks
the different systems installed on
the car and, if no failures are de-
tected, the “CHECK OK” writing
comes on.

Key position “III” - Start

While getting off the
car, always remove the
key from the starting
device.

Never leave children alone on
the car.

Lorsque la clé est extraite, même
partiellement, la colonne de direc-
tion est verrouillée.
Les feux de détresse peuvent être
allumés.
Pour faciliter le déverrouillage de
la colonne de direction, manoeu-
vrer la clé en tournant légèrement
le volant dans les deux sens.

Position “II” - Marche
En plaçant la clé dans cette posi-
tion, l’afficheur à fonctions multiples
effectue un contrôle des signaux
émis par les systèmes dont est équi-
pée la voiture et, si aucune anoma-
lie n’est détectée, le témoin
“CHECK OK” s’illumine.

Position “III” - Démarrage

En cas d’abandon de la
voiture, enlever tou-
jours la clé du bloc de
démarrage.

Ne jamais laisser les enfants
seuls sur la voiture.

Lenkschloß rastet auch bei teilweise
abgezogenem Schlüssel ein.

Die Notblinkanlage kann einge-
schaltet werden.
Zur Entsperrung der Lenkung das
Lenkrad etwas hin- und herbewegen
und dabei den Schlüssel drehen.

Position “II” - Zündung
Dreht man den Schlüssel in diese
Position, so beginnt das Mehrfach-
leuchtendisplay die Kontrolle der von
den in das Fahrzeug montierten An-
lagen kommenden Signale und, falls
keine Fehlbetriebe festgestellt wer-
den, so leuchtet die Meldung
“CHECK OK”.

Position “III” - Anlassen

Bevor man aus dem
Fahrzeug steigt, ziehe
man immer den Schlüs-
sel aus dem Zündschloß.

Unter keinen Umständen dürfen
sich Kinder unbeaufsichtigt im
Fahrzeug aufhalten.

ATTENTION

ACHTUNG

ACHTUNG

WARNING!

WARNING!

ATTENZIONE

-------------------------------------------------------------------------------------------------------------------------------------------------------------

H

28

AVVIAMENTO DEL MOTORE

456M GTA

Si consiglia, per ragio-
ni di sicurezza, di ese-
guire l’operazione con
pedale freno premuto.

Avviamento a freddo

Procedere nel seguente modo:
– portare la leva selettrice del cam-

bio in posizione “P” oppure “N”.

– Ruotare la chiave verso la posi-

zione “III”.

– A motore avviato rilasciare la

chiave che automaticamente ri-
torna nella posizione di marcia
“II”.

– Nel caso di mancato avviamento,

riportare la chiave nella posizio-
ne “0” prima di ripetere la mano-
vra.

– Non premere a fondo sul pedale

dell’acceleratore fino a quando la
temperatura dell'olio non ha rag-
giunto almeno 65

°


÷

 70

°

C circa.

Con motore avviato, a vettura
ferma (e la leva selettrice del
cambio in posizione “P” oppu-
re “N”), evitare, in ogni caso, di
portare il motore a regimi ele-
vati per non danneggiare il cam-
bio.

ENGINE STARTING

456M GTA

For safety reasons,
start the engine keep-
ing the brake pedal de-
pressed.

Cold starting

Proceed as follows:
– put the transmission lever in po-

sition “P” or “N”.

– Turn the key towards the posi-

tion “III”.

– When the engine starts, release

the key: it goes back to the run-
ning position “II” automatically.

– If the engine doesn’t start, put

the key in position “0” before
repeating the procedure.

– Do not press the accelerator

pedal completely unless oil tem-
perature reaches at least 65

°


÷

70

°

C (149

°


÷

 158

°

F).

With engine running and the car
at a standstill (and transmission
lever in position “P” or “N”)
avoid taking the engine to too
high speeds, in order not to
damage the transmission.

DEMARRAGE DU MOTEUR

456M GTA

Pour des raisons de
sécurité, l’opération
devrait  être effectuée
avec la pédale de frein

appuyée.

Démarrage à froid

Agir de la façon suivante:
– placer le levier de sélection des

vitesses dans la position “P” ou
“N”.

– Tourner la clé vers la position

“III”.

– Lorsque le moteur a démarré,

relâcher la clé qui revient auto-
matiquement dans la position de
marche “II”.

– Si le moteur ne démarre pas,

placer à nouveau la clé dans la
position “0”, avant de répéter la
manoeuvre.

– Ne pas appuyer à fond sur la pé-

dale d’accélérateur jusqu’à tant
que la température de l’huile attei-
gne au moins 65

°


÷

 70

°

C environ.

Avec le moteur en fonction, la
voiture arrêtée (et le levier de
sélection des vitesses en posi-
tion “P” ou “N”), éviter de faire
tourner le moteur à des régi-
mes élevés, afin de ne pas en-
dommager la boîte de vitesses.

ANLASSEN DES MOTORS

456M GTA

Es wird aus Sicherheits-
gründen empfohlen,
den Vorgang bei nieder-
getretenem Bremspedal

durchzuführen.

Kaltstart des Motors

Man gehe folgendermaßen vor:
– Den Schalthebel des Getriebes

in die Position P oder N schal-
ten.

– Den Schlüssel in die Position “III”

drehen.

– Sobald der Motor gestartet ist,

lasse man den Schlüssel los, da-
mit er automatisch in die Fahrt-
position “II” übergeht.

– Im Falle eines Fehlstartes drehe

man den Schlüssel in die Positi-
on “0”, bevor man das Manöver
wiederholt.

– Man trete das Gaspedal nicht

vollständig durch, solange die
Öltemperatur nicht mindestens
ca. 65

°


÷

 70

°

C erreicht hat.

Bei laufendem Motor und ste-
hendem Fahrzeug (wenn der
Getriebeschalthebel auf “P”
oder  “N” steht) vermeide man
auf jeden Fall, daß der Motor
auf hohe Drehzahlen beschleu-
nigt wird, damit das Getriebe
nicht beschädigt wird.

ATTENTION

ACHTUNG

WARNING!

WARNING!

ATTENZIONE

ATTENZIONE

-------------------------------------------------------------------------------------------------------------------------------------------------------------


Content      ..     6      7      8      9     ..