Oldsmobile Silhouette (2004 year). Manual - part 11


  Index      Oldsmobile     Oldsmobile Silhouette (2004 year) - manual in english


Search            copyright infringement  


Content      ..     9      10      11      12     ..


Oldsmobile Silhouette (2004 year). Manual - part 11


-------------------------------------------------------------------------------------------------------------------------------------------------------------

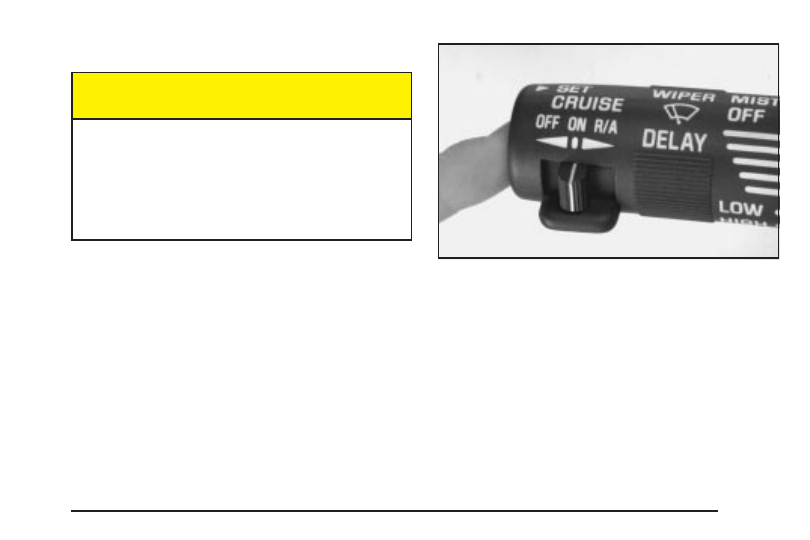
Setting Cruise Control

{

CAUTION:

If you leave your cruise control on when you
are not using cruise, you might hit a button
and go into cruise when you do not want to.
You could be startled and even lose control.
Keep the cruise control switch off until you
want to use cruise control.

1. Move the cruise control switch to ON.

2. Get up to the speed you want.

3. Press the SET button at the end of the lever and

release it.

4. Take your foot off the accelerator pedal.

3-13

-------------------------------------------------------------------------------------------------------------------------------------------------------------

-------------------------------------------------------------------------------------------------------------------------------------------------------------

Resuming a Set Speed

Suppose you set your cruise control at a desired speed
and then you apply the brake. This, of course, shuts
off the cruise control. But you do not need to reset
it. Once you are going about 25 mph (40 km/h) or more,
you can move the cruise control switch from ON to
resume/accelerate (R/A) briefly. You will go back up to
your chosen speed and stay there.

If you hold the switch at R/A, the vehicle will keep going
faster until you release the switch or apply the brake.
So unless you want to go faster, do not hold the
switch at R/A.

Increasing Speed While Using Cruise
Control

To increase your speed while using cruise control,
do one of the following:

Use the accelerator pedal to get to the higher
speed. Press the SET button at the end of the lever,
then release the button and the accelerator pedal.
You will begin to cruise at the higher speed.

Move the cruise switch from ON to R/A. Hold it
there until you get up to the speed you want,
and then release the switch. To increase your speed
in very small amounts, move the switch to R/A
briefly and then release it. Each time you do this,
your vehicle will go about 1 mph (1.6 km/h) faster.

The accelerate feature will work whether or not you have
set an initial cruise control speed.

Reducing Speed While Using Cruise
Control

To reduce your speed while using cruise control, do one
of the following:

Press the SET button at the end of the lever until you
reach the lower speed you want, then release it.

To slow down in very small amounts, press the SET
button briefly. Each time you do this, you will go
about 1 mph (1.6 km/h) slower.

3-14

-------------------------------------------------------------------------------------------------------------------------------------------------------------

-------------------------------------------------------------------------------------------------------------------------------------------------------------

Passing Another Vehicle While Using
Cruise Control

To pass another vehicle while using cruise control, use
the accelerator pedal to increase your speed. When
you take your foot off the pedal, your vehicle will slow
down to the cruise control speed you set earlier.

Using Cruise Control on Hills

How well your cruise control will work on hills depends
upon your speed, load and the steepness of the
hills. When going up steep hills, you may have to step
on the accelerator pedal to maintain your speed.
When going downhill, you may have to brake or shift to
a lower gear to keep your speed down. Of course,
applying the brake takes you out of cruise control. Many
drivers find this to be too much trouble and do not
use cruise control on steep hills.

Ending Cruise Control

To turn off the cruise control, do one of the following:

Step lightly on the brake pedal.

Move the cruise switch to OFF.

Erasing Speed Memory

When you turn off the cruise control or the ignition,
your cruise control set speed memory is erased.

3-15

-------------------------------------------------------------------------------------------------------------------------------------------------------------

-------------------------------------------------------------------------------------------------------------------------------------------------------------

Exterior Lamps

The control to the left of the steering column operates
the exterior lamps.

9

(Off/Auto): Turning the control to this setting will

activate the automatic headlamp control when it is
dark enough outside and turn off all of the lamps and
lights during the day, except the Daytime Running
Lamps (DRL).

;

(Parking Lamps): Turning the control to this

setting turns on the parking lamps together with the
following:

Sidemarker Lamps

Taillamps

Instrument Panel Lights

2

(Headlamps): Turning the control to this setting

turns on the headlamps, together with the previously
listed lamps and lights.

Lamps on Reminder

If the driver’s door is opened and you turn the ignition to
OFF or LOCK while leaving the lamps on, you will
hear a warning chime.

3-16

-------------------------------------------------------------------------------------------------------------------------------------------------------------

-------------------------------------------------------------------------------------------------------------------------------------------------------------

Daytime Running Lamps/Automatic
Headlamp System

Daytime Running Lamps (DRL) can make it easier for
others to see the front of your vehicle during the
day. DRL can be helpful in many different driving
conditions, but they can be especially helpful in the short
periods after dawn and before sunset. Fully functional
daytime running lamps are required on all vehicles
first sold in Canada.

A light sensor on top of the instrument panel makes the
DRL work, so be sure it isn’t covered. The DRL
system will make your front parking and turn signal
lamps come on in daylight when:

The ignition is on.

The exterior lamps control is off.

The parking brake is released.

When the DRL are on, only your front parking and turn
signal lamps will be on. Your instrument panel will
not be lit up.

When it is dark enough outside, the exterior lamps will
come on automatically. When it is bright enough
outside, the exterior lamps will turn off and the DRL will
turn on. Of course, you may still turn on the headlamps
any time you need to.

If you start your vehicle in a dark garage, the automatic
headlamp system will come on immediately. Once
you leave the garage, it will take approximately
one minute for the automatic headlamp system to
change to DRL if it is light outside. During that delay,
your instrument panel cluster may not be as bright
as usual. Make sure your instrument panel brightness
control is in the full bright position. See “Instrument
Panel Brightness Control” under

Interior Lamps

on page 3-18.

To idle your vehicle with the DRL and automatic
headlamp control off, set the parking brake while the
ignition is in OFF or LOCK. Then start the vehicle.
The DRL and automatic headlamp control will stay off
until you release the parking brake.

As with any vehicle, you should turn on the regular
headlamp system when you need it.

3-17

-------------------------------------------------------------------------------------------------------------------------------------------------------------

-------------------------------------------------------------------------------------------------------------------------------------------------------------

Fog Lamps

Your vehicle may have
fog lamps. If it does, the
fog lamps switch is located
in the instrument panel
switchbank. Press the
fog lamp symbol on
the switch to turn on
the lamps.

The indicator light will be lit while the fog lamps are on.
Press the top part of the switch to turn them off.

When your DRL are on, the exterior lamps control must
first be turned from the off position before the fog
lamps can be turned on.

Your parking lamps or headlamps must be on for your
fog lamps to turn on.

At night, when the light sensor automatically turns on
your headlamps, the fog lamps can be turned on
while the exterior lamps control is in any position.

Your fog lamps will go off when you switch to high
beams. Using your high beams in fog is not
recommended.

Interior Lamps

Instrument Panel Brightness

The thumbwheel for this feature is located below the
exterior lamps control. Turn the thumbwheel to the right
to brighten the lights, or to the left to dim them.

Interior Lamps Control

Turn the thumbwheel all the way to the right to turn on
the interior lamps, if the interior lamps override
switch is off. Turn the thumbwheel to the left to turn the
lamps off.

3-18

-------------------------------------------------------------------------------------------------------------------------------------------------------------

-------------------------------------------------------------------------------------------------------------------------------------------------------------

Interior Lamps Override

This switch is located in
the overhead console
switchbank. Press
the bottom of the switch to
keep the interior lamps
off while any door is open,
or the top of the switch
to allow the interior lamps
to come on while any
door is open.

Dome Lamp

The dome lamp is located in the headliner and has two
buttons to manually turn it on or off. The dome lamp
will come on each time you open a door, unless you turn
on the interior lamps override feature. See “Interior
Lamps Override” earlier in this section.

Entry Lighting

With entry lighting, the interior of your vehicle is
illuminated so that you can see inside before you enter
your vehicle. The lamps will come on for 40 seconds
if you unlock your door using your key or the remote
keyless entry transmitter and the ignition is in LOCK or
OFF. After 40 seconds have passed, the interior
lamps will slowly fade out. The lamps will turn off before
the 40 seconds if you do one of the following:

Lock all the doors using the key.

Press LOCK on the power door lock switch.

Press LOCK on the remote keyless entry
transmitter.

When any door is opened, entry lighting is cancelled.
The interior lamps will stay on while any door or
the liftgate is open, and slowly fade out when all doors
and the liftgate are closed.

The interior lamps may stay on for up to 25 seconds
after all doors have been closed if they have not been
locked. See “Delayed Lighting” following.

To turn the entry lighting feature off or on, see

Vehicle

Personalization on page 2-60.

3-19

-------------------------------------------------------------------------------------------------------------------------------------------------------------

-------------------------------------------------------------------------------------------------------------------------------------------------------------

Delayed Lighting

The delayed lighting feature will continue to illuminate
the interior for 25 seconds after all doors have been
closed, so that you can find your ignition and buckle your
safety belt at night. Delayed lighting will not occur
while the ignition is in RUN or ACCESSORY. After
25 seconds have passed, the interior lamps will slowly
fade out. The lamps will fade out before the 25 seconds
have passed if you do one of the following:

Turn the ignition to RUN or ACCESSORY.

Lock all doors using the remote keyless entry
transmitter.

Lock all doors using the power door lock switch
or the key.

To turn the delayed lighting feature off or on,
see

Vehicle Personalization on page 2-60.

Exit Lighting

With exit lighting, the interior lamps will come on for
about 25 seconds whenever you remove the key from
the ignition. If you turn the ignition key to RUN or
ACCESSORY, the lamps will fade out. The lamps will
also fade out if you lock the doors with the power
door lock switch or the remote keyless entry transmitter.

When any door is opened, exit lighting is cancelled.
The interior lamps will stay on while any door or
the liftgate is open, and slowly fade out when all doors
and the liftgate are closed.

The interior lamps may stay on for up to 25 seconds
after all doors have been closed if they have not been
locked. See “Delayed Lighting” earlier in this section.

To turn the exit lighting feature off or on, see

Vehicle

Personalization on page 2-60.

3-20

-------------------------------------------------------------------------------------------------------------------------------------------------------------

-------------------------------------------------------------------------------------------------------------------------------------------------------------

Front Reading Lamps

There are two reading lamps in the overhead console.
To turn either reading lamp on or off, press the lens of the
lamp. These lamps will come on each time you open a
door, unless you turn on the interior lamps override
feature. See “Interior Lamps Override” earlier in this
section.

3-21

-------------------------------------------------------------------------------------------------------------------------------------------------------------

-------------------------------------------------------------------------------------------------------------------------------------------------------------

Rear Reading Lamps

There may be two reading lamps in the third row
headliner. To turn either reading lamp on or off, press
the lens of the lamp.

There is also a reading lamp in the second row,
integrated with the dome lamp. To turn the second row
reading lamp on or off, press the button next to the
lamp lens.

Rear reading lamps will not turn on if the interior lamps
override switch is on. See “Interior Lamps Override”
earlier in this section.

Cargo Lamp

The cargo lamp is located in the rear of your vehicle,
above the liftgate opening, and does not have a switch.
The cargo lamp will come on each time you open a
door, unless you turn on the interior lamps override.
See “Interior Lamps Override” earlier in this section.

Battery Run-Down Protection

Your vehicle has a feature to help prevent you from
draining the battery, in case you accidentally leave the
interior lamps on. If you leave any interior lamps on while
the ignition is in LOCK or OFF, they will automatically turn
off after 10 minutes. The lamps will not come back on
again until you do one of the following:

Turn the ignition to RUN or ACCESSORY.

Turn the interior lamps thumbwheel all the way
to the right, then slightly back to the left.

Open a closed door, or close and reopen a door.

If your vehicle has less than 15 miles (25 km) on
the odometer, the battery saver will turn off the
lamps after only three minutes.

3-22

-------------------------------------------------------------------------------------------------------------------------------------------------------------

-------------------------------------------------------------------------------------------------------------------------------------------------------------

Switchbanks

There are two sets of switchbanks located in the front of
the vehicle. The switches will vary with the options
that are on your vehicle.

Instrument Panel Switchbank

The instrument panel switchbank is located in the
instrument panel below the comfort controls.

This switchbank may contain the following:

Rear Fan Knob. See

Rear Climate Control System

(Without Entertainment System) on page 3-34 or
Rear Climate Control System (With Entertainment
System) 
on page 3-36.

Rear Window Wiper/Washer Switch.
See “Rear Window Wiper/Washer” under
Turn Signal/Multifunction Lever on page 3-8.

Fog Lamps Switch. See

Exterior Lamps

on page 3-16.

Traction Control Switch. See

Traction Control

System (TCS) on page 4-8.

Heated Seats Switches. See

Heated Seats

on page 1-5.

If your vehicle does not have one of these options,
there will be a blank.

If your vehicle is not equipped with the optional rear
climate control system, there will be a storage space in
this switchbank. The rubber mat can be removed for
cleaning. Snap the mat into place after cleaning.

3-23

-------------------------------------------------------------------------------------------------------------------------------------------------------------

-------------------------------------------------------------------------------------------------------------------------------------------------------------

Overhead Console Switchbank

The overhead console switchbank is located in the
overhead console. This switchbank may include
the following:

Interior Lamps Override. See “Interior Lamps
Override” under

Interior Lamps on page 3-18.

Power Sliding Door(s)/Override Switch(es).
See

Power Sliding Door (PSD) on page 2-17.

Power Rear Quarter Windows. See

Power Rear

Quarter Windows on page 2-25.

Ultrasonic Rear Parking Aid (URPA) Disable
Switch. See

Ultrasonic Rear Parking Assist (URPA)

on page 3-24.

If your vehicle does not have some of these options,
there will be a blank.

Ultrasonic Rear Parking
Assist (URPA)

The Ultrasonic Rear Parking Assist (URPA) system is
designed to help you park, while the vehicle is in
REVERSE (R). It operates only at very low speeds, less
than 3 mph (5 km/h). URPA can help make parking
easier and to help you avoid colliding with objects such as
parked vehicles. The URPA system can detect objects up
to 5 feet (1.5 m) behind the vehicle, and tell you how
close these objects are from your rear bumper.

Your vehicle’s URPA operates when the shift lever is
moved into REVERSE (R) and the vehicle speed is less
than 3 mph (5 km/h). Four ultrasonic sensors located at
the rear bumper are used to detect the distance to the
object. The URPA display is located inside the vehicle,
near the rear window. It has three color-coded lights used
to provide distance and system information to the driver.

3-24

-------------------------------------------------------------------------------------------------------------------------------------------------------------

-------------------------------------------------------------------------------------------------------------------------------------------------------------

{

CAUTION:

Even with the Ultrasonic Rear Park Assist
system, the driver must check carefully before
backing up. The system does not operate above
typical backing speeds of 3 mph (5 km/h) while
parking. And, the system does not detect
objects that are more than 5 feet (1.5 meters)
behind the vehicle.

So, unless you check carefully behind you
before and when you back up, you could strike
children, pedestrians, bicyclists or pets behind
you, and they could be injured or killed.

Whether or not you are using Rear Park Assist,
always check carefully behind your vehicle
before you back up and then watch closely
as you do.

URPA can be turned off by
pressing the rear park aid
disable switch located
in the overhead console
switchbank. While the
system is disabled,
an indicator light will be lit
on the switch. You will
not see any lights on the
rear display if the switch
is in the off position.

How the System Works

Unless disabled, the URPA will turn on automatically
when the shift lever is moved into REVERSE (R). When
the system turns on, the three lights on the display
will illuminate for one and a half seconds to let you know
that the system is working. If your vehicle is moving in
REVERSE (R) at a speed greater than 3 mph (5 km/h),
the red light will flash to remind you that the system
does not work at speed greater than 3 mph (5 km/h).

3-25

-------------------------------------------------------------------------------------------------------------------------------------------------------------

-------------------------------------------------------------------------------------------------------------------------------------------------------------

If an object is detected at a REVERSE (R) speed of
less than 3 mph (5 km/h), one of the following will occur:

Description

English

Metric

amber light

5 ft.

1.5 m

amber/amber lights

40 in.

1.0 m

amber/amber/red lights

& continuous chime

20 in.

0.5 m

amber/amber/red

lights flashing &

continuous chime

1 ft

0.3 m

A chime will sound the first time an object is detected
between 20 inches (0.5 m) and 5 feet (1.5 m) away.

URPA cannot detect objects that are above liftgate level.
In order for the rear sensors to recognize an object, it
must be within detection range behind the vehicle.

When the System Does Not Seem to Work
Properly

The light may flash red when the vehicle is in
REVERSE (R) if the ultrasonic sensors are not kept
clean. So be sure to keep your rear bumper free of mud,
dirt, snow, ice and slush. Other conditions that may affect
system performance include things like the vibrations
from a jackhammer or the compression of air brakes on a
very large truck. If after cleaning the rear bumper and
then driving forward at least 15 mph (25 km/h), the
display continues to flash red, see your dealer.

If a trailer was attached to your vehicle, or a bicycle or
an object was on the back of, or hanging out of your
liftgate during your last drive cycle, the light may
also flash red. The light will continue to flash whenever
in REVERSE (R) until your vehicle is driven forward
at least 15 mph (25 km/h) without any obstructions
behind the vehicle.

For cleaning instructions, see

Cleaning the Outside

of Your Vehicle on page 5-95.

3-26

-------------------------------------------------------------------------------------------------------------------------------------------------------------

-------------------------------------------------------------------------------------------------------------------------------------------------------------

Accessory Power Outlets

With accessory power outlets you can plug in electrical
equipment such as a cellular telephone or CB radio.

The front accessory power outlet is located below
the cupholder drawer.

Pull the cover down to use the accessory power outlet.
When not in use, keep the cover on.

The rear accessory power outlet is located in the rear
compartment on the driver’s side next to the air
inflator system.

To remove the cover, pull the tab on the cover and pull
it off. To put the cover back on, line up the tabs at
the back of the cover and put the cover in place. Push
down the tab to secure the cover. When not in use,
always cover the rear accessory power outlet with the
protective cap.

Notice: Leaving electrical equipment on for
extended periods will drain the battery. Always turn
off electrical equipment when not in use and do
not plug in equipment that exceeds the maximum
amperage rating.

Certain electrical accessories may not be compatible
with the accessory power outlet and could result
in blown vehicle or adapter fuses. If you experience a
problem see your dealer for additional information
on accessory power outlets.

Notice: Adding any electrical equipment to your
vehicle may damage it or keep other components
from working as they should. The repairs would not
be covered by your warranty. Check with your
dealer before adding electrical equipment.

When adding electrical equipment, be sure to follow the
proper installation instructions included with the
equipment.

Notice: Improper use of the power outlet can cause
damage not covered by your warranty. Do not
hang any type of accessory or accessory bracket
from the plug because the power outlets are
designed for accessory power plugs only.

3-27

-------------------------------------------------------------------------------------------------------------------------------------------------------------

-------------------------------------------------------------------------------------------------------------------------------------------------------------

Climate Controls

Climate Control System

With this system you can control the heating, cooling
and ventilation for your vehicle.

Operation

Turn the right knob clockwise or counterclockwise to
direct the airflow inside of your vehicle.

To change the current mode, select one of the following:

H

(Vent): This mode directs air to the instrument

panel outlets.

)

(Bi-Level): This mode directs half of the air to the

instrument panel outlets, then directs the remaining
air to the floor outlets. Cooler air is directed to the upper
outlets and warmer air to the floor outlets.

6

(Floor): This mode directs most of the air to the

floor outlets. Use this mode to send air to the rear of the
vehicle. Keep the area under the front seats free of
objects that could obstruct airflow to the rear of
the vehicle.

The right knob can also be used to select defog or
defrost mode. For more information, see “Defogging and
Defrosting” later in this section.

9

(Fan): Turn the left knob clockwise or

counterclockwise to increase or decrease the fan speed.
Turn the knob to OFF to turn off the fan. The fan
must be turned on for the air conditioning compressor to
operate.

:

(Outside Air): Press this button to turn the

outside air mode on or off. When this mode is on,
outside air will circulate throughout your vehicle. When
this mode is on, an indicator light in the button will
come on to let you know that it is activated. The outside
air mode can be used with all modes, but it cannot
be used with the recirculation mode.

3-28

-------------------------------------------------------------------------------------------------------------------------------------------------------------


Content      ..     9      10      11      12     ..