Snowmobile Arctic Cat (2009 year). Manual - part 10


  Index      Snowmobiles / ATV     Snowmobile Arctic Cat - service manual 2009 year


Search            


Content   ..  8  9  10  11   ..


Snowmobile Arctic Cat (2009 year). Manual - part 10


OPERATING INSTRUCTIONS

33

 NOTE: On fan-cooled models if
the throttle control lever operates
properly and the engine does not
start, either a malfunctioning mon-
itor switch or a misadjusted mag-
netic carburetor switch may be the
problem. Take the snowmobile to
an authorized Arctic Cat Snowmo-
bile dealer for service. If not under
warranty, this service is at the dis-
cretion and expense of the snow-
mobile owner

.

 However, if a dire

emergency exists wherein the
engine must be started, discon-
nect the carburetor safety switch
connectors. If disconnection of the
carburetor safety switch connec-
tors is needed to start the engine,
take the snowmobile to an autho-
rized Arctic Cat Snowmobile dealer
for service as soon as possible. If
not under warranty, this service is
at the discretion and expense of
the snowmobile owner

.

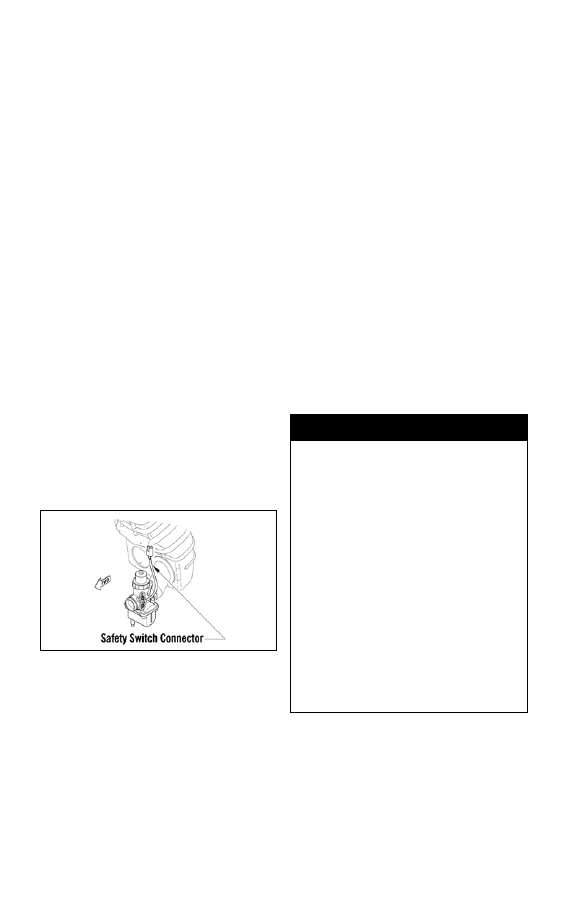
 NOTE: To access the switch con-
nectors, open the left-side access
panel and remove the belt guard;
then locate the switch on the left-
side of the carburetor and trace
the wire to the connector.

0743-448

 NOTE: On liquid-cooled models
if the throttle control lever oper-
ates properly and the engine does
not start, a malfunctioning monitor
switch may be the problem. Take
the snowmobile to an authorized
Arctic Cat Snowmobile dealer for
service. If not under warranty, this
service is at the discretion and
expense of the snowmobile owner

.

However, if a dire emergency
exists wherein the engine must be
started, disconnect the throttle
monitor switch located in the right-
side handlebar control. 

 NOTE: On liquid-cooled models
if disconnection of the throttle
monitor switch is needed to start
the engine, take the snowmobile to
an authorized Arctic Cat Snowmo-
bile dealer for service as soon as
possible. If not under warranty,
this service is at the discretion and
expense of the snowmobile owner

.

 NOTE: The monitor switch is
now bypassed. With exception of
the monitor switch and the emer-
gency stop switch, all other igni-
tion/electrical features (ignition
switch, headlight, taillight, and
brakelight) will operate properly.

! WARNING

Under no circumstances should
disconnection of the throttle con-
trol wiring harness be used as a
substitute for the monitor switch
during normal operation of the
snowmobile. Personal injury and
damage could occur if the throttle
system malfunctions or if the oper-
ator is unable to stop the engine in
an emergency. If the snowmobile
must be operated with a discon-
nected throttle control wiring har-
ness, EXTREME CAUTION MUST
BE TAKEN. NEVER EXCEED 10
MPH WITH THE THROTTLE CON-
TROL WIRING HARNESS DISCON-
NECTED.

34

OPERATING INSTRUCTIONS

VARYING ALTITUDE 

OPERATION

Operating a snowmobile at varying

altitudes requires changes in perfor-

mance components. These changes

affect drive train components (on all

models) and carburetion components

(on carbureted models).

The altitude information decal is

located beneath the hood of the snow-

mobile. On carbureted models, the

information is incorporated into the

Carburetor Main Jet Chart decal.

 NOTE: Just as important as cali-
brating the snowmobile for higher
altitudes is recalibrating the snow-
mobile when going to lower alti-
tudes. Always consult the altitude
decal beneath the hood of the
snowmobile.

M-Series models are initially set up at

the factory for operation between

6000-9000 feet. 

 NOTE: Carburetion and drive
train changes can be made by the
snowmobile owner if qualified to
do so. If the owner does not feel
qualified, take the snowmobile to
an authorized Arctic Cat Snowmo-
bile dealer for this service. This
service is at the discretion and
expense of the snowmobile owner

.

! CAUTION

On carbureted models, carefully
follow the Main Jet Chart recom-
mendations for proper main jet
selection for altitude, temperature,
and gasoline being used.

LUBRICATION

35

LUBRICATION

ACT DRIVE GEAR 

CASE (Each Season 

Prior to Storage)

 NOTE: Flushing the gear case
and replacing the lubricant can be
done by the snowmobile owner if
qualified to do so. If the owner
does not feel qualified, take the
snowmobile to an authorized Arc-
tic Cat dealer for this service. This
service is at the discretion and
expense of the snowmobile owner

.

It is very important that the gear case

be flushed and the lubricant be

replaced after each season of use. Arc-

tic Cat recommends that the flushing

and replacing be done prior to off-sea-

son storage.

To flush the gear case and replace the

lubricant, use the following procedure:

 NOTE: Gear case profiles will
vary from model to model. Deter-
mine which style is being serviced
and refer to the appropriate illus-
tration.

1. Open the left-side access panel;

then remove the panel and the belt

guard.

2. Remove the drive belt (see Drive

Belt sub-section); then remove the

driven pulley.

 NOTE: If excessive oil deposits
are noticed, take the snowmobile
to an authorized Arctic Cat Snow-
mobile dealer for service. If not
under warranty, this service is at
the discretion and expense of the
snowmobile owner

.

3. Tip the snowmobile onto its right

side and place a piece of cardboard

underneath to protect the finish on

the hood and belly pan.

 NOTE: It is recommended that
the gas tank be nearly empty (less
than 1/4 full) when tipping the
snowmobile.

4. Remove the drain plug from the

gear case; then install a drain

adapter fitting with hose into the

drain plug hole.

0743-456

741-636A

 NOTE: To aid in draining the
lubricant, it is advisable to fashion
a drain adapter by acquiring a fit-
ting - Gear Case Drain Fitting (p/n
0644-508) - and a length of 3/8-in.
hose.

5. Tip the snowmobile back to the

upright position; then place a drain

pan on the floor next to the drain

hose and tip the snowmobile

toward its left side far enough to

allow the lubricant to drain from

the gear case into the drain pan.

 NOTE: It is critical that the snow-
mobile is on a level surface to
ensure the lubricant drains prop-
erly and completely.

36

LUBRICATION

6. Secure the snowmobile in this

position until the lubricant is com-

pletely drained.

7. When the lubricant has completely

drained form the gear case, tip the

snowmobile back to the upright

position, remove the drain adapter,

and install and securely tighten the

drain plug; then remove the check/

fill plug.

8. Pour the recommended amount of

Arctic Cat ACT Drive Flush Fluid

(p/n 4639-333) into the check/fill

hole; then install the plug. Tighten
securely.

9. Install the driven pulley; then

install the drive belt (see Drive

Belt sub-section) and the belt

guard.

10. Install the left-side access panel;

then close the access panel.

11. Position the tips of the skis against

a wall; then using a shielded safety

stand, raise the rear of the snow-

mobile off the floor making sure
the track is free to rotate.

12. Start the engine and accelerate

slightly. Use only enough throttle

to turn the track several revolu-

tions. SHUT ENGINE OFF.

13. Open the left-side access panel;

then remove the panel and the belt

guard.

14. Remove the drive belt (see Drive

Belt sub-section); then remove the

driven pulley.

15. Tip the snowmobile onto its right

side and place a piece of cardboard

underneath.

16. Remove the drain plug from the

gear case; then install the drain

adapter fitting with hose into the

drain plug hole.

17. Tip the snowmobile back to the

upright position; then place a drain

pan on the floor next to the drain

hose and tip the snowmobile

toward its left side far enough to

allow the flush fluid to drain from

the gear case into the drain pan.

18. Secure the snowmobile in this

position until the flush fluid is
completely drained.

! CAUTION

It is critical that all of the old lubri-
cant be drained from the gear case
prior to flushing the gear case.

! CAUTION

Do Not add more or less than the
recommended amount of flush
fluid to the gear case.

! WARNING

The tips of the skis must be posi-
tioned against a wall or similar
object.

! WARNING

DO NOT stand behind the snowmo-
bile or near the rotating track.
NEVER run the track at high speed
when the track is suspended.

! CAUTION

It is critical that all of the flush fluid
be drained from the gear case prior
to filling with new lubricant.


Content   ..  8  9  10  11   ..