Snowmobile Polaris RMK Shift / RMK / Dragon RMK (2008 year). Manual - part 10


  Index      Snowmobiles / ATV     Snowmobile Polaris RMK Shift / 600 RMK / 700 RMK / 700 Dragon RMK / 800 Dragon RMK - service manual 2008 year


Search            


Content   ..  8  9  10  11   ..


Snowmobile Polaris RMK Shift / RMK / Dragon RMK (2008 year). Manual - part 10


41

THE PERFECT FIT

IQ Front Suspension Adjustments

Standard Shocks

The tension at which the shock coil spring is set is called spring preload. 
For the best ride, the suspension should be adjusted to use the full travel 
of the shocks with occasional light bottoming. To determine if your 
machine is using full travel, push the jounce bumper down on the shock 
rod until it contacts the body and test ride the machine. The bumper will 
move up on the rod in relation to the amount of travel that was used dur-
ing the ride. If the travel is full, the bumper will be seated at the top of 
the rod.
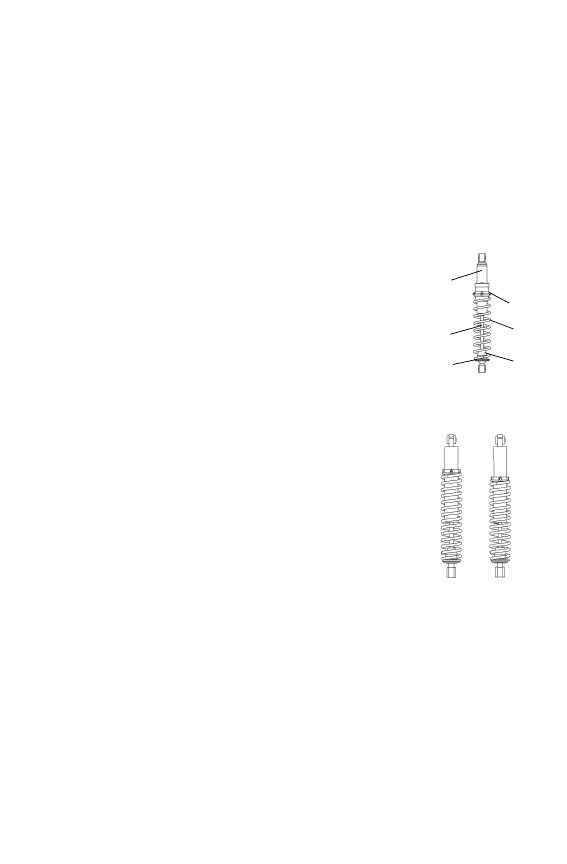
Shock Absorber Components

1.

Retainer

2.

Jounce Bumper

3.

Shock Rod

4.

Body

5.

Threaded Spring Preload Adjuster Nut

6.

Spring

Front Shock Spring Preload 

(RMK Standard Only)

Increasing spring preload will increase ski-to-ground 
pressure. Decreasing spring preload will decrease ski-
to-ground pressure. When adjusting, be sure the 
springs on both the left and right sides of the machine 
are at the same adjustment.

To increase front shock spring preload, grasp the 
spring and turn it to the left. Turn it to the right to 
decrease preload. 

Increasing the spring preload too much may adversely 
affect the handling of the snowmobile and the perfor-
mance of the suspension. Never exceed one inch of preload beyond the 
factory settings, and ensure that both sides are adjusted the same. When 
decreasing preload, make sure at least two turns of preload are holding 
the spring between the retainer on top of the shock and the threaded 
spring preload adjuster nut on the shock body.

Front Shock Springs


(Standard only)

The front springs can be changed if spring preload alone isn't sufficient 
and further adjustment is desired to control suspension stiffness. See 
your Polaris dealer for more information.

1

2

3

5

4

6

Low 

Preload

High

Preload

42

THE PERFECT FIT

Rear Suspension Adjustments

Rider weight, riding style, trail conditions, and vehicle speed all affect 
suspension action.

Each rear suspension can be adjusted to suit rider preference and deliver 
excellent performance for a given set of conditions. However, all sus-
pension designs and adjustments involve a compromise, or trade-off. 
For example, a suspension set up for snow-cross racing would provide a 
very stiff ride on the trail. A suspension set up for trail riding would bot-
tom out harshly on a snow-cross course.

Make adjustments to one area at a time so you can evaluate the change. 
For further assistance, see your dealer.

Suspension Performance Tips

• Rider weight usually determines the position at which the spring pre-

load should be set. However, this may vary with riding style. With a 
little experimentation, each rider can find a preferred set-up. These 
adjustments are easy to make, involve very little time or effort, and 
greatly affect the ride.

• In deep snow, a new rail slide will offer improved performance over a 

worn slide. It can also improve top speed.

NOTE:

Keep the suspension pivot points lubricated. This will reduce moisture 

and rust build-up and ensure proper function of the suspension com-

ponents. Grease rear suspension pivots before adjusting the rear sus-

pension. Refer to the suspension lubrication information beginning on 

page 76.

43

THE PERFECT FIT

Rear Suspension Adjustments

Initial Spring Preload Setting (Sag Method)

To set up the rear suspension torsion 
spring preload, measure the distance 
between the ground and rear bumper. 
This is measurement X.

Take this measurement with no rider 
and with the rear suspension at full 
extension.

NOTE:

The rear bumper may need to 

be lifted upward slightly to fully 

extend the suspension.

Next, have the rider drop down hard 
on the seat and bounce up and down 
several times, collapsing the rear 
suspension. With the rider seated, 
measure the distance between the 
ground and the rear bumper at the 
exact location used for measure-
ment X. This is measurement Y.

To determine sag, commonly referred to as ride-in, subtract measure-
ment Y from X (Sag=X-Y). Adjust sag by rotating the torsion spring 
preload cams located on the rear torque arm. See illustration. The ideal 
amount of sag for this rear suspension is five inches (12.7 cm) (X-Y=5 
in./12.7 cm).

If the rear suspension rides in less than four inches or more than six 
inches with the torsion spring preload cams at their maximum range of 
adjustment, optional torsion springs (softer or stiffer, respectively) may 
be required. This is only an initial setup, and final spring preload may 
vary based on rider preference and riding conditions.

X

Y

44

THE PERFECT FIT

Rear Suspension Adjustments

Torsion Spring Preload

To adjust rear torsion spring preload, rotate the three-position cam using 
the engine spark plug tool. Different rate torsion springs are available if 
a firmer ride is desired. Contact your dealer for more information.

The following information is provided only as a guideline to be used for 
initial suspension set-up. Your set-up may vary based on your desired 
riding style.

Soft (long end of cam to front)

Medium (short end of cam up)

Firm (long end of cam up)

Limiter Strap Position

The following information is pro-
vided only as a guideline to be used 
for initial suspension set-up. Your 
set-up may vary based on your 
desired riding style.

High: Limiter strap in high position


increases ski pressure

Low: Limiter strap in low position 
decreases ski pressure

Soft

Medium

Firm

High

Low


Content   ..  8  9  10  11   ..