Snowmobile Polaris Turbo IQ LXT (2014 year). Manual - part 14


  Index      Snowmobiles / ATV     Snowmobile Polaris Turbo IQ LXT - service manual 2014 year


Search            


Content   ..  12  13  14  15   ..


Snowmobile Polaris Turbo IQ LXT (2014 year). Manual - part 14


59

THE PERFECT FIT

IQ Rear Suspension Adjustments

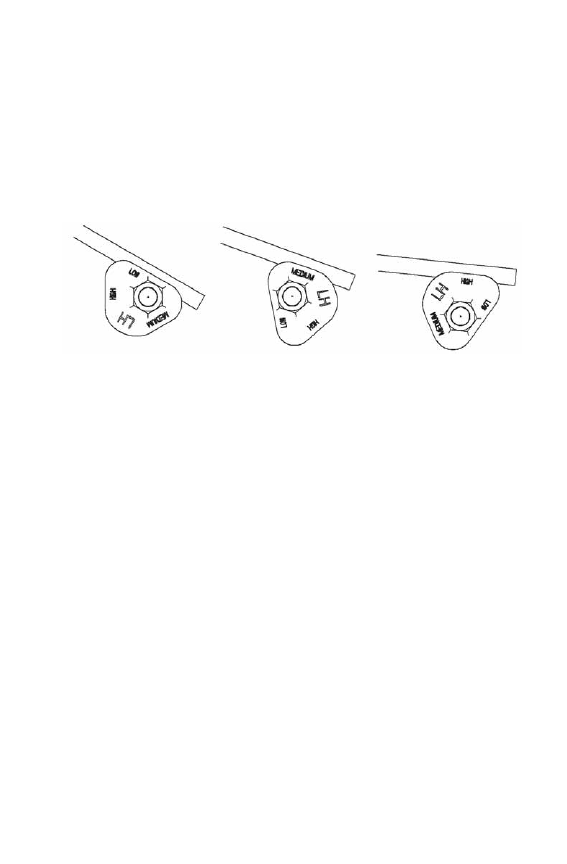
Torsion Spring Preload

To adjust rear torsion spring preload, rotate the three-position cam using 
the engine spark plug tool. Adjustment is easiest when the cam is 
rotated from low to medium, and then to high. Rotating directly from 
low to high will require significantly more effort.

Different rate torsion springs are available if a firmer ride is desired. See 
your dealer for more information. 

Suspension Coupling

On all POLARIS snowmobile rear suspensions, there are two torque 
arms that control the movement of the rail beam. Prior to the advent of 
suspension coupling, these torque arms could move independently of 
each other. Rear suspension coupling links the movement of the front 
and rear torque arms to each other. There are two types of rear suspen-
sion coupling.

Soft

Medium

Firm

60

THE PERFECT FIT

IQ Rear Suspension Adjustments

Front To Rear Coupling and the Front Rear Scissor Stop 
(FRSS)

The front rear scissor stop (FRSS) couples the movement of the front 
torque arm with the rear torque arm and limits the amount of indepen-
dence between the movement of the front torque arm and the rear torque 
arm.

When hitting a bump, the front torque arm starts to compress. The FRSS 
links that movement to the rear torque arm, causing it to compress and 
raise the rear suspension up as one, allowing the suspension to hit the 
bump only once and reducing kickback. 

The factory setting is usually adequate for all riders and conditions.

Rear To Front Coupling and the Rear Rear Scissor Stop 
(RRSS)

The rear rear scissor stop (RRSS) couples the movement of the rear 
torque arm with the front torque arm and limits the amount of indepen-
dent movement between the rear torque and the front torque arm.

Adjusting the RRSS either allows more weight to transfer to the rear for 
more traction, or allows less weight to transfer to the rear, resulting in 
improved cornering performance. An adjustment dot is located on the 
RRSS. This dot is on the longest end of the scissor stop. 

Rear Rear Scissor Stop (RRSS) - Attributes

Moving the RRSS to a higher position will have the following effects on 
the suspension:

• Reduced weight transfer. 

• Improved chatter bump ride. 

• Improved cornering performance.

• Increased load carrying capacity (2-up)

61

THE PERFECT FIT

IQ Rear Suspension Adjustments

Weight Transfer During Acceleration

The preferred method for controlling 
weight transfer during acceleration is 
by adjusting the rear rear scissor stop 
(RRSS). The factory setting is the 
best for most trail riding conditions.

To decrease weight transfer under 
acceleration (for improved corner-
ing), rotate the RRSS to a higher 
position.

To increase weight transfer or ski lift 
during acceleration, rotate the RRSS 
to a lower position. 

Tip: Your dealer can help you with initial 

setup and additional setup instruc-
tions to help you achieve your opti-
mum ride. A scissor stop tool is also 
available from your dealer.

HIGH

LOW

LOW

MEDIUM

62

THE PERFECT FIT

Handlebar Adjustments

Use the RIDER SELECT feature to adjust handlebar position. See page 
34. Use the following steps to adjust handlebar angle at the handlebar 
block.

1. Remove the handlebar cover 

to expose the handlebar and 
the four adjuster block bolts.

2. Using a 7/16” wrench, loosen 

the four nuts on the bottom of 
the adjuster block (turn han-
dlebar to left or right for 
access to back nuts).

Tip: If necessary, pry the blocks apart 

with a screwdriver.

3. Adjust the handlebar to the 

desired height. Be sure han-
dlebars, brake lever and 
throttle lever operate 
smoothly and do not hit the 
gas tank, windshield or any 
other part of the snowmobile 
when turned fully to the left 
or right.

4. Torque the front bolts first, then torque the rear bolts. Torque the 

bolts to 15-17 ft. lbs. (20-23 Nm).

5. Reinstall the handlebar cover.

Handlebar 
Cover

Adjuster 
Block 
Bolts

Nuts


Content   ..  12  13  14  15   ..