Snowmobile Polaris FS IQ Widetrak (2013 year). Manual - part 13


  Index      Snowmobiles / ATV     Snowmobile Polaris FS IQ Widetrak - service manual 2013 year


Search            


Content   ..  11  12  13  14   ..


Snowmobile Polaris FS IQ Widetrak (2013 year). Manual - part 13


54

THE PERFECT FIT

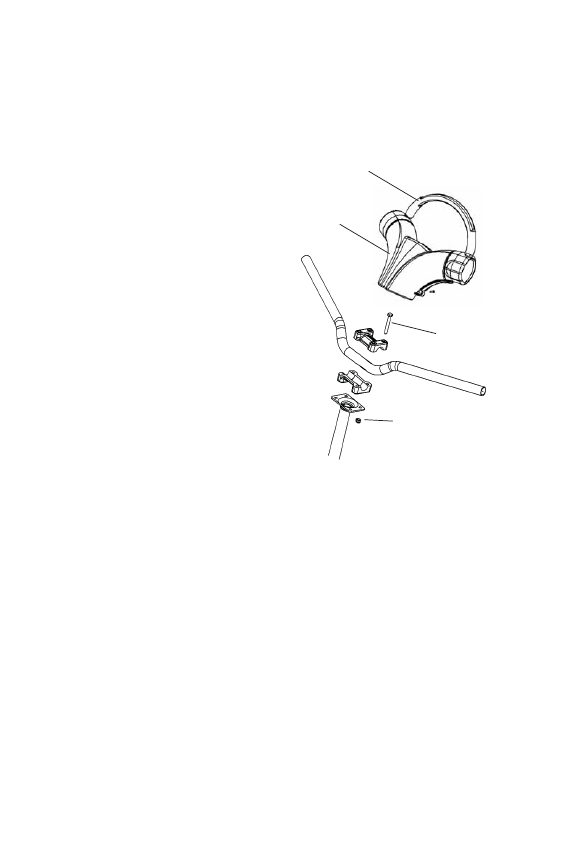
Handlebar Adjustments

Use the following steps to adjust handlebar angle at the handlebar block.

1. Remove the mountain bar.

2. Remove the handlebar cover.

3. Using a 7/16" wrench, loosen 

the four nuts on the bottom of 
the adjuster block. Turn the 
handlebar to the left or right for 
access to the back nuts. If nec-
essary, pry the blocks apart 
with a screwdriver.

4. Adjust the handlebar to the 

desired height. Be sure the han-
dlebar, brake lever and throttle 
lever operate smoothly and do 
not hit the gas tank, windshield 
or any other part of the 
machine when turned fully to 
the left or right.

5. Torque the front bolts first, 

then torque the rear bolts. 
Torque the bolts to 15-17 ft. 
lbs. (20-23 Nm).

6. Reinstall the handlebar cover.

7. Reinstall the mountain bar.

Handlebar 

Cover

Adjuster 

Block 

Bolts

Nuts

Mountain 

Bar

55

THE PERFECT FIT

Accessories

POLARIS offers a wide range of accessories for your snowmobile to 
help make each ride more enjoyable.

Use only POLARIS parts and accessories on your POLARIS snowmo-
bile. Use of unapproved parts and accessories may result in:

• Non-compliance with government/industry requirements

• Voiding of warranty

• Injury to self or others

This applies, but is not limited to the following areas: brakes, clutches, 
fuel systems, and exhaust systems. Exhaust systems are critical safety 
areas that must use approved POLARIS parts. Please see your 
POLARIS dealer for service.

56

PRE-RIDE INSPECTIONS

Pre-Ride Checklist

Inspect all items on the checklist for proper operation or condition 
before each use of the snowmobile. Procedures are outlined on the refer-
enced pages.

Item

See Page

Drive Belt Condition

116

Steering System

58

Brake Fluid

59

Brake Lever/Parking Brake Lock

59, 60

Brake System

108

Throttle Lever

57

Throttle Safety Switch

57

Auxiliary Shut-Off Switch (Engine Stop Switch)

63, 74

Ignition Switch

63, 71

Taillight/Brakelight/Headlight

63

Coolant Level

103

Gearcase Oil Level

95

Engine Oil Level

84

Radiator/Cooling Fins (clean and remove any debris)

--

Foam Oil Breather Element

92

Suspension Mounting Bolts

62

Skags (Wear Bars)

62, 127

Ski Saddle and Spindle Bolts

62

Hood Straps/Latches

58

Seat Latches

57

Rear Wheel Idler Bolts

62, 123

Track Alignment/Condition

61, 124

Rail Slide Condition

124

Oil Level (check before operating if vehicle was tipped 
over)

64

57

PRE-RIDE INSPECTIONS

Before Starting the Engine

Before starting the engine, always refer to all safety warnings pertaining 
to snowmobile operation. Never start the engine without checking all 
vehicle components to be sure of proper operation.

WARNING! Operating the vehicle with worn, damaged, or malfunctioning 
components could result in serious injury or death. Never start the engine 
without checking all vehicle components to be sure of proper operation.

Read and Understand Your Owner's Manual

Read the Owner's Manual completely and refer to it often. The manual 
is your guide to safe and enjoyable snowmobiling experience.

Throttle Lever

The throttle and brake are the primary controls of your snowmobile. 
Always make sure both are functioning properly.

Squeeze the throttle lever to make sure it compresses evenly and 
smoothly. When released, the lever should immediately return to the 
idle position without binding or hesitation. If the throttle does not func-
tion smoothly, or if you discover excessive lever freeplay, DO NOT start 
the engine. Have the throttle serviced immediately.

Throttle Safety Switch

Test the throttle safety switch system before the snowmobile is operated. 
See page 74 for procedure.

Seat Latch

Check the seat latch before each use of the snowmobile. Push downward 
on the seat near the seat latch, then attempt to raise the seat by pulling 
upward on the right-hand passenger grab handle. Make sure the latch is 
secure before riding.


Content   ..  11  12  13  14   ..