Snowmobile Polaris 600 Switchback / 800 Switchback (2013 year). Manual - part 27


  Index      Snowmobiles / ATV     Snowmobile Polaris 600 Switchback, 600 Switchback Pro-R, 600 Switchback Adventure, 800 Switchback, 800 Switchback Pro-R, 800 Switchback Pro-R Adventure - service manual 2013 year


Search            


Content   ..  25  26  27  28   ..


Snowmobile Polaris 600 Switchback / 800 Switchback (2013 year). Manual - part 27


108

MAINTENANCE

Track Maintenance

Track Alignment

Periodically check that the track is centered and running evenly on the 
slide rails. Misalignment will cause excessive wear to the track and slide 
rail.

1. Safely support the rear of the snowmobile with the track off the 

ground.

2. Start the engine and apply a small amount of throttle until the track 

turns slowly at least five complete revolutions. Stop the engine and 
let the track come to a stop (do not apply brakes). 

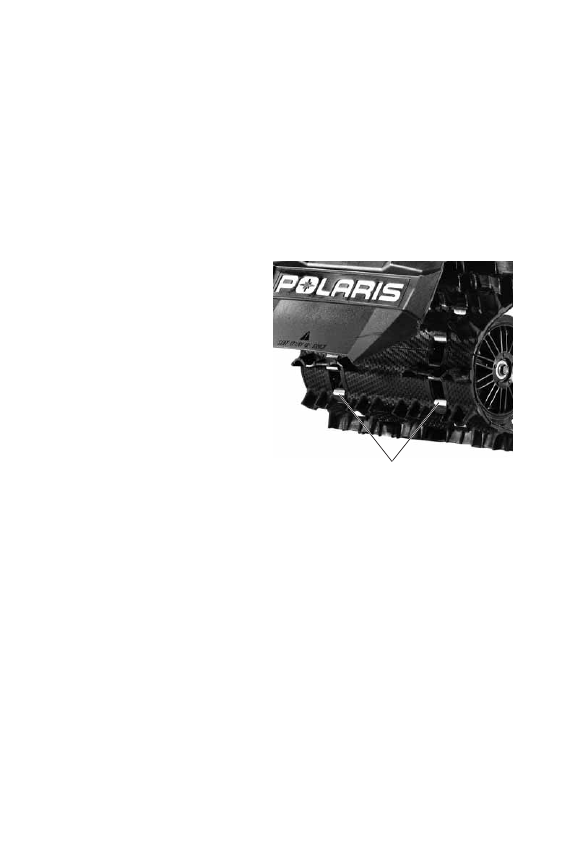
3. Inspect track alignment by 

looking through the track 
window to make sure the rails 
are evenly spaced on each 
side. If the track runs to the 
left, loosen the idler shaft 
bolts, then loosen the left 
locknut and tighten the left 
adjusting bolt. If the track 
runs to the right, loosen the 
idler shaft bolts, then loosen 
the right locknut and tighten 
the right adjusting bolt.

4. After adjustments are com-

plete, tighten the locknuts and torque idler shaft bolts to 35 ft. lbs. 
(47.5 Nm).

5. Repeat steps 2 and 3 to verify proper alignment.

Rails

109

MAINTENANCE

Steering System

Front Suspension Inspection

Each week, or before a long ride, check all steering system fasteners and 
tighten if necessary.

X

X

X

X

110

MAINTENANCE

Steering System

Ski Alignment

WARNING! Improper ski alignment or adjustment may cause loss of steering 
control, resulting in serious injury or death. Do not attempt to change the ski 
alignment or camber adjustment. See your POLARIS dealer.

1. Place the handlebars in a straight-ahead position. 
2. With only vehicle weight compressing the suspension, measure 

10 inches (25.4 cm) forward from the center of the ski mounting 
bolt. See illustration. At this point, measure between the skis. This is 
measurement X. 

3. Perform the same measurement rearward from the center of the ski 

mounting bolt. This is measurement Y.

4. The X measurement should be 1/8-1/4 inch (3-6 mm) greater than 

the Y measurement. If the skis are misaligned, see your dealer for 
alignment correction as camber adjustment may also be affected.

X

Y

10 in. 

(25.4 cm)

10 in. 

(25.4 cm)

111

MAINTENANCE

Steering System

Ski Skags

WARNING! Worn skis and/or skags will adversely affect handling. Loss of 
vehicle control may result, causing serious injury or death. See your dealer's 
studding chart for recommended skags. If you install longer or more aggressive 
carbide skags than the original equipment, it may also be necessary to add track 
studs to maintain proper vehicle control while turning on hard-packed snow or 
ice.

Check skags before each use of the snowmobile to ensure positive steer-
ing characteristics. Skags must be replaced when worn to half their orig-
inal diameter. 

TIP: Carbide skags must be replaced if any abnormal wear or chipping is found.

Skag Replacement

Some models are equipped with single skags. Some models are 
equipped with dual skags.

1. Raise and support the front of 

the snowmobile so the skis are 
approximately 6 inches (15.2 
cm) from the ground.

2. Remove the attaching nuts and 

pry the skag downward.

3. Remove the front end of the 

skag.

4. Remove the rear end of the 

skag.

5. Reverse the steps to install a 

skag.

Skag


Content   ..  25  26  27  28   ..