TRAKTOR PRO 2.9. Manual Englisch (2015) - part 17


  Index      Tractors     TRAKTOR PRO 2.9. Manual Englisch (2015)


Search            copyright infringement  


Content   ..  15  16  17  18   ..


TRAKTOR PRO 2.9. Manual Englisch (2015) - part 17


The Loop section, from left to right: Auto Loop buttons, IN and OUT buttons, ACTIVE button.

Setting a Loop with a Predefined Size

Let’s add a Loop to the track on Deck A.

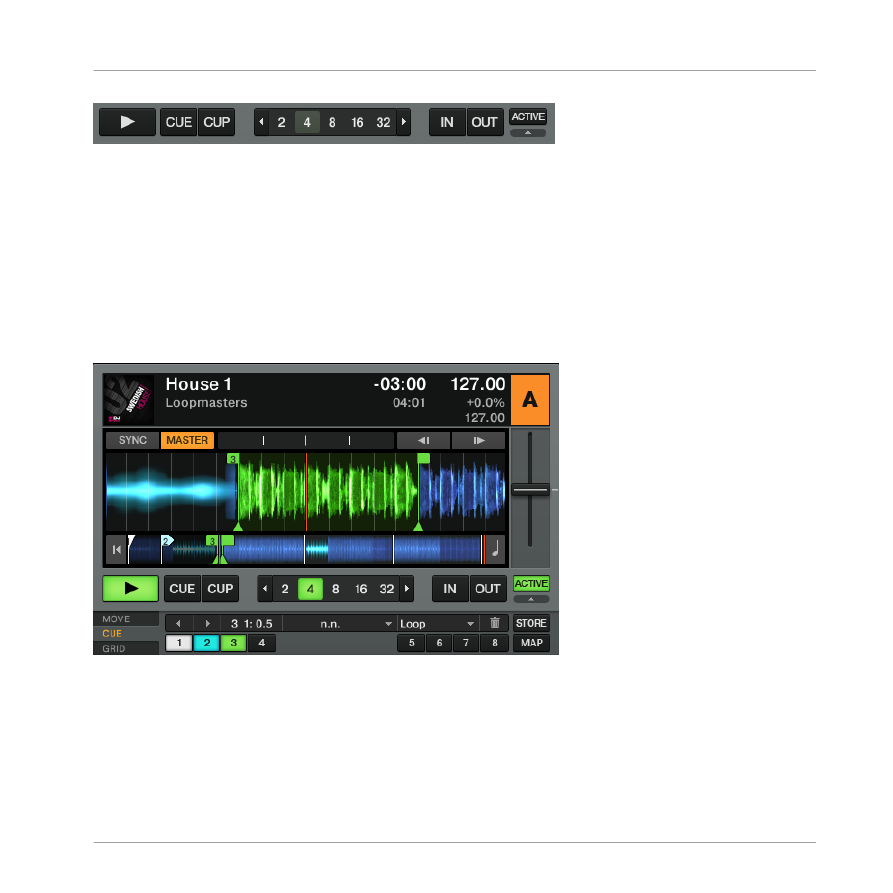
To engage a loop on a playing track, just click one of the Auto Loop buttons.

→ This will automatically add a loop at that position in the track over the area marked in

green. Also, the 

ACTIVE

 button will light up in green.

→ The loop length in beats will correspond to the number written on the Auto Loop button:

Auto Loop and ACTIVE buttons in the Loop section of the Deck.

To change the size of the Loop, just click another Auto Loop button.

Tutorials

Looping and Cueing


TRAKTOR - Manual - 273

Setting a Loop Manually

You can also manually set loop start and loop end points. To do this, use the Loop 

IN

 and Loop

OUT

 buttons in the Loop section:

The Loop IN and Loop OUT buttons.

Press the 

IN

 button to set the Loop In Point.

Press the 

OUT

 button to set the Loop Out Point. As soon as you hit the 

OUT

 button, the

Loop is set and the track will start looping.

We  already  introduced  the  Snap  mode  in  the  previous  tutorial  (see 

16.4.5,  Setting  a  Cue

Point as Starting Point

). This mode also affects the Loop In and Loop Out Points so that they

will automatically be positioned directly on the beat.

Moving a Loop

You can also quickly move the active Loop across your track by using the 

MOVE

 Advanced tab:

Tutorials

Looping and Cueing


TRAKTOR - Manual - 274

The MOVE Advanced Tab

Select Loop from the drop-down menu on the left.

Select a Move Size from the list on the right by clicking on the desired button.

Move the Loop forward or backward with the Loop Move buttons (arrow buttons).

The MOVE Advanced tab also offers the options to move only the Loop In or Loop Out point
which can be used for tension-building drum rolls.

Moving Loops is not available in LE 2.

Storing a Loop

In the previous tutorial, we looked at how to store Cue Points. In a similar fashion, you can
store Loops as well:

To store the active Loop, press an unlit Hotcue button.

→ The Hotcue button lights up, this time in green—you’ve just stored a Loop that you can

return to simply by pressing the same Hotcue button again.

The Cue tab with a stored loop, marked in green.

Tutorials

Looping and Cueing


TRAKTOR - Manual - 275

If you exceed the 8 Hotcue slots, you can use the 

STORE

 button to store even more Hot-

cues or Loops in your track. The 

MAP

 button allows you to re-organize their order.

Storing Loops is not available in LE 2.

Deactivating Looping

If you want to deactivate the current Loop, do the following:

To deactivate looping, click the green 

ACTIVE

 button. The playback continues after the

Loop.

By pressing the 

ACTIVE

 button when there is no Loop currently active, you activate looping.

The next Loop in the track will be activated.

16.6.2 Using Hotcues


We’ve already seen how to use Hotcues to store Cue Points and Loops. We want to show you
here a few more details on their use.

First, open the 

CUE

 Advanced tab again.

As  already  explained,  when  pressing  an  unlit  Hotcue  button,  if  there  is  no  Loop  active,  you
store a Cue Point at the current playback position (the Hotcue button turns blue). If there is a
Loop active, you store this Loop (the Hotcue button turns green).
In the waveform of the Deck, you can see that a vertical line with the same color appears in
the track at the corresponding position. Moreover, a little number at the top reminds you which
button you should use to jump to that Cue Point or Loop:

Tutorials

Looping and Cueing


TRAKTOR - Manual - 276

A waveform with a Cue Point stored as Hotcue 1 and a Loop stored as Hotcue 2.

If you made a mistake, or just decide you no longer want a particular Hotcue, you can quickly 
delete it:
1.

Click on the respective Hotcue.

2.

Click on the Trash button (trash can symbol).

→ You can see that the button is no longer lit.

Hotcues are not available in LE 2.

Creative Uses of Hotcues

Hotcues aren’t just bookmarks to particular sections of a track—they can also be used for crea-
tive techniques such as remixing parts of a song, beat-juggling, etc.
As  an  example,  we  will  show  you  here  how  you  can  quickly  make  use  of  a  Loop  stored  in  a
Hotcue slot to introduce the track you’re about to mix in. By the way, this will allow us to sum
up what we’ve learned until now.
The track Techno 2 is still loaded on Deck B. The track on Deck A is on air (crossfader at full
left) and you want to prepare the track on Deck B for mixing in:

Start the playback of the track in Deck B and send it to your headphones by activating
the Headphones Cue button of Deck B.

Tutorials

Looping and Cueing


TRAKTOR - Manual - 277

1.

Find an interesting Loop near the beginning of the track by using the controls in the Loop
section of Deck B.

2.

Once you have a nice Loop running, store it by pressing an unlit Hotcue button.

3.

Press the respective Hotcue button again to let the Loop start on a downbeat of the track
in Deck A.

4.

Now start to bring this Loop in your mix, for example by implementing the low-cut we ex-
plained in the previous tutorial (see chapter 

16.4.9, Mixing In the Track by Using the

Channel EQ and Filter

).

5.

When you’re about to fade out the previous track completely, deactivate the Loop on the
new track and you’re done.

The 

CUE

 Advanced tab offers a lot more options.

16.7 Adding FX


The FX section of LE 2 only offers one Group FX per Deck and an even smaller amount of
FX.

Now that we have seen the basics of playing tracks on the Decks and mixing them together,
let’s see how to add effects—or “FX” in the TRAKTOR terminology.
TRAKTOR  has  an  extremely  powerful  effect  section.  By  default,  there  are  two  different  FX
Units in TRAKTOR, which can be assigned to any of the Decks.

A FX Unit in Group mode

Tutorials

Adding FX


TRAKTOR - Manual - 278

A FX Unit in Single mode

Prerequisites

TRAKTOR now is in the following state:

• The track Techno 2 is loaded on Deck B. The track is playing and audible and should be

the tempo master.

• The Deck A is stopped (if it’s not the case, press the 

PLAY

 button on the left Deck).

• The crossfader is all the way to the right.

16.7.1 Assigning a Deck to an FX Unit


We need to assign an FX Unit to a Deck. To do this, we use the FX Assign buttons:

The FX Assign buttons on each channel

Let’s assign the FX Unit 1 to Deck B:

Press the FX Assign button 

1

 on channel B to assign Deck B to the FX Unit 1.

Most  commonly,  you  will  assign  one  FX  Unit  to  one  channel  (FX  1  to  Deck  A,  FX  2  to
Deck B, etc), but for this tutorial we wanted to demonstrate also TRAKTOR’s versatile FX
assignment; you can assign any other channel to the same FX Unit as well. For example, if
you want to apply these FX to the track loaded on Deck A, simply press the FX Assign but-
ton 

1

 also on Deck A.

Tutorials

Adding FX


TRAKTOR - Manual - 279

Assigning Decks to FX Units is not available in LE 2 and ME 2.

16.7.2 Group Mode


First we’ll look at Group mode. This mode allows up to three different FX to be used simultane-

ously in a single FX Unit. You see three different FX slots stacked on top of each other in the

corresponding FX Unit.

Group FX

16.7.3 Getting the FX Unit Ready


Per default, there are three effects loaded in both FX Units: Delay, Reverb, and Flanger.

Choose which of the three loaded effects you want to activate by pressing the correspond-
ing FX 

ON

 Button: 

→ The FX Button lights up and activates the respective effect.

Turn the 

D/W

 knob to mix between the unprocessed (“dry”) and the processed (“wet”)

signal. Slowly turn the 

D/W

 knob clockwise to bring in more of the FX and turn it counter-

clockwise to reduce the FX:

→ You now hear the track on Deck B being processed by the FX Unit 2.

Of course, you can use all three effects together—simply activate all three buttons.

Tutorials

Adding FX


TRAKTOR - Manual - 280

16.7.4 Controlling the FX Unit


You can control each FX in this FX Unit by turning the respective FX Knob:

The FX Knobs

Play around with the FX Knobs 1-3 and listen to the result on the audio.

Changing the FX in a Slot

You can load another FX in each slot. Let’s switch the first FX slot to the Gater:

The Gater effect is not available in LE 2.

Click on the downwards-pointing arrow next to 

Delay

 to open the drop-down menu. Now

choose Gater from the list.

If the first FX slot is currently deactivated, press the respective FX Button to activate it
(the button must be lit).

→ You will hear now the Gater cutting the audio at regular intervals. If the effect is not audi-

ble, make sure the 

D/W

 knob is at least set to 50 %.

Tempo-synchronized FX

Now try the following:

Set the FX Knob to various positions and listen to the resulting effect on the audio.

→ You’ll notice that the gating effect stays synchronized to the beat because its tempo fol-

lows the Master.

You can check this by raising the tempo of the Master—you will hear the track playing fast-
er and the Gater following.

Tutorials

Adding FX


TRAKTOR - Manual - 281

16.7.5 Single Mode


You can also switch each FX Unit to Single mode. Instead of multiple FX with one parameter

each, Single mode will give you one FX but with much more control over its parameters.
This time, we will do it on FX Unit 2:

Press FX Assign button 

1

 on channel B to remove the FX assignment.

Press FX Assign button 

2

 on channel B to assign Deck B to the FX Unit 2.

→ The FX Knobs and Buttons will give you access to each of the advanced parameters for

that particular FX. At any time, you can press the 

RST

 Button to reset the parameters to

their default value. As in Group mode, the 

D/W

 knob allows you to adjust the balance be-

tween the unprocessed (dry) signal and the processed (wet) signal.

Single mode is not available in LE 2 and ME 2.

16.7.6 Storing a Snapshot


If you find yourself making the same settings to the FX each time and would like to set a de-
fault state for the FX parameters, simply do the following:
1.

Adjust the FX Knobs and Buttons to your liking.

2.

Press the Snapshot button (floppy disk icon) to store these settings as snapshot.

→ The next time you press the 

RST

 (Reset) Button with this FX loaded, its parameters will

assume the values you stored.

Tutorials

Adding FX


TRAKTOR - Manual - 282

16.8 Using the Remix Decks in Your Mix


The former Sample Decks have now become Remix Decks. Let's have a look at how these work!

(For a general overview of the Remix Deck's control elements, refer to 

7.1.2, Remix Deck

.)

The Remix Deck C with the "Remix Deck Tutorial" Remix Set loaded.

With Remix Decks, you can add Samples (One-shots and Loops) to your mix, live-remix with
whole sets of Sample Cells, and even capture Samples from Track Decks or the Loop Recorder.
You can also save a Remix Deck and all of its content to the Collection as a Remix Set, and
then use it as a single-line item in a Playlist!

In case you were using Sample Decks in an earlier TRAKTOR version, don't panic! All for-
mer Sample Slot functionality stays preserved.

Remix Decks are not available in LE 2 and ME 2.

Prerequisites

TRAKTOR now is in the following state:

• The track Techno 2 is loaded on Deck B. The track is audibly playing and it is the tempo

master. By the way, from now on we will use the term “Track Deck” to describe Decks
that play tracks so that we can easily distinguish them from Remix Decks. In TRAKTOR,

Tutorials

Using the Remix Decks in Your Mix


TRAKTOR - Manual - 283

you can see that the two upper Decks (A and B) are Track Decks whereas the two lower
Decks (C and D) are Remix Decks. If the latter is not the case, click the Deck letters of
Deck's C and D and select the Remix Deck entry for both.

• Deck A is stopped (if this is not the case, press the 

PLAY

 button on the left Deck).

• The crossfader is all the way to the right.

16.8.1 Loading a Sample from the Collection


You can load Samples directly from TRAKTOR’s Track Collection.
1.

Click on the Playlist called 

All Samples

 from your Favorites.

2.

Click on the Sample named D4 BassComplex in the Playlist to select it.

3.

Drag it onto left-upmost Sample Cell of Deck C.

→ The Sample is now loaded and ready to play.

Tutorials

Using the Remix Decks in Your Mix


TRAKTOR - Manual - 284

16.8.2 Triggering the Sample


Triggering the Sample works as follows:
1.

Make sure SYNC is activated on Deck C so that the Deck will start synchronized to the

tempo master Deck, Deck B.

2.

Set the Remix Deck's Quantize Value to 1 (one beat) with the Quantize Value selection
menu in the Deck Heading. To open the menu, click on the Quantization Value number

next to the blue dot in the Deck Heading.

3.

Click the Play button on Deck C. The Remix Deck will start playing, with its internal time-
line synchronized to Deck B. The Sample itself is not yet playing!

4.

Shortly before a down beat in Deck B, click the Play Type indicator on the left side of the
Sample Cell to activate the Sample Cell.

Tutorials

Using the Remix Decks in Your Mix


TRAKTOR - Manual - 285

→ The Play Type indicator flashes until the next down beat of its internal timeline is

reached (remember, we have set the Quantize Value to one beat), and then starts playing

in sync with Deck B (as the Remix Deck is synced to Deck B).

To stop the Sample, and reset the play marker to the Sample start position, [Shift] +

click the Sample Mode indicator. The Sample stops playback according to the setting of
the Quantize Value.

Note that the Quantize Value does not represent the amount of beats it will take before a Sam-
ple starts playing, therefore, it is not a "delay" value; the Quantize Value represents a mark in
the Remix Deck's internal timeline (such as a bar line on a sheet of music).

16.8.3 Capturing a Sample from a Track


We  have  seen  how  we  can  load  Samples  directly  into  one  of  the  Remix  Decks  using  TRAK-
TOR’s Browser, but here’s an even cooler performance feature:
1.

Check that the track Techno 2 is still playing on Deck B. If the playback has reached the
end of the track, press the Skip Back to Start button above the Deck's Play button. Alter-
natively press [Shift]+G on your computer keyboard.

2.

Make sure that Snap mode (

S

) is activated in the Master panel of the Global section.

Tutorials

Using the Remix Decks in Your Mix


TRAKTOR - Manual - 286

3.

Set a Loop in this track using the controls in the Loop section as described in 

16.6.1,

Playing with Loops

.

4.

Drag and drop the track name (

Techno 2

) from Deck B's Deck Heading into the first Sam-

ple Cell of Sample Slot 2 in our Remix Deck C.

→ The loop is copied as a Sample to Remix Deck C.

You could now load a different track into Track Deck B, and still have the loop from the
original song playing in Remix Deck C. It’s great for capturing loops on the fly and using
them to build an alternate mix.

Tutorials

Using the Remix Decks in Your Mix


TRAKTOR - Manual - 287

If the Deck you copied from wasn’t playing a Loop, the Remix Deck will still capture a loop
from the capture source Deck, but it will instead take it from the current playback position.

The loop will automatically be cut to the length of the current loop size (grey-shaded Auto

Loop button in the Track Deck).

Capture a few Samples from various places from the track in Deck B and play around to
get used to the basic playback controls that we described above.

16.8.4 More Sample Controls


Once you have a Sample loaded on one of the Remix Decks, you can change its sound utilizing
a number of controls. There's more possibilities than described here (see also 

7.1.2, Remix

Deck

 for a detailed overview of all control elements of the Remix Deck, and also the TRAKTOR

KONTROL F1 manual), but we will at least show you some of the available functions:

• With the Play Type indicator button on the left side of a Sample Cell, you start and stop

the playback of each Sample Cell. It also indicates whether the Sample is in One-shot or
Loop Mode. Click on the Play Type indicator to start Sample playback. To stop the Sam-
ple,  and  reset  the  play  marker  to  the  Sample  start  position,  [Shift]  +  click  the  Sample
Mode indicator. The Sample then stops playback according to the setting of the Quantize
Value.

• With the Volume fader, you can adjust the volume of the relevant Sample Slot.

• With the Filter fader, you can apply a lowpass/highpass filter to the Sample Slot.

Tutorials

Using the Remix Decks in Your Mix


TRAKTOR - Manual - 288


Content   ..  15  16  17  18   ..