CFMoto ATV CF500-A 4x4. Service Manual - part 5


  Index      Manuals     CFMoto ATV CF500-A 4x4. Service Manual


Search            copyright infringement  


Content      ..     3      4      5      6     ..


CFMoto ATV CF500-A 4x4. Service Manual - part 5


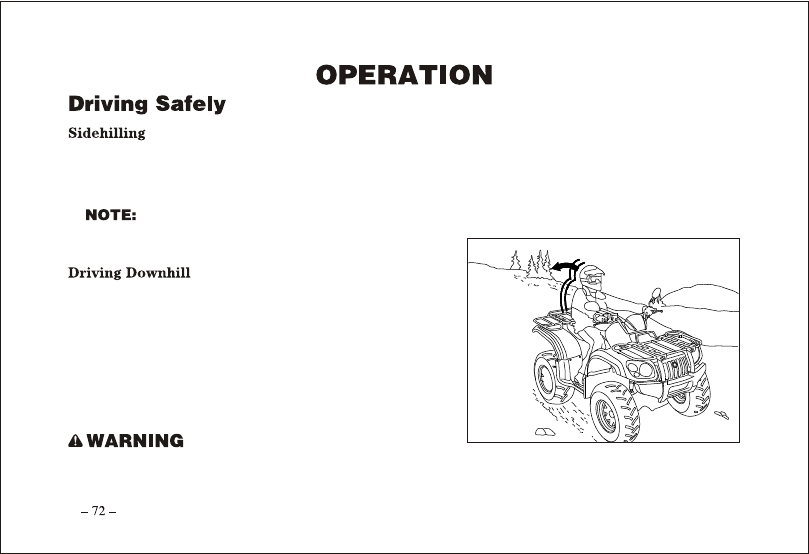
2. Lean into the hill, transferring your upper body weight toward the hill while keeping your feet on the 

footrests.

3. Steer slightly into the hill to maintain vehicle directions.

  If the vehicle begins to tip, quickly turn the front wheel downhill, if possible, or dismount on the 

uphill side immediately!

Whenever descending a hill, follow these precautions:
1. Proceed directly downhill.
2. Shift your weight to the rear of the vehicle.
3. Slow down.
4. Apply the brakes slightly to aid in slowing.
Familiarize yourself with operation of the auxiliary rear brake 
lever.

Excessive speed can cause loss of control and lead to serious injury or death.  Always operate slowly when 
traveling downhill.

-------------------------------------------------------------------------------------------------------------------------------------------------------------

Improper hill climbing procedures could cause loss of 
control or overturn and result in serious injury or death.
Avoid climbing steep hills (25

maximum).

Use extreme caution when operating on hills, and follow 
proper operating procedures outlined in the owner s manual.

If the vehicle stalls while climbing a hill, never back it down 
the hill! One maneuver that can be used when it s necessary to 

turn around while climbing a hill is the K-turn:
1. Stop and shift the gear selector lever to the parking position while keeping body weight uphill.
2. Shut off the engine.
3. Dismount on the uphill side of the vehicle, or on the left if the vehicle is pointing straight uphill.
4. Staying uphill of the vehicle, turn the handlebars full left.
5. While holding the brake lever, shift the gear selector lever to the low gear position and slowly allow the 

vehicle to roll around to your right until it s pointing across the hill or slightly downward.

6. Shift the gear selector lever to the parking position and remount the vehicle from the uphill side, keeping 

body weight uphill.

-------------------------------------------------------------------------------------------------------------------------------------------------------------

7. Restart the engine, while holding the brake lever, shift the gear selector lever to low gear position.
8. Release the brake and proceed slowly, controlling speed with the brake, until the vehicle is on more level 

ground.

Your ATV can operate through water with a maximum recommended depth equal to the bottom of the footrests . 
Follow these procedures when operating through water:
1. Determine water depths and current before crossing.
2. Choose a crossing where both banks have gradual inclines.
3. Proceed slowly, avoiding rocks and obstacles if possible.
4. After crossing, dry the brakes by applying light pressure to 

the lever until braking action is normal.

-------------------------------------------------------------------------------------------------------------------------------------------------------------

Avoid operating the vehicle through deep or fast-flowing water.  If you cannot avoid water that 

exceeds the recommended maximum depth


, go slowly


, balance your weight carefully


, avoid 

sudden movements, and maintain a slow and steady forward motion.  Do not make sudden turns or 
stops, and do not make sudden throttle changes.

After running the vehicle in water, it s critical to have it serviced as outlined in the maintenance chart.  See page 

120.  The following areas need special attention:  engine oil, transmission oil, front and rear gear cases and all 
grease fittings.

 If water has been ingested into the CVT, follow the procedure on page 104 for drying out the CVT.

If your vehicle becomes immersed, and it s impossible to take it to your dealer before starting it, follow the 

steps described on page 120.  Have the vehicle serviced by your dealer promptly.

Major engine damage can result if the vehicle is not thoroughly inspected after operation in water.  Perform 
the services outlined in the maintenance chart.
If your vehicle becomes immersed or is operated in water that exceeds the footrest level, take it to your 
dealer for service before starting the engine.

-------------------------------------------------------------------------------------------------------------------------------------------------------------

Be alert!  Look ahead and learn to read the terrain.  Be constantly alert for hazards such as logs, rocks and low 
hanging branches.

Severe injury or death can result if your vehicle comes in contact with a hidden obstacle.  Not all obstacles 
are immediately visible. Travel with caution in unfamiliar terrain.

-------------------------------------------------------------------------------------------------------------------------------------------------------------

Follow these precautions when operating in reverse:
1. Always avoid backing downhill.
2. Back slowly.
3. When in reverse, apply the brakes lightly for stopping.
4. Avoid turning at sharp angles in reverse.
5. Never open the throttle suddenly while backing.

Failure to use caution when operating in reverse can result in serious injury or death.  Before shifting into 
reverse, always check for obstacles or people behind the vehicle.  When it s safe to proceed, back slowly.

Do not use the override switch unless additional power is required for vehicle movement.  Use with caution.
Avoid backing on inclines, and avoid turning at sharp angles.

Your ATV is equipped with a reverse speed limiter. The override button should be used with 

caution as rearward vehicle speed is greatly increased.  Do not operate at wide open throttle. Open 
the throttle just enough to maintain a desired speed.

Excessive throttle operation while in the speed limit mode may cause fuel to build in the exhaust, resulting 
in engine popping and/or engine damage.

-------------------------------------------------------------------------------------------------------------------------------------------------------------

Avoid parking on an incline if possible.  If it s unavoidable, follow these precautions:

1. Turn the engine off.
2. Place the gear selector to parking position.
3. Always block the rear wheels on the downhill side as illustrated.

-------------------------------------------------------------------------------------------------------------------------------------------------------------

To achieve maximum traction while riding in 2WD or 4WD, the two rear wheels are mounted solidly on one 
axle and turn together at the same speed. Furthermore, when riding in 4WD-LOCK
(

DIFF. LOCK

), the front wheels also turn together at the same speed. Therefore, unless the wheel on the 

inside of the turn is allowed to slip or lose some traction, the ATV will resist turning. A special turning 
technique must be used to allow the ATV to make turns quickly and easily. It is essential that this skill be 
learned first at low speed.

Always follow proper procedures for turning as described in this Owner s Manual. Practice turning at low 

speeds before attempting to turn at faster speeds. Do not turn at speeds too fast for your skills or the 
conditions. Operate at a slow speed and allow extra time and distance for maneuvers when in 4WD- LOCK 
(

DIFF. LOCK

).

As you approach a curve, slow down and begin to turn the handlebars in the desired direction.  As you do so, 
put your weight on the footboard to the outside of the turn (opposite your desired direction) and lean your 
upper body into the turn. Use the throttle to maintain an even speed through the turn. This maneuver will let the 
wheel on the inside of the turn slip slightly, allowing the ATV to make the turn properly.

-------------------------------------------------------------------------------------------------------------------------------------------------------------

This procedure should be practiced at slow speed many times in a large area with no obstacles. If an incorrect 
technique is used, your ATV may continue to go straight. If the ATV doesn t turn, come to a stop and then 

practice the procedure again. If the riding surface is slippery or loose, it may help to position more of your 
weight over the front wheels by moving forward on the seat.
Once you have learned this technique you should be able to perform it at higher speeds or in tighter curves.
Improper riding procedures such as abrupt throttle changes, 
excessive braking, incorrect body movements, or too much 
speed for the sharpness of the turn may cause the ATV to tip. 
If the ATV begins to tip over to the outside while negotiating 
a turn, lean more to the inside. It may also be necessary to 
gradually let off on the throttle and steer to the outside of the 
turn to avoid tipping over.
Remember: Avoid higher speeds until you are thoroughly 
familiar with the operation of your ATV.

-------------------------------------------------------------------------------------------------------------------------------------------------------------

Auxiliary power outlets provide 12V power for operating accessories such as hand held spot lights.   See your 
dealer.

Careful periodic maintenance will help keep your vehicle in the safest, most reliable condition.
Inspection, adjustment and lubrication of important components are explained in the periodic maintenance 
chart.
Inspect, clean, lubricate, adjust and replace parts as necessary. When inspection reveals the need for replacement 
parts, use genuine parts available from your dealer.

Service and adjustments are critical.  If you re not familiar with safe service and adjustment 

procedures, have a qualified dealer perform these operations.

Maintenance intervals in the following chart are based upon average riding conditions and an average vehicle 
speed of approximately 10 miles per hour. Vehicles subjected to severe use must be inspected and serviced 
more frequently.

-------------------------------------------------------------------------------------------------------------------------------------------------------------

Frequent immersion in mud, water or sand
Racing or race-style high RPM use
Prolonged low speed, heavy load operation
Extended idle
Short trip cold weather operation

Pay special attention to the oil level. A rise in oil level during cold weather can indicate contaminants collecting 
in the oil sump or crankcase. Change oil immediately if the oil level begins to rise. Monitor the oil level, and if 
it continues to rise, discontinue use and determine the cause or see your dealer.

Perform these procedures more often for vehicles subjected to severe use.
Have an authorized dealer perform these services.

Improperly performing the procedures marked with a


could result in component failure and lead to 

serious injury or death. Have an authorized dealer perform these services.

-------------------------------------------------------------------------------------------------------------------------------------------------------------

Perform all services at whichever maintenance interval is reached first.

Steering

Front suspension

Rear suspension

Tires

Brake fluid level

Brake lever/pedal travel

Brake systems

Wheels/fasteners

Frame fasteners

Engine oil level

Air filter, pre-filter

Air box sediment tube

Pre-Ride

Pre-Ride

Pre-Ride

Pre-Ride

Pre-Ride

Pre-Ride

Pre-Ride

Pre-Ride

Pre-Ride

Pre-Ride

Daily

Daily

Make adjustments as needed.  See 
Pre-Ride Checklist on page 58.

Inspect; clean often

Drain deposits when visible

-------------------------------------------------------------------------------------------------------------------------------------------------------------

Coolant

Headlamp/tail lamp

Air filter, main element

Recoil housing

Brake pad wear

Battery

Front gear case oil

Rear gear case oil

Transmission oil

Daily

Daily

Weekly

Weekly

Monthly

Monthly

Monthly

Monthly

Monthly

1 M 

3 M 

10H

20H

25H

25H

25H

25 H

50 H

60 (100)

125 (200)

155 (250)

155 (250)

155 (250)

Check level daily, change coolant
every 2 years

Check operation; apply dielectric 
grease if replacing

Inspect; replace as needed

Inspect periodically

Check terminals; clean; test

Inspect level; change yearly

Inspect level; change yearly

Inspect level; change yearly

Drain water as needed, check often 
if operating in wet conditions

Engine oil change
(break-in)

General lubrication

155 (250)

310 (500)

Perform a break-in oil change at 
one month

Lubricate all fittings, pivots, cables, 
etc.

-------------------------------------------------------------------------------------------------------------------------------------------------------------

Shift Linkage

Steering

Front suspension

Rear suspension

6 M 

1 M 

6 M 

3 M 

6 M 

6 M 

6 M 

6 M 

6 M 

6 M 

6 M 

28H

50H

50H

50H

50H

50H

50H

50 H

50H

50H

100H

310 (500)

310 (500)

310 (500)

310 (500)

310 (500)

310 (500)

310 (500)

310 (500)

310 (500)

310 (500)

620 (1000)

Inspect, lubricate, adjust

Lubricate

Lubricate

Lubricate

Carburetor float bowl

Throttle Cable/ ETC 
Switch

Choke cable

Carburetor air intake 
ducts/ flange

Drive belt

Cooling system

Engine oil change

Drain bowl periodically and prior 
to storage

Inspect; adjust; lubricate;replace if 
necessary

Inspect; adjust; lubricate;replace if 
necessary

Inspect ducts for proper sealing/air 
leaks

Inspect; adjust; replace as needed

Inspect coolant strength seasonally; 
pressure test system yearly

Perform a break-in oil change at 25 
hours/one month

-------------------------------------------------------------------------------------------------------------------------------------------------------------

Oil filter change

Fuel filter

Spark plug

Ignition Timing

Wiring

Oil tank vent hose

Radiator

Valve clearance

Cooling hoses

Engine mounts

Exhaust muffler/pipe

12 M 

12 M 

6 M 

12 M 

12 M 

12 M 

12 M 

12 M 

12 M 

12 M 

12 M 

12 M 

100H

100H

100H

100H

100H

100H

100H

100H

100H

100H

100H

100H

620 (1000)

620 (1000)

620 (1000)

620 (1000)

620 (1000)

620 (1000)

620 (1000)

620 (1000)

620 (1000)

620 (1000)

620 (1000)

Replace with oil change

Inspect routing, condition

Inspect; adjust

Replace yearly

Inspect; clean external surfaces

Inspect for leaks

Inspect

Inspect

Inspect; replace as needed

Inspect

Fuel system

Check for leaks at tank cap, lines, 
fuel valve, filter, carburetor; replace
lines every two years

620 (1000)

Inspect for wear, routing, security; 
apply dielectric grease to connectors 
subjected to water, mud, etc.

-------------------------------------------------------------------------------------------------------------------------------------------------------------

Clutches

 (drive and driven)

Wheel bearings

Brake fluid

Spark arrestor

Idle speed

Toe adjustment

Auxiliary brake

Headlight aim

12 M 

12 M

24 M

36 M

100H

100 H

200 H

300 H

620 (1000)

1000 (1600)

1240 (2000)

1860 (3000)

Inspect; clean; replace worn parts

Inspect; replace as needed

Change every two years

Clean out

Adjust as needed

Adjust as needed

Inspect periodically; adjust when 
parts are replaced

Inspect daily; adjust as needed

-------------------------------------------------------------------------------------------------------------------------------------------------------------


Content      ..     3      4      5      6     ..