CFMoto ATV HX500-S, HX500-L 4x4. Service Manual - part 3


  Index      Manuals     CFMoto ATV HX500-S, HX500-L 4x4. Service Manual


Search            copyright infringement  


Content      ..     1      2      3      4      ..


CFMoto ATV HX500-S, HX500-L 4x4. Service Manual - part 3


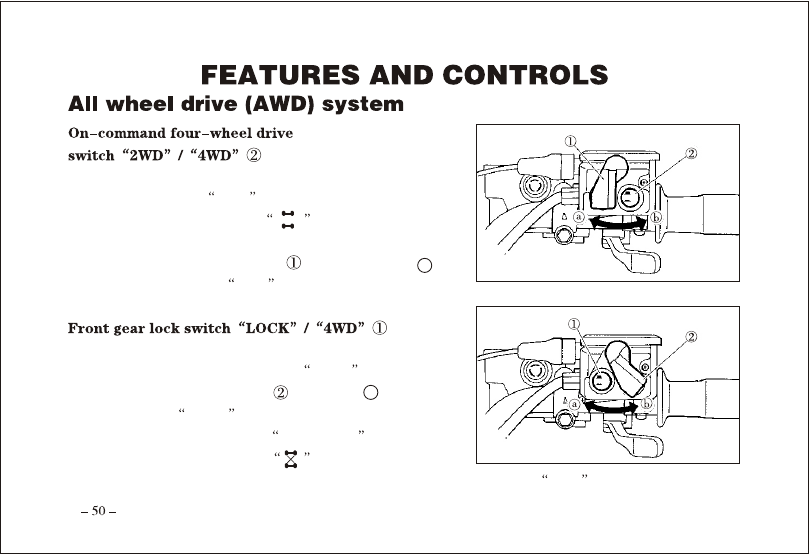
To change from 2WD to 4WD, stop the ATV/Quadricycle, and 

then set the switch to

4WD

. When the ATV/Quadricycle 

is in 4WD, the 4WD indicator


will come on in the 

dashboard display. To change from 4WD to 2WD, stop the 

ATV/Quadricycle, be sure the lever

 is set to position      , 

and then set the switch to

2WD

.

To lock the front gear in 4WD, make sure the on-command 

four-wheel-drive switch is set to

4WD

, stop the 

ATV/Quadricycle, move the lever

 to position      , and then 

set the switch to

LOCK

. When the front gear is locked, 

the front gear lock indicator  (

DIFF.LOCK

) light will 

come on along with the indicator


 in the dashboard display.

To release the front gear lock, stop the ATV/Quadricycle and set the switch to

4WD

.

a

b

-------------------------------------------------------------------------------------------------------------------------------------------------------------

When the switch is set to

LOCK

, the front gear lock indicator light will flash until the front gear is 

locked.
When the indicator light is flashing, turning the handlebar left and right will help the front gear lock to 
engage.
Riding before the front gear lock is properly engaged (e.g., when the indicator light is flashing) will 
cause the engine speed to be limited until engagement is complete.
When the ATV/Quadricycle is in 4WD-LOCK, the 
maximum traveling speed is limited to 35 km/h (22 mph). 
However, if conditions require full engine power to be 
available, push and hold the override switch to disable 
the 4WD-LOCK speed limiter. 

Once the engine is running, movement of the throttle lever will 
increase the engine speed. Regulate the speed of the machine 
by varying the throttle position. Because the throttle is spring-loaded, the machine will decelerate, and the 
engine will return to an idle any time the hand is removed from the throttle lever.
Before starting the engine, check the throttle to be sure it is operating smoothly. Make sure it returns to the idle 
position as soon as the lever is released.

-------------------------------------------------------------------------------------------------------------------------------------------------------------

Check the operation of the throttle lever before you start the engine. If it does not work smoothly, check for 
the cause. Correct the problem before riding the ATV/Quadricycle. Consult your dealer if you can t find or 

solve the problem yourself.

The speed limiter keeps the throttle from fully opening, 
even when the throttle lever is pushed to the maximum.
Turning in the adjusting screw

 limits the maximum 

engine power available and decreases the maximum 
speed of the ATV/Quadricycle.

Do not turn the adjusting screw out more than 12 mm (0.47 in). Always make sure the throttle lever free play 
is adjusted to 3-5 mm (0.12-0.20 in).

-------------------------------------------------------------------------------------------------------------------------------------------------------------

Functions of the respective switch positions are as follows:
ON:
The engine can be started only at this position and the headlights and taillight come on when the light switch is 
on. The key can not be removed in this position.
OFF:
All electrical circuits are switched off. The key can be removed in this position.

-------------------------------------------------------------------------------------------------------------------------------------------------------------

: This indicator comes on when the

2WD

/

4WD

switch is 

set to the

4WD

position.

: The front lock indicator

DIFF.LOCK

in  the four-wheel-drive 

indicator comes on when the

LOCK

4WD

switch is set 

to the

LOCK-4WD

position.

Due to the synchronizing mechanism in the front gear case, the four-

wheel drive indicator may not come on until the ATV/Quadricycle starts moving.

This indicator light comes on when press the turning switch to


This indicator light comes on when the gear selector is in the

L

position.

This indicator light comes on when the gear selector is in the

H

position

This indicator light comes on when the gear selector is in the

N

position.

-------------------------------------------------------------------------------------------------------------------------------------------------------------

This indicator light comes on when the gear selector is in the

R

 reverse position.

This indicator light comes on when the gear selector is in the

P

 (park) position.

This indicator light comes on when press the turning switch to


This indicator light comes on when press the override switch.

This indicator light comes on when press the headlight illumination switch to        .

If the indicator light flashes or the speedometer does not show the speed while riding, have your dealer 
check the speed sensor circuit.

-------------------------------------------------------------------------------------------------------------------------------------------------------------

when the temperature indicator is in the white area of side C, it 

means that the temperature is normal. The red area of side H 

indicates that the temperature is high. In that case please stop the 

engine until the coolant temperature goes down. In case the 

temperature frequently goes high, check coolant capacity or 

consult the local dealer.

The engine may overheat if the ATV/Quadricycle is 

overloaded. If this happens, reduce the load to specification.

After restarting, make sure that the temperature indicator is in the white area of side C. Continuous use 

while the temperature indicator is in the red area of side H may cause damage to the engine.

shows the riding speed. Odometer : shows the total distance traveled.

  indicates the remaining amount of the gasoline in the fuel tank.

F

indicates the total amount 

of fuel is 19L. When the indicator reaches the first point of red mark, fuel should be refilled as soon as possible.

The red mark indicates that the remaining fuel is only about 4.0L.

-------------------------------------------------------------------------------------------------------------------------------------------------------------

The break-in period for your new ATV/Quadricycle is defined as first twenty hours of operation, or the time it 
takes to use the first four full tanks of petrol. No single action on your part is as important as following the 
procedures for a proper break-in. Careful treatment of a new engine will result in more efficient performance 
and longer life for the engine. Perform the following procedures carefully.

Excessive heat build-up during the first three hours of operation will damage close-fitted engine parts. Do 
not operate at full throttle or high speeds for extended periods during the first three hours of use.
Use of any oils other than those recommended may cause serious engine damage.  We recommend the use of 
4 Synthetic Oil for your 4-cycle engine.

1. Fill the fuel tank with petrol.
2. Check the oil level on the dipstick.

Add 4 Synthetic Oil if necessary to maintain the oil level between the minimum and maximum level marks.

3. Drive slowly at first. Select an open area that allows room to familiarize yourself with vehicle operation and 

handling.

4. Vary throttle positions.  Do not operate at sustained idle.
5. Perform regular checks on fluid levels, controls and areas outlined on the daily pre-ride inspection checklist.  

See page 58.

-------------------------------------------------------------------------------------------------------------------------------------------------------------

6. Pull only light loads.

7. During the break-in period, change both the oil and the filter at 25 hours or one month.

If a proper inspection is not done before each use, severe injury or death could result.  Always inspect the 

vehicle before each use to ensure it s in proper operating condition.

-------------------------------------------------------------------------------------------------------------------------------------------------------------

-------------------------------------------------------------------------------------------------------------------------------------------------------------

Engine exhaust contains poisonous carbon monoxide and can cause loss of consciousness resulting in severe 
injury or death. Never run an engine in an enclosed area.

Operating the vehicle immediately after starting could cause engine damage. Allow the engine to warm up 
for several minutes before operating the vehicle.

1. Apply the rear brake pedal.
2. Turn the main switch to

ON

.

3. Shift the gear selector into the neutral or park position.

 When the gear selector is in the neutral or park position, if either indicator light does not come on, ask 

your dealer to inspect its electric circuit.

 The engine can be started in any gear if the rear brake pedal is applied. However, it is recommended to 

shift into neutral or park before starting the engine.

4. Use the starter (choke) in reference to the figure:

o

Position 

 : Cold engine start ambient temperature below 5

(40  F).

o

o

Position 

 : Cold engine start ambient temperature at 0 

(30  F)

30 

 (90  F) and warming up position.

-------------------------------------------------------------------------------------------------------------------------------------------------------------

Position 

 : Cold engine start ambient temperature Above 

o

25 

 (80  F) and warm engine start position.

5. Completely close the throttle lever and start the engine by 

pushing the start switch.

If the engine fails to start, release the start switch, then 
push the start switch again. Pause a few seconds before 
the next attempt. Each cranking should be as short as 
possible to preserve battery energy. Do not crank the 
engine more than 10 seconds on each attempt.
If the battery is discharged, pull the recoil starter to 
start the engine.

6. If the engine is started with the starter (choke) in position 

, the starter (choke) should be returned to 

position

 to warm up the engine. If the engine is started with the starter (choke) in position 

, keep the 

starter (choke) in this position to warm up the engine.

7. Continue warming up the engine until it idles smoothly and return the starter (choke) to position 

before 

riding.

-------------------------------------------------------------------------------------------------------------------------------------------------------------

See the

Break-In Period

section prior to operating the engine for the first time.

To start a warm engine, refer to the

Starting a cold engine

section. The starter (choke) should not be used. 

The throttle should be opened slightly.

Before shifting, you must stop the machine and return 
the throttle lever to the closed position. Otherwise, the 
transmission may be damaged.
Shifting: Neutral to High and High to Low

1. Bring the machine to a complete stop and return the 

throttle lever to the closed position.

2. Apply the brakes, then shift by moving the gear selector along the shift guide.

Make sure that the gear selector is completely shifted into position.

-------------------------------------------------------------------------------------------------------------------------------------------------------------

3. Open the throttle lever gradually.
Shifting: Neutral to Reverse and Reverse to Park

The gear selector cannot be shifted into reverse (R) or park(P) 
without applying the rear brake.

1. Bring the machine to a complete stop and return the throttle 

lever to the closed position.

2. Apply the rear brake pedal.
3. Shift from neutral to reverse or from reverse to park and vise 

versa by moving the gear selector along the shift guide.

When in reverse, the reverse indicator light should be on. If the light does not come on, ask your dealer to 
inspect the reverse indicator light electrical circuit.
Due to the synchronizing mechanism in the engine, the light may not come on until the ATV/Quadricycle 
starts moving.

4. Check behind for people or obstacles, then release the rear brake pedal.
5. Open the throttle lever gradually and continue to watch rear while moving backward.

When you shift into reverse, make sure there are no obstacles or people behind you. When it is safe to 
proceed, go slowly.

-------------------------------------------------------------------------------------------------------------------------------------------------------------

Overloading the vehicle or carrying or towing cargo improperly can alter vehicle handling and may cause 
loss of control or brake instability. Always follow these precautions when hauling cargo:

 Never exceed the stated load capacity for this vehicle.

 Reduce speed and allow a greater distance for braking.

 When operating over rough or hilly terrain, reduce speed and cargo to maintain stable driving conditions.


In the rear rack should be as far forward and as low as possible. Carrying a high load raises the center of 
gravity and creates a less stable operating condition. Reduce load weight when cargo is high. When 
handling off-centered loads that cannot be centered, secure the load and operate with extra caution.


Unsecured loads may shift and create unstable operating conditions, which could result in loss of control 
of the vehicle. Always be sure that the rear rack is lowered.


when operating with loads extending beyond the rack. Stability and maneuverability may be adversely 
affected, causing the machine to overturn. 

-------------------------------------------------------------------------------------------------------------------------------------------------------------

Carrying a load on only the front rack or the rear rack may cause an imbalanced condition and increases 
the possibility of vehicle overturn. Balance loads proportionally between the front rack and the rear rack, 
but do not exceed the stated load capacity.
Use extreme caution when applying brakes with a loaded vehicle. Avoid terrain or situations that may 
require backing down- hill.
Always attach the tow load to the hitch point.
The vehicle should never exceed 10 mph (16 km/h) while towing a load on a level surface.  Vehicle speed 
should never exceed 5mph (8 km/h) when towing loads in rough terrain, while cornering, or while 
ascending or descending a hill.
Do not obstruct the headlight when loading the front rack.

-------------------------------------------------------------------------------------------------------------------------------------------------------------


Content      ..     1      2      3      4      ..