CFMoto motorcycle CF150-A, CF150-C. Service Manual - part 3


  Index      Manuals     CFMoto motorcycle CF150-A, CF150-C. Service Manual


Search            copyright infringement  


Content      ..     1      2      3      4      ..


CFMoto motorcycle CF150-A, CF150-C. Service Manual - part 3


 (3)Selection of spark plug and replacement;

【Selection of spark plug】

Model number: CR9EP

;

CFMOTO genuine part must be used.

【Inspection and replacement of spark plug】

1. Replacement period: 6000km

;

2. Take off spark plug and clean surrounding

.

Use tool to remove the spark plug and use steel


thread to clean carbon deposition or dust

;

3. Check spark plug for any damage or burnt and also check if seal is working and replace parts

 if necessary

;

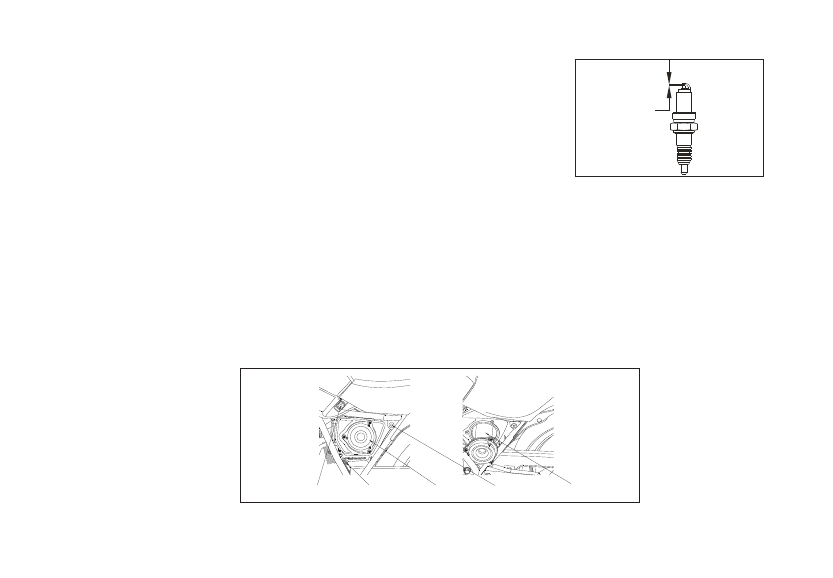
4. Use a feeler gauge to check electro polar

,

standard


is

 0 .8 

to


0.9 mm

;

5. During spark plug, put spark plug onto thread and then tighten with spark plug wrench

;

(4) Air filter cleaning and installation

Pic 18: Position of air filter.

Fuel tank joint 


Hook


Oil filter


  Frame joint


Element

-3 0-

0.8 ~0.9

mm

Pic17

-------------------------------------------------------------------------------------------------------------------------------------------------------------

1. Element of air filter must be replaced in certain period. Service period should be shortened 
in places with a lot of dust or high temperature

2. Air filter must be cleaned after 1000km


ride

,

and after


4000km

,

air filter must be


checked


carefully and cleaned

;

3. Replace the element in case of dirty or crack or damaged

;

clean air filter can improve


engine


performance and prolong its life

;

4. Vehicle is equipped with foam element and could be cleaned with non

-

flammable


coal oil or

 cleaning liquid

;

5. Disassembly: Remove left side cover and then remove tightening bolt and then take out the

 element

;

6. Follow the reverse procedures for assembly

;

NOTE:  Don't get water into the element during wash, it will damage

 engine starting or acceleration performance.

(5)Throttle lever inspection and adjustment

Pic19:  Throttle operation line inspection

;

Upper adjustment tube      tightening


bolt     


Idle


speed


adjustment


bolt

- 31-

-------------------------------------------------------------------------------------------------------------------------------------------------------------

1. Check RH turning lever to full right position for normal


turning


and


whether


position


fixing


is


reliable

;

2. Upper adjustment bolt allows minor adjustment, and same for lower adjustment bolt tube

;

3. During minor adjustment, release tightening screw 2 and then turn 1 for adjustment.

NOTE: 
1. Re-assembly must be done in case of throttle operation line incorrect;
2.Replace the operation line in case of throttle line broken or performance 

failure.

【Carburetor adjustment】

The vehicle idle speed is 1500

±

RPM/min(Neutral gear). Adjust the idle speed after starting the


engine

;

Adjustment: Turn nut 3 clockwise and idle increases

;

Turn nut 3, idle decreases

;

Carburetor idle speed can be adjusted lower decreased in higher temperature

and higher in


lower


temperature.

Users can not often adjust the idle speed and never adjust

 idle speed below 1300, or head cylinder will faster damage 

wear or damage the engine due to insufficient fuel.

WARNING:

-3 2-

Throttle lever adjustment:

1. Throttle lever free travel: 2-6 mm;
2. Upper adjustment bolt tube can be slightly adjusted and bottom bolt tube(join between throttle

 body & throttle cable) can be adjustmend to a certain extent;

3. During slight adjustment, loose tightening bolt 2 and adjust 1;
4. When doing bigger-range adjustment, loose tightening bolt 4 and adjust free travel between

 2-6 mm. 

-------------------------------------------------------------------------------------------------------------------------------------------------------------

 (6)Clutch adjustment:

Clutch is operated by hand. Clutch lever:  free play is 10 to 20 mm

;

Clutch is used to pass power from engine to transmission or cut the power if necessary

;

The clut ch

 lever must be grasped completely or released completely

.

Try to avoid doing only half (half-clutch),


or clutch will be worn or damaged

.

PIC

 20 

shows bigger range of adjustment ,and left pic shows 


smaller adjustment

;

1. Smaller range adjustment: Release tightening bolt and turn small adjustment bolt tube. Turn

 adjustment tube 5 clockwise and clutch free stroke is increased and decreased in anti-clockwise

;

2. Bigger range adjustment: Release 1 tightening bolt on the crankshaft clutch operation line 
and adjust 2 big adjustment bolt tube

Clutch


free


stroke


is


increased


when


big


adjustment


bolt


is


turning


clockwise


and


decreased


in


anti

-

clockwise

;

3. Ride for a while after clutch adjustment to see if clutch can be released

;

4. In case of clutch worn too much or burnt, replacement must be done in CFMOTO service station. 

Small


adjustment


bolt

NOTE:   Please go to CFMOTO service station if vehicle is not in good

 status after your adjustment.

Pic20: Inspection of clutch cable

- 33-

Lock nut

Big adjustment bolt

Clutch lever

Lock nut

Lock nut

Big adjustment bolt

Small


adjustment


bolt

Lock nut

Clutch lever

-------------------------------------------------------------------------------------------------------------------------------------------------------------

(7)Driven chain inspection, adjustment or lubrication

Driven chain contains a lot of parts working together. Good lubrication and proper adjustment

 decides its last life. Ignorance of chain service or maintenance will lead chain wear or damage. 

Chain must be serviced in certain period and replace the chain, big sprocket or small sprocket

 if necessary.

Inspection: 

1.Shift to neutral gear and switch off the engine

;

2.Put


figure


on

 1 

and


sway the


chain

swaying


from

 1 0 

to


20mm

;

3.Check any wear, missing part or damage, replace if necessary

;

4.Check any wear of big & small sprockets and replace in case of any wear, teeth missing or

 broken teeth

;

Lubrication:

1.Clean driven belt, big sprocket and small sprocket. Add proper volume of oil or new lubricant

 onto these parts

;

2.Lubricate every 500 km and maintenance should be more frequent in places with a lot of dust.

Drive  chain 

Turning direction


Tightening clamp

Big


sprocket

Adjustment bolt


Tightening


bolt       

Adjust


scale

Pic21: Inspection of drive chain

-3 4-

-------------------------------------------------------------------------------------------------------------------------------------------------------------

【Drive chain adjustment & replacement】

If adjustment

1. Stop engine and stand up vehicle with main stand, shift to Neutral position

2. Loosen nut of rear wheel shaft, move adjsutable bolt of       to


make


chain


swing


between


10mm


and


20mm

Left

 & 

right


adjustment indication should be at         position

Check


chain


tension


properly

Finally


tighten


nut


of


rear


wheel


shaft


and


lock


nut

    .

If replacement

1. Use snipe nose pliers to remove lock plate


of


drive chain.

2. Use tool to remove big chain


sprocket


and


small


sprocket

.

3. Reinstall chain as reverse procedures and adjust free play of drive chain.
4. Assemble lock plate with open end in the opposite direction of chain running.

⑦  

⑥ 

③  

(8)Front brake check & adjustment

If check

1. Check fluid level of fluid reservoir, and check brake caliper if it’s ok.


2. Check if any leakage or damage of brake fluid reservoir or brake hose.
3. Check brake disc wear
4. When move brake lever, if pressure not enough, please check air bubbles of brake hose or brake

 system.


Must eliminate air bubbles to guarantee brake effect. This work should be done by 

CFMOTO authorized local dealer workshop.

【            】

- 35-

-------------------------------------------------------------------------------------------------------------------------------------------------------------

[Replacement for brake disc & pad]

1. Wh en limit thickness of brake disc reaches 3mm


after long

-

time wear

,

new disc must be replaced.


2. Wh en limi t thickness of brake pad reaches 1.5mm after long

-

time wear

,

new pad mu st be replaced.

3. Before replace brake disc, brake caliper and front wheel should be removed.
4. Before replace brake pad, remove brake caliper and loosen brake spring of caliper.
5

.

After


replacement


of


brake


disc


or


brake


caliper

,

don

'

t drive immediately. Operate brake 

lever several times to make sure brake disc can fit brake caliper very well.

[Front brake light switch]

1. Front brake light switch is located at between front brake


lever


and


master


cylinder

.

2. When grasp brake lever, brake light is on and loosen brake lever, it will be off.
3. If brake light switch broken, replace it immediately.

Pic22: Inspection of front brake

Brake disc

Brake caliper

Brake fluid hose

Master cylinder

-3 6-

-------------------------------------------------------------------------------------------------------------------------------------------------------------

3. Make sure to replace brake disc and pad periodically according to maintenance

 periodical table.

4. Brake system repair and maintenance shoud be done by CFMOTO authorized

 local dealer.

1. Use and refill DOT 3 or DOT 4 brake fluid, and DON'T mix DOT 3 and DOT 4

 fluid together.

2. Fluid is strong corrosive, DON'T splash to human skins. DON'T drink fluid. If

 it happen, please wash it immediately with lots of clean water and go to hospital .

WARNING:

(9)Rear brake check & adjustment

If check

Free play of rear brake pedal: 10~20mm
Stand up motorcycle with main stand and measure free play of rear brake pedal.

There’s indication       on


rear


brake


arm

    .

There’s scale on cover of rear brake drum 


If brake indication align with brake scale when step


pedal brake

,

that


mean


brake shoe is worn

 out

,

please replace brake shoe immediately

.

④  

① .  

[              ]

Pic23: Inspection of rear brake

Cover of rear

 brake

Scale

Indication

Rear brake arm

Adjustable nut

Rear brake light

Adjustable nut

- 37-

-------------------------------------------------------------------------------------------------------------------------------------------------------------

[Adjustment & replacement]

When adjust rear brake, rotate adjustable nut      clockwise to reduce free play and increase free


play if by anti

-

clockwise

.

Disassemble muffler and drive chain, then remove nut of rear wheel shaft  and undo fixing nut

 of rear brake , finally remove rear wheel and rear brake to replace rear brake or brake shoe.This


work should be done by


CFMOTO


authorized local dealer workshop

.

1. When brake shoe assembled into brake drum, spring hook should be fixed

 completely and properly.

2. After adjusting free play of rear brake, Need to check by testing drive.
3. Step on and off rear brake pedal several times, rotate rear wheel to check if it

 can run freely. 

4. After adjustment of free play,      arc groove must be in the arm pin of rear brake. 
5. If not adjustable properly, please go to local dealer workshop to do it.

WARNING:

[Rear brake light switch adjustment]

Rear brake light switch is located on bracket of footpedal which is at the rear and right side of

 engine.

If light ON lately, rotate       adjustable


nut


by


anti

-

clockwise


direction

.

If light ON earlier, rotate      adjustable


nut


by


clock

-

wise


direction

.

⑦  

⑦  

-3 8-

-------------------------------------------------------------------------------------------------------------------------------------------------------------

3. If overfilled, use clean water to wash.
4. When use new battery, if produced for over 6 months or surronding 
temperature is lower 0 degree, NEED to recharge battery to use.

Location of battery
1.Connection hole
2.Battery
3.Hook hole of right side cover

4.Tie band of battery
5.Connection hole of fuel tank

Pic24: Location of battery

(10)Battery maintenance

1. Use distilled water to fill into battery. Normal water can reduce lifetime

 of battery use.

2. Keep electrolyte between upper and lower level. 

NOTE:

1. When charging battery, it will generate flammable gas, so keep far away from fire,

 spark or cigarette lighting. Keep well-ventilated at changing place.

2. There are sulphuric acid in electrolyte, DON'T touch it with skin or splash to eyes,

 because it will burn skin or eyes. Please wear protecting clothes and goggles. 

3. Use clean water to wash immediately if electrolyte splash to skin.
4. Wash eyes with clean water at least 5 minutes and go to hospital if it splash to 
eyes.
5. Electrolyte is toxic, DON'T drink it. If carelessfully it goes into stomach, DO drink

WARNING:

- 39-

-------------------------------------------------------------------------------------------------------------------------------------------------------------

 lots of clean water or milk and edible oil , then go to hospital immediately.

6. Keep away from children.

[Fill electrolyte of battery]

Battery


specification


is

 1 2

N

7 - 4

A

.

Battery is located inside right side panel

.

When remove


right


side


panel

need


to


disconnect


fixing


points


with


frame


and fuel tank.

remove


right


side


panel


from


hook


hole

   .

When filling electrolyte

,

open cover of battery

,

then fill electrolyte into


each unit of battery.

Keep


it’s level between upper and lower line

.

Waiting for

 30 

minutes to check if its leverl between


upper and lower line

.

After that

,

if


it’s lower than Lower line , only distilled water can be refilled.

 If over


Upper line

,

it’s overfilled and will erode frame and other components. It will also cause

 short circuit between


each unit and burn battery. When refilling distilled water , be sure to use air 

blow-by hose to remove air inside battery.

①  

⑤ 

Finally

③ 

[Check & Adjustment]

Check electrolyte


level


monthly


to


guarantee


it’s between upper and lower line. If it’s lower

 than Lower line, need to refill distilled water into battery, but don’t overfill to over Upper line.

If Not using motorcycle for long time, please remove battery from vehicle and fully charged.

 Disconnect            


of battery firstly.

Regularly clean anode


and


of


battery

.

Connect


anode


firstly and then cathode.

 DON

'

T connect wrongly.

If repalce battery, be sure to use same specification of battery.

[Replacement of fuse]

Rated current of starter relay fuse is 20A

.

Starter


relay


fuse


is


located


behind


battery

.


Auxuliary


fuse


is


inside


rubber


protector.

Fuse of main cable is under seat. Its rated current is 10A

.

There’s also auxiliary fuse.

cathode 

cathode 

-4 0-

-------------------------------------------------------------------------------------------------------------------------------------------------------------

If fuse is often burned, please go to CFMOTO authorized local dealer workshop to repair.
Replace new fuse after disconnect used fuse.

When replace fuse, ignition switch and other switchs must be off to avoid 
short circuit. Never use fuse which is different rated current with above-
mentioned rated current. Otherwise it will burn vehicle. It will cause light 
cannot be switched on when driving or use at night.

WARNING:

(11)Maintenance for engine cooling system

[Location of radiator]


is


located


at


front


of


vehicle


as


picture


shows

.

Coolant type

Only high-quality of anti-freezing and anti-corrosion long life coolant can be used for

 aluminium-alloy engine. There’re 50% anti-freezging coolant and 50% distilled water.

ATTENTION:

1. Engine coolant is special liquid, cannot use normal water or other

 liquid. Otherwise it will damage engine.

2. Please go to CFMOTO authorized local dealer to buy good quality coolant.

② 

How to check coolant level

1. Stand up motorcycle with main stand
2. Check coolant level when engine is cooling down
3. Coolant level should be between UPPER


line


and


LOWER


line

- 41-

-------------------------------------------------------------------------------------------------------------------------------------------------------------

How to refill coolant when coolant level is under LOWER line 

1. Stand up motorcycle with main stand
2. Remove left and right side cover of fuel tank 
3. Remove fuel tank
4. Open       cover of reservior tank as picture shown and refill until coolant level close to       

UPPER line 

5. Reverse above procedure to finish operation.

⑦  

ATTENTION:

When refill coolant or coolant leakage, please go to CFMOTO authorized
 local dealer workshop to do or repair.

(12)Cleaning & Storage

[Cleaning]

Regularly clean motorcycle and check if any damage ,wear or leakage.

Pic25: Cooling system

Cap of coolant filler

Radiator

Cooling fan

Lower limit

Upper limit

Cap of reservoir tank

Reservoir tank

After cleaning, start engine for several minutes. Use lubricant to make drive chain smoother and

 check if brake is ok before driving.

-4 2-

-------------------------------------------------------------------------------------------------------------------------------------------------------------

1.  Components which cannot be washed by high-pressure water pipe: 

Ignition switch, Electric switches, Dashboard, Electric components, Battery, 
Air filter, Wheel rim, Outlet of Exhaust pipe, Parts under fuel tank.

2. Cleaning sometimes reduces brake performance. Need to check and adjust

 before driving.

WARNING:

[Vehicle storage]

After daily use, keep motorcycle at dry and well-ventilated place.
If long-time storage (more than 30 days), NEED to check and maintain before storage to avoid

 problems when driving.

Besides above-mentioned maintenance, following action should be done.
1. Clean and make it dry


and


cerated


for


painted


plastics

.

2. Drain out fuel from fuel tank and spray anti-corrosion material.
3. Remove spark plug and inject 15~20ml oil into cylinder, then reassemble spark plug.
4. Remove battery and keep it at well-ventilated and dry place. Avoid sunshine on motorcycle 

   for long time.

5. Charge air into tire to stipulated pressure and keep front wheel and rear wheel away ground.
6. Use good quality mantle to cover motorcycle and keep dry and well-ventilated place.

[Driving after storage]

1. Remove mantle from motorcycle and clean it.
2. Measure battery voltage, if voltage value is lower than

 1 2.30

V

,

NEED


to


recharge battery


slowly

.

Afterc harged fully

,

assemble it on motorcycle

.

3. Clean anti-corrosion material and refill fuel into fuel tank.
4. Test motorcycle at safety place to check if it’s ok.

- 43-

-------------------------------------------------------------------------------------------------------------------------------------------------------------

(13)Motorcycle use time-limit and Disposal

[Use time-limit]

Please follow local transportation department regualtions or rules.

[Disposal]

How to deal with used engine oil
Pour used engine oil into plastic barrel and send it to recycled company.
DON’T drain used engine oil to anywhere to avoid pollution.
How to dispose other used material
1. Classify these parts such as used battery, used bulb, used filter element, used plastics, used
    tires and so on, and put them into dustbin for recycle.


DON’T throw at your disposal and drain

out 

to pollute environment.

2. Scrap motorcycle upon regulations of local transportation department.

 (14)Adjustment values of motorcycle

Freeplay of hand brake lever: 10

- 2 0

mm


Freeplay


of


throttle


lever

: 2 - 6

mm

Freeplay of pedal brake


lever

: 1 0 - 20

mm


Freeplay


of


clutch


lever

: 1 0-20

mm

Drive chain looseness: 10

- 2 0

mm


Clearance


of


spark


plug

: 0.8-0 . 9

mm

Clearance of inlet&outlet valve: 0.10

- 0.15

mm


Torque


of


tighten


nut


of


rear


shock


absorber

: 3 5 - 45

N

.

m

Torque of tighten nut of handlebar: 10-14N.m
Torque of tighten nut of front fork: 50-80N.m
Torque of tighten nut of front wheel shaft: 50-80N.m
Torque of tighten nut of steering system: 60-90N.m
Torque of tighten nut of rear wheel shaft: 50-80N.m
Torque of tighten bolt fixing front shock absorber and upper connecting plate: 10-14N.m
Torque of tighten bolt fixing front shock absorber and steering column: 10-14N.m
Torque of tighten nut of suspension: M8 (20-30N.m) , M10(30-40N.m)

electrolyte

-4 4-

-------------------------------------------------------------------------------------------------------------------------------------------------------------

(15)Main specifications for CF150-A

Item

Specifications

Vehicle 
chassis

Maker

Model

Technical Standard

Brand

Type

VIN serail No.

Persons 

Steering 

Gear type

Brake

Brake operation

Clutch

Clutch


operation

Engine Starting

Length.Width. Height

Wheel base

Minimum Ground Clearance

Complete vehicle kerb mass

Max. load

Volume of fuel tank

Number of tire

Size and pressure of front wheel and tire

Size and pressure of rear wheel and tire

Ignition 

Zhejiang CFMOTO Power Co., Ltd.

CF150-A

Q/CFD004

CFMOTO

2-wheel motorcycle

LCEPDKL2XXXXXXXX

Max. 2 people (driver and passenger

)

Handlebar

5-speed gear

Front: Disc brake / Rear:Drum brake

Front: Hand brake/Rear: Pedal brake

Wet

Clutch lever

Electric start

2040mmx750mmx1070mm

1280mm

170mm

128kg

150kg

15 L

2

2.75-18   42P

3.25-18   52P

CDI

Spark plug type

CR9EP

- 45-

Specifications

Zhejiang CFMOTO Power Co., Ltd.

CF150-C

Q/CFD013

CFMOTO

2-wheel motorcycle

LCEPDKL6XXXXXXXX

Max. 2 people (driver and passenger

)

Handlebar

6-speed gear

Front: Disc brake / Rear:Drum brake

Front: Hand brake/Rear: Pedal brake

Wet

Clutch lever

Electric start

2040mmx750mmx1070mm

1280mm

170mm

128kg

150kg

15 L

2

2.75-18   42P

3.25-18   52P

CDI

CR9EP

-------------------------------------------------------------------------------------------------------------------------------------------------------------


Content      ..     1      2      3      4      ..