CFMoto motorcycle CF150-A. Service Manual - part 3


  Index      Manuals     CFMoto motorcycle CF150-A. Service Manual


Search            copyright infringement  


Content      ..     1      2      3      4      ..


CFMoto motorcycle CF150-A. Service Manual - part 3


2-5

 2 VEHICLE BODY & MUFFLER

 2

2

2

2

2

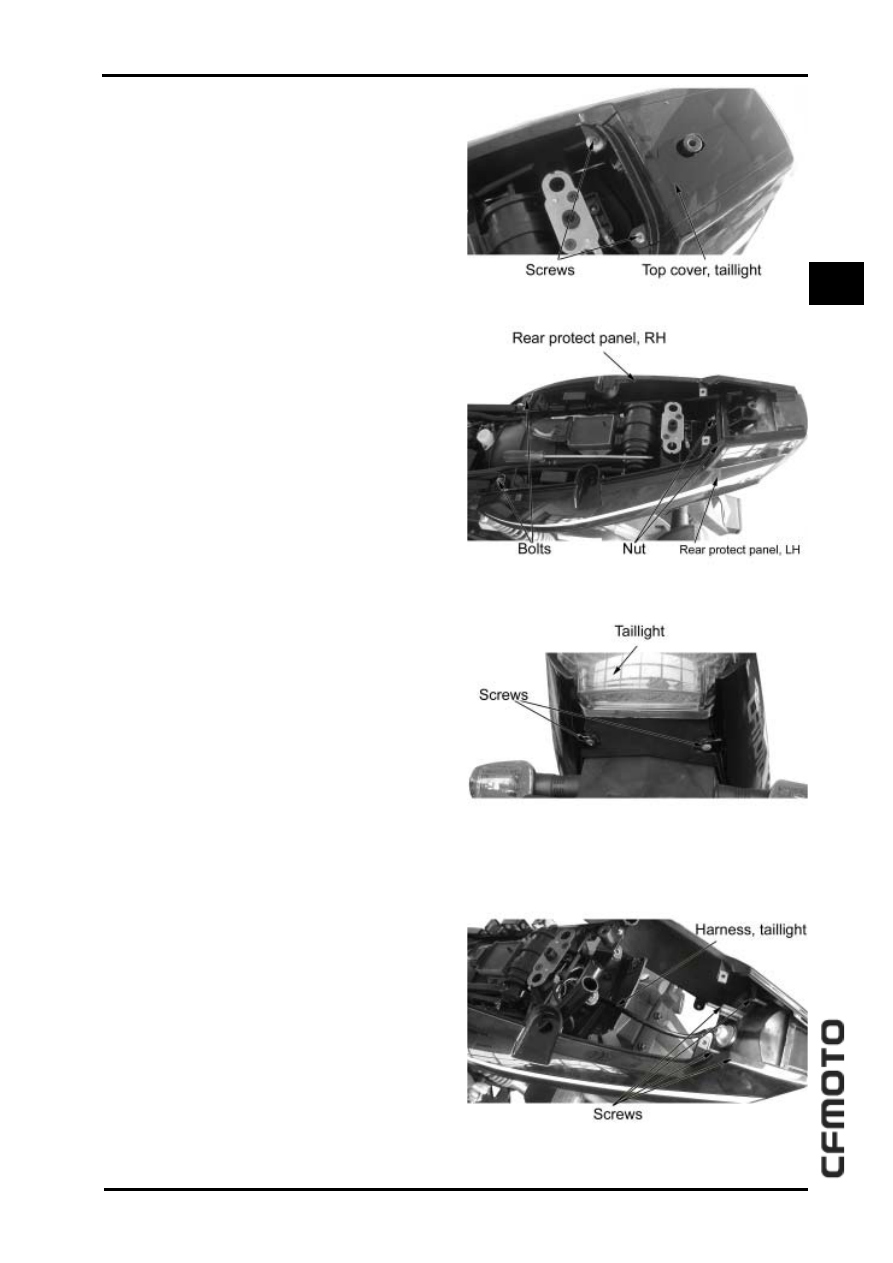
Top cover ,tail light

Remove

Remov seat,rear rack

Loosen tapping screw,pulling back tail light  top

cover

Remove top cover of tail light

Installation

Reverse the removal procedures for

installation.

Backpalte(LH&RH)

Remove

Remove seat,rear rack

Remove top cover of tail light

Loosen 2 bolts &2 nuts

Loosen 2 tapping screws

Pull back backplate(L&R)and tail light

Pull up connector of tail light cable

Loosen 4 tapping screws

Remove backplate(L&R)

Installation

Reverse the removal procedures for

installation.

-------------------------------------------------------------------------------------------------------------------------------------------------------------

2-6

Rear license bracket&rear

reflector&rear fender

Remove

Remove seat,rack,top coverof tail light and

backplate(L&R) in turn.

Loosen 2 bolts (fix nut 1 at the back of fender

with spanner),remove rear license bracket

Loosen nut 2,remove rear reflector

Loosen 2 screws

Loosen 2 bolts

Loosen 2 screws

Pull up connector of rear turn light cable

Remove rear fender

Installation

Reverse the removal procedure for installation.

Rear innerfender

Remove

Remove seat,rack,top cover of tail light and

backplate(L&R) in turn .

rear fender

Loosen 2 bolts

Remove rear innerfender

Installation

Reverse the removal procedures for

installation.

FENDER exploded view (R)

-------------------------------------------------------------------------------------------------------------------------------------------------------------

2-7

 2 VEHICLE BODY & MUFFLER

 2

2

2

2

2

Front fender

Remove

Loosen threaded sleeve(arrows of flexible shaft

,autometer),remove flexible shaft of autometer

Loosen 2 bolts 1 at left inboard of front fender

Loosen 2 bolts 2 at right inboard of front fender

remove front fender

Installation

Reverse the removal procedures for

installation.

Cover of chain

Loosen botl 1

Loosen botl 2

Pull it up ,remove chain cover

Installation

Reverse the removal procedures for

installation.

-------------------------------------------------------------------------------------------------------------------------------------------------------------

2-8

lock bracket of seat, helmet

lock

Remove

Loosen 2 screw 1

Remove lock bracket

Remove dragline of seat

Loosen screw 2

Remove helmet lock

Pull up dragline of seat

Remove the dragline and lock of helmet

Installation

Reverse the removal procedure for installation.

Large shade comp.

Remove

Loosen 2 bolts 1

Loosen 2 bolts 2

-------------------------------------------------------------------------------------------------------------------------------------------------------------

2-9

 2 VEHICLE BODY & MUFFLER

 2

2

2

2

2

Loosen 1 bolt 3

Pull up connector of front turn light cable

and connector of head light cable

Remove large shade comp.

Installation

Reverse the removal procedures for

installation.

Headlight cover

Remove

Remove headlight cover

Loosen 4 bolt ,remove front turn light

Loosen 5 tapping screw,5 screw ,remove head

light

Loosen 4 nut 1,renmove air deflector and front

cover of Headlight

Lloosen nut 2,remove front turn light

Installation

Reverse the removal procedures for

installation.

LARGE SHADE COMP. exploded view (R)

-------------------------------------------------------------------------------------------------------------------------------------------------------------

2-10

Muffler ,Triangular shield(R)

Remove

Remove clip

Remove outlet pipe of gulp valve

Remove 2 bolts in muffler

Loosen bolt 1 and nut ,remove muffler

Loosen bolt 2,remove triangular shield(R)

Installation

Reverse the removal procedure for installation.

triangular shield (LH)

Lloosen bolt 1

Loosen bolt 2

Remove triangular shield(LH)

Installation

Reverse the removal procedures for

installation.

-------------------------------------------------------------------------------------------------------------------------------------------------------------

2-11

 2 VEHICLE BODY & MUFFLER

 2

2

2

2

2

Layout of Main parts

Cable

Remove

Loosen screw

Remove connector of choke cable out of

carburetor,then can remove choke cable

Remove top cover

Press spring of throttle valve

Remove throttle cable out of throttle valve,then

can Remove throttle cable

Installation

Reverse the removal procedures for

installation.

Attention

You must assemble throttle cable as shown on

the assembly

Make sure to protect needle vavle

-------------------------------------------------------------------------------------------------------------------------------------------------------------

3-1

 3 Inspection and Adjustment (vehicle body)

 3

3

3

3

3

Maintenance information

..................3-1

Periodical replacing parts chart

........3-2

Fuel switch, throttle cable, chain

......3-3

Air filter

..........................................3-4

Rear drum brake, clutch, brake fluid

.......3-5

Suspension, bolt, nut, tire

.....................3-6

Front & rear axle, steering column

.........3-6

Maintenance information

Note:

z

It is forbidden to run the engine for long time in closed place or place without nice ventilation,

because the tail gas contains poisonous elements such as carbon monoxide (CO) etc.

z

When the engine just stops, the temperature of muffler and engine is still high; they will

burn the skin if they touch it. Uniform with long sleeves and gloves must be worn for

operation when overhaul is necessary while the engine just stops.

z

Gasoline is easily combustible, so no smoking or naked fire is allowed at the operation

site. Not only flames, but also electric sparks shall be avoided. Besides, the vapoured

gasoline is explosive, please operate it in the place with nice ventilation.

z

Please be cautious that do not let the turning pieces such as driving system etc as well as

movable pieces clip your hands or clothes.

Note:


The vehicle must be placed in an even and stable place, raise the vehicle properly with the main

support of the vehicle or maintenance bracket.

-------------------------------------------------------------------------------------------------------------------------------------------------------------

3-2

P e rio dica l  rep la c in g  parts   ch a rt 

T his  m o torc ycl e m us t d o pe riod ica l m ai nte nanc e re gu larl y. K e ep  m o torc ycle b e c lea n b efo re do ing  

m ain tena nc e. 

T im el y Ins pec t,  Clean , A d ju st,  Lubr ica te o r R ep lac e M ark : “I”;  Cl ean : “C ”; R ep lac e:” R”;  

Lu bric ate :”L”  

W ith o u t * m a rk  ite m : us er  do   m ain tenan ce b y him se lf. O r  go  to  C FM OT O  m a in ten a n ce 

stati o n   to   do   m a in ten an ce . 

W ith  * m ark  item :  d o m ain t en an c e b y C F M OT O  m ain ten ance  tech n ica l p e rs o n.  If u se r h as  

sp ecia l too l,  repl ace m en t  p ar ts   or   m ai nten an ce   kno w ledg e , h e   can   d o   m a inte n an c e  b y  

h im sel f.  

W ith  ** m ar k i tem :  In  or d e r  to  ens u r e v eh ic le d ri vin g  safe ty, o n ly C F M O TO   m ain te n anc e 

tec hn ic al p erso n d o  m a in te n anc e. 

R em ark   1

W he n dri ving  th is  m o torc yc le i n d us t are a, m a inte nanc e  peri od s ho w  m ust  be c ut s ho rt.   

R em ark   2

K ilo m e ters  on  odo m e ter a re ov er t he m a xim al  num be r, pe riod ic al m ai nten an ce  m u st b e 

do ne as regu lat ed k il om ete rs a s th e c hart.  

R em ark   3

O nl y C F M OT O m ainten anc e Tec hnic al per so n do  m a inte nan ce  an d a dju stm en t. 


Fr eq u e n cy 

Ir e m  

In te rva l 

K ilom ete rs (km )

R e m a rk   2


1 0 0 0km   40 0 0 km   8 0 0 0km  

1 20 0 0 km  

R e m a rk 

*fu el  ta n k,  fu el 
s witch ,  fu e l  pip e 

D aily 

Tim e ly  m a in tain   o r  r ep la ce,  w h e n   d am a ge , 

a ge   or  b lo c kin g  


*fu el  t hr ottle 


I  

b e fo re   u se  

*ca rb u re to r  & id le  


I  


A ir   filter   &   e le m e n t 

R e m a rk 

1

  C  

C  

R  

C  


Sp ark  p lu g   

I  

R  


E n gin e  lu b rica tio n  o il 

N e w   m otor cyc le   m u s t  r e place ,  wh e n   k ilom e te rs   o n   o do m e ter   3 00 k m

6 0 0 km

10 0 0 km .  Aft er   fo rm er   m a in te n a nce ,  d o  re p la cem en t  e ach   15 0 0  

km  

L u b rica tio n  oil filter  

A n nu a l  C  

C  

C  

C  

R  


D rivin g cha in , 
s p ro c ket  

R e m a rk 

1


e a ch   5 00 km :  I

L  

*b ra ke   p a d 


ea c h   1 0 0 0km :  I

R  

**b ra ke   flu id 


e ve ry  2   yea rs:  R  

**fro n t  &   r ea r   b ra ke  
s yste m  

R e m a rk  3  

I  

b e fo re   u se  

*S w itc h    

I  

b e fo re  

u se  

*lig h t,  h o rn 


I  

b e fo re   u se  

*b a tter y  M o n th ly 

I  


F u s e  o r o ve rlo a d  
p ro te c to r 

 I 

I  I  I 


C on n e cting  w ire  


I  


**th ro ttle  a d ju s tm e n t 

R e m a rk 3  

I  


*clu tc h    

I  

b e fo re  

u se  

*su sp en s ion   system  


I  


*stre ng the n   n u t  an d  
b o lt 

  I 

I  I 

b e fo re  

u se  

*w he e l   

I  

b e fo re  

u se  

**s tee r in g  co lu m n  
b e a rin g  

R e m a rk 3  

I  


**  e ng ine   in s p ectio n 

R e m a rk 3  

I  


-------------------------------------------------------------------------------------------------------------------------------------------------------------

3-3

 3 Inspection and Adjustment (vehicle body)

 3

3

3

3

3

Fuel switch

Check the oil pipe for any aging or damage.

In case of any aging or damage with the fuel pipes,

replace with new ones.

Check if there is cracks or bending with the vacuum

tube.

Replace it with a new one.

Torque:2.5N.m

Warning:

No smoking and fire

Throttle cable

Turn the throttle handle, and check if it can turn

smoothly.

Check the outer clearance of throttle cable.

clearance:2-6mm

Turn adjustor to adjust throttle cable clearance

Chain

Inspect transmission chain slackness

slackness:10-20mm

Chain adjustment:

1. loose nut of rear axle

2. loose nut of chain adjustor, adjust left and right

chain adjustors to same scale

3. turn rear wheel, check chain slackness

4. fasten adjustort nut, and then fasten rear axle nut

Caution:

After chain adjustment, must inspect clearance of

brake pedal.

-------------------------------------------------------------------------------------------------------------------------------------------------------------

3-4

Air filter

Remove 3 fixing bolts

Take out air filter element

Take out and inspect sponge from air filter element:

1. If damaged, replace

2. If dusty or dirty, clean

-------------------------------------------------------------------------------------------------------------------------------------------------------------

3-5

 3 Inspection and Adjustment (vehicle body)

 3

3

3

3

3

Rear drum brake

When step rear brake pedal, mark needle point the

limit. It prove that brake shoes have weared

completely. Replace new brake shoes timely.

Brake clearance

Front(hand) brake clearance:10-20mm

Rear(foot) brake clearance: 10-20mm

Clutch

check clutch clearance:10-20mm

1. large adjustment: loose locking nut, turn large ad-

justment screw tube and adjust clearance.

2. slight adjustment: loose locking nut, turn slight

adjustment crew tube and adjust clearance

Brake fluid

keep steering handle straight, insepect brake fluid

level of up brake pump and ensure the level between

up limit and down limit.

Appointed brake fluid:DOT3 or DOT4 brake fluid

-------------------------------------------------------------------------------------------------------------------------------------------------------------

3-6

Front suspension

Hold tight the front brake lever, press  the front

suspension up and down several times.

Check front shock absorber for oil leakage,

damage or

looseness of the fastening parts.

Rear suspension

Press rear suspension up and dowm and check

if rear shock absorbers have big play and every part

has abnormal noise or loosen connection

 press rear wheel and

move it side to side. And check if rear hanging

pivot has abnormal noise or loosen connection

Bolt, Nut

Check if bolts or nuts loosen. If loosen, tighten it as

appointed torque.

Tire

Inspect tire and check if it has crack or damage

Check the abradability of tire. If the abradability reach

the maximum(triangle), replace tire.

Check the tire pressure as right picture as right illus-

tration regulation.

Caution:

check tire pressure when tires are cooled

.

Front & Rear axle

check if front axle loose. If loose, tighten it as ap-

pointed tourque.

Front axle nut tourque

: 60-80N

.

m

check if rear axle loose. If loose, tighten it as ap-

pointed tourque.

Rear axle nut tourque

: 80-100N

.

m

Steering handle

Move steering handle side to side. and check if wires

have interference

Trun front wheel, check if front wheel has interference.

If front wheel does not move side to side smoothly,

check if steering axle tighten or not

-------------------------------------------------------------------------------------------------------------------------------------------------------------


   3 Engine Inspection and Adjustment

 3

3

3

3

3

                     Inspection and Adjustment

Inspection Period

..........................................   3-8

Inspectionn and Adjustment process

.............3-9

Valve clearance

.............................................. 3-9

Engine idling

..................................................  3-10

Spark plug

.....................................................   3-10

Air filter

..........................................................    3-11

Lubrication system inspection

......................  3-12

Cooling system inspection

............................  3-14

Cylinder pressure inspection

.......................   3-15

Engine oil pressure inspection

.....................  3-16

  3-7

  3-7

  3-7

  3-7

  3-7

-------------------------------------------------------------------------------------------------------------------------------------------------------------

 3-8

 3-8

 3-8

 3-8

 3-8

-------------------------------------------------------------------------------------------------------------------------------------------------------------


   3 Engine Inspection and Adjustment

 3

3

3

3

3

Inspection and Adjustment-process


 Introduce detail inspection information base on

above item list.

Valve clearance

First inspection for every forty hours after twenty hours

running in.hereafter,check one time every forty hours or

every 1000km.Must to inspect after remove cylinder

cover.

Big noise if big valve clearance,power decrease if small

valve clearance.Check valve clearance based on in-

spection period. if necessary,need to adjust it .Proce-

dures as follows:

z

Remove oilet plug screw 1.

z

Remove the bolt of front cover(left)2.

z

Remove valve cage cover 3.

z

Turn crankshaft through the screw hold of  the front

cover(left) ,then,adjust the TDC reticle of the flywheel

of magnetor to aim at the reticle of up oiletof front

cover(left).

z

Check the clearance between valve bottom  and the

adjustable bolt of rocker .

Valve clearance

Cold state of engine

Intake valve:0.06-0.08

exhaust valve:0.10-0.13

Attention:Inspection and adjustment of valve

clearance should proceed in the cold state

of engine,and in the TDC of pistion by filler

gauge.

If valve clearance exceed specified valve,adjust it in

the prescribed limit by special tools. Process: loosen

adjustable bolt and nut.

Loosen the adjustable bolt and nut of valve clearance,

the filler gauge mat between the top of valve (intake

valve:0.07mm thickness,exhaust valve:0.12mm) and

adjustable valve bolt.tighten the valve adjustable bolt,

make slight   contact with filler gauge,tighten bolt and

nut.


 3-9

 3-9

 3-9

 3-9

 3-9

-------------------------------------------------------------------------------------------------------------------------------------------------------------


Content      ..     1      2      3      4      ..