CFMoto UTV Terracross CF625-3, CF500-6, CF625-6. Service Manual - part 8


  Index      Manuals     CFMoto UTV Terracross CF625-3, CF500-6, CF625-6. Service Manual


Search            copyright infringement  


Content      ..     6      7      8      9     ..


CFMoto UTV Terracross CF625-3, CF500-6, CF625-6. Service Manual - part 8


Battery

Improperly connecting or disconnecting battery cables can result in an explosion and cause serious injury or
 death. When removing the batter


always disconnect the negative (black) cable first. When reinstalling the


battery, always connect the negative (black) cable last.

Battery Removal

1. Remove the driver

'

s seat. See page 34.

2. On conventional batteries, remove the battery vent tube.
3. Disconnect the black (negative) battery cable


first

.

4. Disconnect the red (positive) battery cable 
last.
5. Lift the battery out of the vehicle. Be careful 
not to tip a conven-tional battery sideways, 
which could spill electrolyte.

CAUTION

If electrolyte spills, immediately wash it off with a solution of one tablespoon baking soda and one cup water

 to prevent damage to the vehicle.
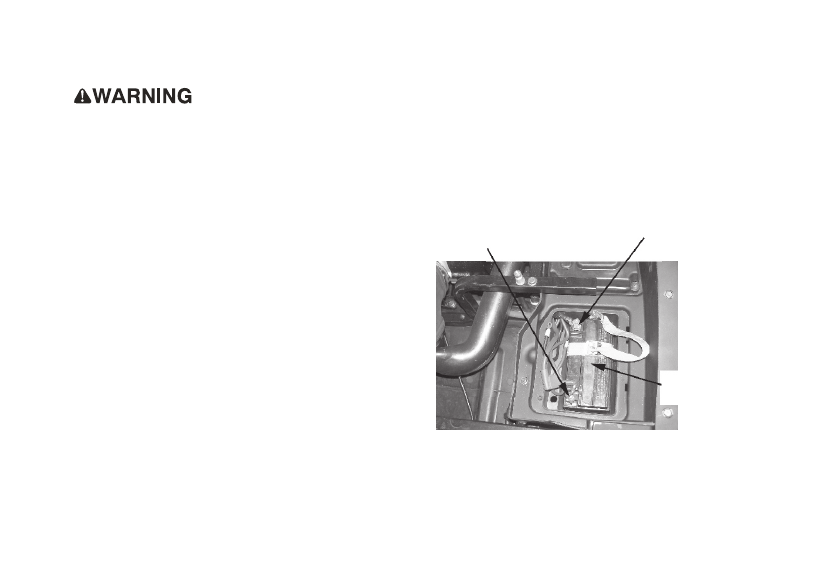
Battery  

-111-

Positive

 (

red

)

Negative

 (

black

)

-------------------------------------------------------------------------------------------------------------------------------------------------------------

BatteryBattery 

Installation

Using a new battery that has not been fully charged can damage the bat-tery and result in a shorter life. 
It can also hinder vehicleperformance. 
Follow the battery charging instructions on page 119 before installing the battery.
1. Ensure that the battery is fully charged.
2. Place the battery in the battery holder.
3. On conventional batteries, install the battery vent tube (sealed bat-teries do not have a vent tube).

NOTE: The vent tube must be free of obstructions and securely installed. 
Route the tube away from the frame and vehicle body to prevent contact with electrolyte.


Battery


gases


could


accumulate


in


an


improperly


installed


vent


tube


and


cause


an


explosion

resulting


in


serious


injury


or


death

Always


ensure


that


the


vent


tube


is


free


of


obstructions


and is securely

 installed as  recommended. 

4. Coat the terminals with dielectric grease or petroleum jelly.
5. Connect and tighten the red (positive) cable first.
6. Connect and tighten the black (negative) cable last.
7. Verify that cables are properly routed.
8. Reinstall the driver

'

s seat.

-112-

-------------------------------------------------------------------------------------------------------------------------------------------------------------

Battery
Battery Storage

Whenever the vehicle is not used for a period of three months or more, 
remove the battery from the vehicle, ensure that it's fully charged, and 
store it out of the sun in a cool, dry place. Check battery voltage each 
month during storage and recharge as needed to maintain a full charge. 
See page 114.

NOTE:

 Battery


charge


can


be


maintained


by


using


a


Battery


Tender


charger or by charging about once a month to make up for normal self-
discharge. Battery Tender can be left connected during the storage 
period, and will automatically charge the battery if the voltage drops 
below a pre-determined point. 

Battery


Fluid


A poorly maintained battery will deteriorate rapidly. Check the battery fluid level often. Battery


vol

:

12V  30Ah


CFMOTO

-113-

-------------------------------------------------------------------------------------------------------------------------------------------------------------

Battery

Battery Charging (Conventional Battery

)

1. Remove the battery from the vehicle to prevent damage from leak-
ing or spilled electrolyte during charging. See page 111

.

2. Charge the battery with a charging output no larger than 1/10 of the battery

'

s amp/hr rating. 

Charge as needed to raise the specific grav-ity to 1.270 or greater.
3. Reinstall the battery. See page 112

Battery Charging (Sealed Battery

)

The following battery charging instructions apply only to the installa-tion of a sealed battery. 
Read all instructions before proceeding with the installation of this battery.
The sealed battery is already filled with electrolyte and has been sealed 
and fully charged at the factory. Never try the sealing strip off or add 
any other fluid to this battery. 
The single most important thing about maintaining a sealed battery is to 
keep it fully charged. Since the battery is sealed and the sealing strip 
cannot be removed, you must use a voltmeter or multimeter to measure 
DC voltage.

An overheated battery may explode, causing severe injury or death. Always watch charging times carefully. 
Stop charging if the battery becomes very warm to the touch. Allow it to cool before resuming charging.

For a refresh charge, follow all instructions carefully.
1. Check the battery voltage with a voltmeter or multimeter. A fully 
charged battery will register 12.8 V or higher.
2. If the voltage is less than 12.8 volts, recharge the battery at 1.2 amps 
or less until battery voltage is 12.8 or greater.


NOTE: When using an automatic charger, refer to the charger manufacturer's 
instructions for recharging. When using a constant current charger, 
use the guidelines on the next page for recharging.


-114-

-------------------------------------------------------------------------------------------------------------------------------------------------------------

Battery

Battery Charging (Sealed Battery)

NOTE: 

Always verify battery condition before and 1-2 hours after the end of charging.

State of


Charge

Voltage

Action

Charge Time

100%

12.8-13.0V

None, check at 3 
 None required

mos. from date of 
manufacture

None required

75%-100%

12.5-12.8V

May need slight  charge,

3-6 hours

if no 
charge given, 
check in 3 months

50%-75%

12.0-12.5V

Needs charge

5-11hours

25%-50%

11.5-12.0V

Needs charge

At  least  13  hours, 
verify state of charge

-115-

-------------------------------------------------------------------------------------------------------------------------------------------------------------

Cleaning and Storage

Washing the Vehicle
Keeping your vehicle clean will not only improve its appearance 
but it can also extend the life of various components.


CAUTION

High water pressure may damage components.CFMOTO recommends washing the vehicle by


hand


or


with


a


garden


hose

using


mild


soap

Certain


products

including


insect


repellents


and


chemicals

will


damage


plastic


surfaces

Do not allow these types of products to contact the vehicle.

The best and safest way to clean your vehicle is with a garden 
hose and a pail of mild soap and water. 
1. Use a professional-type washing cloth, cleaning the upper body first 
and the lower parts last.
2. Rinse with clean water frequently.
3. Dry surfaces with a chamois to prevent water spots.

Washing Tips

Avoid


the


use


of


harsh


cleaners

which


can


scratch


the


finish

.

Do


not


use


a


power


washer


to


clean


the


vehicle

.

Do


not


use


medium


to


heavy


duty


compounds


on


the


finish

.

Always


use


clean


cloths and pads for cleaning and polishing. Old or 

reused cloths and pads may contain dirt particles that will scratch the finish.

-116-

-------------------------------------------------------------------------------------------------------------------------------------------------------------

Cleaning and Storage

Washing the Vehicle

If a high pressure water system is used for cleaning (not recommended), 
exercise extreme caution. The water may damage components and could 
remove paint and decals. Avoid directing the water stream at the following items: 

Wheel


bearings

Radiator

Transmission seals

Brakes

Cab and body panels

Labels and decals

Electrical components and wiring


NOTE:

 If warning and safety labels are damaged, contact your CFMOTO deal

for free replacement.
Grease all zerk fittings immediately after washing. Allow the engine 
run for a while to evaporate any water that may have entered the engine
or exhaust system.
Polishing the Vehicle
CFMOTO recommends the use of common household aerosol furniture 
polish for polishing the finish on your CFMOTO vehicle. Follow the 
instructions on the container.
Polishing Tips

Avoid the use of automotive products

,

some of which can scratch the

finish of your vehicle.

Always use clean cloths and pads for cleaning and polishing. Old or

reused cloths and pads may contain dirt particles that will scratch the finish.


-117-

-------------------------------------------------------------------------------------------------------------------------------------------------------------

Cleaning and Storage

Chrome Wheel Care (if equipped)

Proper maintenance will protect chrome wheels from corrosion, pre-
serve wheel life and ensure a 

like new

” 

appearance


for


many


years

.

NOTE:

 Chrome wheels exposed to road salt (or salt in the air in coastal areas) 

are more susceptible to corrosion if not properly cleaned. Clean 
chrome wheels more often if they're exposed to salt or


other


corrosive


elements.
1. Wash chrome wheels frequently. Use a mild detergent. Never use 
abrasive cleaners on plated or painted surfaces.
2. Rinse well with clear water. Soap, detergents, salt, dirt, mud and 
other elements can cause corrosion. 
3. Polish the clean chrome wheels periodically. Use an automotive 
grade chrome polish.
4. Routinely and liberally apply a weather resistant wax to each pol-
ished chrome wheel. Choose a product suitable for chrome finishes. 
Read and follow the product labels


and


instructions

.

Removing Corrosion

If light rust is found on the chrome finish, use steel wool (#0000-OTT 
grade) to remove it. Gently rub the affected areas with the steel wool 
until the corrosion has been removed. Clean and polish the wheel as out-
lined above.


-118-

-------------------------------------------------------------------------------------------------------------------------------------------------------------

Cleaning and Storage

Storage Tips 

CAUTION

Starting the engine during the storage period will disturb the protective film 
created by fogging and damage could occur. Never start the engine during 
the storage period.
lean the Exterior
Make any necessary repairs and clean the vehicle as recommended. See  page 116.

Stabilize the Fuel
1. Fill the fuel tank.
2. Add CFMOTO Carbon Clean Fuel Treatment or CFMOTO Fuel Stabilizer. 
Follow the instructions on the container for the recommended amount.

NOTE: 

Carbon Clean removes water from fuel systems, stabilizes fuel and 

removes carbon deposits from pistons, rings, valves and exhaust sys tems.

3. Allow the engine to run for 15-20 minutes to allow the stabilizer to 
disperse through the


entire


fuel


delivery


system

.

Oil and Filter
Change the oil and filter. See page 83.


Air Filter / Air Box
Inspect and clean or replace the pre-filter and air filter. See page 83. 
Clean the air box. Drain the sediment tube.
Fluid Levels
Inspect the fluid


levels

Add or change fluids as recommended in the


Periodic Maintenance Chart beginning on page 95

Demand drive fluid

 (

front


gearcase

)

Rear gearcase fluid

Transmission


fluid

Brake fluid

 (

change every two years and any time the fluid looks dark or contaminated)

Coolant

 (

test strength

/

fill

)

-119-

-------------------------------------------------------------------------------------------------------------------------------------------------------------

Cleaning and Storage

Storage Tips

Inspect and Lubricate
Inspect all cables and lubricate all areas of the vehicle as recommended


in the Periodic Maintenance Chart


beginning on page 72

.

Fog the Engine
1. Treat the fuel system with CFMOTO


Carbon


Clean

Follow


the


instructions


on the container. Start the

 engine. Allow it to idle for several


minutes so the Carbon Clean reaches the injectors. Stop the engine.

2. Remove the spark plugs and add 2-3 tablespoons of Premium 4 Synthetic


0W40 engine oil. To access the

 plug holes, use a section of


clear 1/4" hose and a small plastic squeeze bottle filled with the premeasured


amount of oil.

NOTE: 

Do this carefully! If you miss the plug holes, oil will drain from the spark


plug cavities into the hole at 

the front of the cylinder head, and appear


to be an oil leak.

3. Reinstall the spark plugs. Torque to specification.


4. Apply dielectric grease to the inside of each spark plug cap. Do not


reinstall the caps onto the plugs at this 

step

.

5. Turn the engine over several times. Oil will be forced in and around


the piston rings and ring lands, coating

 the cylinder with a protective


film of fresh oil.

6. If CFMOTO


fuel system additive is not used, fuel tank, fuel lines, and


injectors should be completely drai-

ned of gasoline.
7. Reinstall the spark plug caps to the spark plugs.
Battery


Maintenance

See pages 112-114


for storage and charging procedures

.

Storage Area/Covers
Be sure the storage area is well ventilated. 

NOTE: 

Do not use plastic or coated materials. They do not allow enough ventilation


to prevent condensation,

 and may promote corrosion and oxidation.

-120-

-------------------------------------------------------------------------------------------------------------------------------------------------------------

Cleaning and Storage

Removal from Storage

1. Check the battery electrolyte level and charge the battery if necessary.
Install it in the vehicle. Make sure the battery vent hose is


routed properly and that it's not pinched or

 restricted in any way.

2. Make sure the spark plug is tight.
3. Fill the fuel tank with fuel.
4. Check all the points listed in the Daily Pre-Ride Inspection section


on page 56.

NOTE: Tightness of the bolts, nuts and other fasteners should be checked by


an authorized CFMOTO


dealer

.

5. Lubricate at the intervals outlined in the Periodic Maintenance
Chart beginning on page 72

.

Engine exhaust contains poisonous carbon monoxide and can cause loss of


consciousness or death. Never

 run an engine in an enclosed area.

Transporting the Vehicle

Follow these procedures when transporting the vehicle.
1. Place the transmission in PARK. Stop the engine.
2. Remove the key to prevent loss during transporting.
3. Secure the fuel cap and seats.
4. Always tie the frame of the CFMOTO


vehicle


to


the


transporting


unit


securely with suitable straps or rope. 

Do not attach tie straps to the


front control arm bolt pockets.

-121-

-------------------------------------------------------------------------------------------------------------------------------------------------------------

SPECIFICATIONS

Item

CF625-3

CF500-6

27L

27L


2720ml

2720ml


300ml(first time),250ml(replace)

250kg(riders/cargo/accessories)

Receiver Hitch Tongue Capacity

50kg

Receiver Hitch Towing Capacity

125kg(including trailer and cargo)

Overall Length

2630mm

Overall Width

1320mm

Overall Height

1800mm

Wheelbase

1960mm

Minimum turning radius

5.0m

240mm

Ground Clearance

495kg(Wi th full Engine Oi l and fuel)

2800ml(first time), 2500ml(replace)

300ml(first time), 250ml(replace)

330ml(first time), 280ml(replace)

100kg

495kg(Wi th full En gine Oi l and fuel)

2800ml (first time) ,2500ml (replace)

330ml(first time), 280ml(replace)

100kg

250kg(riders/cargo/accessories)

50kg

125kg(including trailer and cargo)

2630mm

1320mm

1800mm

1960mm

5.0m

240mm

Engine Oil Capacity

Coolant Capacity

Rear Gearcase Oil Capacity

Loadable Weight Capacity


Maximum Weight Capacity

(Payload)

Gross


Vehicle


Weight

Fuel


Capa


city

Transfer Case Oil Capyacit

CF625-6

27L

2720ml

300ml(first time),250ml(replace)

537kg(Wi th full En gine Oi l and fuel)

2800ml (first time) ,2500ml (replace)

330ml(first time), 280ml(replace)

100kg

250kg(riders/cargo/accessories)

50kg

125kg(including trailer and cargo)

2630mm

choose 12 in . tire: 1565mm

1860mm

1960mm

5.25m

300mm

-122-

choose 14 in . tire: 1590mm

-------------------------------------------------------------------------------------------------------------------------------------------------------------

Item

CF625-3

CF500-6

ENGINE NO.

196S-C

CF188-C

ENGINE TYPE

Single cylinder

4 valve 4 stroke with

counterbalance

Single cylinder

4 valve 4 stroke with

counterbalance

Displacement

594ml

493ml

Bore x Stroke

96mm

×

82mm

87.5mm

×

82mm

Alternator Output

300W

5000 r/min

300W

5000 r/min

Compression Ratio

10:1

10.2:1

Starting System

Electric

Electric

Fuel System

EFI

Electronic fuel injection

EFI

Electronic fuel injection

Ignition System

ECU

ECU

Spark Plug / Gap

NGK:DPR7EA-9/0.8-0.9

NGK:DPR7EA-9/0.8-0.9

Front Suspension

Independent double arm

Independent double arm

Rear Suspension

Independent double arm

Independent double arm

Lubrication System

Compression


Wet Sump

Compression


Wet Sump

Engine Oil

SAE15W/40 SG

SAE15W/40 SG

Driving System Type

Front/Rear gear output

Front/Rear gear output

Shift Type

Dual Range

/

L

H

N

R

Dual Range

/

L

H

N

R

Gear Reduction - Low

5.857

5.857

Gear Reduction

Reverse

3.828

3.828

Gear Reduction - High

3.514

3.514

CF625-6

196S-C
Single cylinder

4 valve 4 stroke with

counterbalance
594ml

96mm

×

82mm

300W

5000 r/min

10:1

Electric

EFI

Electronic fuel injection

ECU

NGK:DPR7EA-9/0.8-0.9

Independent double arm

Independent double arm

Compression


Wet Sump

SAE15W/40 SG

Front/Rear gear output

Dual Range

/

L

H

N

R

5.857

3.828

3.514

-123-

-------------------------------------------------------------------------------------------------------------------------------------------------------------

Item

CF625-3

CF500-6

Drive Ratio - Front

3.667(33/9)

3.667(33/9)

Drive Ratio - Final

3.667(33/9)

3.667(33/9)

Tire Size - Front

25

×

8-12 77J

25

×

8-12 77J

Tire Size - Rear

25

×

10-12 85J

25

×

10-12 85J

Tire Pressure - Front

70kPa

70kPa

Tire Pressure - Rear

84kPa

84kPa

Brakes, Front/Rear

Foot Activated, 4-wheel hydraulic disc

Foot Activated, 4-wheel 

hydraulic disc

Front trunk Loadable

10kg

10kg

Headlight

35W/35W

×

2

35W/35W

×

2

Brake light/Tail light

21W/5W

×

2

21W/5W

×

2

Front turning light

21W

×

2

21W

×

2

Rear turning light

10W

×

2

10W

×

2

Front position light

5W

×

2

5W

×

2

Dashboard

LCD Dashboard

LCD Dashboard

Auxiliary DC Outlet

12V  Maximal


current

:

10A

12V  Maximal


current

:

10A

3.667(33/9)

3.667(33/9)

26

×

9

-14 48J

26

×

11-14 54J

12 in. tire: 70kPa 14 in. tire: 50kPa

12 in. tire: 84kPa 14 in. tire: 50kPa

Foot Activated, 4-wheel hydraulic disc

10kg

35W/35W

×

2

21W/5W

×

2

21W

×

2

10W

×

2

5W

×

2

LCD Dashboard

12V  Maximal


current

:

10A

CF625-6

-124-

25

×

8-12 77J

25

×

10-12 85J

-------------------------------------------------------------------------------------------------------------------------------------------------------------

Drive Belt Wear/Burn

Possible Cause

Solution

Driving onto a pickup or


tall trailer in high range

Use low range during loading.

Starting out going up a


steep incline

Use low range. See warnings on page 63

.

Driving at low RPM or


ground speed (3

-7 

MPH

)

Drive at a higher speed or use low range more frequently.
See page


43

Insufficient warm-up at


low ambient temperatures

Warm the engine at least 5 minutes. With the transmission


in 

neutral, advance the throttle to about 1/8 throttle in


short bursts,

 5 to 7 times. The belt will become more flexible


and prevent belt

 burning.

Slow/easy clutch engagement

Use the throttle quickly and effectively.

Towing/pushing at low


RPM/low ground speed

Use low range only.

Use low range only.

Utility use/plowing

Stuck in mud or snow

Shift the transmission to low range and carefully use fast,


aggressive throttle application to engage clutch.

WARNING

Excessive throttle may cause loss of control and 

vehicle overturn

Climbing over large


objects from a stopped


position

Shift the transmission to low range and carefully use fast,


brief, 

aggressive throttle application to engage clutch

.

WARNING

Excessive throttle may cause loss of control


and vehicle overturn.

Belt slippage from water


or snow ingestion into

 the


PVT system

Dry out the PVT. See page 95

Inspect


clutch


seals


for


damage if repeated leaking occurs.

Clutch malfunction

See your dealer.

Poor engine performance

Check for fouled plugs or foreign material in gas tank or


fuel

 lines. See your dealer.

Slippage from failure to


warm up belt

Always warm up the belt by operating below 30 mph


for


one mile (5 miles or more when temperature is below


freezing).

TROUBLESHOOTING

-125-

-------------------------------------------------------------------------------------------------------------------------------------------------------------

Drive Belt Wear/Burn

Possible Cause

Solution

Wrong or missing belt

Install the recommended belt.

mproper break-in

Always break in a new belt and/or clutch. See
 pages 53 and 43

.

Engine Doesn't Turn Over

Possible Cause

Solution

Low battery voltage

Loose battery connections

Loose solenoid connections

Loose electronic control box connections

Recharge the battery to 12.8 VDC

Check all connections and tighten

Check all connections and tighten

Inspect, clean, reinstall connectors

Engine Turns Over, Fails to Start

Possible Cause

Solution

Out of fuel

Refuel

Clogged fuel filter

See your CFMOTO


dealer

Water is present in fuel

Drain the fuel system and refuel

Old or non-recommended fuel

Replace with fresh recommended fuel

Fouled or defective spark plugs

Inspect plugs and replace if necessary

Water or fuel in crankcase

Immediately see your CFMOTO


dealer

Low battery voltage

Recharge the battery to 12.8 VDC

Mechanical failure

See your dealer

-126-

-------------------------------------------------------------------------------------------------------------------------------------------------------------


Content      ..     6      7      8      9     ..