KTM LC4 400-660LC42003 engine. Manual - part 20


  Index      Manuals     KTM LC4 400-660LC42003 engine. Repair Manual


Search            


Content   ..  18  19  20  21   ..


KTM LC4 400-660LC42003 engine. Manual - part 20


Disassembling the carburetor (Dell’Orto PHM 38 ND)

NOTE: Before commencing to disassemble the carburetor make sure
that your workplace is clean and large enough to properly arrange all
carburetor components before you.

– Remove the two screws and pull the carburetor cover out of the

carburetor together with the throttle slide.

– Wrap the throttle slide in a clean piece of cloth and put it onto the

air filter box.

– Undo screw and take the starting piston out of the carburetor.
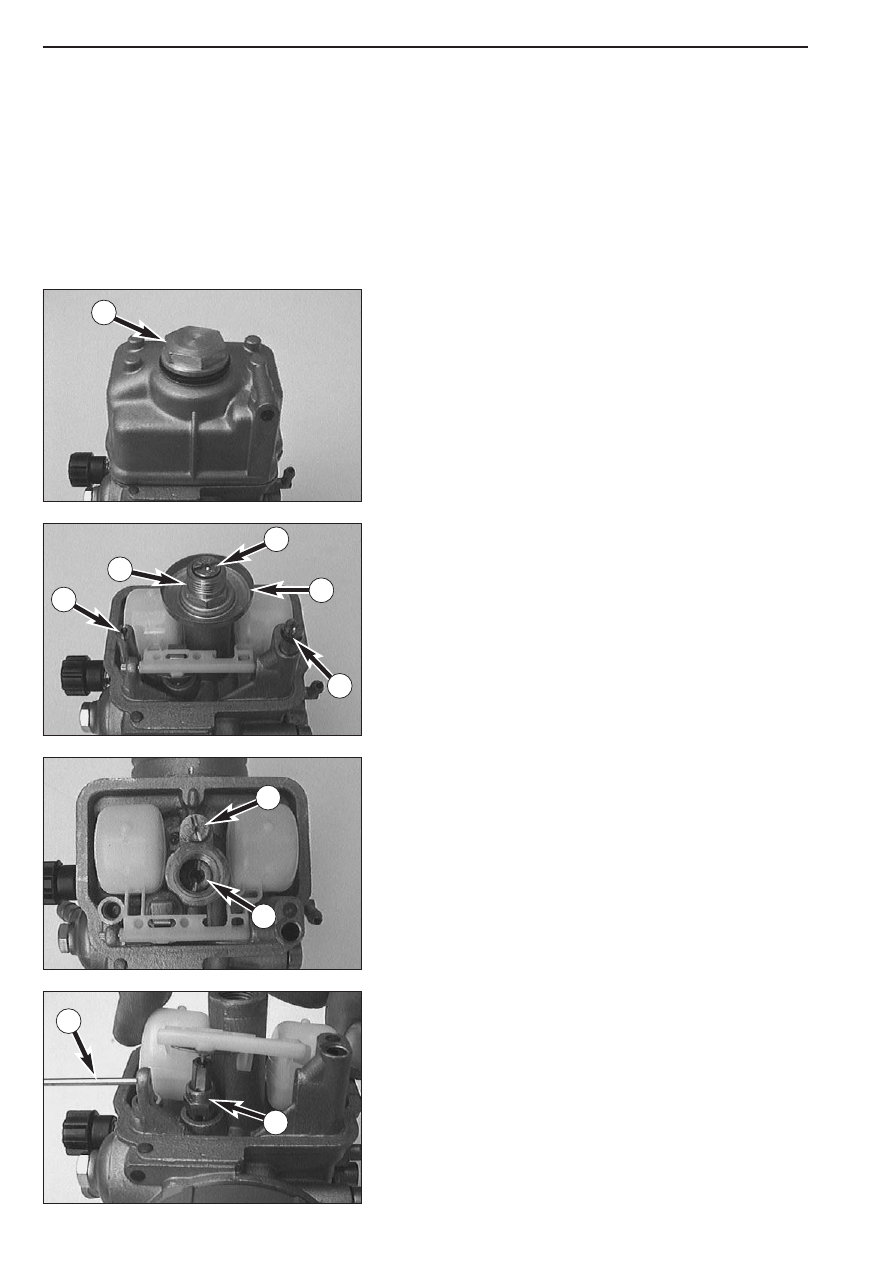
– Remove the plug 

1

together with the seal ring and take off the float

chamber.

– Remove the main jet 

2

, the main jet holder 

3

and the baffle 

4

.

– Twist out the starting jet 

6

.

– Twist out the return valve 

5

.

– Remove the idling jet 

8

together with the idle mixture pipe below.

– Twist out the needle jet 

7

.

– Pull out the pin 

9

and remove the float.

– Remove the entire needle valve 

bk

together with the gasket behind.

8-16D

1

2

3

4

5

6

7

8

9

10

Repair manual  KTM LC4 

Art.-Nr

.  3.206.006 -E

8-17D

– Twist the mixture adjusting screw 

1

clockwise all the way in,

counting and writing down the number of twists. Twist out the
mixture regulating screw and remove it together with the spring, the
washer and the O-ring.

– Twist the adjusting screw 

2

clockwise all the way in, counting and

writing down the number of twists. Twist out the adjusting screw
and remove it together with the spring, the O-ring and the washer.

– Remove screw 

3

, and take off the hose connection together with

the fuel filter.

– Twist out the jet holder 

4

together with the accelerating jet 

5

.

– Remove the 3 screws 

6

and take off the entire pump housing 

7

together with the gasket.

CAUTION

!

– D

O NOT DAMAGE THE MEMBRANE WHEN REMOVING THE PUMP HOUSING

.

R

EMOVE THE MEMBRANE BEFORE CLEANING THE PUMP HOUSING

.

– A

DJUSTMENT SCREW

8

IS FACTORY CALIBRATED AND MUST NOT BE TURNED

.

– Clean all jets and other components and blow them through with

compressed air.

– Clean the carburetor housing and use compressed air to blow

through all ducts within the carburetor.

– Check all gaskets for damage and exchange them, if necessary.

1

2

3

4

5

6

7

8

8-18D

Assembling the carburetor (Dell’Orto PHM 38 ND)

– Position the pump housing 

1

together with the gasket and fasten

them with the 3 screws. Make sure that the membrane is properly
positioned in the pump housing.

– Put the seal ring onto the jet holder 

3

and mount the jet holder

together with the accelerating jet 

4

. The flat section of the

accelerating jet must face backwards.

– Insert the fuel filter into the carburetor. Position the hose connection

and mount screw 

5

together with the seal ring.

– Put the spring, the washer and the O-ring onto the mixture adjusting

screw 

6

and twist the mixture adjusting screw all the way in.

– Twist out the mixture adjusting screw, applying the same number of

twists previously written down during the disassembly of the device.

– Put the spring, the washer and the O-ring onto the adjusting screw

7

and twist the adjusting screw all the way in.

– Twist out the adjusting screw, applying the same number of twists

previously written down during the disassembly of the device.

– Insert the seal ring into the carburetor bore and mount the needle

valve 

8

.

1

2

3

4

5

6

7

8

Repair manual  KTM LC4 

Art.-Nr

.  3.206.006 -E

– Position the float and mount the pin 

1

. When mounting the float

make sure that the needle 

2

valve properly engages with the float.

Check by moving the float upwards: the needle valve must move
with the float.

– Mount the idling mixture pipe and the idling jet 

4

.

– Mount the needle jet 

3

.

– Position the baffle 

5

and fasten it with the main jet holder 

6

.

– Mount and tighten the main jet 

7

.

– Mount and tighten the starting jet 

8

.

– Mount the return valve 

9

.

Check the O-ring 

bk

in the float chamber for proper fit.

– Position the float chamber and fasten it with the plug 

bl

. Do not

forget the seal ring.

8-19D

1

2

3

4

5

6

7

8

9

10

11

8-20D

CARBURETOR – DELL’ORTO VHSB 38 QS

Repair manual  KTM LC4 

Art.-Nr

.  3.206.006 -E

Disassembling the carburetor (Dell’Orto VHSB 38 QS)

NOTE: Before commencing to disassemble the carburetor make sure
that your workplace is clean and large enough to properly arrange all
carburetor components before you.

– Open the cap and pull the carburetor cover out of the carburetor

together with the throttle slide.

– Wrap the throttle slide in a clean piece of cloth and put it onto the

air filter box.

– Undo the screw and pull the entire cold-starting device out of the

carburetor.

– Remove the three screws 

1

and take off the float chamber together

with the gasket.

– Take the two floats out of the carburetor.
– Take the perforated bushing off the baffle.

– Remove the main jet 

2

and the baffle 

3

.

– Twist out the starting jet 

4

and the idling jet 

5

.

– Pull out pin 

6

and remove the float arm 

7

.

– Remove the entire needle valve 

8

together with the seal ring

behind.

8-21D

1

2

3

4

5

6

7

8

– Twist out the needle jet 

1

.

– Twist the mixture adjusting screw 

2

clockwise all the way in,

counting and writing down the number of twists. Twist out the
mixture regulating screw and remove it together with the spring, the
washer and the O-ring.

– Twist the adjusting screw 

3

clockwise all the way in, counting and

writing down the number of twists. Twist out the adjusting screw
and remove it together with the spring.

– Remove plug 

5

together with the seal ring and take off  the fuel

filter 

4

.

– Clean all jets and other components and blow them through with

compressed air.

– Clean the carburetor housing and use compressed air to blow

through all ducts within the carburetor.

– Check all gaskets for damage and exchange them, if necessary.

Assembling the carburetor (VHSB 38 QS)

– Put the spring, the washer and the O-ring onto the mixture adjusting

screw 

2

and twist the mixture adjusting screw all the way in.

– Twist out  the mixture adjusting screw, applying the same number of

twists previously written down during the disassembly of the device.

– Put the spring, the washer and the O-ring onto the adjusting screw

3

and twist the adjusting screw all the way in.

– Twist out the adjusting screw, applying the same number of twists

previously written down during the disassembly of the device.

– Insert the fuel filter 

4

into the plug 

5

and mount the plug together

with the seal ring.

8-22D

1

2

3

4

5

2

3

4

5

Repair manual  KTM LC4 

Art.-Nr

.  3.206.006 -E

– Mount the needle jet 

1

.

– Insert the seal ring into the carburetor bore and mount the needle

valve 

2

.

– Position the float arm 

3

and mount pin 

4

.

– Mount the idling jet 

5

and the starting jet 

6

.

– Position the baffle 

7

and fasten it with the main jet 

8

.

– Put the perforated bushing 

9

onto the baffle and mount the gasket.

– Insert the two floats 

bk

into the float chamber and mount the float

chamber.

8-23D

1

2

3

4

5

6

7

8

9

10


Content   ..  18  19  20  21   ..