BMW Motorcycle (R1100RT, R1100RS, R850/1100GS, R850/1100R). Manual - part 4
 

  Index      Manuals     BMW AG Motorcycle (R1100RT, R1100RS, R850/1100GS, R850/1100R). Repair Manual


Search            


Content   ..  2  3  4  5   ..


BMW Motorcycle (R1100RT, R1100RS, R850/1100GS, R850/1100R). Manual - part 4


00.22

Key to maintenance intervals

–

Inspection at 1000 km (600 miles)

I

–

BMW Service

II

–

BMW Inspection

III

–

Annual Service

IV

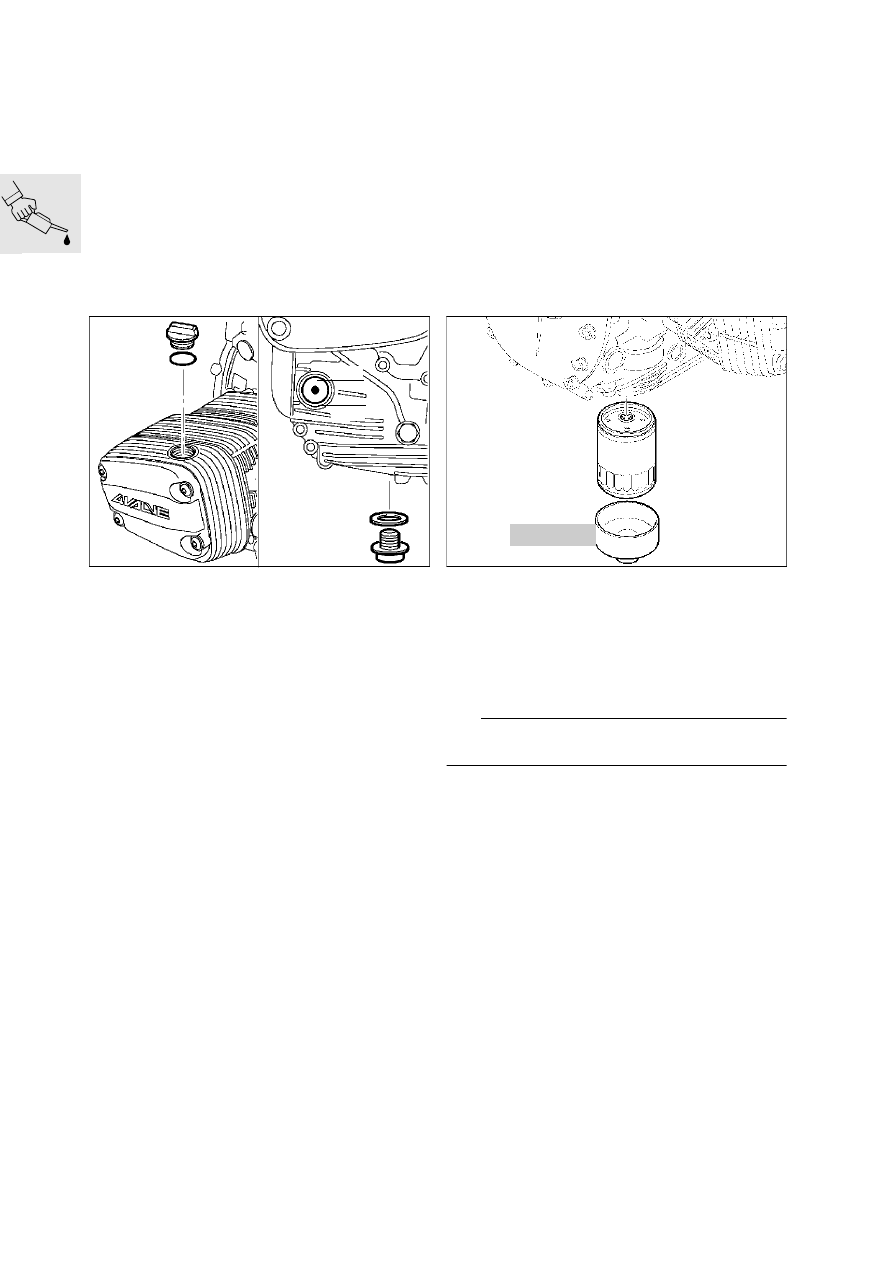
Change engine oil, renew oil filter 
element

(Inspection I, II, III, IV)

•

Remove screw plug.

•

Unscrew oil drain plug and drain off oil.

•

Fit new seal and screw in drain plug.

•

Using oil filter wrench, BMW No. 11 4 650, 
unscrew and remove the oil filter element.

•

Coat sealing ring on new oil filter element with oil 
and screw in.

•

Top up oil/seal off.

•

Do not check oil level until at least 10 minutes af-
ter test run/test ride.

e

 Caution:

Never add engine oil above the MAX mark.

X

 Tightening torque:

Oil filter......................................................... 11 Nm
Oil drain plug................................................ 32 Nm

Fill quantity for engine:
- with oil filter change ............. 3.75 l (6.6 Imp. pints)
- without oil filter change ........ 3.50 l (6.2 Imp. pints)
Oil volume between
MIN and MAX marks ............0.50 l (0.88 Imp. pints)

Engine oil grade:
Brand-name HD oil for four-stroke spark-ignition en-
gine, API classifications SE,SF,SG; combination 
with CC or CD specification.

Max

Min

RS000180

11 4 650

RS110950

00.23

Change the oil in the gearbox and 
rear wheel drive

(Inspection I, III, IV)

Changing oil in gearbox

•

[RT] Push in oil drain pipe (1), BMW No. 23 4 680 
and turn to right.

•

Unscrew and remove oil filler plug and oil drain 
plug/drain off oil.

•

Fit new seal and screw in drain plug.

•

Top up gearbox oil.

•

Insert oil filler plug with new seal.

X

 Tightening torque:

Oil drain plug................................................ 23 Nm
Oil filler plug ................................................. 23 Nm

Fill quantity::
gearbox up to lower rim of filler hole
Initial filling..............................1.0 l (1.76 Imp. pints)
During oil changes ...................0.8 l (1.4 Imp. pints)

Changing oil in rear wheel drive

•

Unscrew and remove oil filler plug and oil drain 
plug/drain off oil.

•

Fit new seal and screw in drain plug.

•

Top up gearbox oil.

•

Insert oil filler plug with new seal.

X

 Tightening torque:

Oil drain plug................................................ 23 Nm
Oil filler plug ................................................. 23 Nm

Fill quantity:
Initial filling ........................... 0.25 l (0.44 Imp. pints)
During oil changes ............. 0.23 l (0.404 Imp. pints)

Oil grade:
Brand-name hypoid gear oil, SAE 90, API 
class GL 5

RT

1

RS000210

RS000070

00.24

Checking battery acid level/topping 
up if necessary, cleaning/greasing 
battery posts

(Inspection III, IV)

•

Remove dualseat.

•

[RS/RT] Take off left side fairing.

•

[GS] Take off right side fairing.

•

[R] Remove tank cover.

•

Remove air cleaner cover (1).

•

Remove intake air pipe (2).

•

[GS/R] Unscrew fuel tank fastenings.

•

[GS/R] Raise rear of fuel tank and support with a 
suitable object.

•

Release the rubber battery strap (3).

•

Remove battery.

e

 Caution:

Disconnect negative terminal of battery first, then 
positive terminal. Connect positive battery terminal 
first, then negative terminal.

•

Top up battery acid level with distilled water as 
far as the MAX mark.

•

Installation in reverse order.

Protective battery-post grease:
e.g. Bosch Ft 40 V1

X

 Tightening torque:

Fuel tank to rear frame ................................. 22 Nm

Renewing air cleaner

(Inspection III)

•

Remove dualseat.

•

[GS] Detach fuel tank at rear, raise it and support 
it with a suitable object.

•

Renew air cleaner insert.

X

 Tightening torque:

Fuel tank to rear frame ................................. 22 Nm

R/GS/RT

RS

1

2

3

RS000340

00.25

Renewing fuel filter

(Inspektion III)

•

Remove dualseat.

•

[RS/RT] Take off side sections of fairing.

•

[RS] Detach cockpit inner panel (1) at fuel tank.

•

[GS] Remove right side fairing.

•

[R] Remove fuel tank cover.

•

[RT] Detach storage compartment

•

Unfasten fuel tank mount (2)

•

Seal off fuel feed and return line (3) with hose clip, 
BMW No. 13 3 010, loosen and pull off.

•

Remove vent pipes (4).

•

Remove fuel pump connector (5).

•

Lift off fuel tank.

RS

1

5

3

4

2

13 3 010

RS160010

00.26

C

A

B

C

A

B

6x

6x

RT

13 3 010

3

5

4

RT160060

00.27

e


Caution:

Fuel is flammable and a hazard to health. Observe 
relevant safety regulations.

•

Drain fuel tank.

•

Remove fuel pump unit/detach vent hoses.

RS000130

00.28

•

Detach hoses from fuel filter (1)

•

Fit new fuel filter.

•

Installation in reverse order.

•

Secure non-reusable hose clips with pliers, 
BMW No. 13 1 500.

e

 Caution:

Note correct direction of flow through fuel filter. Use 
only an O-ring seal (2) in good condition. After 
assembly, check fuel pump unit for leaks.

X

 Tightening torqu

Fuel tank to rear frame ................................. 22 Nm 
Fuel pump unit to fuel tank . ........................... 6 Nm

1

2

RS160030

00.29

Checking/renewing spark plugs

(Inspection II, III)

•

Pull off spark plug cap with cap assembly tool, 
BMW No. 12 3 520.

•

Unscrew and remove spark plugs with spark-
plug wrench, BMW No. 12 3 510.

Electrode gap:  ........................ 0.8 mm (0.0315 in)
Gap wear limit:............................. 1.0 mm (0.04 in)

e

 Caution:

Do not bend electrodes - risk of breakage!

Taking up slack at cylinder heads 

(Inspection I)

•

Remove cylinder head cover.

e

 Caution:

Trap escaping oil.

•

Select a gear and turn the rear wheel, or set the 
piston to TDC by turning the belt pulley.

Top dead centre on ignition stroke:
1. The OT (TDC) mark appears and
2. the inlet and exhaust valves of the cylinder in 

question are closed.

•

Tighten cylinder head nuts.

Tightening procedure after 1000 km ( 600 miles )
1. Tighten cylinder head nuts individually in a cross-

wise pattern

1.1.Slacken off one nut
1.2.Tighten nut to init. torque ....................... 20 Nm
1.3.Tighten nut to specified wrench angle....... 180°
2. Unfasten/retighten M10 screw ................ 40 Nm

12 3 510

RS000010

RS 00. 002

TDC

RS00002


Content   ..  2  3  4  5   ..