Volkswagen Jetta / Bora: Electrical System Manual - part 49


  Index      Volkswagen     Volkswagen Jetta (2005 year) / Bora (2006 year) - Electrical System manual


Search            copyright infringement  


Content   ..  47  48  49  50   ..


Volkswagen Jetta / Bora: Electrical System Manual - part 49


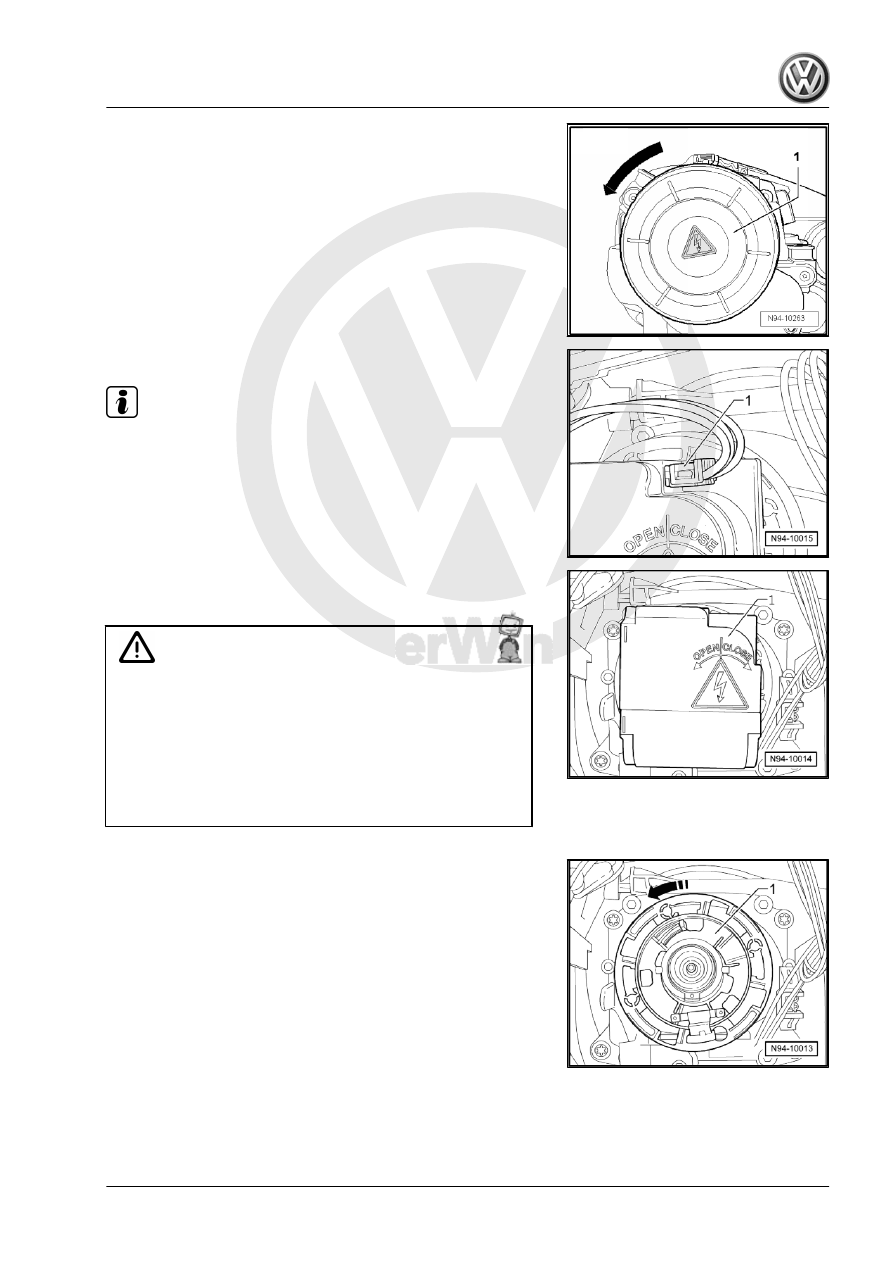
– Pull off connector -1-.

Note

The connector is ejected automatically when the gas discharge

bulb starter unit -N195- is removed.

– Turn gas discharge bulb starter unit -N195- -1- in direction of

starter unit lettering “OPEN” and pull gas discharge bulb start‐

er unit -N195- off headlight.

WARNING

♦ Within the bulb glass of gas discharge bulbs, pressures

can range from between 7 bar (cold) and 100 bar (hot).

Temperatures can reach up to 700 degrees Celsius on the

glass bulb.

♦ The glass bulb may explode resulting in a risk of injury

from burning.

♦ Always wear eye protection and gloves when removing

and installing gas discharge bulbs!

– Turn bulb retainer -1- in -direction of arrow- and remove bulb

retainer.

Jetta 2005 ➤ , Bora 2006 ➤

2. Main headlights with gas discharge bulbs    

193

Note

Do not touch bulb glass when fitting a gas discharge lamp

bulb . Fingers leave traces of grease on the glass, which when

switching the gas discharge lamp bulb on, evaporate and

cause the glass to cloud over.

Use extreme care when fitting a gas discharge lamp bulb and

do not subject the bulb to mechanical stress. The glass bulb

is extremely sensitive and is subjected to a very high pressure.

Avoid looking directly into the collimated beam as the UV rays

from the gas discharge bulb are about 2.5 times greater than

normal halogen bulbs.

When installing cap, ensure that it is seated correctly. The in‐

gress of water will lead to permanent damage of the headlight.

If a headlight is removed with automatic range control, the ba‐

sic setting of the headlight should always be checked when

reinstalling ⇒ Maintenance ; Booklet  20.1 .

Installation is performed in the reverse order of installation; when

doing this, note the following:
– Check function of headlight.
– Check headlight setting and adjust headlight as necessary

⇒ Maintenance ; Booklet  20.1

2.4.2

Renewing main beam headlight bulb

Note

The following diagrams show renewal of the main beam headlight

bulb for the left headlight.

Removing:
– Switch off ignition and all electrical consumers and pull out

ignition key.

– Pull off cover cap -1-.

Jetta 2005 ➤ , Bora 2006 ➤

194

– Press spring retaining clip -2- in -direction of arrow- under the

locking lugs-1- and fold spring retaining clip -2- upwards.

– Take main beam bulb -1- out of headlight.
Installing:

Note

When installing cap, ensure that it is seated correctly. The in‐

gress of water will lead to permanent damage of the headlight.

Do not touch bulb glass when fitting bulbs. Fingers leave

traces of grease on the glass, which evaporate when the bulb

is switched on and cause the glass to cloud over.

Installation is performed in the reverse order of installation; when

doing this, note the following:

– Place the headlight main beam bulb -1- in the recesses

-arrows- on the headlight.

– Check function of headlight.
– Check headlight setting and adjust headlight as necessary

⇒ Maintenance ; Booklet  20.1

Jetta 2005 ➤ , Bora 2006 ➤

2. Main headlights with gas discharge bulbs    

195

Renewing side light bulb

Note

The following diagrams show renewal of the side light bulb for the

left headlight.

Removing:
– Switch off ignition and all electrical consumers and pull out

ignition key.

– Pull off cover cap -1-.

– Pull, depending on the cable length, the bulb holder -2- with

the side light bulb as far it is possible out of the reflector -1-.

– Pull side light bulb -2- in -direction of arrow- out of the bulb

holder -1-.

Installing:

Note

When installing cap, ensure that it is seated correctly. The in‐

gress of water will lead to permanent damage of the headlight.

Do not touch bulb glass when fitting bulbs. Fingers leave

traces of grease on the glass, which evaporate when the bulb

is switched on and cause the glass to cloud over.

Installation is performed in the reverse order of installation; when

doing this, note the following:
– Check function of headlight.
– Check headlight setting and adjust headlight as necessary

⇒ Maintenance ; Booklet  20.1

Jetta 2005 ➤ , Bora 2006 ➤

196


Content   ..  47  48  49  50   ..