Volkswagen Jetta / Bora: Electrical System Manual - part 44


  Index      Volkswagen     Volkswagen Jetta (2005 year) / Bora (2006 year) - Electrical System manual


Search            copyright infringement  


Content   ..  42  43  44  45   ..


Volkswagen Jetta / Bora: Electrical System Manual - part 44


Removing and installing spray jet as‐

sembly

Removing:
– Switch off ignition and all electrical consumers and pull out

ignition key.

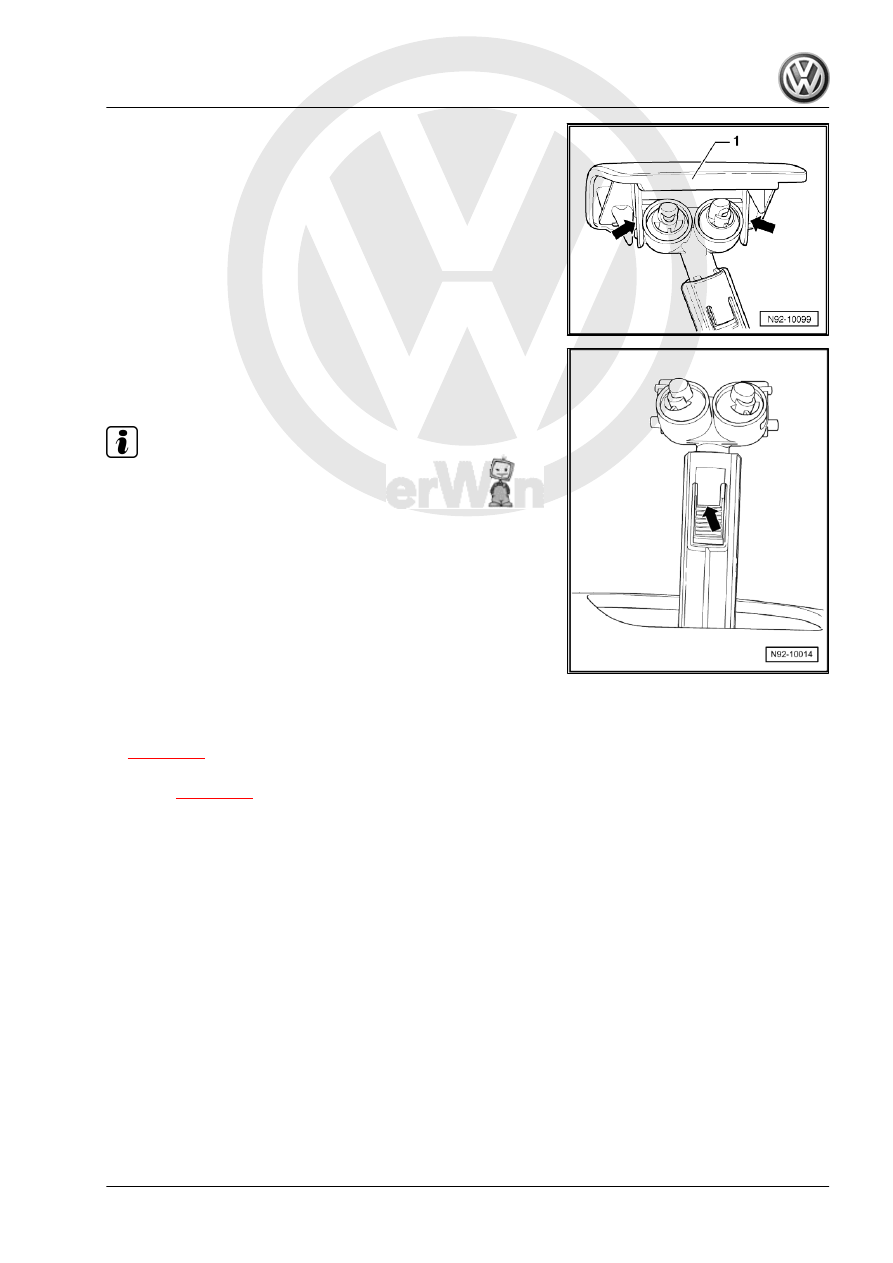
– Pull spray jet with cover cap -1- onto stop out of bumper cover.
– Unclip cap -1- from mounting points -arrows- on washer spray

jet assembly.

– Lever locking hooks -arrow- up slightly and pull out spray jet

assembly.

Installing:

Note

The degree to which the cover cap of the spray jet is pulled down

onto the bumper cover can be adjusted using the clips on the

washer spray jet assembly. If the washer spray jet assembly is

not pulled in far enough, the cover cap will not seat correctly. If

the washer spray jet assembly is pulled in too far, the cover cap

and the bumper cover could be pushed out of shape.

– Push washer spray jet assembly in pop-up cylinder until it en‐

gages.

– Fit cover cap on washer spray jet assembly and allow pop-up

cylinder to retract.

– Check the cover cap is seated correctly on the bumper cover.
– If necessary, adjust seat of cover cap by pushing washer spray

jet assembly in higher or lower position on pop-up cylinder.

– Bleed the headlight washer system after completing work

⇒ page 173

 .

– Check headlight washer system spray jets and adjust if nec‐

essary 

⇒ page 173

 .

3.5

Adjusting headlight washer system jets

⇒ Maintenance ; Booklet  18.1

3.6

Bleeding the headlight washer system

To guarantee sound functioning, the headlight washer system

must be bled following assembly work or when operated for the

first time.
– Fill reservoir for windscreen and headlight washer systems.
– Start the engine.
– Switch “ON” the headlight.
– Operate headlight washer system several times (3-5 times, 3

seconds each time).

– Repeat this bleeding procedure until the pop-up cylinders and

spray jets are functioning soundly.

Jetta 2005 ➤ , Bora 2006 ➤

3. Headlight washer system    

173

Wash water line hose couplings

The following hose coupling types are used to connect the hoses

to pumps and spray jets and/or as points of separation:

4.1

Windscreen and rear window washer

system

– Pull the two coupling sections apart (no securing device) to

loosen the connection.

– To secure the connection, push the two coupling sections to‐

gether, until you hear and feel them engage.

– To loosen the connection, rotate the lock ring -1- by 90°

-arrow- and pull off the hose connection.

– To secure the connection, push on the hose connection and

rotate the lock ring -1- -arrow- until it engages.

– To loosen the connection, pull up the lock ring -1- by approx.

1 mm -arrow- and pull off the hose connection.

– To secure the connection, push on the hose connection and

push in the lock ring -1- until it engages.

Jetta 2005 ➤ , Bora 2006 ➤

174

Headlight washer system

– To loosen the connection -1- push the lock ring -arrow- and

pull off the hose connection.

– To secure the connection, push and hold the lock ring

-arrow- and push on the hose connection. Check that the se‐

curing clip has correctly engaged by depressing and trying to

pull off without the clip.

Jetta 2005 ➤ , Bora 2006 ➤

4. Wash water line hose couplings    

175

Hose repair

A new repair concept has been developed for repair work on wash

system hoses. Various connectors, special EPDM hoses (ethyl‐

ene propylene diene monomer) and heat-shrink hose are availa‐

ble as spare parts

5.1

General description

♦ The replacement parts can be found in the parts catalogue

(ETKA).

♦ Replacement parts are available for repair of both smooth and

corrugated pipes.

5.2

Repairing smooth pipe

Smooth pipe with a diameter or 5x1 mm or 6x1 mm can be re‐

paired with EPDM hose.
– Cut damaged section at right angles out of smooth pipe which

is to be repaired.

– Select the appropriate EPDM hose -2- and cable ties accord‐

ing to the parts catalogue (ETKA).

– Cut EPDM hose -2- so that ends -1- and -3- of smooth pipe

can each be pushed about 10 mm into the EPDM hose -2-.

– Secure the repair joints with cable ties -1-.

5.3

Repairing corrugated pipe

Special tools and workshop equipment required
♦ Hot air gun -VAS 5179- or

♦ Hot air gun -V.A.G 1416/- or
♦ Hot air blower -VAS 1978/14-

Jetta 2005 ➤ , Bora 2006 ➤

176


Content   ..  42  43  44  45   ..