Dacia Solenza (engine E7J). Manual - part 138


  Index      Dacia     Dacia Solenza (engine E7J) - service repair manual 2004 year


Search            


Content   ..  136  137  138  139   ..


Dacia Solenza (engine E7J). Manual - part 138


82

ACCOUSTIC WARNING - ANTI STARTING

82 - 9

If  further to the diagnostic by means of the CLIP tester, it is necessary the replacement of the

E.C.U. (computer) injection, for its dismounting, proceed as follows:

- disconnect the battery (the contact being off);
- dismount the screw from the battery attachment clip;
- remove the battery;
- dismount the two attachment nuts of the injection computer and of the ECU protector;
- remove the injection ECU protector;
- disconnect the injection computer from the engine wiring;
- dismount the ECU injection

For mounting, perform the dismounting operations in the reverse order.
The injection computer is delivered not coded. It is necessary the memorising of an anti starting

code in the computer, after this has been mounted.

Proceed as follows:

1. Set the contact on, without starting the engine, for 5 seconds.
2. Take off the contact; after 10 seconds, the anti starting function is activated, and the anti

starting indicator will blink rarely (one blink per second).

3. Set the contact on. The anti starting indicator must turn off after 3 seconds and the engine

can be started.

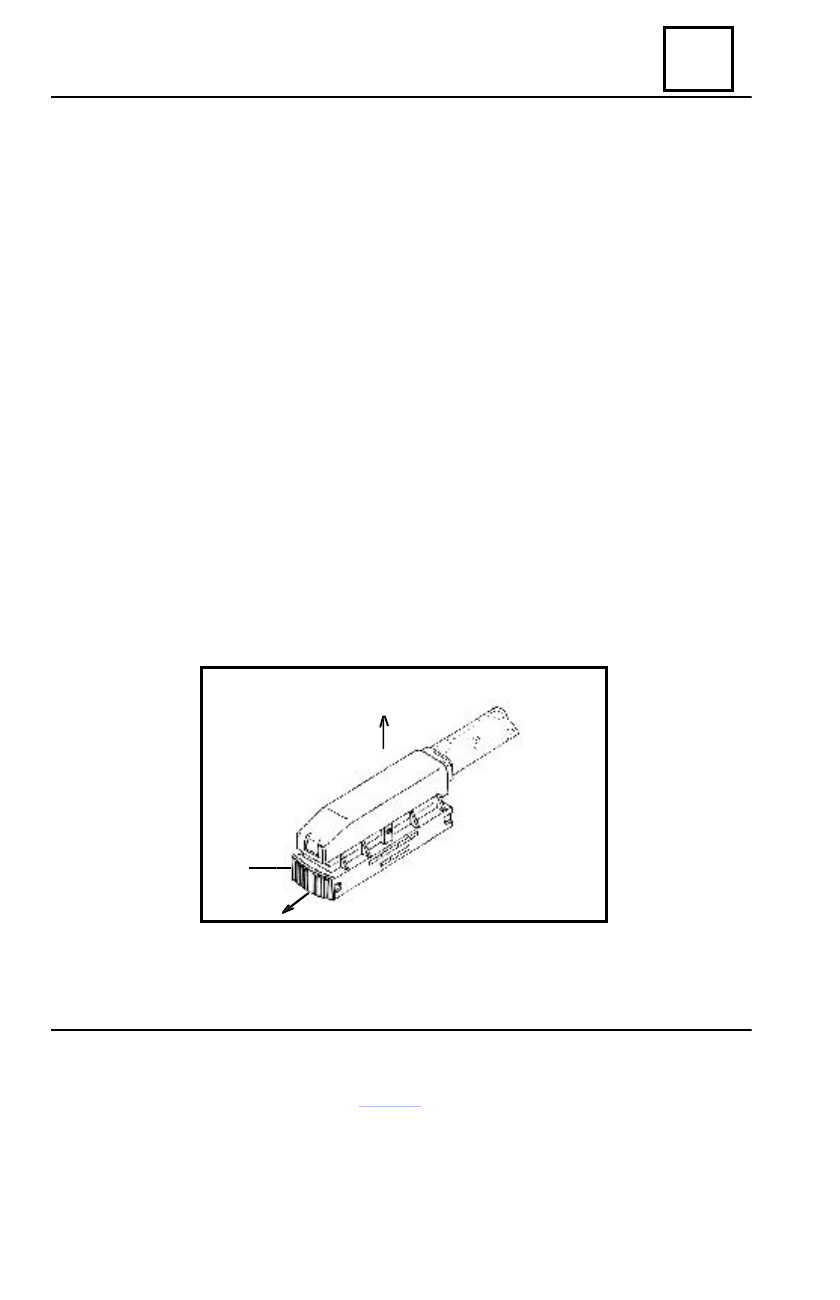
In order to disconnect the injection computer (E.C.U. injection) act upon the blocking lever (A)

of the connector in the direction of the B arrow, then the connector will be lifted in the direction of
the C arrow.

In case the vehicle is blocked on the road further to serious damages of the anti starting system,

the “ Procedure for repairing code introduction” may be used, which allows the moving of the
vehicle to the nearest DACIA service centre for complete repairing. In order to perform this
procedure it is necessary the CLIP tester and the specific repairing code of that vehicle.

A

B

C

Electric control unit injection replacement

82

ACCOUSTIC WARNING - ANTI STARTING

82 - 10

(For auto made before 03.07.2003)

The acoustic warning is attached on the closing plate of the upper longitudinal girder.

DISMOUNTING

Lift the vehicle by means of an elevator.
Disconnect the acoustic warning connector (1).
Dismount the attachment screw (2) of the acoustic warning on the closing plate of the left

upper longitudinal girder.

REMOUNTING

Perform the dismounting operations in the reverse order. The acoustic warning must not be in

contact with the  left  wheel fairing.

The required tightening moment of the screw: 17 Nm ±15%.
Check the operation of the acoustic warning.

Acoustic warning

82

ACCOUSTIC WARNING - ANTI STARTING

82 - 11


         REPLACEMENT OF THE ACCOUSTIC WARNING

(for auto made after 03.07.2003)

The new acoustic warning is attached in the engine compartment, on the left upper front

longitudinal girder.

1

2

DISMOUNTING

Disconnect the battery (-) terminal.
Remove by hand  the battery screen from the acoustic warning attaching area so that dismounting

of the screw (1) is permitted.

Dismount the screw (1) attaching the acoustic warning on the left upper front longitudinal

girder.

Disconnect the acoustic warning connector (2).
Carefully remove the acoustic warning

REMOUNTING

Perform the dismounting operations in  the reverse order.
Check the operation of the acoustic warning.

REMARK !
Each time when dismounting the acoustic warning, replace the fan-type the

attachment screw 

(1)  .

The required tightening moment of the attachment screw is of 21 Nm + 10%.

Acoustic warning

82

ACCOUSTIC WARNING - ANTI STARTING

82 - 12

Procedures

A. E.C.U. DECODER REPLACEMENT PROCEDURE AND

ANTI STARTING CODE MEMORISING

The new E.C.U. decoder is always not coded. After its mounting on the vehicle it is necessary

that this one is memorising the anti starting code in order to be operational.

REMARK:
If only the E.C.U. decoder is replaced, there is no need of an intervention to the

E.C.U. injection (injection computer), which will keep the old anti starting code.

ATTENTION!
After the E.C.U. decoder memorised the anti starting code, this code cannot be erased

or replaced with another one.

In order to perform this procedure, one of the keys of the vehicle and the CLIP tester are

needed.

Proceed as follows:
1. Connect the CLIP tester to the diagnostic socket and to the battery (or the lighter socket)

of the vehicle.

2. Read the configuration of the old E.C.U. decoder in the following way, before dismounting

it from the vehicle:

- select the type “B41”
- enter the menu “ COMPUTER TEST” then select “ ANTI STARTING”
- access “COMMAND MODE” then “CONFIGURATIONS READING”
-  note the configurations found  : petrol, programming with 1  or  2  keys, ceiling delayed

light, the type of the doors’ blocking switch (CPE), etc.;

3. Return to the menu “COMPUTER TEST”
4. Remove the old E.C.U. decoder and replace it with a new one, the contact being off.
5. Enter the menu “ANTI STARTING”, then select “ STATE LIST”. If the E.C.U. decoder is

new, you must find the following states:

18G FIRST CYCLE MEMORISING………………….......………… PASSIVE
19G NOT PERFORMED KEY PROGRAMMING ………..……….. ACTIVE
19D UNBLOCKED KEY PROGRAMMING ……………….………ACTIVE

OBSERVATION:
If the states 19G and 19D are not “ACTIVE” this means the E.C.U. decoder has

been already used, so it isn’t new and cannot memorise another anti starting code.

6.

Access the menu “COMMAND MODE” and then “CONFIGURATION”, where you

will configure the new E.C.U. decoder in the same way as the old one: petrol, 1 key, ceiling
delayed light, impulsion doors blocking switch, etc. selecting one by one these configurations,
which you’ll validate with “CLICK” on the blue button on right top of the screen.


Content   ..  136  137  138  139   ..