Dacia Solenza (engine E7J). Manual - part 133


  Index      Dacia     Dacia Solenza (engine E7J) - service repair manual 2004 year


Search            


Content   ..  131  132  133  134   ..


Dacia Solenza (engine E7J). Manual - part 133


80

BATTERY - FRONT HEADLIGHTS

80 - 11

Disconnect the (-) plug of the battery;
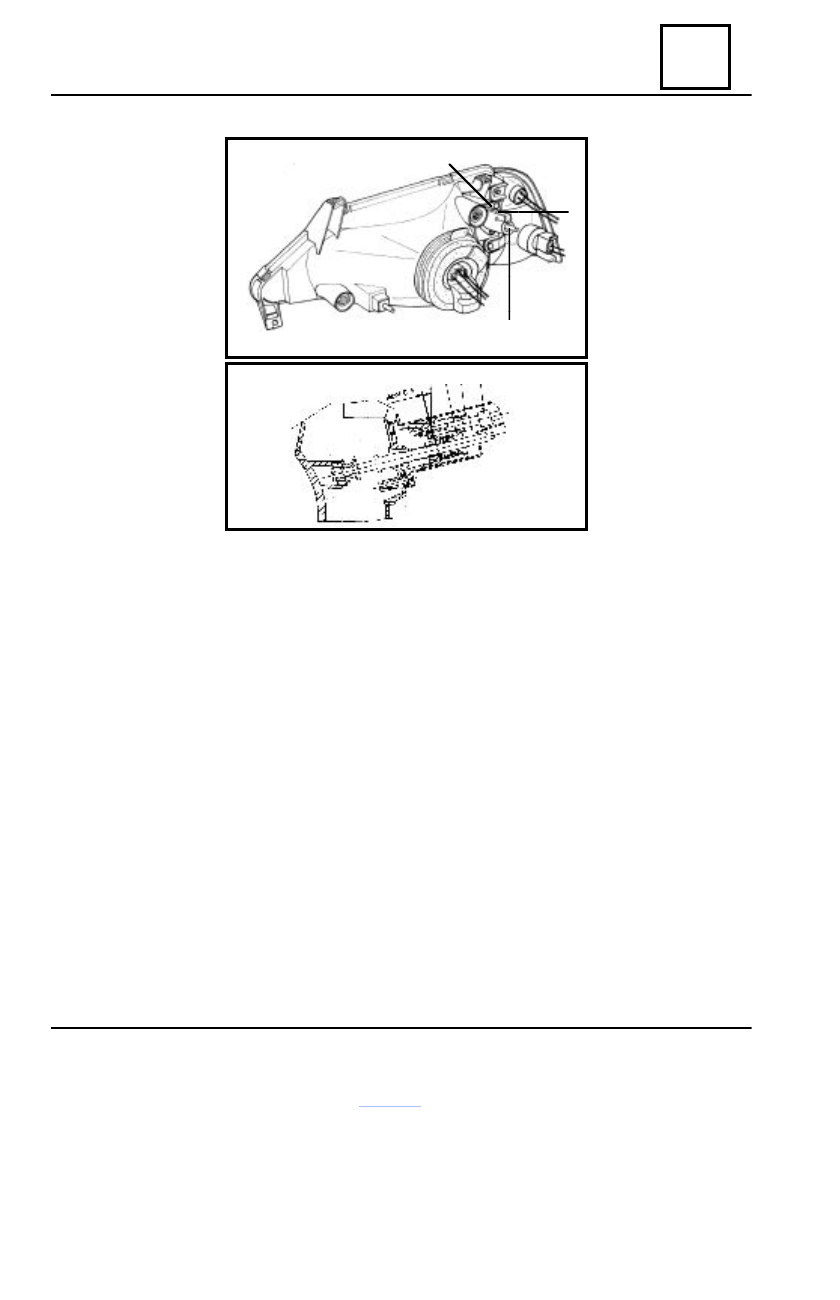
Dismount the headlamp adjusting control from the turning lamp-headlamp assembly:

- pull backward the gasket of the headlamp adjustment corrector (1);
- detach from clips the protector (2) of the headlamp adjustment mechanism;
- loosen the locking nut (3);
- detach from clips the headlamp adjustment control cable (4) from the headlamp

adjustment corrector and then from the fork (5);

Dismount the headlamp adjusting control from the other turning lamp-headlamp assembly.
Detach from clips the headlamp adjustment control cables and cut the attachment collars.
Dismount the headlamps adjustment control button.
Dismount the attachment nut of the headlamp adjustment control on the dashboard.
Dismount the bonnet opening control cable from the opening handle (see chapter 52).
Detach from clips, by means of a straight screwdriver, the cables passing bushing from the

cowl panel.

Remove the headlamps adjusting control cables from the cowl-passing hole. Mark the mounting

position of  the headlamps adjustment control cables.

REMOUNTING

Insert the headlamps adjusting control cables through the cowl-passing hole, observing the

existent position prior to dismounting.

Insert the bonnet opening control cable through the cables passing bushing.

DISMOUNTING

1

2

V

5 6 3 4

Replacement of the headlamps mechanic adjustment control

BATTERY - FRONT HEADLIGHTS

80

80 - 12

Replacement of the headlamps mechanic adjustment control

Attach on the cowl panel, by means of clips, the cables passing bushing, ensuring the cockpit

compartment sealing against possible water drain along the cables passing bushing.

Mount the bonnet opening control cable in the opening handle (see chapter 52). Position the

headlamps adjustment control on the dashboard.

Mount the attachment nut of the headlamps adjustment control on the dashboard.
Mount the headlamps adjustment control button and turn it in the position “3”.
Mount the headlamp adjustment control to a turning lamp-headlamp assembly :

- attach in clips by means of a straight screwdriver, the headlamp adjustment control cable

in fork (5) and then in the headlamp adjustment corrector;

- tighten initially the cable by hand till the fork (5) is in contact with support (6) so that fork

is remaining at max. 0.5 mm against the support;

- block the headlamp adjustment cable by means of the nut (3);
- attach in clips the protector (2) of the headlamp adjustment mechanism;
- position correctly the gasket of the headlamp adjustment corrector – the vertical adjustment

screw (V) must come out through the gasket.

Mount the headlamp adjustment control of the other turning lamp-headlamp assembly.
Attach in the attachment points, by means of clips, the headlamps adjusting control cables,

replace and mount the attachment collars, observing the mounting position prior to the dismounting.

Keep a  distance of approximate 40 mm 

±

  10 mm  between the right cable and the cylinder

no.1 spark plug cable, in order to avoid the loses due to electric-magnetic induction.

Reconnect the battery (-) terminal.
Switch on the headlamps and check the operation of the headlamps mechanic adjusting control.

The adjustment of the luminous spot dip of the headlamps in the downward sense of the vehicle
loading condition is to be performed by bringing the headlamps adjusting button in the “0” position
and then in the desired condition.

REMARK : The required tightening moment of the attachment nut of the headlamps

adjustment control on the dashboard: 2 Nm.

81

INSIDE AND REAR LIGHTING

81 - 1

REAR LAMPS

REAR LAMP REPLACEMENT

DISMOUNTING

Disconnect the battery  (-)  plug.
Disconnect the rear  lamp connector .
Inside trunk,  dismount the screw with triangle head (A).
Extract the rear lamp towards  outside.

REMOUNTING

Perform the dismounting operations in the reverse order, positioning correctly the rear lamp in

its seat. Check the bulbs connections and operation.

                        Rear right lamp                                             Rear left lamp

Rear right lamp connector

Rear left lamp connector

Pin

Denomination

Pin

Denomination

1

+ Right stop lamp

1

Fog parking lamp supply

2

+ Right parking lamp

2

Left turning lamp supply

3

Free

3

Free

4

Mass

4

Mass

5

Right turning lamp supply

5

+ Left stop lamp

6

Revere driving lamp supply

6

+  Left  parking  lamp

Inside and rear lighting

A

6

1

B

B

B

B

6

1

INSIDE AND REAR LIGHTING

81

81 - 2

REPLACEMENT OF REAR TURNING,

PARKING, FOG, REVERSE DRIVING,

STOP BULB

DISMOUNTING

Disconnect the battery (-) terminal.
Disconnect the rear  lamp connector
Dismount the screw with triangle head
Extract the rear lamp towards outside
Dismount the two attachment screws (B) of

the bulbs support on the lamp glass.

Dismount the worn bulb.

REMOUNTING

Perform the dismounting operations in the

reverse order, checking the condition of the
sealing gasket between the  lamp  glass  and the
bulbs support: if this one is not good, replace it.
Check the bulbs operation and connections.

REPLACEMENT OF LICENSE PLATE

LAMP BULB

DISMOUNTING

Disconnect the battery (-) terminal.
Disconnect the license plate lamp connector.
Extract the license plate lamp holder.
Remove the worn bulb and replace it.

REMOUNTING

Perform the dismounting operations in the

reverse order. Check the bulb operation.

REPLACEMENT OF ADDITIONAL

STOP LAMP BULB

DISMOUNTING

Disconnect the battery (-) terminal.
Dismount the  TORX 20 attachment screw

of the additional stop lamp. Mark the mounting
position of  the lamp mass wire connector.

Inside and rear lighting

Disconnect the additional stop lamp

connector.

Detach the two  side clips  and extract the

reflector-glass assembly from the lamp body.

Detach carefully from  clips the  lamp glass,

by means of a straight screwdriver.

Replace the worn  bulb.

REMOUNTING

Perform the dismounting operations in the

reverse order. Check the bulb connections and
operation.

REPLACEMENT OF LICENSE

PLATE LAMP

DISMOUNTING

Disconnect the battery (-) terminal.
Disconnect the license plate lamp

connector.

Detach from  clips the  license plate lamp.

REMOUNTING

Perform the dismounting  operations in the
reverse order. Check the bulb operation.

REPLACEMENT OF ADDITIONAL

STOP LAMP

DISMOUNTING

Disconnect the battery (-) terminal.
Dismount the attachment screw TORX 20

of the additional stop lamp. Mark the mounting
position of  the lamp mass wire connector.

Disconnect the additional stop lamp

connector.

REMOUNTING

Perform the dismounting operations in the

reverse order.

Check the bulb connections and operation.


Content   ..  131  132  133  134   ..