Nissan Frontier D40. Manual - part 686


  Index      Nissan     Nissan Frontier D40 (2010 year) - Service and Repair Manual


Search            


Content   ..  684  685  686  687   ..


Nissan Frontier D40. Manual - part 686


PREPARATION

FSU-3

< PREPARATION >

C

D

F

G

H

I

J

K

L

M

A

B

FSU

N

O

P

PREPARATION

PREPARATION

Special Service Tool

INFOID:0000000005275015

The actual shapes of Kent-Moore tools may differ from those of special service tools illustrated here.

Commercial Service Tool

INFOID:0000000005275016
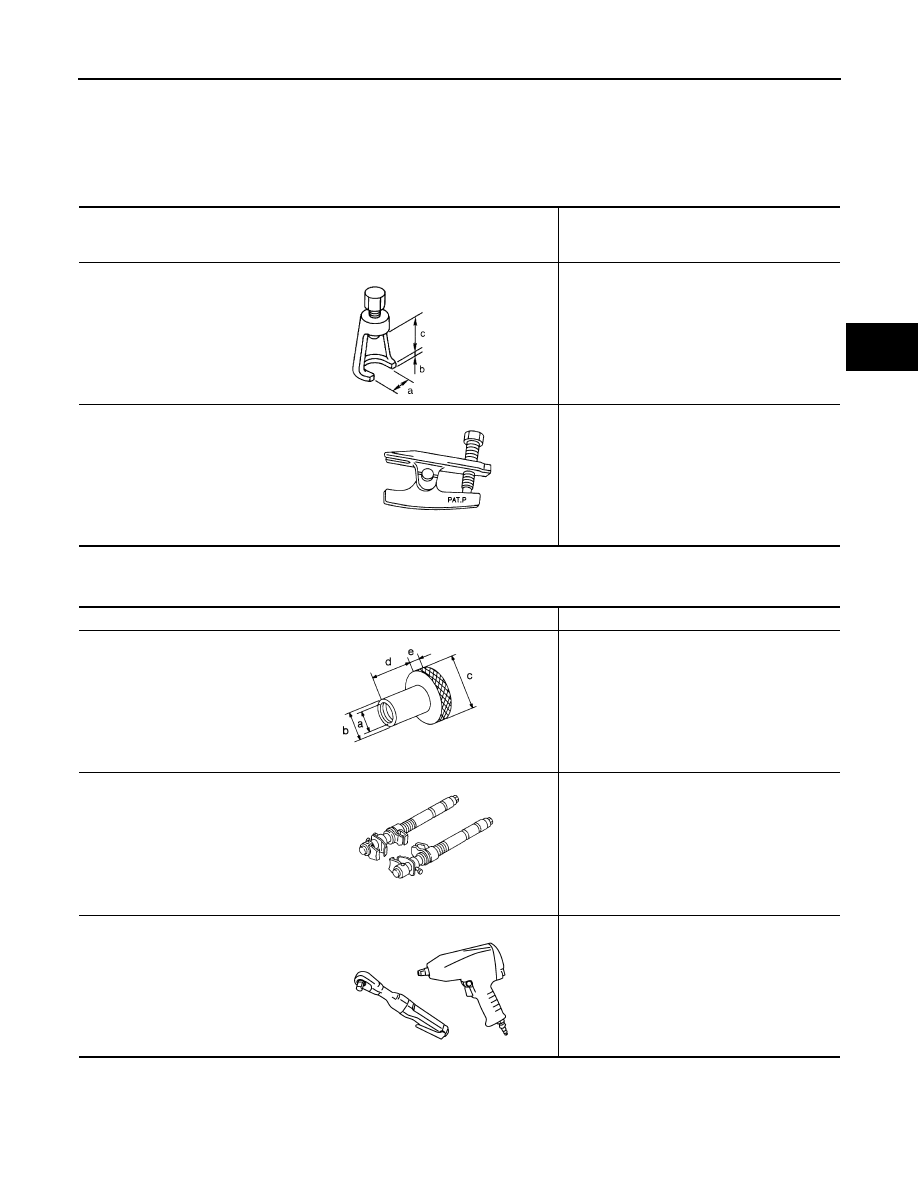
Tool number
(Kent-Moore No.)
Tool name

Description

ST29020001
(J-24319-01)
Gear arm puller

Removing ball joint for knuckle
a: 34 mm (1.34 in)
b: 6.5 mm (0.256 in)
c: 61.5 mm (2.421 in)

HT72520000
(J-25730-A)
Ball joint remover

Removing tie-rod outer end

NT694

NT146

Tool name

Description

Attachment wheel alignment

Measuring wheel alignment
a: Screw M24 x 1.5 pitch
b: 35 mm (1.38 in) dia.
c: 65 mm (2.56 in) dia.
d: 56 mm (2.20 in)
e: 12 mm (0.47 in)

Spring compressor

Removing and installing coil spring

Power tool

Loosening bolts and nuts

NT148

NT717

PBIC0190E

FSU-4

< SYMPTOM DIAGNOSIS >

NOISE, VIBRATION AND HARSHNESS (NVH) TROUBLESHOOTING

SYMPTOM DIAGNOSIS

NOISE, VIBRATION AND HARSHNESS (NVH) TROUBLESHOOTING

NVH Troubleshooting Chart

INFOID:0000000005275017

Use the chart below to help you find the cause of the symptom. Repair or replace parts as necessary.

x: Applicable

Reference page

FSU-1

2

FSU-1

3

FSU-1

2

FSU-1

2

FSU-2

4

FS

U-5

FS

U-5

FS

U-5

F

AX-4,

 "NVH T

rou

bl

es

ho

ot

in

g

 Cha

rt"

DL

N-1

8

3

"NV

H

 T

rou

ble

s

hoo

ti

ng Cha

rt"

F

AX-4,

 "NVH T

rou

bl

es

ho

ot

in

g

 Cha

rt"

WT

-4

1,

 "NVH T

ro

u

b

les

ho

ot

ing

 Ch

art"

WT

-4

1,

 "NVH T

ro

u

b

les

ho

ot

ing

 Ch

art"

BR-6, 

"NVH T

ro

u

b

les

ho

ot

ing

 Ch

art"

ST

-5,

 "NVH T

rou

bl

es

ho

ot

in

g

 Cha

rt"

Possible Cause and
SUSPECTED PARTS

Im

pro

per in

st

a

lla

ti

on

lo

os

en

es

s

Sh

oc

k ab

so

rbe

r de

fo

rma

tio

n,

da

ma

ge

 or 

de

fle

c

tion

Bu

sh

in

g o

m

o

u

n

ti

ng

 de

te

ri

ora

ti

o

n

Part

s int

e

rference

S

p

ring

 fa

tig

u

e

Su

sp

en

si

on

 lo

os

en

es

s

Inc

o

rrec

t whe

e

l al

ig

nm

en

t

S

ta

b

iliz

er ba

fa

tig

u

e

DRIVE SHA

F

T

D

IFFE

RE

NT

IA

L

WHEEL HUB AND BE

ARING

TIRES

ROA

D

 WHEEL

BRAKES

STEERI

N

G

Symptom

Noise

×

×

×

×

×

×

×

×

×

×

×

×

×

Shake

×

×

×

×

×

×

×

×

×

×

×

Vibration

×

×

×

×

×

×

×

×

×

Shimmy

×

×

×

×

×

×

×

×

×

×

Shudder

×

×

×

×

×

×

×

×

Poor quality ride or handling

×

×

×

×

×

×

×

×

×

×

ON-VEHICLE SERVICE

FSU-5

< ON-VEHICLE MAINTENANCE >

C

D

F

G

H

I

J

K

L

M

A

B

FSU

N

O

P

ON-VEHICLE MAINTENANCE

ON-VEHICLE SERVICE

Front Suspension Parts

INFOID:0000000005275018

Check front suspension parts for excessive play, cracks, wear and
other damage.
• Shake each front wheel to check for excessive play. If looseness is

noted:

- Inspect wheel bearing end play. Refer to 

FAX-5, "On-Vehicle

Inspection and Service"

.

- Check ball joint end play. Refer to 

FSU-9, "Inspection"

.

• Make sure that the cotter pin is inserted in drive shaft end (4WD

only).

• Retighten all nuts and bolts to the specified torque.

• Check shock absorber for oil leakage and other damage.
• Check suspension ball joint for grease leakage and ball joint dust

cover for cracks and other damage.

Front Wheel Alignment

INFOID:0000000005275019

PRELIMINARY INSPECTION

WARNING:

Always adjust the alignment with the vehicle on a flat surface.
NOTE:
If alignment is out of specification, inspect and replace any damaged or worn rear suspension parts before
making any adjustments.
1.

Check and adjust the wheel alignment with the vehicle under unladen conditions. “Unladen conditions”
means that the fuel, coolant, and lubricant are full; and that the spare tire, jack, hand tools and mats are in
their designated positions.

2.

Check the tires for incorrect air pressure and excessive wear.

3.

Check the wheels for run out and damage. Refer to 

WT-44, "Inspection"

.

4.

Check the wheel bearing axial end play. Refer to 

FAX-5, "On-Vehicle Inspection and Service"

.

5.

Check the shock absorbers for leaks or damage.

6.

Check each mounting point of the suspension components for any excessive looseness or damage.

7.

Check each link, arm, and the suspension member for any damage.

8.

Check the vehicle height. Refer to 

FSU-24, "Wheelarch Height (Unladen*1)"

.

GENERAL INFORMATION AND RECOMMENDATIONS

1.

A Four-Wheel Thrust Alignment should be performed.
• This type of alignment is recommended for any NISSAN vehicle.
• The four-wheel “thrust” process helps ensure that the vehicle is properly aligned and the steering wheel

is centered.

• The alignment machine itself should be capable of accepting any NISSAN vehicle.
• The alignment machine should be checked to ensure that it is level.

Suspension component torques

: Refer to 

FSU-12, 

"Component"

SMA525A

SFA392B

FSU-6

< ON-VEHICLE MAINTENANCE >

ON-VEHICLE SERVICE

2.

Make sure the alignment machine is properly calibrated.
• Your alignment machine should be regularly calibrated in order to give correct information.
• Check with the manufacturer of your specific alignment machine for their recommended Service/Cali-

bration Schedule.

THE ALIGNMENT PROCESS

IMPORTANT: Use only the alignment specifications listed in this Service Manual. Refer to 

FSU-23, "Wheel

Alignment (Unladen*1)*6"

.

1.

When displaying the alignment settings, many alignment machines use “indicators”: (Green/red, plus or
minus, Go/No Go). Do NOT use these indicators.
• The alignment specifications programmed into your alignment machine that operate these indicators

may not be correct.

• This may result in an ERROR.

2.

Some newer alignment machines are equipped with an optional “Rolling Compensation” method to “com-
pensate” the sensors (alignment targets or head units). Do NOT use this “Rolling Compensation”
method.
• Use the “Jacking Compensation” method. After installing the alignment targets or head units, raise the

vehicle and rotate the wheels 1/2 turn both ways.

• See Instructions in the alignment machine you are using for more information.

CAMBER AND CASTER

1.

Measure camber and caster of both the right and left wheels
with a suitable alignment gauge and adjust as necessary to
specification.

NOTE:
Some vehicles may be equipped with straight (non-adjustable)
lower link bolts and washers. In order to adjust camber and
caster on these vehicles, first replace the lower link bolts and
washers with adjustable (cam) bolts and washers.

2.

If outside of the specified value, adjust camber and caster using
the adjusting bolts in the front lower link.

CAUTION:

After adjusting the camber then check the toe-in.
NOTE:
Camber changes about 3' (0.05

°

) minutes with each graduation

of one adjusting bolt. Refer to table below for examples of lower
link adjusting bolt effect on camber and caster. 

3.

Tighten the adjusting bolt nuts to specification. Refer to 

FSU-12, "Component"

.

TOE-IN

Camber

: Refer to 

FSU-23, "Wheel Alignment (Unlad-

en*1)*6"

.

SRA096A

WEIA0115E

Rear adjusting 
bolt

1 In

1 Out

1 In

1 Out

0

0

1 In

1 Out

Front adjusting 
bolt

1 Out

1 In

1 In

1 Out

1 In

1 Out

0

0

Camber
Degree minute 
(Decimal degree)

0' (0

°

)

0'  (0

°

)

7'  (0.12

°

)

- 7' (-0.12

°

)

3'  (0.05

°

)

- 3' (-0.05

°

)

3'  (0.05

°

)

- 3' (-0.05

°

)

Caster
Degree minute 
(Decimal degree)

- 12' (-0.20

°

)

12' (0.20

°

)

0'  (0

°

)

0'  (0

°

)

6'  (0.10

°

)

- 6' (-0.10

°

)

- 6' (-0.10

°

)

6'  (0.10

°

)


Content   ..  684  685  686  687   ..