Nissan Titan A60. Manual - part 53


  Index      Nissan     Nissan Titan A60 (2011 year) - Service and Repair Manual


Search            


Content   ..  51  52  53  54   ..


Nissan Titan A60. Manual - part 53


AV

REAR DOOR SPEAKER

AV-37

< REMOVAL AND INSTALLATION >

[BASE AUDIO]

C

D

E

F

G

H

I

J

K

L

M

B

A

O

P

REAR DOOR SPEAKER

Removal and Installation

INFOID:0000000006166457
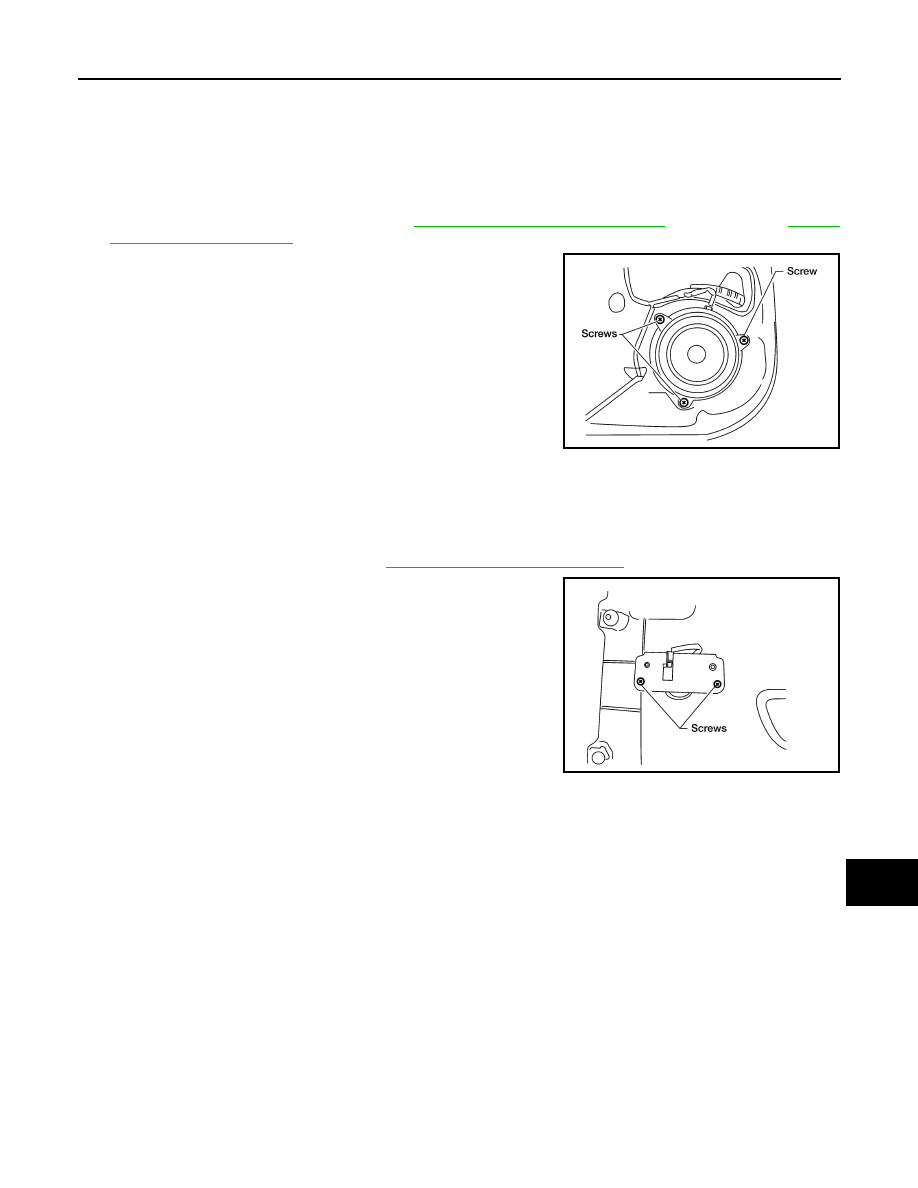
REAR DOOR SPEAKER

Removal

1. Remove the rear door finisher. Refer to 

INT-10, "Removal and Installation"

 (Crew Cab) or 

INT-10,

"Removal and Installation"

 (King Cab).

2. Remove the three rear door speaker screws and remove the

rear door speaker.

Installation

Installation is in the reverse order of removal.

REAR DOOR TWEETER

Removal

1. Remove the rear door finisher. Refer to 

INT-10, "Removal and Installation"

.

2. Remove the rear door tweeter screws and remove the rear door

tweeter.

3. Disconnect the rear door tweeter connector.

Installation

Installation is in the reverse order of removal.

WKIA1492E

WKIA1494E

AV-38

< REMOVAL AND INSTALLATION >

[BASE AUDIO]

AUDIO ANTENNA

AUDIO ANTENNA

Location of Antenna

INFOID:0000000006166458

ALNIA0824GB

1.

Antenna

2.

Main feeder cable

AV

DIAGNOSIS AND REPAIR WORKFLOW

AV-39

< BASIC INSPECTION >

[MID AUDIO]

C

D

E

F

G

H

I

J

K

L

M

B

A

O

P

BASIC INSPECTION

DIAGNOSIS AND REPAIR WORKFLOW

Work Flow

INFOID:0000000006166459

OVERALL SEQUENCE

DETAILED FLOW

1.

GET INFORMATION FOR SYMPTOM

Get detailed information from the customer about the symptom (the condition and the environment when the

incident/malfunction occurred).

>> GO TO 2.

2.

CONFIRM THE SYMPTOM

Try to confirm the symptom described by the customer. Verify relation between the symptom and the condition

when the symptom is detected.

>> GO TO 3.

3.

DETECT MALFUNCTIONING PART BY DIAGNOSTIC PROCEDURE

Inspect according to Diagnostic Procedure of the system.

ALNIA0182GB

AV-40

< BASIC INSPECTION >

[MID AUDIO]

DIAGNOSIS AND REPAIR WORKFLOW

Is malfunctioning part detected?

YES

>> GO TO 4.

NO

>> GO TO 2.

4.

REPAIR OR REPLACE THE MALFUNCTIONING PART

1. Repair or replace the malfunctioning part.

2. Reconnect parts or connectors disconnected during Diagnostic Procedure.

>> GO TO 5.

5.

FINAL CHECK

Refer to confirmed symptom in step 2, and make sure that the symptom is not detected.
Was the repair confirmed?

YES

>> Inspection End.

NO

>> GO TO 2.


Content   ..  51  52  53  54   ..