Nissan Maxima. Manual - part 234


  Index      Nissan     Nissan Maxima (2009-2014 year) - Service and Repair Manual


Search            


Content   ..  232  233  234  235   ..


Nissan Maxima. Manual - part 234


BR-4

< PRECAUTION >

PRECAUTIONS

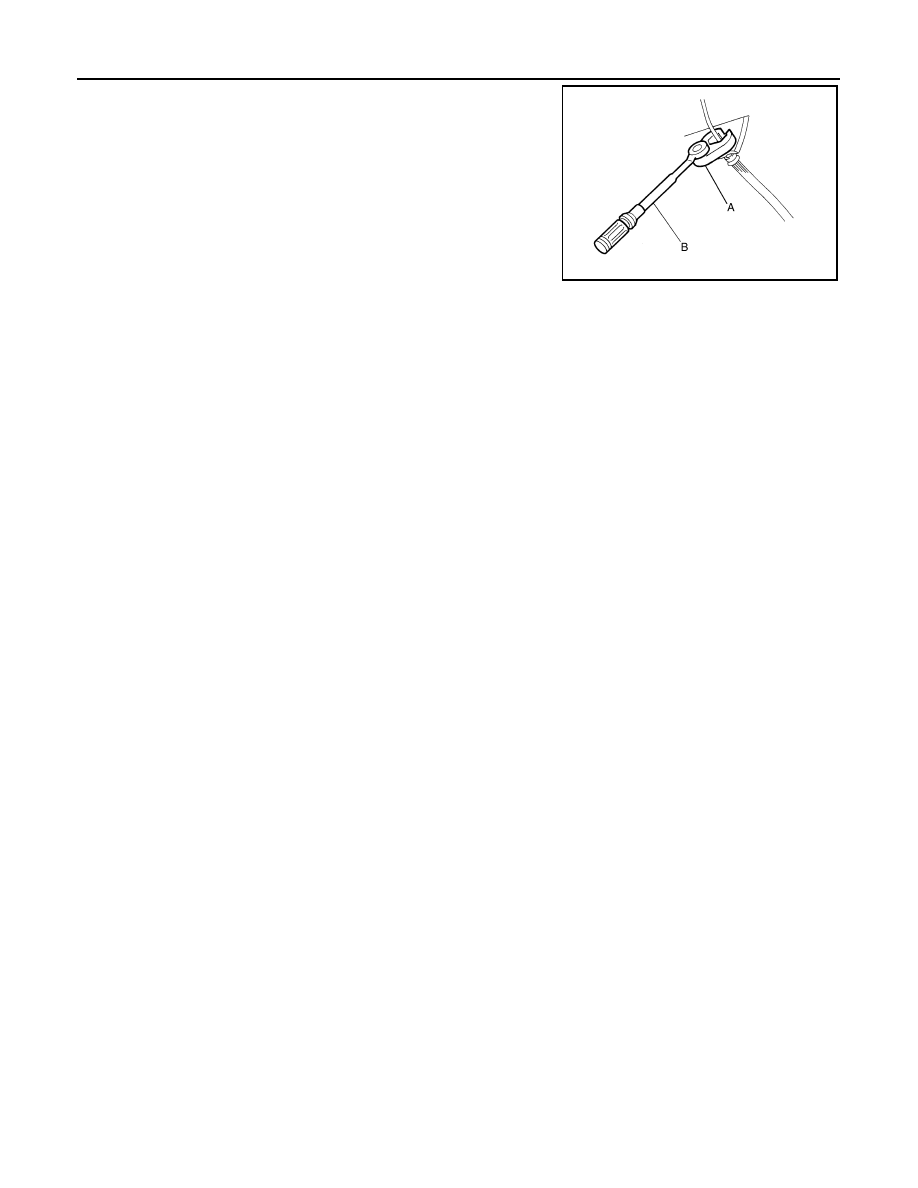
• Tighten the brake tube flare nut to the specified torque with a crow-

foot (A) and torque wrench (B).

• Always connect the battery terminal when moving the vehicle.

• Turn the ignition switch OFF and disconnect the ABS actuator and

electric unit (control unit) harness connector or the battery negative

terminal before performing the work.

• Check that no brake fluid leakage is present after replacing the

parts.

WARNING:

Clean brake pads and shoes with a waste cloth, then wipe with

a dust collector.

JPFIA0001ZZ

PREPARATION

BR-5

< PREPARATION >

C

D

E

G

H

I

J

K

L

M

A

B

BR

N

O

P

PREPARATION

PREPARATION

Special Service Tool

INFOID:0000000009466572

The actual shapes of the tools may differ from those illustrated here.

Commercial Service Tool

INFOID:0000000009466573

Tool number
(TechMate No.)
Tool name

Description

(J-46532)
Brake pedal height measurement tool

Measuring brake pedal height

38-PFM90.5
( — )
Pro-Cut PFM90 On-Car Brake Lathe

Refinishing rotors

LFIA0227E

ALFIA0092ZZ

Tool name

Description

1. Flare nut crowfoot
2. Torque wrench

Installing brake tubes and hoses
 a: 10mm (0.39 in)/12mm (0.47 in)

Power tool

Loosening nuts, screws and bolts

NT360

PIIB1407E

BR-6

< SYMPTOM DIAGNOSIS >

NOISE, VIBRATION AND HARSHNESS (NVH) TROUBLESHOOTING

SYMPTOM DIAGNOSIS

NOISE, VIBRATION AND HARSHNESS (NVH) TROUBLESHOOTING

NVH Troubleshooting Chart

INFOID:0000000009466574

Use the chart below to help you find the cause of the symptom. If necessary, repair or replace these parts.

×: Applicable

Reference page

BR-7,

 "BRAKE

 P

A

D : I

nspe

cti

on

 of

 Pad

"

BR-8, 

"BRAKE P

A

D :

 Inspection of P

ad"

BR-7,

 "BRAKE

 P

A

D : I

nspe

cti

on

 of

 Pad

"

BR-8, 

"BRAKE P

A

D :

 Inspection of P

ad"

BR-7,

 "BRAKE

 P

A

D : I

nspe

cti

on

 of

 Pad

"

BR-8, 

"BRAKE P

A

D :

 Inspection of P

ad"

BR-7,

 "DISC ROT

O

R : I

nspe

cti

on

 of

 Roto

r"

BR-8, 

"DISC ROT

O

R :

 In

sp

ectio

of 

Ro

to

r"

BR-7,

 "DISC ROT

O

R : I

nspe

cti

on

 of

 Roto

r"

BR-8, 

"DISC ROT

O

R :

 In

sp

ectio

of 

Ro

to

r"

F

AX-4

RAX-4

FSU-5,

 "NVH T

rou

bl

es

ho

ot

in

C

h

ar

t"

WT

-5

5,

 "NVH T

rou

bl

es

ho

ot

in

g Cha

rt"

WT

-5

5,

 "NVH T

rou

bl

es

ho

ot

in

g Cha

rt"

FAX-4

, "NV

H

 T

rou

ble

shoo

ting

 Cha

rt"

ST

-8,

 "NVH T

ro

u

bl

es

ho

ot

in

g Ch

art

"

Possible cause and
SUSPECTED PARTS

Pad

s - da

ma

ge

d

Pad

s - un

ev

en

 wea

r

Shi

ms

 da

ma

ge

d

Ro

to

r im

ba

la

nce

Ro

to

r da

ma

ge

Rot

or runout

Ro

to

r de

fo

rm

at

io

n

Ro

to

r de

fle

ct

ion

Rot

or rust

Ro

to

r th

ickn

ess v

a

riati

o

n

WHEEL HUB

SUSPENS

ION 

TIRE

S

ROAD WHEEL

DRIVE SHAFT

STE

E

RING

Symptom

Noise

×

×

×

×

×

×

×

×

×

Shake

×

×

x

×

×

×

×

Shimmy, Shudder

×

×

×

×

×

×

×

x

×

×

×

FRONT DISC BRAKE

BR-7

< BASIC INSPECTION >

C

D

E

G

H

I

J

K

L

M

A

B

BR

N

O

P

BASIC INSPECTION

FRONT DISC BRAKE

BRAKE PAD
BRAKE PAD : Inspection of Pad

INFOID:0000000009466575

PAD WEAR

• Check pad thickness from the inspection hole on cylinder body.

Check using a scale if necessary.

DISC ROTOR
DISC ROTOR : Inspection of Rotor

INFOID:0000000009466576

VISUAL

Check surface of disc rotor for uneven wear, cracks, and serious damage. Replace as necessary.

RUNOUT

1. Attach disc rotor to wheel hub using wheel nuts (at two or more

positions). 

2. Inspect runout using a dial gauge placed at 10 mm (0.39 in)

inside the disc edge.

NOTE:

Before measuring, make sure that wheel bearing axial end play

is within the specification. Refer to 

FAX-5, "Inspection"

.

3. When runout exceeds limit value, displace mounting positions of

disc rotor by one hole. Then find a position of the minimum value for runout.

4. If runout is outside the specified value after performing the above operation, refinish disc rotor using Tool.

THICKNESS

Check thickness of the disc rotor using a micrometer. Replace disc

rotor if thickness is under the wear limit.

Standard thickness

: Refer to 

BR-46, "Front Disc 

Brake"

.

Minimum thickness

Refer to 

BR-46, "Front Disc 

Brake"

.

ALFIA0154ZZ

Runout limit

: Refer to 

BR-46, "Front Disc Brake"

.

(with it attached to the vehicle)

Tool number

: 38-PFM90.5

BRA0580D

Standard thickness

: Refer to 

BR-46, "Front 

Disc Brake"

.

Minimum thickness

: Refer to 

BR-46, "Front 

Disc Brake"

.

Thickness variation
(Measured at 8 positions)

: Refer to 

BR-46, "Front 

Disc Brake"

.

SBR020B


Content   ..  232  233  234  235   ..