Nissan Maxima. Manual - part 1089


  Index      Nissan     Nissan Maxima (2009-2014 year) - Service and Repair Manual


Search            


Content   ..  1087  1088  1089  1090   ..


Nissan Maxima. Manual - part 1089


FRONT PASSENGER AIR BAG MODULE

SR-17

< REMOVAL AND INSTALLATION >

C

D

E

F

G

I

J

K

L

M

A

B

SR

N

O

P

FRONT PASSENGER AIR BAG MODULE

Removal and Installation

INFOID:0000000009471844

CAUTION:

• Before servicing, turn ignition switch OFF, disconnect both battery terminals and wait at least 3 min-

utes.

• Do not use air tools or electric tools for servicing.

• Always work from the side of air bag module. Do not work from the front of it.

• Always place air bag module with pad side facing upward.

• Do not cause impact to the air bag module by dropping etc. Replace the air bag module if it has been

dropped or sustained an impact.

REMOVAL

1. Disconnect the negative and positive battery terminals, then wait at least 3 minutes. Refer to 

PG-67,

"Removal and Installation (Battery)"

.

2. Remove the glove box assembly. Refer to 

IP-20, "Removal and Installation"

.

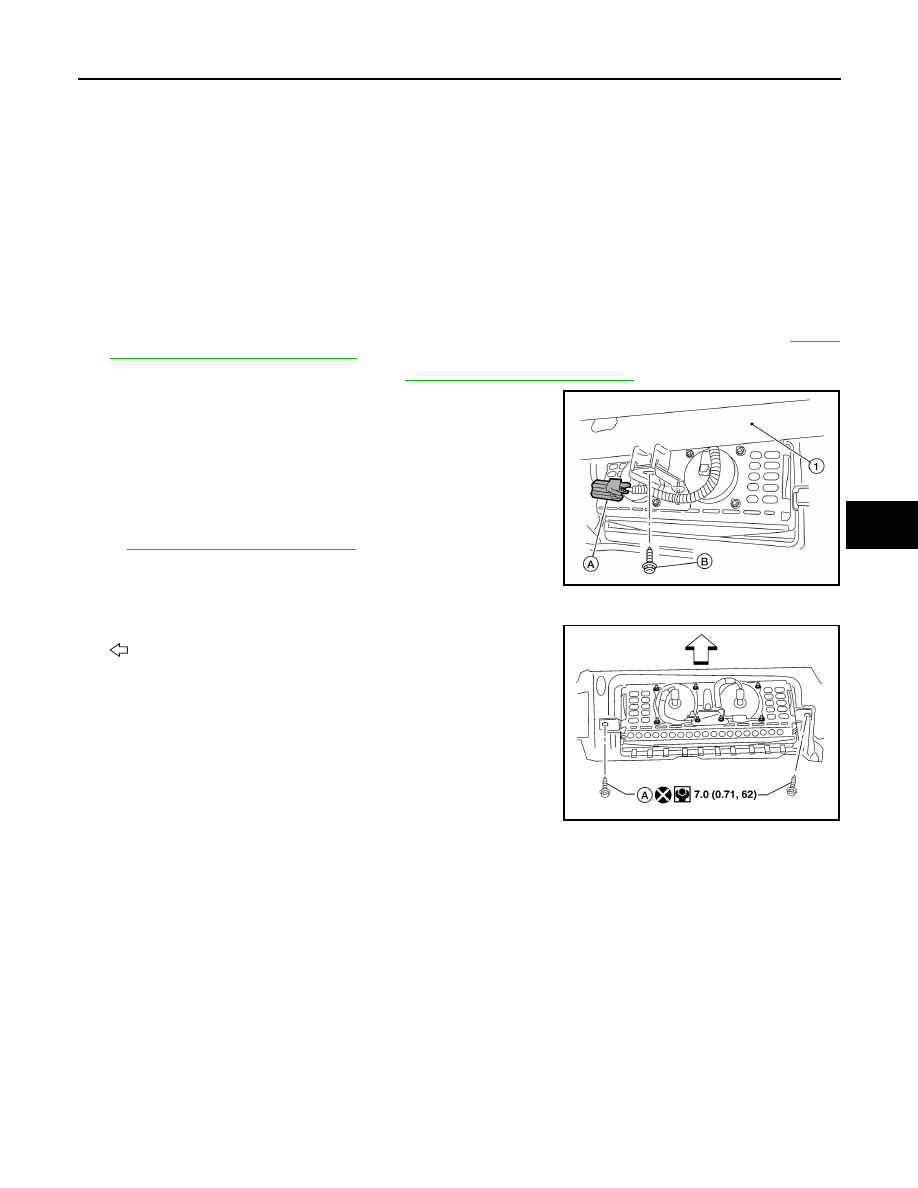
3. Disconnect the harness connector (A) from the front passenger

air bag module.

NOTE:

The figure shows installed condition of the front passenger air

bag module without glove box in place.

4. Remove front passenger air bag module bolt (B) from steering

member (1).

5. Remove the remaining instrument panel from the vehicle. Refer

to 

IP-19, "Removal and Installation"

.

6. Remove the front passenger air bag module screws (A).

 : Front

Front passenger air bag 
module bolt (B)

: 22.3 N·m (2.3 kg-m, 16 in-
lb)

AWHIA0447ZZ

ALHIA0127GB

SR-18

< REMOVAL AND INSTALLATION >

FRONT PASSENGER AIR BAG MODULE

7. Release the upper and lower front passenger air bag module

tabs (A) from instrument panel and pad assembly (1).

8. Rotate and lift the front passenger air bag module away from the

instrument panel, then remove.

INSTALLATION

CAUTION:

• Do not use old bolts after removal; replace with new bolts.

• Be careful not to damage the harness while installing.

• After the work is completed, make sure no system malfunction is detected by air bag warning lamp.

• In case a malfunction is detected by the air bag warning lamp, reset with the self-diagnosis function

and delete the memory by CONSULT.

• If a malfunction is still detected after the above operation, perform self-diagnosis to repair malfunc-

tions. Refer to 

SRC-12, "SRS Operation Check"

1. Install front passenger air bag module to the instrument panel assembly.
2. Install the instrument panel assembly. Refer to 

IP-19, "Removal and Installation"

.

3. Connect the front passenger air bag module harness connector to yellow 4-pin service replacement con-

nector and fasten to mounting bracket. 

ALHIA0128ZZ

SIDE CURTAIN AIR BAG MODULE

SR-19

< REMOVAL AND INSTALLATION >

C

D

E

F

G

I

J

K

L

M

A

B

SR

N

O

P

SIDE CURTAIN AIR BAG MODULE

Component

INFOID:0000000009471845

Removal and Installation

INFOID:0000000009471846

CAUTION:

• Before servicing, turn ignition switch OFF, disconnect both battery terminals and wait at least 3 min-

utes.

• Do not use air tools or electric tools for servicing.

• Always work from the side of air bag module. Do not work from the front of it.

• Always place the curtain air bag module with air bag deployment side facing upward.

• Do not attempt to disassemble side curtain air bag module.

REMOVAL

1. Disconnect the negative and positive battery terminals, then wait at least 3 minutes. Refer to 

PG-67,

"Removal and Installation (Battery)"

.

2. Remove the headlining. Refer to 

INT-33, "Removal and Installation"

.

3. Disconnect the side curtain air bag module harness connector

(2) from the inflator (1).

1.

Side curtain air bag module tether 2.

Side curtain air bag module assembly 3.

Side curtain air bag module inflator

Front

ALHIA0284ZZ

ALHIA0130ZZ

SR-20

< REMOVAL AND INSTALLATION >

SIDE CURTAIN AIR BAG MODULE

• For installing/removing direct-connect SRS harness connec-

tors. Refer to 

SRC-9, "SRS Component Connectors"

.

• Do not repair direct-connect SRS component harness connec-

tors. Refer to 

SRC-12, "Trouble Diagnosis Introduction"

.

4. Remove the bolts, then remove side curtain air bag module

assembly.

INSTALLATION

Installation is in the reverse order of removal.

CAUTION:

• Be careful not to damage the air bag harness.

• After the work is completed, make sure no system malfunction is detected by air bag warning lamp.

• In case a malfunction is detected by the air bag warning lamp, reset by the self-diagnosis function

and delete the memory by CONSULT.

• If a malfunction is still detected after the above operation, perform self-diagnosis to repair malfunc-

tions. Refer to 

SRC-12, "SRS Operation Check"

.

• Make sure the side curtain air bag module is not twisted at any point along the vehicle when

installed.

• Replace the side curtain air bag module if it has been dropped

or sustained an impact. 

PHIA0953J

JMHIA0009ZZ


Content   ..  1087  1088  1089  1090   ..