Nissan Qashqai J11. Manual - part 1075


  Index      Nissan     Nissan Qashqai J11 - Service and Repair Manual


Search            


Content   ..  1073  1074  1075  1076   ..


Nissan Qashqai J11. Manual - part 1075


HA-126

< REMOVAL AND INSTALLATION >

[TYPE 3]

COOLER PIPE AND HOSE

MR16DDT engine models

HIGH-PRESSURE FLEXIBLE HOSE

HIGH-PRESSURE FLEXIBLE HOSE : Removal and Installation

INFOID:0000000010501662

CAUTION:

Perform lubricant return operation before each refrigeration system disassembly. However, if a large
amount of refrigerant or lubricant is detected, never perform lubricant return operation. Refer to 

HA-

114, "Perform Lubricant Return Operation"

.

REMOVAL

1.

Use a refrigerant collecting equipment (for HFC-134a) to discharge the refrigerant. Refer to 

HA-112,

"Recycle Refrigerant"

.

2.

Remove mounting bolt, and then disconnect high-pressure flexible hose from the high-pressure pipe 2.
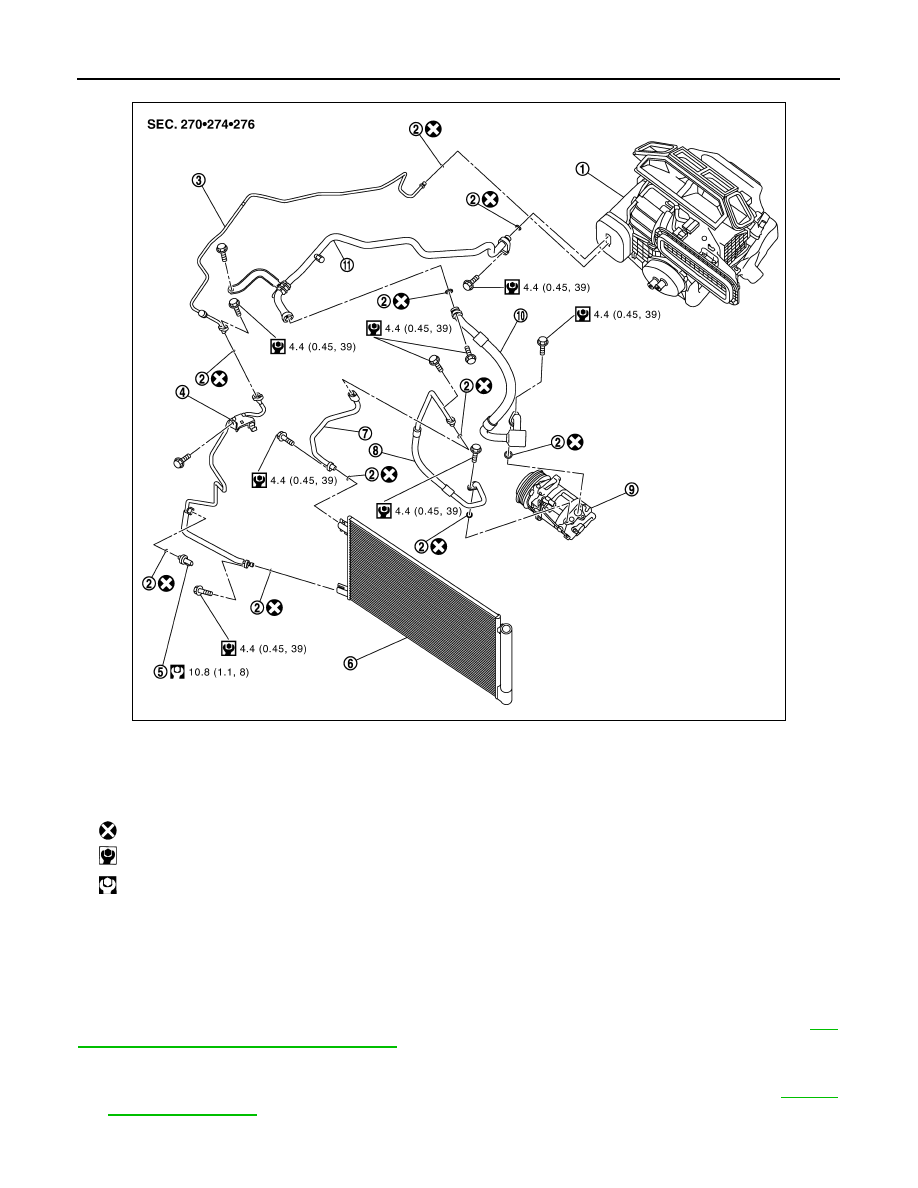
JMIIA4021GB

1.

A/C unit assembly

2.

O-ring

3.

High-pressure pipe 3

4.

High-pressure pipe 1

5.

Refrigerant pressure sensor

6.

Condenser & liquid tank assembly

7.

High-pressure pipe 2

8.

High-pressure flexible hose

9.

Compressor

10. Low-pressure flexible hose

11.

Low-pressure pipe

: Always replace after every disassembly.

: N·m (kg-m, in-lb)

: N·m (kg-m, ft-lb)

COOLER PIPE AND HOSE

HA-127

< REMOVAL AND INSTALLATION >

[TYPE 3]

C

D

E

F

G

H

J

K

L

M

A

B

HA

N

O

P

CAUTION:

Cap or wrap the joint of the A/C piping with suitable material such as vinyl tape to avoid the entry
of air.

3.

Remove mounting bolt, and then disconnect high-pressure flexible hose from the compressor.

CAUTION:

Cap or wrap the joint of the A/C piping and compressor with suitable material such as vinyl tape to
avoid the entry of air.

4.

Remove high-pressure flexible hose from the vehicle.

INSTALLATION

Note the following items, and then install in the reverse order of removal.

CAUTION:

• Replace O-rings with new ones. Then apply compressor oil to them when installing.
• Check for leakages when recharging refrigerant. Refer to 

HA-110, "Leak Test"

.

LOW-PRESSURE FLEXIBLE HOSE

LOW-PRESSURE FLEXIBLE HOSE : Removal and Installation

INFOID:0000000010501663

CAUTION:

Perform lubricant return operation before each refrigeration system disassembly. However, if a large
amount of refrigerant or lubricant is detected, never perform lubricant return operation. Refer to 

HA-

114, "Perform Lubricant Return Operation"

.

REMOVAL

1.

Use a refrigerant collecting equipment (for HFC-134a) to discharge the refrigerant. Refer to 

HA-112,

"Recycle Refrigerant"

.

2.

Remove cowl top extension. Refer to 

EXT-30, "Removal and Installation"

. (MR20DD engine models)

3.

Disengage fixing clip, and then remove insulator upper side. (MR20DD engine models)

4.

Remove mounting bolt, and then disconnect low-pressure flexible hose from low-pressure pipe.
(HRA2DDT engine models and MR16DDT engine models)

CAUTION:

Cap or wrap the joint of the A/C piping with suitable material such as vinyl tape to avoid the entry
of air.

5.

Remove mounting bolt, and then disconnect low-pressure flexible hose from expansion valve. (MR20DD
engine models)

CAUTION:

Cap or wrap the joint of the A/C piping and expansion valve with suitable material such as vinyl
tape to avoid the entry of air.

6.

Remove mounting bolt, and then disconnect low-pressure flexible hose from the compressor.

CAUTION:

Cap or wrap the joint of the A/C piping and compressor with suitable material such as vinyl tape to
avoid the entry of air.

7.

Remove low-pressure flexible hose mounting bolt. (MR20DD engine models)

8.

Remove low-pressure flexible hose from the vehicle.

INSTALLATION

Note the following items, and then install in the reverse order of removal.

CAUTION:

• Replace O-rings with new ones. Then apply compressor oil to them when installing.
• Check for leakages when recharging refrigerant. Refer to 

HA-110, "Leak Test"

.

LOW-PRESSURE PIPE

LOW-PRESSURE PIPE : Removal and Installation

INFOID:0000000010501664

CAUTION:

Perform lubricant return operation before each refrigeration system disassembly. However, if a large
amount of refrigerant or lubricant is detected, never perform lubricant return operation. Refer to 

HA-

114, "Perform Lubricant Return Operation"

.

REMOVAL

HA-128

< REMOVAL AND INSTALLATION >

[TYPE 3]

COOLER PIPE AND HOSE

1.

Use a refrigerant collecting equipment (for HFC-134a) to discharge the refrigerant. Refer to 

HA-112,

"Recycle Refrigerant"

.

2.

Remove fixing clip, and then remove insulator upper side.

3.

Remove cowl top extension. Refer to 

EXT-30, "Removal and Installation"

.

4.

Remove mounting bolt, and then disconnect low-pressure pipe from expansion valve.

CAUTION:

Cap or wrap the joint of the A/C piping and expansion valve with suitable material such as vinyl
tape to avoid the entry of air.

5.

Remove mounting bolts, and then disconnect low-pressure pipe from low-pressure flexible hose.

CAUTION:

Cap or wrap the joint of the A/C piping with suitable material such as vinyl tape to avoid the entry
of air.

6.

Remove mounting nut, and then remove low-pressure pipe.

INSTALLATION

Note the following items, and then install in the reverse order of removal.

CAUTION:

• Replace O-rings with new ones. Then apply compressor oil to them when installing.
• Check for leakages when recharging refrigerant. Refer to 

HA-110, "Leak Test"

.

HIGH-PRESSURE PIPE 1

HIGH-PRESSURE PIPE 1 : Removal and Installation

INFOID:0000000010501665

CAUTION:

Perform lubricant return operation before each refrigeration system disassembly. However, if a large
amount of refrigerant or lubricant is detected, never perform lubricant return operation. Refer to 

HA-

114, "Perform Lubricant Return Operation"

.

REMOVAL

1.

Use a refrigerant collecting equipment (for HFC-134a) to discharge the refrigerant. Refer to 

HA-112,

"Recycle Refrigerant"

.

2.

Remove front bumper fascia assembly. Refer to 

EXT-20, "Removal and Installation"

.

3.

Remove mounting bolt, and then disconnect high-pressure pipe 1 from high-pressure pipe 3.

CAUTION:

Cap or wrap the joint of the A/C piping with suitable material such as vinyl tape to avoid the entry
of air.

4.

Remove mounting bolt, and then disconnect high-pressure pipe 1 from the condenser & liquid tank
assembly.

CAUTION:

Cap or wrap the joint of the A/C piping and condenser with suitable material such as vinyl tape to
avoid the entry of air.

5.

Disconnect refrigerant pressure sensor harness connector.

6.

Remove mounting bolt, and then remove high-pressure pipe 1 from the vehicle.

INSTALLATION

Note the following items, and then install in the reverse order of removal.

CAUTION:

• Replace O-rings with new ones. Then apply compressor oil to them when installing.
• Check for leakages when recharging refrigerant. Refer to 

HA-110, "Leak Test"

.

HIGH-PRESSURE PIPE 2

HIGH-PRESSURE PIPE 2 : Removal and Installation

INFOID:0000000010501666

CAUTION:

Perform lubricant return operation before each refrigeration system disassembly. However, if a large
amount of refrigerant or lubricant is detected, never perform lubricant return operation. Refer to 

HA-

114, "Perform Lubricant Return Operation"

.

REMOVAL

COOLER PIPE AND HOSE

HA-129

< REMOVAL AND INSTALLATION >

[TYPE 3]

C

D

E

F

G

H

J

K

L

M

A

B

HA

N

O

P

1.

Use a refrigerant collecting equipment (for HFC-134a) to discharge the refrigerant. Refer to 

HA-112,

"Recycle Refrigerant"

.

2.

Remove front bumper fascia assembly. Refer to 

EXT-20, "Removal and Installation"

.

3.

Remove mounting bolt, and then disconnect high-pressure pipe 2 from high-pressure flexible hose.

CAUTION:

Cap or wrap the joint of the A/C piping and expansion valve with suitable material such as vinyl
tape to avoid the entry of air.

4.

Remove mounting bolt, and then disconnect high-pressure pipe 2 from condenser & liquid tank assembly.

CAUTION:

Cap or wrap the joint of the A/C piping and condenser with suitable material such as vinyl tape to
avoid the entry of air.

5.

Remove high-pressure pipe 2 from the vehicle.

INSTALLATION

Note the following items, and then install in the reverse order of removal.

CAUTION:

• Replace O-rings with new ones. Then apply compressor oil to them when installing.
• Check for leakages when recharging refrigerant. Refer to 

HA-110, "Leak Test"

.

HIGH-PRESSURE PIPE 3

HIGH-PRESSURE PIPE 3 : Removal and Installation

INFOID:0000000010709171

CAUTION:

Perform lubricant return operation before each refrigeration system disassembly. However, if a large
amount of refrigerant or lubricant is detected, never perform lubricant return operation. Refer to 

HA-

114, "Perform Lubricant Return Operation"

.

REMOVAL

1.

Use a refrigerant collecting equipment (for HFC-134a) to discharge the refrigerant. Refer to 

HA-112,

"Recycle Refrigerant"

.

2.

Disconnect fixing clip, and then remove insulator upper side.

3.

Remove mounting bolt, and then disconnect high-pressure pipe 3 and low-pressure pipe from expansion
valve. (HRA2DDT engine models and MR16DDT engine models)

CAUTION:

Cap or wrap the joint of the A/C piping and expansion valve with suitable material such as vinyl
tape to avoid the entry of air.

4.

Remove mounting bolt, and then disconnect high-pressure pipe 3 and low-pressure flexible hose from
expansion valve. (MR20DD engine models)

CAUTION:

Cap or wrap the joint of the A/C piping and expansion valve with suitable material such as vinyl
tape to avoid the entry of air.

5.

Remove mounting bolt, and then disconnect high-pressure pipe 3 from high-pressure pipe 1.

CAUTION:

Cap or wrap the joint of the A/C piping with suitable material such as vinyl tape to avoid the entry
of air.

6.

Remove high-pressure pipe 3 from the vehicle.

INSTALLATION

Note the following items, and then install in the reverse order of removal.

CAUTION:

• Replace O-rings with new ones. Then apply compressor oil to them when installing.
• Check for leakages when recharging refrigerant. Refer to 

HA-110, "Leak Test"

.

REFRIGERANT PRESSURE SENSOR

REFRIGERANT PRESSURE SENSOR : Removal and Installation

INFOID:0000000010501667

CAUTION:


Content   ..  1073  1074  1075  1076   ..