Mitsubishi L200. Manual - part 866
COMPRESSOR ASSEMBLY
HEATER, AIR CONDITIONER AND VENTILATION
55A-80
COMPRESSOR ASSEMBLY
REMOVAL AND INSTALLATION
M1552004403007
Pre-removal Operation
• Refrigerant Discharging (Refer to
.)
• Under skid plate, Engine room under cover removal
(Refer to GROUP 51 .)
• Front overfender Removal (Refer to GROUP 51 .)
Post-installation Operation
• Refrigerant Charging (Refer to
• A/C compressor drive belt tension check and adjustment
(Refer to GROUP 11A, On-Vehicle Service, A/C compres-
sor drive belt tension check and adjustment.)
• Under skid plate, Engine room under cover installation
(Refer to GROUP 51 .)
• Front overfender installation (Refer to GROUP 51 .)
AC500337
1, 2
3
3
N
4
2
1
6
AJ
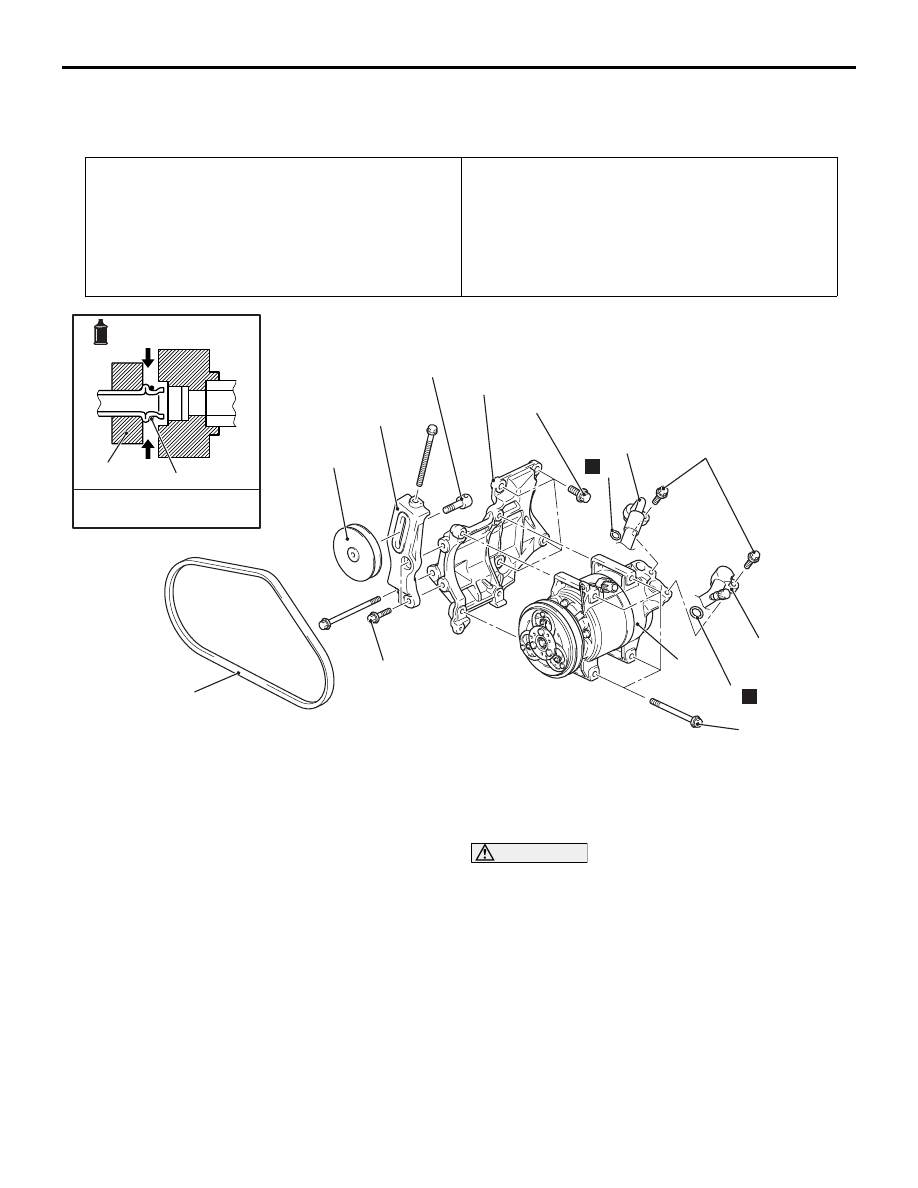
44 ± 8 N·m
16 ± 10 N·m
-Pipe coupling
A/C compressor oil:
ZXL 100PG
3
N
7
5
8
13 ± 2 N·m
22 ± 4 N·m
22 ± 4 N·m
Removal steps
<<
A
>>
1.
A/C compressor discharge hose
<<
A
>>
2.
A/C compressor suction hose
3.
A/C piping O-ring
<<
B
>>
4.
A/C compressor drive belt
<<
C
>>
>>
A
<<
5.
A/C compressor and clutch
assembly
6.
Tension pulley
7.
A/C compressor tension pulley
bracket
8.
A/C compressor bracket
REMOVAL SERVICE POINTS
<<A>> A/C COMPRESSOR DISCHARGE HOSE
AND A/C COMPRESSOR SUCTION HOSE DIS-
CONNECTION
CAUTION
Use the plug which is not breathable because A/
C compressor oil or receiver have high hygro-
scopicity.
Plug the removed nipple of the pipe to prevent the
entry of dust and dirt.