Mazda MX-5 Miata (1997+). Manual - part 26


  Index      Mazda     Mazda MX-5 Miata - service repair manual 1997 year


Search            


Content   ..  24  25  26  27   ..


Mazda MX-5 Miata (1997+). Manual - part 26


as specified, check for air in system, rear brake adjustment (drum brakes) or worn shoes or pads. 

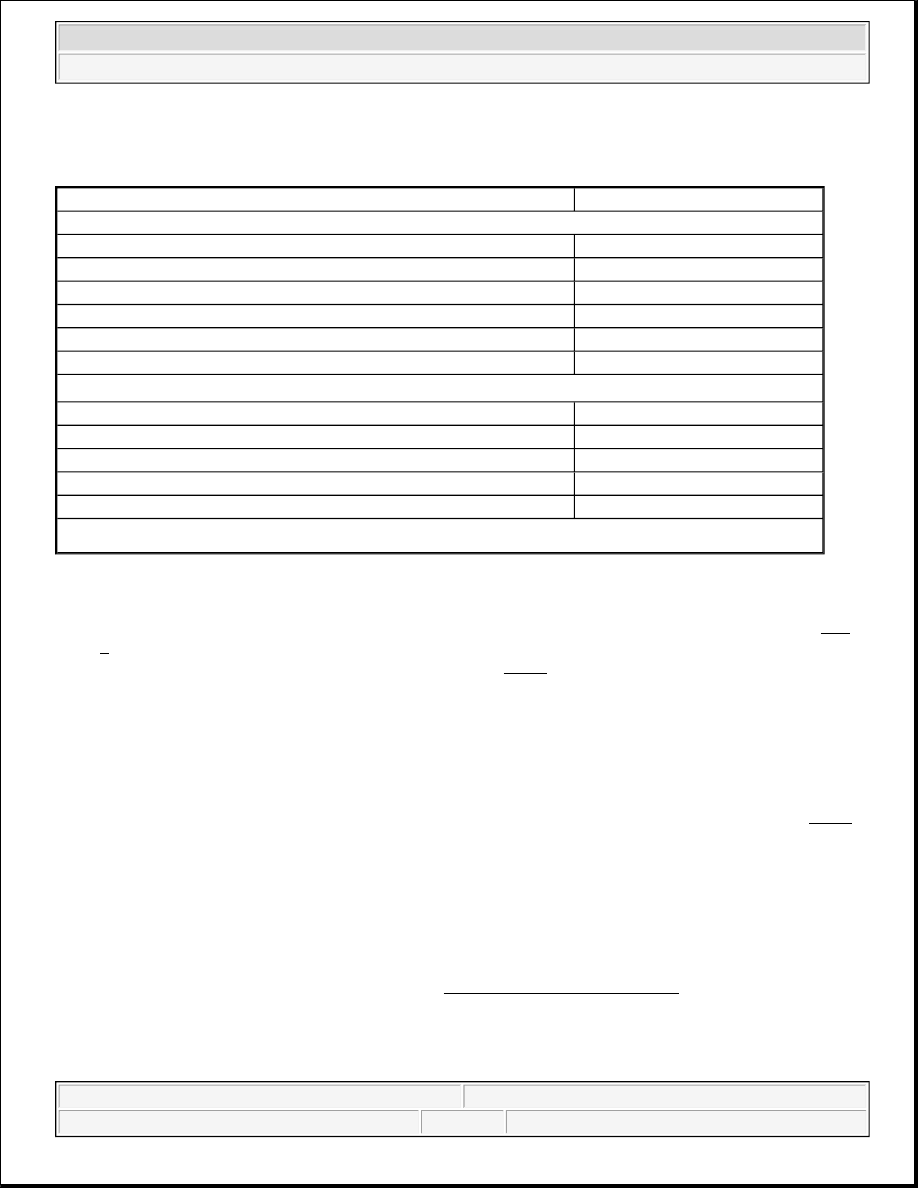
BRAKE PEDAL HEIGHT SPECIFICATIONS 

Millenia & Protege 

1. Released pedal height is measured between brake pedal and stoplight switch mounting bracket. See Fig. 

3 . Disconnect stoplight switch electrical connector and remove switch. Measure length "L" between 
stoplight switch mounting bracket and brake pedal. See Fig. 3 . On Millenia, length should be .79-
.90" (20-23 mm). On Protege, length should be .71-.86" (18-22 mm).  

2. On all models, if clearance is as specified, install stoplight switch. No adjustment is necessary. If 

clearance is not as specified, loosen lock nut "B" and rotate self-locking nut "A" counterclockwise until it 
does not contact brake pedal.  

3. Loosen push rod lock nut and rotate push rod until correct clearance between brake pedal and stoplight 

switch mounting bracket is obtained. Tighten push rod lock nut. Rotate self-locking nut "A" clockwise 
until clearance between brake pedal and end of self-locking nut "A" is .004-.039 (.1-1.0 mm). See Fig. 3 
Tighten lock nut "B". 

4. Install NEW stoplight switch. Stoplight switch is automatically adjusted by pulling back on brake pedal 

until stoplight switch click noise is heard. Reconnect stoplight switch electrical connector. Check 
stoplight operation. Adjust pedal free play. See BRAKE PEDAL FREE PLAY . Tighten push rod lock 
nut to 18-25 ft. lbs. (24-34 N.m).  

5. Applied pedal height is measured from angled portion of firewall (without carpet) to pedal pad center. 

Start engine. Depress brake pedal with 132 lbs. (60 kg) pressure. On Millenia, distance should be 2.7" (70 
mm). On Protege, distance should be 3.8" (95 mm). On all models, if distance is not as specified, check 

Application

In. (mm)

Pedal Released

Miata

6.8-7.1 (171-181)

MPV

7.5-7.9 (191-201)

MX-3

7.6-7.7 (193-196)

MX-6 & 626

7.5-7.7 (191-196)

RX7

6.5-6.9 (165-176)

929

7.4-7.7 (188-195)

Pedal Applied 

(1)


Miata

3.7 (95)

MPV, MX-6 & 626

3.3 (85)

MX-3

2.8 (70)

RX7

3.9 (100)

929

1.6 (40)

(1)

Minimum height.

NOTE:

When adjusting brake pedal height, a NEW stoplight switch must be used. 
Stoplight switch can only be adjusted one time.


1997 Mazda MX-5 Miata 

BRAKE SYSTEM 1995-97 BRAKES Mazda - Disc & Drum


for air in system, rear brake adjustment (drum brakes) or worn shoes or pads.  

Fig. 3: Adjusting Brake Pedal Height (Millenia Shown; Protege Is Similar) 
Courtesy of MAZDA MOTORS CORP. 

TESTING 

PROPORTIONING VALVE 

NOTE:

B2300, B3000 and B4000 are not equipped with a proportioning valve.


1997 Mazda MX-5 Miata 

BRAKE SYSTEM 1995-97 BRAKES Mazda - Disc & Drum


1. Connect 2 pressure gauges and adapters to proportioning valve. One to input port and other to output port. 

Bleed brake system. See BLEEDING BRAKE SYSTEM . Depress brake pedal until pressure gauge 
reads as specified and check output pressure. See PROPORTIONING VALVE PRESSURE 
SPECIFICATIONS
 .  

2. Depress brake pedal again, applying additional pressure. Recheck output pressure. See 

PROPORTIONING VALVE PRESSURE SPECIFICATIONS . If output pressure is not as specified, 
replace proportioning valve.  

PROPORTIONING VALVE PRESSURE SPECIFICATIONS 

Application

Inlet Pressure psi (kg/cm

2

 )

Outlet Pressure psi 

(kg/cm

2

 )

Miata

With ABS

569 (40) 850 (60)

526-612 (37-43) 626-740 

(44-52)

Without ABS

427 (30) 850 (60)

384-470 (27-33) 540-654 

(38-46)

Millenia

430 (31) 850 (60)

400-460 (28-32) 520-600 

(37-42)

MPV

1995

512 (36) 1422 (100)

484-540 (34-38) 854-995 

(60-70)

1996-97

427 (30) 853 (61)

370-484 (26-34) 583-697 

(41-49)

MX-3

With ABS

356 (25) 853 (61)

328-384 (23-27) 512-598 

(36-42)

Without ABS

427 (30) 853 (61)

399-455 (28-32) 512-598 

(36-42)

MX-6 & 626

With ABS

500 (35) 850 (60)

470-530 (33-37) 597-683 

(42-48)

Without ABS

500 (35) 850 (60)

470-530 (33-37) 557-643 

(39-45)

Protege

With ABS

356 (25) 853 (61)

328-384 (23-27) 568-654 

(40-46)

Without ABS 1.5L

356 (25) 853 (61)

328-384 (23-27) 483-569 

(34-40)

Without ABS 1.8L

356 (25) 853 (61)

328-384 (23-27) 654-740 

(46-52)

RX7

570 (40) 850 (60)

530-610 (37-43) 626-739 

(44-52)

929

427 (30) 853 (61)

399-455 (28-32) 541-654 


1997 Mazda MX-5 Miata 

BRAKE SYSTEM 1995-97 BRAKES Mazda - Disc & Drum


POWER BRAKE UNIT 

1. With engine off, depress brake pedal several times. Press and hold brake pedal and start engine. If brake 

pedal moves down slightly immediately after engine starts, power brake unit is operating. If brake pedal 
does not move as specified, go to next step.  

2. Run engine for 1-2 minutes. Stop engine. Press brake pedal several times and note if first pedal stroke is 

longer than subsequent strokes. If first pedal stroke is longer than subsequent strokes, power brake unit is 
operating. If length of strokes is equal, check valve and vacuum hose between vacuum source and power 
brake unit. Repair as necessary, and go to next step.  

3. Start engine. Press and hold brake pedal. Stop engine. Hold pedal down for about 30 seconds. If pedal 

height remains at same height, power brake unit is operating. If pedal height recedes, check valve and 
vacuum hose between vacuum source and power brake unit. Repair as necessary.  

REMOVAL & INSTALLATION 

FRONT DISC BRAKE PADS 

Removal & Installation (B2300, B3000 & B4000) 

1. To prevent master cylinder overflow when caliper piston is depressed, remove and discard some brake 

fluid from master cylinder reservoir. Raise and support vehicle. Remove front wheel assemblies. Place a 
large "C" clamp on caliper.  

2. Tighten clamp to bottom piston in cylinder bore. Remove clamp. Remove 2 caliper pin bolts. Remove 

caliper from rotor and wire aside. Slide brake pads off caliper anchor plate. Remove anchor plate (if 
necessary). Replace pad if lining thickness is less than specified. See MINIMUM PAD LINING 
SPECIFICATIONS (FRONT)
 .  

3. To install, reverse removal procedure. Use "C" clamp and old pad to push caliper piston into piston bore 

until piston bottoms out. Bleed air from brake system (if necessary).  

Removal & Installation (Miata, Millenia, MPV, MX-6, 626 & 929) 

1. Raise and support front of vehicle. Remove front wheel assemblies. Remove lower lock pin/guide bolt. 

See Fig. 4 , Fig. 5 or Fig. 6 . Pivot caliper upward and support using rope.  

2. Remove pads, shims, guide plates or pad guides and "V" springs (if equipped). Replace pad if lining 

thickness is less than specified. See MINIMUM PAD LINING SPECIFICATIONS (FRONT) .  

3. To install, reverse removal procedure. Use Disc Brake Expander (49-0221-600C) and an old pad to push 

piston fully inward to install disc pads. 

(38-46)


1997 Mazda MX-5 Miata 

BRAKE SYSTEM 1995-97 BRAKES Mazda - Disc & Drum


Content   ..  24  25  26  27   ..