Lexus NX300 (2021 year). Manual in english - page 4


  Index      Manuals     Lexus NX300 (2021 year). Manual in english


Search            copyright infringement  


Content      ..     2      3      4      5     ..


Lexus NX300 (2021 year). Manual in english - page 4


73

2-1. Instrument cluster

2

Vehi

cle

 status 

inform

ati

on a

nd i

ndic
ators

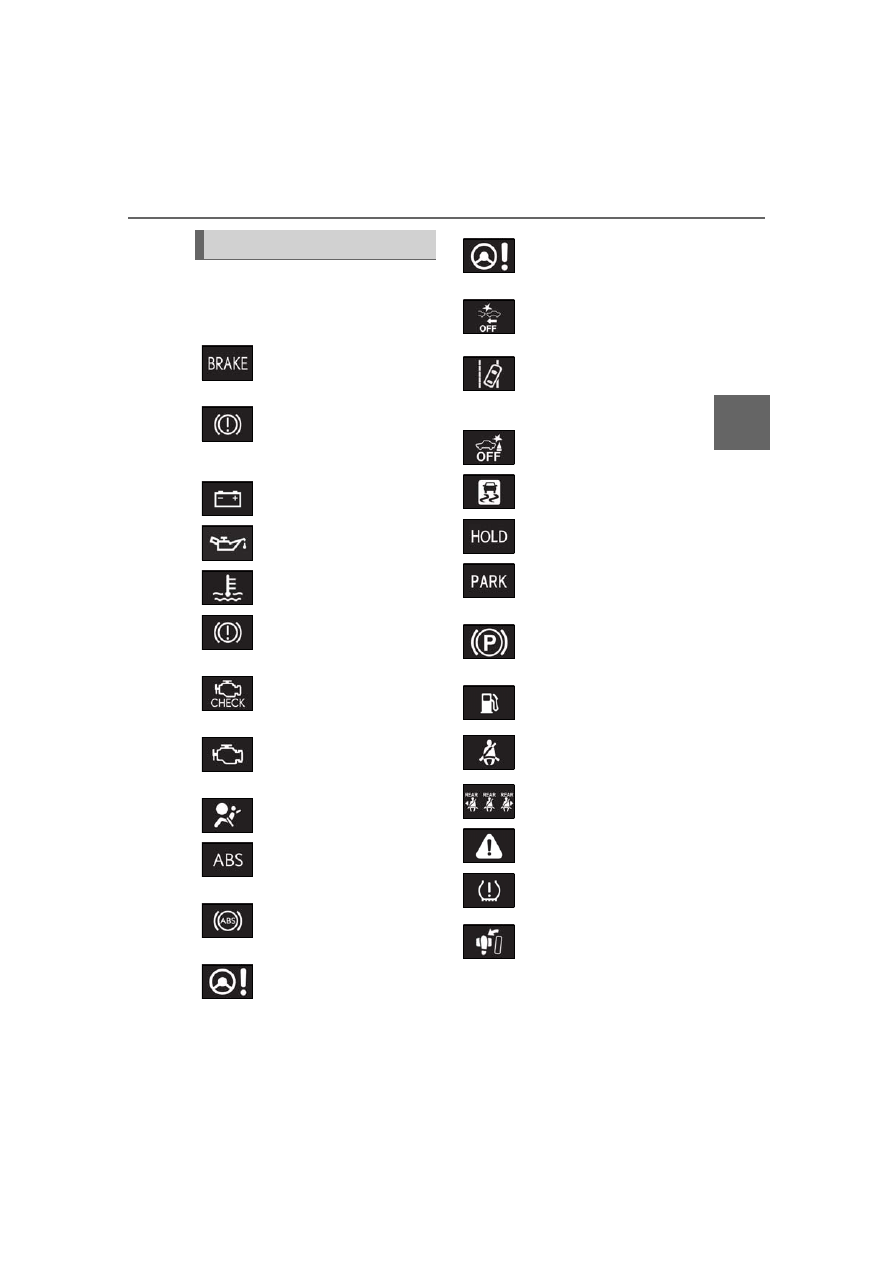
Warning lights inform the driver of mal-
functions in any of the vehicle’s sys-
tems.

*1

: These lights turn on when the engine 

switch is turned to IGNITION ON 
mode to indicate that a system check is 
being performed. They will turn off after 

Warning lights

(U.S.A.)

Brake system warning light

*1


(

P.373)

(Red)

(Canada)

Brake system warning light

*1


(

P.373)

Charging system warning 
light

*2

 (

P.373)

Low engine oil pressure warn-
ing light

*2

 (

P.373)

High coolant temperature 
warning light

*2

 (

P.374)

(Yellow)

Brake system warning light

*1


(

P.374)

(U.S.A.)

Malfunction indicator lamp

*1


(

P.374)

(Canada)

Malfunction indicator lamp

*1


(

P.374)

SRS warning light

*1

 (

P.374)

(U.S.A.)

ABS warning light

*1

 (

P.375)

(Canada)

ABS warning light

*1

 (

P.375)

(Yellow)

Electric power steering sys-
tem warning light

*1

 (

P.375)

(Red)

Electric power steering sys-
tem warning light

*1

 (

P.375)

PCS warning light

*1

 (

P.375)

(Orange)

LTA indicator

*2

 (if equipped) 

(

P.376)

LDA indicator

*2

 (if equipped) 

(

P.376)

PKSB OFF indicator

*1, 3

 (if 

equipped) (

P.376)

Slip indicator light

*1

 (

P.376)

Brake hold operated indica-
tor

*1, 3

 (

P.377)

(U.S.A.)

Parking brake indicator

*3


(

P.377)

(Canada)

Parking brake indicator

*3


(

P.377)

Low fuel level warning light 
(

P.377)

Driver’s and front passenger’s 
seat belt reminder light 
(

P.377)

Rear passengers’ seat belt 
reminder light

*4

 (

P.378)

Master warning light

*1


(

P.378)

Tire pressure warning light

*1


(

P.378)

Brake Override Sys-
tem/Drive-Start Control warn-
ing light

*2

 (

P.379)

74

2-1. Instrument cluster

the engine is started, or after a few sec-
onds. There may be a malfunction in a 
system if the lights do not turn on, or 
turn off. Have the vehicle inspected by 
your Lexus dealer.

*2

: This light illuminates on the multi-infor-

mation display.

*3

: The light flashes to indicate a malfunc-

tion.

*4

: This light illuminates on the center 

panel.

The indicators inform the driver of the 
operating state of the vehicle’s various 
systems.

WARNING

If a safety system warning light does 

not come on

Should a safety system light such as the 

ABS and SRS airbag warning light not 

come on when you start the engine, this 

could mean that these systems are not 

available to help protect you in an acci-

dent, which could result in death or seri-

ous injury. Have the vehicle inspected by 

your Lexus dealer immediately if this 

occurs.

Indicators

Turn signal indicator (

P.171)

(U.S.A.)

Headlight indicator (

P.177)

(Canada)

Tail light indicator (

P.177)

Headlight high beam indicator 
(

P.179)

Automatic High Beam indica-
tor (

P.180)

Fog light indicator (

P.183)

Eco Driving Indicator Light

*1


(

P.76)

“Eco” indicator 

*2

 (

P.257)

“Sport” indicator

*2

 (if 

equipped) (

P.257)

“Sport S” indicator

*2

 (if 

equipped) (

P.257)

“Sport S+” indicator

*2

 (if 

equipped) (

P.257)

“Custom” indicator

*2

 (if 

equipped) (

P.257)

Dynamic radar cruise control 
indicator

*2

 (

P.224)

Cruise control “SET” indica-
tor

*2

 (

P.224)

Cruise control indicator

*2


(

P.224)

75

2-1. Instrument cluster

2

Vehi

cle

 status 

inform

ati

on a

nd i

ndic
ators

*1

: These lights turn on when the engine 

switch is turned to the IGNITION ON 
mode to indicate that a system check is 
being performed. They will turn off after 
the engine is started, or after a few sec-
onds. There may be a malfunction in a 
system if the lights do not turn on, or 
turn off. Have the vehicle inspected by 
your Lexus dealer.

*2

: This light illuminates on the multi-infor-

mation display.

*3

: The light flashes to indicate that the sys-

tem is operating.

*4

: The light comes on when the system is 

turned off.

*5

: When the outside temperature is 

approximately 37°F (3°C) or lower, the 
indicator will flash for approximately 10 
seconds, then stay on.

*6

: In order to confirm operation, the BSM 

outside rear view mirror indicators illu-
minate in the following situations:
When the engine switch is turned to 
IGNITION ON mode while the BSM 
main switch is set to ON.
When the BSM main switch is set to 
ON while the engine switch is in IGNI-
TION ON mode.
If the system is functioning correctly, the 
BSM outside rear view mirror indica-
tors will turn off after a few seconds.

(White)

LTA indicator

*2

 (if equipped) 

(

P.210)

LDA indicator

*2

 (if equipped) 

(

P.219)

(Green)

LTA indicator

*2

 (if equipped) 

(

P.210)

LDA indicator

*2

 (if equipped) 

(

P.219)

(Orange)

LTA indicator

*2, 3

 (if equipped) 

(

P.210)

LDA indicator

*2, 3

 (if 

equipped) (

P.219)

Intuitive parking assist indica-
tor (if equipped) (

P.235)

PKSB OFF indicator

*1, 4

 (if 

equipped) (

P.241)

Slip indicator light

*1, 3


(

P.260)

VSC off indicator

*1, 4

 (

P.261)

PCS warning light

*1, 4


(

P.200)

(AWD mod-

els only)

All-wheel drive lock indicator

*1


(

P.264)

(U.S.A.)

Parking brake indicator 
(

P.171)

(Canada)

Parking brake indicator 
(

P.171)

Brake hold standby indicator

*1


(

P.174)

Brake hold operated indica-
tor

*1

 (

P.174)

Low outside temperature indi-
cator

*2, 5

 (

P.77)

BSM outside rear view mirror 
indicators

*6, 7

 (if equipped) 

(

P.249)

Security indicator

*8

 (

P.67, 

69)

(U.S.A.)

“AIR BAG ON/OFF” indi-
cator

*8

 (

P.41)

(Canada)

“AIR BAG ON/OFF” indi-
cator

*8

 (

P.41)

76

2-1. Instrument cluster

If the BSM outside rear view mirror indi-
cators do not illuminate or do not turn 
off, there may be a malfunction in the 
system.
If this occurs, have the vehicle inspected 
by your Lexus dealer.

*7

: This light illuminates on the outside rear 

view mirrors.

*8

: This light illuminates on the center 

panel.

Eco Driving Indicator

Eco Driving Indicator Light
During Eco-friendly acceleration (Eco 
driving), the Eco Driving Indicator Light 
will turn on. When the acceleration 
exceeds the Zone of Eco driving, or 
when the vehicle is stopped, the light 
turns off.

Eco Driving Indicator Zone Display
Suggests the Zone of Eco driving with 
current Eco driving ratio based on 
acceleration.

Eco driving ratio based on acceleration
If the acceleration exceeds the Zone of 
Eco driving, the right side of the Eco 
Driving Indicator Zone Display will illu-

minate.
When this happens, the Eco Driving 
Indicator Light will turn off.

Zone of Eco driving

Eco Driving Indicator will not operate 

under the following conditions:

The shift lever is in any position other than 

D.

A paddle shift switch is operated.

Neither Normal mode nor Eco mode is 

selected. (

P.257)

The vehicle speed is approximately 80 

mph (130 km/h) or higher.

Settings of the display and non-display of 

the Eco Driving Indicator Light can be 

changed. (

P.85)

A

B

C

D

77

2-1. Instrument cluster

2

Vehi

cle

 status 

inform

ati

on a

nd i

ndic
ators

The units used on the meters and some indicators may differ depending on the target 
region.

Engine coolant temperature gauge

Displays the engine coolant temperature

Tachometer

Displays the engine speed in revolution per minute

Outside temperature

Displays the outside temperature within the range of -40°F (-40°C) to 122°F (50°C). Low 
outside temperature indicator comes on when the ambient temperature is 37°F (3°C) or 
lower.

Background color of driving mode

Background color changes according to the driving mode. (

P.257)

• Sport  mode:  Red
• Eco  mode:  Blue
When in Normal mode/Custom mode, the background color is black.

Clock

Time displayed is linked to the analog clock on the instrument panel. (

P.298)

Multi-information display

Presents the driver with a variety of vehicle data (

P.80)

Gauges and meters

The meters display various drive information.

Meter display

A

B

C

D

E

F

78

2-1. Instrument cluster

Displays warning messages in case of a malfunction (

P.382)

Speedometer

Displays the vehicle speed

Fuel gauge

Displays the quantity of fuel remaining in the tank

Shift position and shift range

Displays the selected shift position or selected shift range (

P.167)

Odometer, trip meter and maintenance required information display

Odometer:
Displays the total distance the vehicle has been driven
Trip meter:
Displays the distance the vehicle has been driven since the meter was last reset.
Trip meters “A” and “B” can be used to record and display different distances inde-
pendently.
Maintenance required information:
Displays the remaining distance until the engine oil should be changed.
• Displays the maintenance required information when the engine switch is in IGNITION 

ON mode.

• It can be reset on 

 of the multi-information display. (

P.83)

Operating condition

The engine switch is in IGNITION ON 

mode.

Outside temperature display

In the following situations, the correct 

outside temperature may not be dis-

played, or the display may take longer 

than normal to change.

• When stopped, or driving at low speeds 

(less than 12 mph [20 km/h])

• When the outside temperature has 

changed suddenly (at the entrance/exit of 

a garage, tunnel, etc.)

When “--” or “E” is displayed, the system 

may be malfunctioning.

Take your vehicle to your Lexus dealer.

Pop-up display

In some situations, a pop-up display will be 

temporarily displayed on the multi-informa-

tion display or the odometer/trip 

meter/maintenance required information 

screen.

The pop-up display function can be set 

on/off. (

P.85)

Liquid crystal display

Small spots or light spots may appear on the 

display. This phenomenon is characteristic 

of liquid crystal displays, and there is no 

problem continuing to use the display.

Customization

The meter display can be customized on 

the multi-information display.

(Customizable features: 

P.425)

G

H

I

J

79

2-1. Instrument cluster

2

Vehi

cle

 status 

inform

ati

on a

nd i

ndic
ators

Switches between odometer, trip 
meter and maintenance required infor-
mation displays. When the trip meter is 
displayed, pressing and holding the 
button will reset the trip meter.

The brightness of the instrument panel 
lights can be adjusted.

1

Darker

2

Brighter

Instrument panel brightness adjustment

The instrument panel brightness levels 

when the tail lights are on and off can be 

adjusted individually. However, when the 

surroundings are bright (daytime, etc.), 

turning on the tail lights will not change the 

instrument panel brightness. At this time, 

any adjustments made to the instrument 

panel brightness levels will be applied to 

both settings at once.

WARNING

The information display at low tem-

peratures

Allow the interior of the vehicle to warm 

up before using the liquid crystal infor-

mation display. At extremely low tem-

peratures, the information display 

monitor may respond slowly, and display 

changes may be delayed.

For example, there is a lag between the 

driver’s shifting and the new gear number 

appearing on the display. This lag could 

cause the driver to downshift again, 

causing rapid and excessive engine brak-

ing and possibly an accident resulting in 

personal death or injury.

NOTICE

To prevent damage to the engine and 

its components

Do not let the indicator needle of the 

tachometer enter the red zone, which 

indicates the maximum engine speed.

The engine may be overheating if the 

engine coolant temperature gauge is 

in the red zone (H); or “Engine Cool-

ant Temp High” is shown on the multi-

information display. In this case, imme-

diately stop the vehicle in a safe place, 

and check the engine after it has 

cooled completely. (

P.401)

Changing between the odome-
ter, trip meter and maintenance 
required information

Changing the Instrument panel 
light brightness

80

2-1. Instrument cluster

Display

Menu icons

Liquid crystal display

P.78

The multi-information display is oper-
ated using the meter control switches.

Select an item/change pages

Enter/set

Return to the previous screen

Press: Displays the screen regis-

tered to 

. When no screen has 

been registered, the drive informa-
tion screen will be displayed. Press 
and hold: Registers the currently 

displayed screen to 

.

The registration confirmation screen is dis-
played. If the selected screen cannot be 
registered, a registration failure message 

Multi-information display

The multi-information display pres-
ents the driver with a variety of 
vehicle data.

Display and menu icons

Drive information (

P.81)

Navigation system-linked dis-
play (if equipped) (

P.82)

Audio system-linked display 
(

P.83)

Driving assist system informa-
tion (

P.83)

Warning message display 
(

P.83)

Settings display (

P.83)

NOTICE

The multi-information display at low 

temperatures

Allow the interior of the vehicle to warm 

up before using the liquid crystal infor-

mation display. At extremely low tem-

peratures, the information display 

monitor may respond slowly, and display 

changes may be delayed.

Changing the meter display

A
B
C
D

81

2-1. Instrument cluster

2

Vehi

cle

 status 

inform

ati

on a

nd i

ndic
ators

will be shown.

Call sending/receiving and history 
display

Linked with the hands-free system, sending 
or receiving call is displayed. For details 
regarding the hands-free system, refer to 
the “NAVIGATION AND MULTIMEDIA 
SYSTEM OWNER’S MANUAL”.

Content displayed as drive infor-
mation

Select to display various drive data.

Items displayed can be switched by 
pressing 

 or 

 of the meter con-

trol switches to select 

 and pressing 

 or 

.

Current fuel consumption

*1

Displays the current rate of fuel consump-
tion

Average fuel consumption (after 
reset

*2

/after start/after refuel)

*1

Displays the average fuel consumption 
since the function was reset, the engine 
was started, and the vehicle was refueled, 
respectively
Use the displayed average fuel consump-
tion as a reference.

Average vehicle speed (after 
reset

*2

/after start)

*1

Displays the average vehicle speed since 
the function was reset and the engine was 
started, respectively

Elapsed time (after reset

*2

/after 

start)

*1

Displays the elapsed time since the func-
tion was reset and the engine was started, 
respectively

Distance (driving range/after start)

*1

Displays the estimated maximum distance 
that can be driven with the quantity of fuel 
remaining and the distance driven after the 
engine was started respectively.
• This distance is computed based on your 

average fuel consumption. As a result, 
the actual distance that can be driven 
may differ from that displayed.

• When only a small amount of fuel is 

added to the tank, the display may not be 
updated.
When refueling, turn the engine switch 
off. If the vehicle is refueled without turn-
ing the engine switch off, the display may 
not be updated.

*1

: Displayed when the item is set in “Drive 

Info 1”, “Drive Info 2” and “Drive Info 3”.

*2

: The function can be reset by pressing 

the 

 of the meter control switches 

for longer than 1 second when the item 
to reset is displayed.
If there is more than one item that can 
be reset, the item selection screen will 
appear.

Eco Driving Indicator Zone Dis-
play

P.76

Boost Meter/Oil Temperature 
Gauge/Oil Pressure Gauge (if 
equipped)

Boost Meter:
Displays the boost pressure. The dis-
play changes colors when the specified 
pressure is exceeded.

Drive information

E

82

2-1. Instrument cluster

Oil Temperature Gauge:
Displays the temperature of the engine 
oil. The display flashes when the engine 
oil exceeds 284°F (140°C).
Oil Pressure Gauge:
Displays the oil pressure for the engine 
interior. A buzzer sounds and warning 
message is displayed when the oil 
pressure gets low. (

P.384)

Depending on the road conditions, tem-
perature, vehicle speed, etc., the actual 
vehicle condition on the display screen 
may differ.
Use the display screen as a reference.

G monitor (if equipped)

Displays the acceleration forces of the 
front, back, left and right of the vehicle. 
Also displays the turning angle of the 
steering wheel, brake oil pressure, 
accelerator opening.

The actual vehicle conditions may 
differ from those on the display 
screen, depending on the road con-
ditions, outside temperature, vehicle 
speed, etc. Use the display screen 
as a reference.

If a battery terminal is disconnected 
and reconnected, the steering 
amount display may be disabled 
temporarily. After driving the vehi-
cle for a while, the display will be 
enabled.

Speedometer

Displays the vehicle speed.

Tire inflation pressure

Displays inflation pressure of each tire.

The inflation pressure of the spare tire will 

not be displayed.

Vehicle sway warning

Detects the sway of the vehicle within a 
lane, which is often associated with a 
decrease in the driver’s attention level 
and alerts the driver.
This display is a part of the LTA (Lane 
Tracing Assist) system or LDA (Lane 
Departure Alert with steering control) 
system. The display is enabled when 
the operating conditions of the vehicle 
sway warning are met. (

P.209, 218)

Display off

A blank screen is displayed.

Tire inflation pressure

It may take a few minutes to display the 

tire inflation pressure after the engine 

switch is turned to IGNITION ON mode. 

It may also take a few minutes to display 

the tire inflation pressure after inflation 

pressure has been adjusted.

“--” may be displayed if the tire informa-

tion cannot be determined due to unfa-

vorable radio wave conditions.

Tire inflation pressure changes with tem-

perature. The displayed values may also 

be different from the values measured 

using a tire pressure gauge.

When disconnecting and reconnecting 

battery terminals

The drive information will be reset.

Select to display the following naviga-
tion system-linked information.

Route guidance

Compass display (heading-up dis-
play)

Navigation system-linked dis-
play (if equipped)

83

2-1. Instrument cluster

2

Vehi

cle

 status 

inform

ati

on a

nd i

ndic
ators

Select to enable selection of an audio 
source or track on the display using the 
meter control switches.

Select to display the operational status 
of the following systems:

LTA (Lane Tracing Assist) (if 
equipped) (

P.205)

LDA (Lane Departure Alert with 
steering control) (if equipped) 
(

P.214)

Dynamic radar cruise control with 
full-speed range (

P.224)

RSA (Road Sign Assist) (if 
equipped) (

P.222)

The displayed icon changes depending 
on the system used.

Select to display warning messages 
and measures to be taken if a malfunc-
tion is detected. (

P.382)

The settings of the following items can 
be changed using the meter control 
switches.

For functions that can be enabled or 
disabled, the function switches 
between on and off each time 

 is 

pressed.

 LTA (Lane Tracing Assist) (if 

equipped) (

P.205)

Select to set up the following items.

Lane centering

Select to enable/disable the lane centering 
function.

Steering Assist

Select to enable/disable steering wheel 
assistance.

Alert

Select to change the alert types.

Alert sensitivity

Select to set the warning sensitivity.

Sway warning

Select to enable/disable the vehicle sway 
warning.

Sway sensitivity

Select to set the vehicle sway warning sen-
sitivity.

 LDA (Lane Departure Alert 

with steering control) (if equipped) 
(

P.214)

Select to set up the following items.

Steering Assist

Select to enable/disable steering wheel 
assistance.

Alert

Select to change the alert types.

Alert sensitivity

Select to set the warning sensitivity.

Sway warning

Select to enable/disable the vehicle sway 
warning.

Audio system-linked display

Driving assist system information

Warning message display

Settings display

84

2-1. Instrument cluster

Sway sensitivity

Select to set the vehicle sway warning sen-
sitivity.

 PCS (Pre-Collision System) 

(

P.198)

Select to set up the following items.

PCS on/off

Select to enable/disable the pre-collision 
system.

PCS sensitivity

Select to change the warning timing.

PKSA (Parking Support Alert) (if 
equipped) (

P.234)

Select to set up the following items.

Intuitive parking assist sensor

Select to enable/disable the intuitive park-
ing assist sensor.

Volume

Select to set the volume of the buzzer 
which sounds when the parking support 
alert is operated.

 PKSB (Parking Support 

Brake function) (if equipped) 
(

P.240)

PKSB on/off

Select to enable/disable the parking sup-
port brake function (for static objects).

 RSA (Road Sign Assist) (if 

equipped) (

P.222)

Select to set up the following items.

Road Sign Assist

Select to enable/disable road sign assist.

Over Speed

Select to set the over speed alert on/off.

Level of Over Speed

Select to set the over speed alert level.

Others

Select to set the other road sign assist.

Clock

Select to switch between 12-hour dis-
play and 24-hour display.

Vehicle Settings

 PBD (Power Back Door)

*1


(

P.102)

Select to set up the following items.
• System  settings
Select to enable/disable the power back 
door system.
• Volume
Select to set the volume of the buzzer 
which sounds when the power back door 
system.

• Kick Sensor

*2

Select to enable/disable the kick sensor.

*1

: Vehicles with power back door

*2

: Vehicles with Hands Free Power Back 

Door

TPMS (Tire Pressure Warning Sys-
tem) (

P.343)

Select to initialize the tire pressure warning 
system.

Scheduled Maintenance (

P.324)

Select to initialize the scheduled mainte-
nance.

Oil maintenance (

P.335)

Select to reset the engine oil maintenance 
information (message indicating mainte-
nance is required and distance until the 
next oil change) after engine oil mainte-

85

2-1. Instrument cluster

2

Vehi

cle

 status 

inform

ati

on a

nd i

ndic
ators

nance is performed.

Meter settings

Language

Select to change the language on the dis-
play.

Units

Select to change the unit of measure for 
fuel consumption.

 Eco Driving Indicator Light 

(

P.76)

Select to activate/deactivate the Eco Driv-
ing Indicator Light.

 Switch settings (

P.80)

Displays a procedure to register a desired 
screen to 

.

You can register 1 screen as a shortcut, 
which can be displayed by pressing 

.

Drive information screen (

P.81)

Select to choose between 2 items that will 
be displayed on each drive information 
screen (“

Drive info 1”, “Drive Info 2” and 

“Drive Info 3

”) respectively.

Pop-up display (

P.78)

Select to set the following pop-up displays, 
which may appear in some situations, 
on/off.
• Intersection guidance display of the nav-

igation system-linked system

• Incoming call display of the hands-free 

phone system

• Instrument panel brightness adjustment 

display

Accent color

Select to change the accent colors on the 

screen, such as the cursor color.

Initialization

Select to reset the meter display settings.

Suspension of the settings display

In the following situations, the settings dis-

play using the meter control switches will be 

suspended.

When a warning message appears on the 

multi-information display

When the vehicle begins to move

Automatically displayed when the sys-
tem is used. (

P.235)

WARNING

Cautions during setting up the dis-

play

As the engine needs to be running 

during setting up the display, ensure that 

the vehicle is parked in a place with ade-

quate ventilation. In a closed area such as 

a garage, exhaust gases including harm-

ful carbon monoxide (CO) may collect 

and enter the vehicle. This may lead to 

death or a serious health hazard.

NOTICE

During setting up the display

To prevent battery discharge, ensure that 

the engine is running while setting up the 

display features.

Intuitive parking assist (if 
equipped)

86

2-1. Instrument cluster

*

: If  equipped

Head-up display

Display brightness will change automati-
cally according to the brightness of the sur-
rounding area.

Display position adjustment switch

Display brightness adjustment 
switch

Display brightness can be adjusted to the 
desired level.

“HUD” button

“DISP” button

Vehicle speed

Eco Driving Indicator (

P.88)

Tachometer

Shift position and shift range

Displays the selected shift position or 
selected shift range (

P.167)

Audio display

Displays audio information for approxi-
mately 3 seconds when the audio system is 
operated

Route guidance display (vehicles 
with navigation system) (

P.89)

When approaching an intersection while 
the navigation system is giving route guid-
ance, an arrow will automatically be dis-
played to indicate the direction of travel.

Lane departure warning display 
(LTA [Lane Tracing Assist]) (if 
equipped) (

P.205)

Lane departure warning display 
(LDA [Lane Departure Alert with 
steering control]) (if equipped) 
(

P.214)

Approach warning display 
(Dynamic radar cruise control with 
full speed range) (

P.230)

Road signs (RSA [Road Sign 
Assist]) (if equipped) (

P.222)

Pre-collision warning message (Pre-
Collision System) (

P.198)

Speed limit display (vehicles with 
navigation system) (

P.89)

Parking Support Brake function (for 
static objects) (if equipped) 
(

P.240)

Head-up display

*

The head-up display can be used to 
project vehicle speed and other 
information onto the windshield.

System components

A

B
C

D

E

Head-up display contents

87

2-1. Instrument cluster

2

Vehi

cle

 status 

inform

ati

on a

nd i

ndic
ators

G monitor (if equipped) (

P.82)

Boost Meter (if equipped) (

P.81)

Brake Override System (

P.145)

Drive-Start Control (

P.145)

“HUD” button

Pressing the button turns the head-up 
display on/off and changes the vehicle 
speed display units as follows:

U.S.A.

OFF 

 ON (MPH) 

 ON (km/h) 


OFF

Canada

OFF 

 ON (km/h) 

 ON (MPH) 


OFF

“DISP” button

Pressing the button changes the dis-
play items   (except vehicle speed) as 
follows:

• Off
• Eco Driving Indicator
• Tachometer
• Tachometer/Boost Meter (if 

equipped)

• G monitor (if equipped)

Head-up display

The head-up display may seem dark and 

hard to see when viewed through sun-

glasses, especially polarized sunglasses.

Adjust the brightness of the head-up dis-

play or remove your sunglasses.

When the head-up display is turned off, it 

will not display anything until it is turned 

on again.

Switching the head-up display

A

WARNING

Before using the head-up display

Check that the position and brightness of 

the head-up display image does not 

interfere with safe driving. Incorrect 

adjustment of the image’s position or 

brightness may obstruct the driver’s view 

and lead to an accident, resulting in 

death or serious injury.

Caution for changing settings of the 

head-up display

As the engine needs to be running while 

changing the settings of the head-up dis-

play, ensure that the vehicle is parked in a 

place with adequate ventilation. In a 

closed area such as a garage, exhaust 

gases including harmful carbon monox-

ide (CO) may collect and enter the vehi-

cle. This may lead to death or a serious 

health hazard.

88

2-1. Instrument cluster

Adjusting the display position

1

Higher

2

Lower

Setting the brightness

The brightness of the display is auto-
matically adjusted in accordance with 
the brightness of the surrounding envi-
ronment. However, the brightness can 
also be manually adjusted in 9 stages.

1

Brighter

2

Darker

Eco Driving Indicator Zone Display

Suggests the Zone of Eco driving with cur-
rent Eco driving ratio based on accelera-
tion.

Eco driving ratio based on acceler-
ation

If the acceleration exceeds the Zone of 
Eco driving, the right side of the Eco Driv-
ing Indicator Zone Display will illuminate.

Zone of Eco driving

NOTICE

To prevent damage to components

Do not place any drinks near the head-

up display projector. If the projector 

gets wet, electrical malfunctions may 

result.

Do not place anything on or put stick-

ers onto the head-up display projector.

Doing so could interrupt head-up dis-

play indications.

Do not touch the inside of the head-up 

display projector or thrust sharp edges 

or the like into the projector.

Doing so could cause mechanical mal-

functions.

When changing the settings of the 

head-up display

To prevent battery discharge, ensure that 

the engine is running while changing the 

settings of the head-up display.

Making the display easier to see

Eco Driving Indicator

A

B

C


Content      ..     2      3      4      5     ..