Range Rover Sport. Manual - part 68


  Index      Land Rover     Range Rover Sport - service repair manual 2005-2009 year


Search            


Content   ..  66  67  68  69   ..


Range Rover Sport. Manual - part 68


NOTE: 


Return the suspension to 'normal ride height' when the vehicle is removed from the ramp.

Two Post Lift 

  CAUTION: If the drive shaft(s) are to be removed, release the parking brake and select NEUTRAL 'N' in the

transmission in order that the shaft(s) can be rotated when the vehicle is raised to the desired height.

1. Position the vehicle with the centre of the lift pillars aligned approximately with the front of the driver/passenger seat
cushions. 

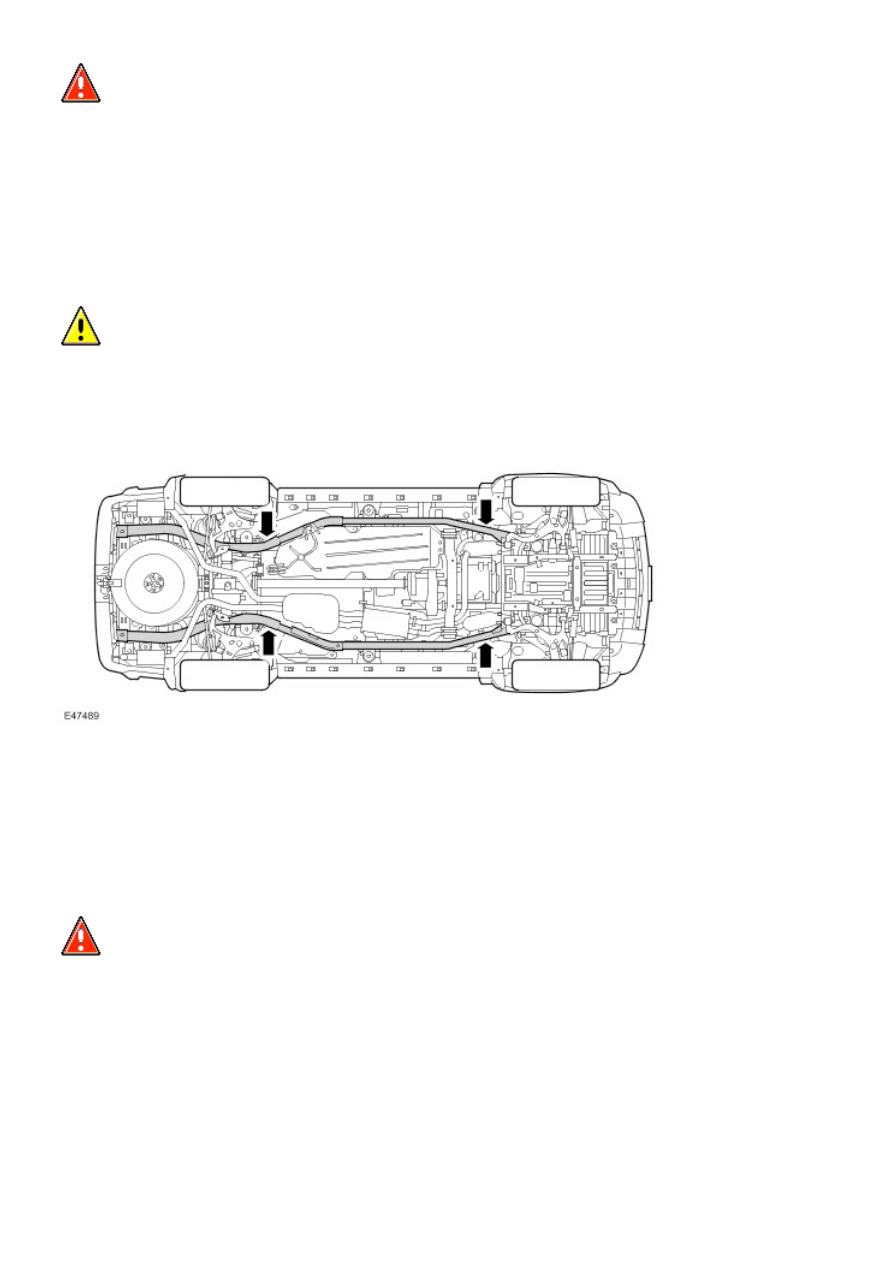
2. Extend the lifting arms and position the pad of each lifting arm beneath the body frame longitudinal lifting points.

3. Raise the vehicle until the wheels are just clear of the ground and check that the pads of each lifting arm are still
correctly positioned.

4. Raise the vehicle to the desired height.

5. Ensure that vehicle is correctly supported on all four lifting pads, that pads are still correctly positioned and are in full
contact with the body frame longitudinals.

  WARNING: Make sure that the vehicle is stable before commencing work.

Rear Shock Absorber and Air Spring Assembly (64.21.01.99) 

Removal

NOTE: 


Only the air spring being removed needs to be depressurised.

1
.

  WARNING: Do not work on or under a vehicle supported only by a jack. Always support the vehicle

on safety stands.

Raise and support the vehicle.

2 . Remove the wheel and tire.

3 . Using T4, depressurize the air suspension. 

For additional information, refer to 

Air Suspension System Depressurize and Pressurize (60.50.38)

4 . Disconnect the shock absorber and air spring assembly from the lower arm.


Remove the nut and bolt.

5 .

  CAUTION: Always plug any open connections to prevent contamination.

Disconnect the air line.

6 . Using a trolley jack, support the shock absorber and air spring assembly.

7 . Remove the three shock absorber and air spring retaining nuts.

8 . Remove the shock absorber and air spring assembly.

9 . Remove the Voss connector from the air line.


Remove and discard the collet and the union.

Install the shock absorber and air spring assembly.


Make sure the shock absorber and air spring assembly top mounting to body mating faces
are clean.


Connect the air line into the Voss connector.


Pull on the air line to make sure it is fully installed into the Voss connecter.


Fit the nuts and tighten to 63 Nm (46 lb.ft).

Installation

1
.

  CAUTION: Make sure the new Voss connector is installed and fully tightened with the alignment

plug installed.

Install a new Voss connector to the air spring.


Tighten to 3.5 Nm (2.6 lb.ft)

2
.

Install the shock absorber and air spring assembly.


Make sure the shock absorber and air spring assembly top mounting to body mating faces
are clean.


Fit the nuts and tighten to 63 Nm (46 lb.ft).


Connect the air line into the Voss connector.


Pull on the air line to make sure it is fully installed into the Voss connecter.

3 . Connect the shock absorber and air spring assembly to the lower arm.


Tighten the nut and bolt to 300 Nm (221 lb.ft).

4 . Using T4, pressurize the air suspension. 

For additional information, refer to 

Air Suspension System Depressurize and Pressurize (60.50.38)

5 . Install the wheel and tire.


Tighten the wheel nuts to 140 Nm (103 lb.ft).

Rear Air Shock Absorber (64.30.02.45) 

Special Service Tools

Air spring tester 
204-538 

Band-it Thrift tool 
100-050 (LRT-99-019) 

Removal

NOTE: 


This procedure should also be used to remove the rear air spring.

1
.

  WARNING: Do not work on or under a vehicle supported only by a jack. Always support the vehicle

on safety stands.

Raise and support the vehicle.

2 . Remove the wheel and tire.

3 . Remove the shock absorber and spring assembly. 

For additional information, refer to 

Rear Shock Absorber and Air Spring Assembly (64.21.01.99)

4 . Remove the gaiter.


Remove and discard the 2 straps.


Content   ..  66  67  68  69   ..