Discovery 2. Manual - part 625


  Index      Land Rover     Land Rover Discovery 2 - service manual 1999 year


Search            


Content   ..  623  624  625  626   ..


Discovery 2. Manual - part 625


REAR SUSPENSION

REPAIRS

64-31

Bushes - Watts linkage  

$% 64.35.35  

Models with SLS:

WARNING: Ensure the air suspension system is 
made safe before commencing work. Otherwise 
the chassis may lower onto the bump stops 
during repair.

Remove

1. Raise rear of vehicle. 

WARNING: Do not work on or under a 
vehicle supported only by a jack. Always 
support the vehicle on safety stands.

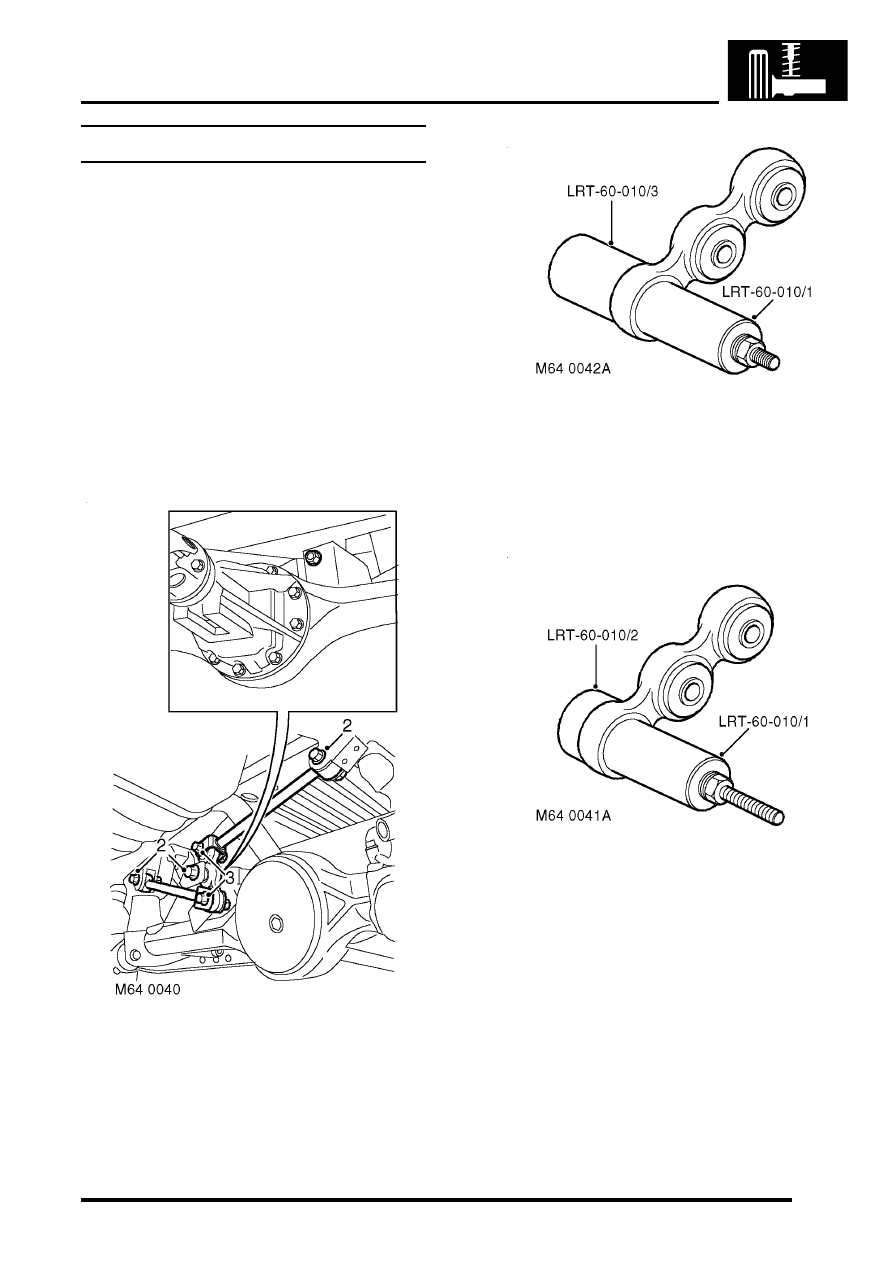
2. Remove 3 nuts and bolts securing Watts 

linkage to axle and chassis and remove Watts  
linkage. 

3. Remove 2 nuts and bolts securing transverse 

links to pivot housing and remove links from 
pivot housing. 

4. Use LRT-60-010/1 and LRT-60-010/3 to press 

bushes from transverse links and pivot 
housing. 

Refit

1. Clean bush locations in transverse links and 

pivot housing.

2. Using LRT-60-010/1 and LRT-60-010/2press 

new  bushes into transverse links and pivot 
housing. 

3. Position transverse links to pivot housing and 

tighten bolts to 155 Nm  (114 lbf.ft). 

4. Position Watts linkage to axle and chassis. Fit 

bolts but do not tighten at this stage.

5. Remove stand(s) and lower vehicle.
6. Tighten  bolts securing pivot housing to axle to  

230 Nm (170 lbf.ft). Tighten  bolts securing 
transverse links to chassis to  140 Nm (103 
lbf.ft).

CAUTION: Nuts and bolts must be tightened 
with weight of vehicle on suspension.

REAR SUSPENSION

64-32

REPAIRS

Sensor - height - SLS

$% 64.36.01  

WARNING: Ensure the air suspension system is 
made safe before commencing work. Otherwise 
the chassis may lower onto the bump stops 
during repair.

Remove

1. Raise rear of vehicle. 

WARNING: Do not work on or under a 
vehicle supported only by a jack. Always 
support the vehicle on safety stands.

2. Disconnect height sensor multiplug. 
3. Remove bolt securing height sensor link to 

radius arm. 

4. Remove 2 bolts securing height sensor to 

chassis and remove height sensor. 

Refit

1. Position height sensor to chassis and tighten 

bolts to 6 Nm (4.4 lbf.ft). 

2. Position height sensor link to radius arm and 

tighten bolt to 25 Nm (18 lbf.ft).  

3. Connect height sensor multiplug. 
4. Remove stand(s) and lower vehicle.
5. Use TestBook to calibrate height sensor.

Compressor unit - air - SLS

$% 64.50.10  

WARNING: Ensure the air suspension system is 
made safe before commencing work. Otherwise 
the chassis may lower onto the bump stops 
during repair.

Remove

1. Using TestBook, depressurise SLS air system. 

After depressurisation, approximately 1 bar 
(15 lbf.in

2

) air pressure remains in the 

system.

2. Release 2 fasteners and remove air 

compressor unit cover. 

3. Remove 2 bolts securing air compressor unit to 

chassis. Release unit and lower onto blocks to 
support the weight.

4. Noting their fitted position, disconnect pipes 

from air valves. 

CAUTION: Always fit plugs to open 
connections to prevent contamination.

REAR SUSPENSION

REPAIRS

64-33

5. Disconnect inlet and exhaust pipes. 

CAUTION: Always fit plugs to open 
connections to prevent contamination.

6. Disconnect multiplugs from air valves, exhaust 

valve and compressor. 

7. Release and disconnect compressor  multiplug 

from casing. 

8. Remove air compressor unit from vehicle. 

9. Release supply/exhaust pipe. 

CAUTION: Always fit plugs to open 
connections to prevent contamination.

10. Remove 3 bolts securing compressor to  

casing. Remove compressor and collect  
mounting washers. 

Refit

1. Locate mounting washers and position 

compressor in casing.

2. Apply Loctite 270 to compressor securing bolts. 

Fit bolts and tighten to 7 Nm  (5.2 lbf.ft). 

3. Connect compressor multiplug to casing. 
4. Connect supply/exhaust pipe. 
5. Position air compressor unit on support block, 

connect inlet and exhaust pipes. 

6. Connect multiplugs to air valves, exhaust valve 

and compressor.

7. Connect pipes to air valves. 
8. Position air compressor unit to chassis and 

engage casing in retaining lugs. Fit air 
compressor unit securing bolts and tighten to 
25 Nm (18 lbf.ft). 

9. Ensure pipes are located in cut outs in casing. 

10. Position air compressor unit cover and lock 

fasteners. 

REAR SUSPENSION

64-34

REPAIRS

Filter - intake - SLS

$% 64.50.12 

Remove

1. Remove LH tail lamp.


 + 

 LIGHTING, REPAIRS, Lamp - tail. 

2. Disconnect filter from retaining peg.
3. Disconnect quick release connection and 

remove filter assembly.

Refit

1. Position filter assembly and connect quick 

release connection.

2. Secure filter retaining peg.
3. Fit LH tail lamp.


 + 

 LIGHTING, REPAIRS, Lamp - tail.

Switch - ride height

$% 64.50.45

Remove

1. Carefully remove switch. 
2. Disconnect multiplug from switch. 
3. Remove switch. 

Refit

1. Connect multiplug switch. 
2. Position switch and push to secure. 


Content   ..  623  624  625  626   ..