Land Rover Discovery. Manual - part 103


  Index      Land Rover     Land Rover Discovery - service 1995-1996 year


Search            


Content   ..  101  102  103  104   ..


Land Rover Discovery. Manual - part 103


41

TRANSFER GEARBOX

4

DESCRIPTION AND OPERATION

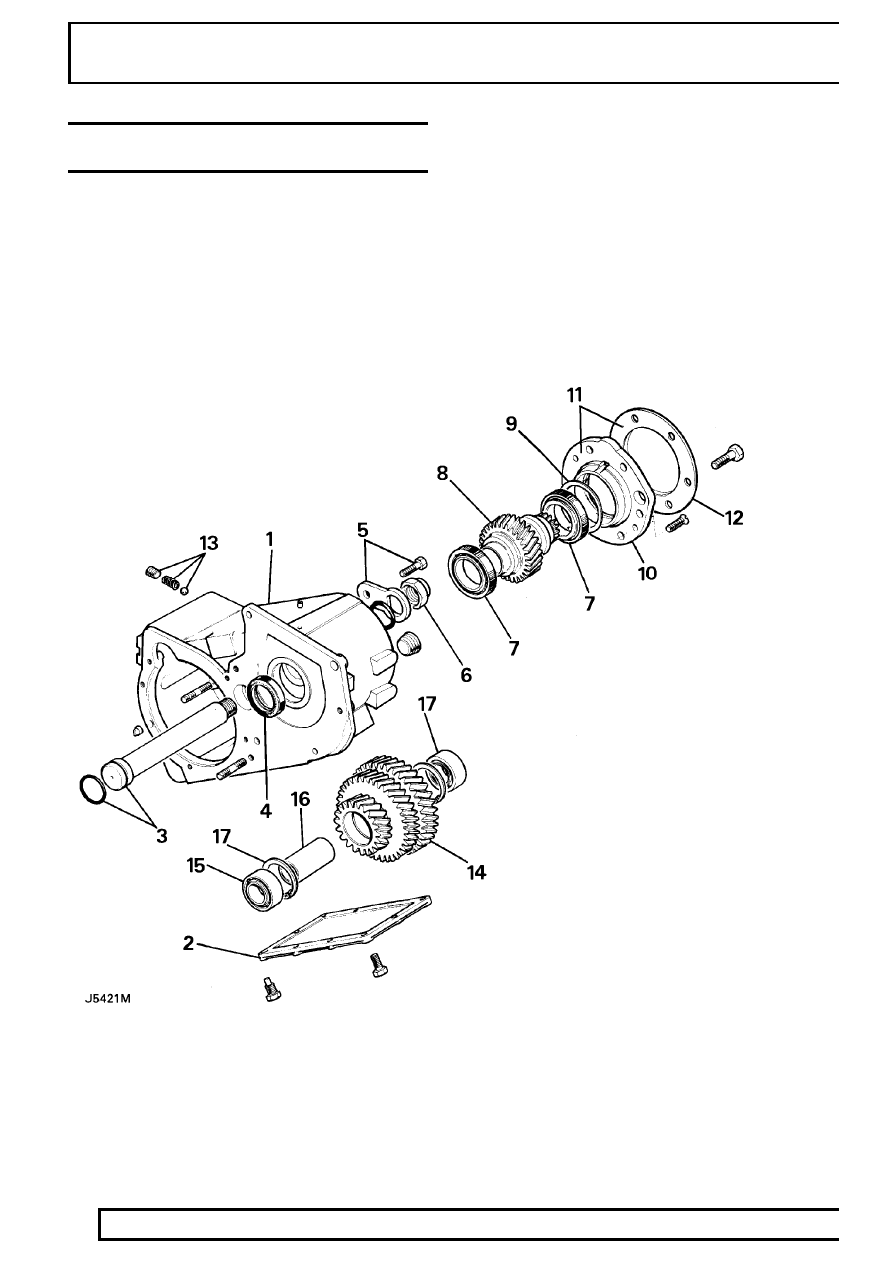
INTERMEDIATE GEAR AND POWER TAKE OFF
ASSEMBLY

1. Transfer case assembly
2. Transfer case bottom cover
3. Intermediate shaft and ’O’ ring
4. Oil seal
5. Retaining plate and anchor screw
6. Intermediate shaft nut
7. Bearing
8. Transfer mainshaft gear
9. Selective shim

10. Mainshaft transfer bearing housing
11. Joint sealant
12. Power take off cover
13. High low detent ball and spring
14. Intermediate gear cluster
15. Bearings
16. Collapsible spacer
17. Circlip

TRANSFER GEARBOX

5

DESCRIPTION AND OPERATION

TRANSFER GEAR SELECTOR COMPONENTS

1. Gaiter retaining screw - 4 off
2. Gaiter
3. Gaiter support plate
4. Gate plate
5. Gasket
6. Clip
7. Pin
8. Circlip, retaining nylon seat
9. Gear lever ball

10. Nylon seat
11. Cross shaft
12. Gear lever
13. Gear change housing
14. Non-metallic bushes
15. Countersunk screws
16. End cover
17. Selector fork
18. ’O’ ring seals

TRANSFER GEARBOX

1

FAULT DIAGNOSIS

LT230T TRANSFER BOX - OIL LEAKS

Verify that the leak is from the transfer box and not the
gearbox before proceeding.

1. Input seal.
2. Cover plate joints.
3. Front output seal.
4. Front and rear housing joint faces.
5. Rear output seal.
6. Power take off cover plate joint.
7. Bearing plate joint.

41

TRANSFER GEARBOX

2

FAULT DIAGNOSIS

PROCEDURE

Prior to road test

1. Check oil level in transfer box is correct.
2. Check tightness of level and drain plugs.
3. Check breather system for blockage. To validate

the system the pipe must be removed,
inspected, rectified as necessary and refitted.

4. Remove all traces of oil from exterior of transfer

box.

Take vehicle for short road test.

5. Identify source of leaks and rectify as follows.

Front or rear output seal leaking:-

1. Drain the oil and remove the leaking output

flange.

2. Inspect the seal track on the flange for surface

damage. If damaged renew component.

3. Remove and discard the oil seal.
4. Inspect the seal locating bore and remove any

sharp edges which may damage the new oil
seal.

5. Fit new seal.
6. Fit the output flange and all the other parts.
7. Add oil to correct level into the gearbox.

See

LUBRICANTS, FLUIDS AND CAPACITIES,
Information, Recommended Lubricants and
Fluids

Cover plate gasket leaking.

1. Drain the oil and remove the leaking cover plate.
2. Remove all traces of joint sealant from both joint

faces.

3. Degrease all components and apply a thin film of

Hylomar sealant, to both joint faces.

4. Apply thread sealant to the bolts which come

into contact with gearbox oil.

5. Refit cover plate.

CAUTION: Care must be taken not to
overtighten the fixings.

Leak between the main and transfer gearboxes.

1. Site vehicle onto a ramp [hoist].
2. Select neutral in transfer box and select 4th gear

in the main gearbox.

3. Run engine at 2000 rpm with the clutch/drive

engaged.

4. Observe joint between the main and transfer

boxes.

5. If oil leak is found establish if it is gear oil.
6. If so, the leak is originating from the transfer box.
7. Check the two inner (main/transfer) bolts are oil

tight, as these holes are tapped through into the
main transfer case.

8. Remove the transfer box to inspect the

mainshaft collar seal track condition, and the
front face of the transfer case for porosity.

See

Repair, LT230T Transfer Gearbox

9. If these areas require servicing, the transfer

gearbox input seal must also be renewed.

CAUTION: Avoid damaging the new seal
lip and ensure the seal is fitted flush with
the machined face. Also ensure the new

seal is not damaged when refitting the transfer
gearbox.

10. If red A.T.F type oil is seen leaking during the

workshop test, investigate the main gearbox for
cause of leak.

Detent plug or electrical switch leaks.

1. Detent plugs and electrical switches do not

usually leak. It must be noted that they fit into
open tapped holes in the transfer case and
therefore should be considered when looking for
the source of the leak.


Content   ..  101  102  103  104   ..