JAC Trucks. Manual - part 142


  Index      JAC     JAC Trucks - service repair manual


Search            


Content   ..  140  141  142  143   ..


JAC Trucks. Manual - part 142


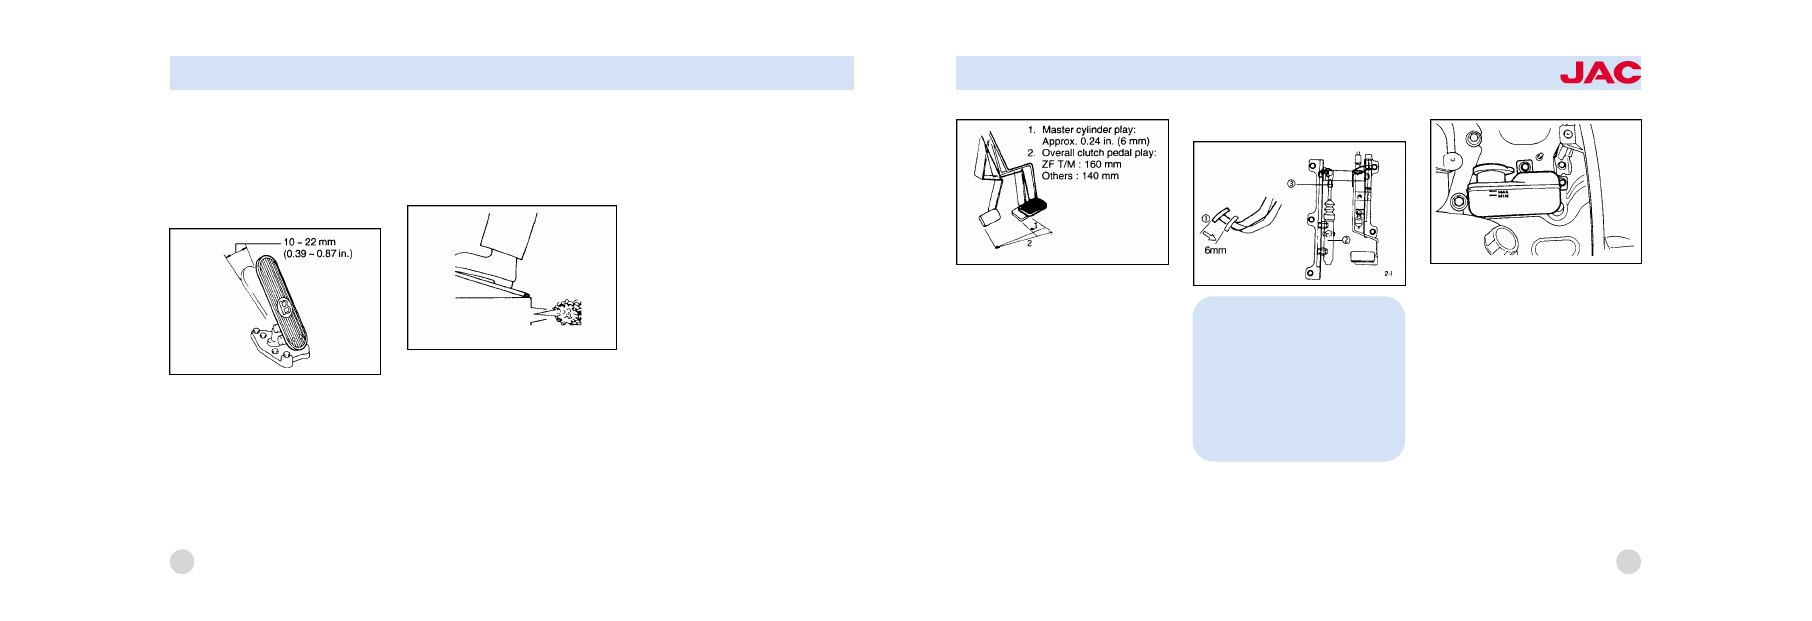
the pedal up to the first resistance
encountered when the pedal is
depressed with your finger. Adjust
this play to about 6 mm (0.24 in.)
by turning the center belt of the
master cylinder push rod.

After

adjusting, firmly tighten the nut on
the center belt while holding the
belt in position with a corench.
1) Master cylinder play:
Approx. 0.24 in. (6 mm)
2) Master cylinder

3) Play adjusting nut

Bleeding of clutch piping
If there is air in the piping, the
clutch will be hard to disengage.

When the fluid reservoir tank has
been emptied, be sure that the
clutch piping is bled. Have an as鄄
sistant in bleeding the piping and
proceed as follows:
1. Fill the clutch fluid reservoir tank
with brake fluid up to the "MAX"
level. Since the level falls during
the bleeding operation, add brake
fluid to prevent emptying the tank.

95

NOTE:
If the adjustment cannot be
made to this play specification,
the clutch disc is worn down to
the service limit. Take the vehi鄄
cle to your nearest service facil鄄
ity for correction.

35 mm, have the steering wheel
adjusted by your nearest Autho鄄
rized Dealer.
CHECKING

BRAKE

PEDAL

FREE PLAY

Check the pedal free play by de鄄
pressing the pedal with finger.The
pedal free play is the stroke made
by the pedal moves until you feel a
change in resistance.This is the
brake pedal free play. The freeplay
should be within the limits speci鄄

fied in the illustration below. If it is
not, have it inspected by your JAC
dealer and adjusted or repaired if
necessary.

CLUTCH PEDAL PLAY
The clutch pedal play will de鄄
crease as the disc wears. If it is
not adjusted, the clutch will slip,
making it impossible to operate the
vehicle. When the clutch pedal
play has decreased to less than
8.3 in. (210 mm), adjustment is re鄄

quired.
Check the pedal play by depress鄄
ing the pedal with finger. Depress鄄
ing the pedal will make you feel re鄄
sistance in two stages. The pedal
play is the stroke made by the
pedal until it reaches the second
stage and is 0.24 to 0.31 in. (6 to
8mm) standard. The play in the
first stage is the master cylinder
play. In the second stage, it is the
clutch booster push rod play. The
play is easier to check when the
compressed air pressure is lower.
If it is out of specification, have it
inspected and adjusted or re鄄
paired if necessary.
荫 Adjust the clutch master cylin鄄
der play, which is the movement of

94

VEHICLE MAINTENANCE REQUIREMENTS

2. Remove the rubber cap from the
air bleeder of the clutch booster,
mount one end of a transparent
vinyl hose, and put the other end
in a bowl containing brake fluid.

3. Depress the clutch pedal sever鄄
al times. After the stroke has set鄄
tled, keep the pedal depressed.

Let the assistant loosen the air

bleeder to discharge the air along
with the brake fluid. Let him tighten
the air bleeder immediately after
air has been discharged.

4. After the air bleeder has been
tightened, release the pedal.
5. Repeat steps 3 and 4 until there
are no more air bubbles in the

brake fluid that runs out from the
air bleeder. As a final step, tighten
the air bleer firmly and install the
rubber cap.
6. Check the fluid level in the fluid
reservoir tank and add brake fluid up
to the "H" level. Depress the clutch
pedal to check for fluid leaks.
CHECKING THE BRAKES

96

NOTE:
If the brake fluid is discharged
from the air bleeder, the stroke
of the pedal will change. Tight鄄
en the air bleeder immediately
after the pedal has touched the
stopper.

CAUTION:
Because brakes are essential to
the safe operation of the car, it
is suggested that they be
checked and inspected by your
JAC dealer. The brakes should
be checked and inspected for
wear at those intervals speci鄄
fied in the vehicle maintenance
schedule in Section 6-3.

VEHICLE MAINTENANCE REQUIREMENTS

WARNING:
Use caution when handling
brake fluid. It can damage your
vision if it get into your eyes. It
will also damage your vehicles
paint if spilled on it and not re鄄
moved immediately.

Checking the Brake Fluid Level

To Check the Fluid Level (If in鄄
stalled)

The fluid level in the brake fluid

reservoir should be checked peri鄄
odically. The level should be be鄄
tween the "L" and "H" marks on the
side of the reservoir. If the level is
at or below the "L" mark, carefully
add fluid to bring it up to "H". Do
not overfill.
COOLANT LEVEL AND LEAKS
IN COOLING SYSTEM

If

lamp is illuminated add the

coolant after removing the surge
tank cap at firt.

Check reservoir tank for the
coolant level.The coolant level
should be with in the range 1
shown in the illustration. If the level
is low, add coolant by reference to
"Replacement of coolant".

97

Checking and changing the engine
coolant

Handling of cooling system
Engine overheating is caused by
the low coolant level or rust and

scale accumulations in the cooling
system. If the radiator clogs very
badly or coolant is very dirty, per鄄
form cleaning and coolant re鄄
placement as described below. If
the coolant level is low, add
coolant as necessary.

Addition of coolant
If the warning lamp lights when the
starter switch is set to "ON", the
coolant level is low. Note that the
procedure for adding coolant

98

CAUTION:
荫 Check the coolant level be鄄
fore vehicle operation while the
engine is cold.
荫 After checking the coolant
level, be sure to reinstall the
cap positively.
荫 Be sure to add the coolant
containing antirust or anti -
freeze of the same concentra鄄
tion as the coolant in the cool鄄
ing system.
荫 Do not check the coolant
level after the engine has been
stopped. Be sure to check the
level when the coolant tempera鄄
ture is low.

WARNING:
Do not remove the surge tank
cap when the engine is hot.
When the engine is hot, the
coolant is under pressure and
may erupt through the opening
if the cap is removed. You
could be seriously burned if
you do not observe this precau鄄
tion.
Do not remove the surge tank
cap until the radiator is cool to
the touch.

CAUTION
When the cooling system is
cleaned, the coolant or cleaning
solution is drained at elevated
temperature.

Therefore,

be

careful not to get scalded.

VEHICLE MAINTENANCE REQUIREMENTS

varies according to the type of the
engine cooling system on vehicle.
Use city water as coolant and add
anti-rust or anti -freeze to have a
specified concentration for preven鄄
tion of engine or cooling system
corrosion.
Do not use hard water from well
river etc.
Antifreeze
Select proper concentration be鄄
tween 30 and 53% by reference to
the table shown below.

ADJUSTMENT OF BRAKE SHOE
CLEARANCE
Air brake vehicles
If the brake linings are wom and
the clearance between the brake
drum and linings

(brake shoe

clearance) increases, it can be
dangerous because the brake
performance deteriorates. Check
and adjust the brake shoe clear鄄
ance at regular intervals.
荫 The brake shoe clearance
should be determined on the basis
of the stroke of the brake chamber
push rod. If the push rod stroke
exceeds 40 mm (1.57 in.) on the
front wheels or 50 mm (1.97 in.) on
the rear wheels when the brake
pedal is depressed all the way, ad鄄

99

CAUTION:
荫 Be sure to use anti-freeze at
the concentration most appro鄄
priate for the atmospheric tem鄄
perature within a range from 30
to 53% . If the concentration is
below 30%, the anti-corrosion
property will be adversely af鄄
fected. If the concentration is
above 53% , the anti -freeze
property will decrease and en鄄
gine overheating will also be
caused. Use anti-freeze at the
specified concentration.
荫 If winter is over, be sure to
drain the coolant containing an鄄
tifreeze and put In genuine an鄄
ti-rust "RADIPET 9".

just the clearance.
1. Apply chocks to the tires before
the wheel to be adjusted is jacked
up.
2. Strongly push the outer periph鄄
ery of tire to check for wheel loose鄄
ness. If the wheel is loose, it can鄄
not be correctly adjusted. Take the
vehicle to your nearest service
shop for correction.
3. Start the engine to increase the
compressed air pressure to more
than 6.4 kgf/cm

2

(625kPa). Leave

the engine running at idle.
4. Push the knob of the cab control
valve to release the emergency
brakes.
5. Remove the dust cap from the
wheel brake inspection hole and

check the lining thickness. If the
lining is worn down to the notch
shown in illustration, it is worn be鄄
yond the service limit. Have your
nearest service shop replace the
linings. Make sure that the dust
cap is reinstalled after inspection.

6. Turn the worm shaft of the slack
adjuster in the direction that the
push rod extends until the worm
shaft touches the stopper.
7. Back off the worm shaft 3 or 4

notches on the front wheels or 4 or
5 notches on the rear wheels.
The notches are indicated by the
clocks the worm shaft makes when
turned.

8. Measure the stroke made by the
push red of the brake chamber
when the brake pedal is de鄄
pressed all the way. Verify that the
stroke is up to specifications given
in the following table if it is out of
specification, adjust with the worm

100

VEHICLE MAINTENANCE REQUIREMENTS

shaft.
Standard stroke of brake chamber
push rod

9. Turn the wheel in the forward
direction by hand and depress
the brake pedal to stop rotation of
the wheel. Turn the wheel to check
for dragging. With slight foot pres鄄
sure on the brake pedal, turn each
wheel by hand to check that the
front wheels are slightly lighter to
turn than the rear wheels or there
is not great difference and that
right and left wheels are about e鄄
qual.
10. As a final step, install the dust
plug. Operate the vehicle at a slow

speed and perform brake tests to
check for brake performance, un鄄
even braking and other troubles.
ENGINE OIL LEVEL

Position the vehicle on a level sur鄄
face. The best time to check the oil
level is before operating the engine
or about 30 minutes after stop of
engine.
The checking procedure is as fol鄄
lows:
1. Wipe the level gauge 1 well with

a cloth, insert it into the level
gauge guide 2 and remove the
gauge to check the oil level. The
oil level should be between "FULL"
and "LOW" inscribed lines.

2. If the level is Iow, add engine oil
through the filler cap 3. After ad鄄
dition of engine oil, allow more
than six minutes and then recheck

101

CAUTION:
If the oil level is checked when
the engine is stopped before
sufficient rise of oil temperature,
the detected level will be lower
than the actual level, because
some oil accumulation in the
engine does not flow back into
the oil pan.


Content   ..  140  141  142  143   ..