Isuzu Amigo / Axiom / Trooper / Rodeo / VehiCross. Manual - part 78


  Index      Isuzu     Isuzu Amigo / Axiom / Trooper / Rodeo / VehiCross - service repair manual 1999-2002 year


Search            


Content   ..  76  77  78  79   ..


Isuzu Amigo / Axiom / Trooper / Rodeo / VehiCross. Manual - part 78


INTELLIGENT SUSPENSION

3F–33

Removal

1. Disconnect the battery ground cable.
2. Remove the front console assembly.

Refer to

 Consoles in Body and Accessories section.

3. Disconnect the connector from the control unit.
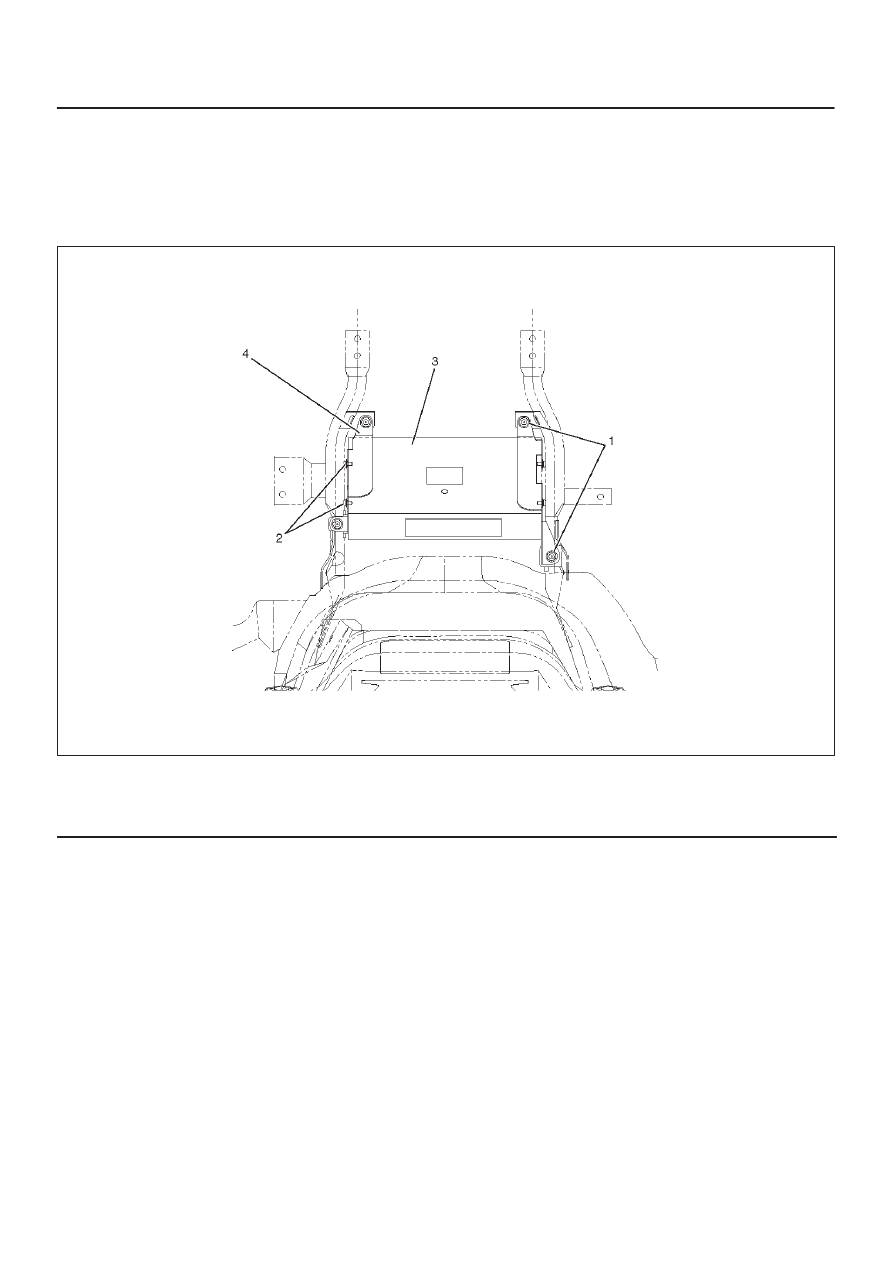
View A

828RY00002

Legend

(1) Nut
(2) Screw

(3) Control Unit
(4) Bracket

4. Remove 4 nuts.
5. Disconnect the control unit with brackets.
6. Remove 4 screws.
7. Disconnect the control unit from brackets.

Installation

To install, follow the removal steps in the reverse order,
noting the following points.
Torque:
Nut (1) 8N·m (69 lb in)

3F–34

INTELLIGENT SUSPENSION

Front Actuator

Front Actuator and Associated Parts

RH

450RY00004

Legend

(1) Connector
(2) Clip
(3) Actuator
(4) Shock Absorber
(5) Front
(6) Bracket

LH

450RY00003

Legend

(1) Connector
(2) Clip
(3) Actuator
(4) Shock Absorber
(5) Front
(6) Bracket

INTELLIGENT SUSPENSION

3F–35

Removal

1. Disconnect the battery ground cable.
2. Disconnect the connector from  the harness and

remove the connector from the bracket.

3. Remove the clip.

View B

450RY00005

Legend

(1) Screw
(2) Actuator
(3) Nut
(4) Bracket
(5) Nut
(6) Washer
(7) Shock Absorber

1. Remove 2 screws.
2. Remove the actuator.
3. Remove the nut (3).
4. Disconnect bracket.
5. Remove the nut (5).
6. Disconnect the washer.
7. Remove the shock absorber.

Refer to

 Shock Absorber in this section.

Inspection and Repair

Refer to

 shock Abosorber in this section.

Installation

1. Install the shock absorber.

Refer to

 Shock Absorber in this section.

2. Install the washer and nut (5), then tighten it to the

specified torque.
Torque: 15 N·m (11 lb ft)

3. Install the bracket and nut (3), then tighten it to the

specified torque.
Torque: 39 N·m (29 lb ft)

NOTE: Fix the lower nut with wrench not to turn and
tighten upper nut.

4. Fit the top of the shock absorber rod in the connection

part of the actuator.

NOTE:

The mating section is width fitting across flats.
If these normally fit, the distance between the
actuator lower face and the bracket upper face is
about 1 mm.

5. Install 2 screws then tighten it to the specified torque.

3 N·m (26 lb in)

6. Connect the connector to the harness and insert the

connector to the bracket.

7. Connect the actuator harness with the clip.
8. Connect the battery ground cable.

3F–36

INTELLIGENT SUSPENSION

Rear Shock Absorber

Rear Shock Absorber and Associated Parts

LH

461R100003

Legend

(1) Connector
(2) Clip
(3) Rear Shock Absorber
(4) Bracket
(5) Bolt

(6) G-Sensor
(7) Front
(8) Upper
(9) Right

(10) Connector

(11) Gusset


Content   ..  76  77  78  79   ..