Infiniti M35/M45 Y50. Manual - part 310


  Index      Infiniti     Infiniti M35/M45 Y50 - service repair manual 2007 year


Search            copyright infringement  


Content   ..  308  309  310  311   ..


Infiniti M35/M45 Y50. Manual - part 310


BODY REPAIR

BL-309

C

D

E

F

G

H

J

K

L

M

A

B

BL

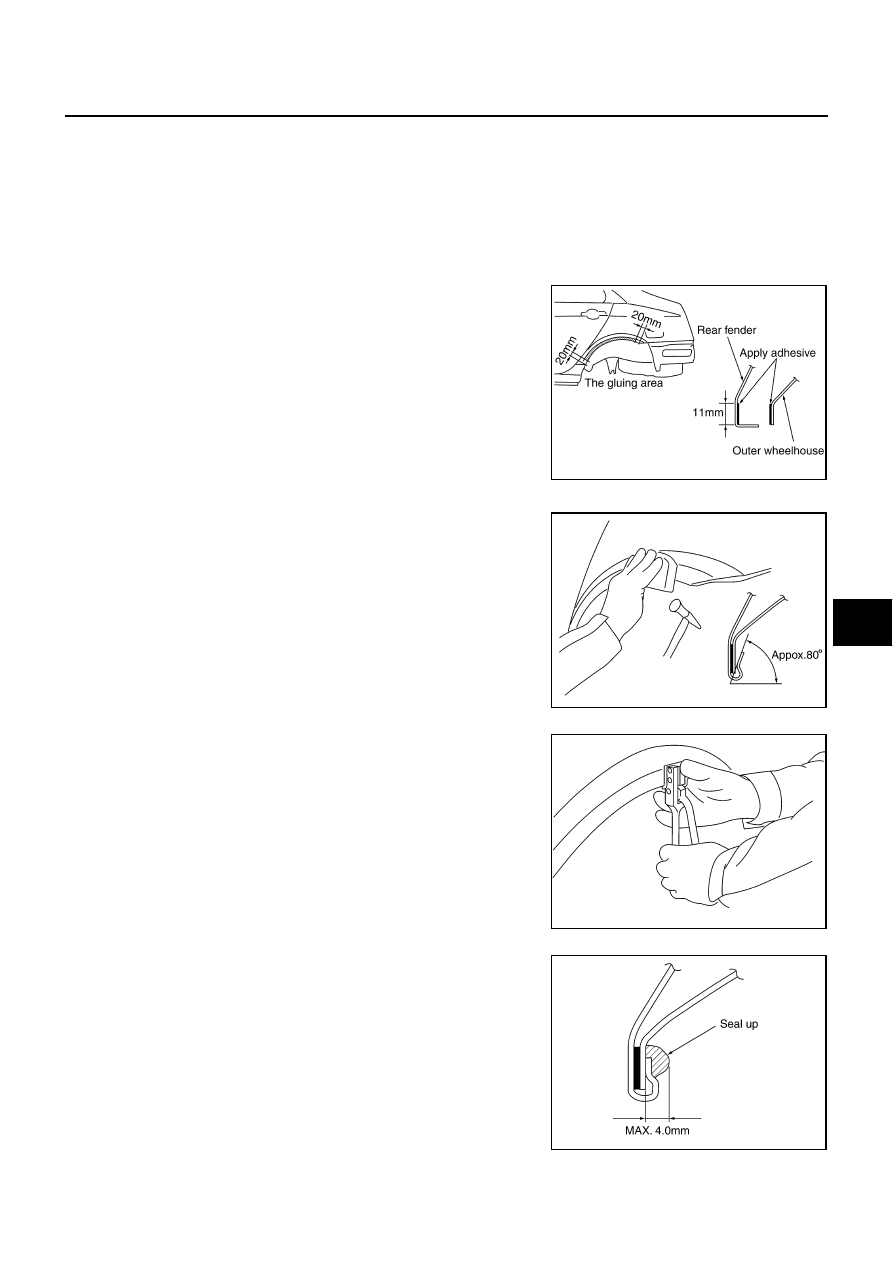
Rear fender hemming process

1.

A wheel arch is to be installed and hemmed over left and right outer wheel house.

2.

In order to hem the wheel arch, it is necessary to repair any damaged or defaced parts around outer
wheel house.

CAUTION:

Ensure that the area that is to be glued around outer wheelhouse is undamaged or defaced.

Procedure of the hemming process

Peel off old bonding material on the surface of outer wheelhouse
and clean thoroughly.

Peel off a primer coat in the specified area where new adhesive
is to be applied on rear fender (the replacing part).

Apply new adhesive to both specified areas of outer wheelhouse
and rear fender.

Attach rear fender to the body of the car, and weld the required
part except the hemming part.

Bend the welded part starting from the center of the wheel arch
gradually with a hammer and a dolly. (Also hem the end of the
flange.)

Hemming with a hammer is conducted to an approximate angle
of 80 degrees.

Starting from the center, hem the wheel arch gradually, using
slight back and forth motion with a hemming tool.

Seal up the area around the hemmed end of the flange.

<Adhesive>

3M automix panel bond 8115, 
or any equivalents

SIIA2244E

SIIA2245E

SIIA2246E

SIIA2247E

BL-310

BODY REPAIR

Foam Repair

NIS0028Z

During factory body assembly, foam insulators are installed in certain body panels and locations around the
vehicle. Use the following procedure(s) to replace any factory-installed foam insulators.

URETHANE FOAM APPLICATIONS

Use commercially available spray foam for sealant (foam material) repair of material used on vehicle. Read
instructions on product for fill procedures.

1.

Fill procedures after installation of service part.

Remove foam material remaining on vehicle side.

Clean area in which foam was removed.

Install service part.

Insert nozzle into hole near fill area and fill foam material or fill in enough to close gap with the service
part.

2.

Fill procedures before installation of service part.

Remove foam material remaining on vehicle side.

Clean area in which foam was removed.

Fill foam material on wheelhouse outer side.
NOTE:
Fill in enough to close gap with service part while avoiding
flange area.

Install service part.

NOTE:
Refer to label for information on working times.

LIIA1081E

LIIA1082E

BODY REPAIR

BL-311

C

D

E

F

G

H

J

K

L

M

A

B

BL

Replacement Operations

NIS00215

DESCRIPTION

This section is prepared for technicians who have attained a high level of skill and experience in repairing col-
lision-damaged vehicles and also use modern service tools and equipment. Persons unfamiliar with body
repair techniques should not attempt to repair collision-damaged vehicles by using this section.

Technicians are also encouraged to read Body Repair Manual (Fundamentals) in order to ensure that the orig-
inal functions and quality of the vehicle can be maintained. The Body Repair Manual (Fundamentals) contains
additional information, including cautions and warning, that are not including in this manual. Technicians
should refer to both manuals to ensure proper repairs.

Please note that these information are prepared for worldwide usage, and as such, certain procedures might
not apply in some regions or countries.

BL-312

BODY REPAIR

The symbols used in this section for cutting and welding / brazing operations are shown below.

PIIA0149E


Content   ..  308  309  310  311   ..