Hyundai Tiburon (2003 year). Manual - part 197


  Index      Hyundai     Hyundai Tiburon - service repair manual 2003 year


Search            


Content   ..  195  196  197  198   ..


Hyundai Tiburon (2003 year). Manual - part 197


TIBURON(GK) > 2003 > G 2.7 V6 DOHC > Body Electrical System > Audio > Audio Unit > Repair 
procedures, TIBURON(GK) > 2003 > G 2.7 V6 DOHC > Body Electrical System > Audio > Audio Unit > 
Repair procedures

REMOVAL

1. Disconnect the negative(-) battery terminal. 

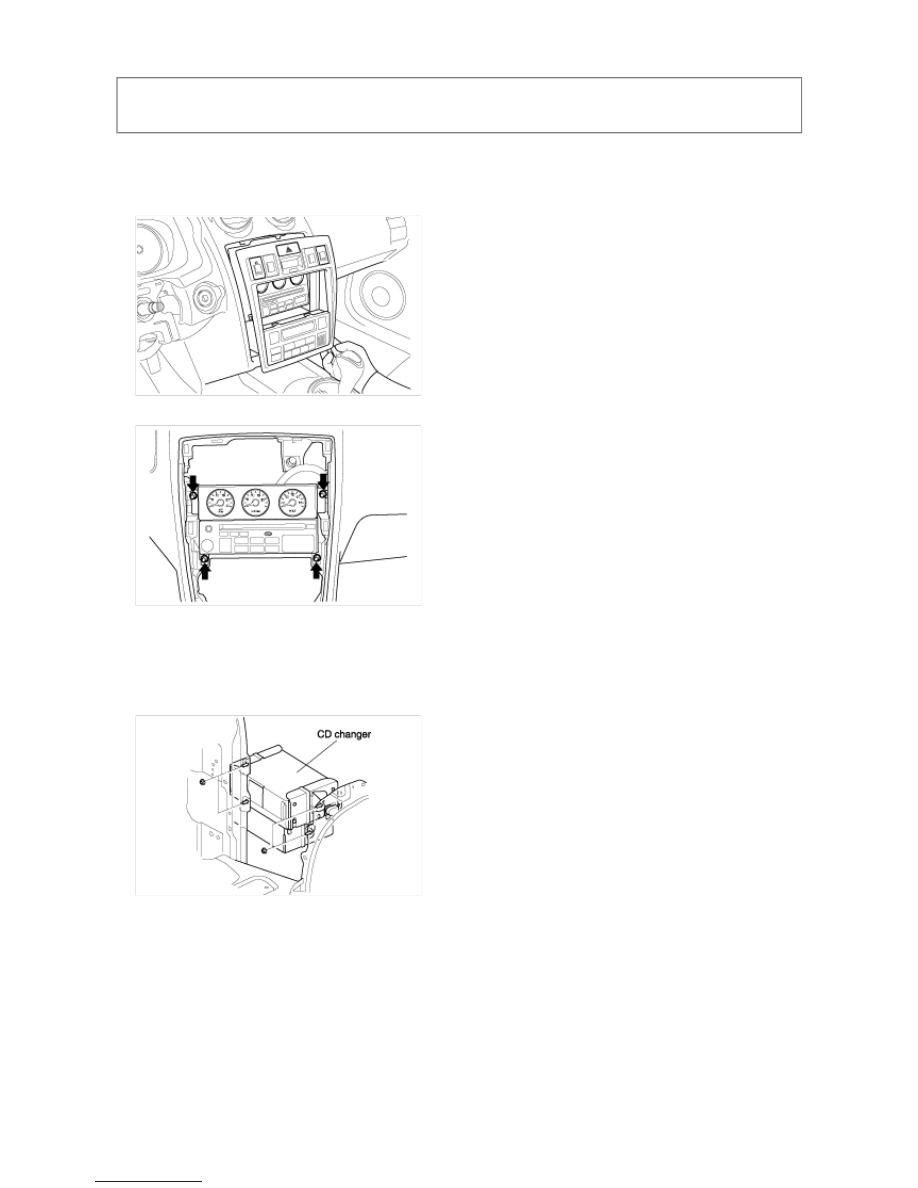
2. Remove the center facia panel and disconnect the wire connectors. 


3. Remove the 4 screws holding the audio and multi-gauge unit then remove the audio assembly. 


4. Installation is the reverse of removal. 

AUTO CD CHANGER

1. Remove the right side quarter trim. 

2. Remove the auto CD changer from the right side quarter panel. 


INSPECTION

TAPE HEAD AND CAPSTAN CLEANING

1. To obtain optimum performance, clean the head, and capstan as often as necessary, depending on frequency 

of use and tape cleanness. 

2. To clean the tape head and capstan, use a cotton swab dipped in ordinary rubbing alcohol. Wipe the head 

and capstan. 

If you see any error indication in the display while using the CD or Tape mode, find the cause in the chart below. 


AUDIO FAULT CODE

INDICATION 

CAUSE 

SOLUTION 

Er2 

CDP deck mechanical error 
(eject error, loading error) 

After resetting the audio, push the eject button. 
If disc is not ejected, consult your hyundai dealer. 

Er3 

Focus error 
Data read error 

Make sure the disc is not scratched or damaged. 
Press the eject button and pull out the disc. 
Then insert a normal CD disc. 

Er6 

Disc error 

Check if the disc is inserted correctly in the CD player. 
Make sure the disc is not scratched or damaged. 

Er8 

Tape deck error 
Tape eject error 

After resetting the audio, push the eject button. 
If tape is not ejected, consult your hyundai dealer. 

HHH 

Temperature is too high 

Fault code will reset automatically when the 
temperature returns to normal. 

no CD 

No disc in magazine 
No CD magazine in the auto change 

Insert disc in magazine or insert CD magazine in the 
auto changer. 

In order to reset the audio, pull out the audio fuse (10A) in the body control module after waiting at least 10 
seconds, then insert the audio fuse. 


TIBURON(GK) > 2003 > G 2.7 V6 DOHC > Body Electrical System > Multifunction switch > Components and 
Components Location, TIBURON(GK) > 2003 > G 2.7 V6 DOHC > Body Electrical System > Multifunction switch > 
Components and Components Location

COMPONENTS


TIBURON(GK) > 2003 > G 2.7 V6 DOHC > Body Electrical System > Multifunction switch > Multi 
Function Switch > Repair procedures, TIBURON(GK) > 2003 > G 2.7 V6 DOHC > Body Electrical System 
> Multifunction switch > Multi Function Switch > Repair procedures

REMOVAL

• Never attempt to disassemble or repair the air bag module or clock spring. If faulty, replace it. 

• Do not drop the air bag module or clock spring or allow contact with water, grease or oil. Replace if a 

dent, crack, deformation or rust is detected. 

• The air bag module should be stored on a flat surface and placed so that the pad surface is facing 

upward. Do not place anything on top of it. 

• Do not expose the air bag module to temperatures over 93°C(200°F). 

• After deployment of an air bag, replace the clock spring with a new one. 

• Wear gloves and safety glasses when handing an air bag that has been deployed. 

• An undeployed air bag module should only be disposed of in accordance with the procedures mentioned 

in the restraints section. 

• When you disconnect the air bag module-clock spring connector, take care not to apply excessive force. 

• The removed air bag module should be stored in a clean, dry place. 

• Prior to installing the clock spring, align the mating mark and "NEUTRAL" position indicator of the clock 

spring, and after turning the front wheels to the straight-ahead position, install the clock spring to the 
column switch. If the mating mark of the clock spring is not properly aligned, the steering wheel may not 
completely rotate during a turn, or the flat cable within the clock spring may be broken obstructing normal 
operation of the SRS and possibly leading to serious injury to the vehicle's driver. To inspect the clock 
spring,refer to the restraints section. 

1. Remove the air bag module. 


2. Remove the steering wheel. 


3. Remove the steering column upper shroud and steering column lower shroud. 


Content   ..  195  196  197  198   ..