Honda Element. Manual - part 521


  Index      Honda     Honda Element - service repair manual 2007-2008 year


Search            


Content   ..  519  520  521  522   ..


Honda Element. Manual - part 521


4. Disconnect the tie-rod end from the steering arm on the damper using the ball joint thread protector and 

ball joint remover (see BALL JOINT REMOVAL ).  

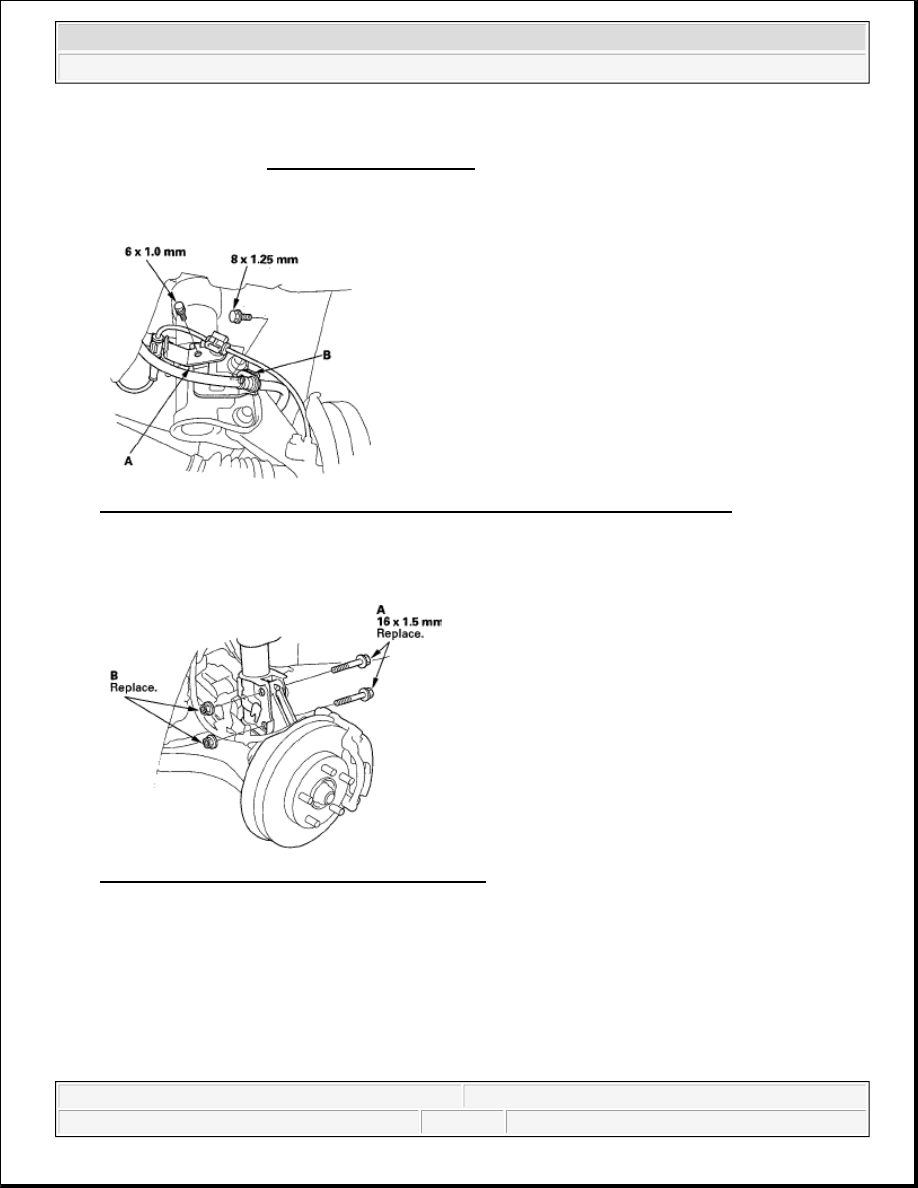
5. Remove the bolts, and remove the wheel sensor harness bracket (A) and brake hose bracket (B) from the 

damper. Do not disconnect the wheel sensor connector. 

Fig. 28: Identifying Wheel Sensor Harness Bracket And Brake Hose Bracket Bolts 
Courtesy of AMERICAN HONDA MOTOR CO., INC. 

6. Remove the damper pinch bolts (A) while holding the nuts (B). 

Fig. 29: Identifying Damper Pinch Bolts And Nuts 
Courtesy of AMERICAN HONDA MOTOR CO., INC. 

7. Remove the flange nuts (A) from the top of the damper. 


2007 Honda Element EX 

2007-08 SUSPENSION Front Suspension - Element


Fig. 30: Identifying Damper Flange Nuts 
Courtesy of AMERICAN HONDA MOTOR CO., INC. 

8. Lower the lower arm, and remove the damper assembly (A). 

Fig. 31: Identifying Damper Assembly 
Courtesy of AMERICAN HONDA MOTOR CO., INC. 

INSTALLATION 

1. Lower the lower arm, and position the damper assembly in the body. Turn the damper mounting base so 

the "delta L" or "delta R" mark (A) faces toward the outside of the vehicle. 


2007 Honda Element EX 

2007-08 SUSPENSION Front Suspension - Element


Fig. 32: Identifying Damper Mounting Base 
Courtesy of AMERICAN HONDA MOTOR CO., INC. 

2. Loosely install the new flange nuts (A) onto the top of the damper. 

Fig. 33: Identifying Damper Flange Nuts With Torque Specification 
Courtesy of AMERICAN HONDA MOTOR CO., INC. 

3. Position the damper on the knuckle, and install the new damper pinch bolts (A) and the new flange nuts 

(B), and lightly tighten the nuts. 


2007 Honda Element EX 

2007-08 SUSPENSION Front Suspension - Element


Fig. 34: Identifying Damper Pinch Bolts And Flange Nuts With Torque Specification 
Courtesy of AMERICAN HONDA MOTOR CO., INC. 

4. Place a jack under the lower arm, and raise the suspension to load it with the vehicle's weight. 

5. Tighten the flange nuts on the top of the damper to the specified torque value.  

6. Tighten the damper pinch bolts to the specified torque value.  

7. Install the brake hose bracket (A) and the wheel sensor harness bracket (B) onto the damper, and tighten 

the bolt to the specified torque values. 

Fig. 35: Identifying Brake Hose Bracket And Wheel Sensor Harness Bracket With Torque 
Specifications
 
Courtesy of AMERICAN HONDA MOTOR CO., INC. 

8. Clean off any grease contamination from the ball joint tapered section and threads, then connect the tie-

rod end to the steering arm. Tighten the nut (A) to the specified torque value. Install the cotter pin (B) 
after tightening, and bend its end as shown. 

NOTE:

Do not place the jack against the lower arm ball joint.


2007 Honda Element EX 

2007-08 SUSPENSION Front Suspension - Element


Content   ..  519  520  521  522   ..