Honda Element. Manual - part 409


  Index      Honda     Honda Element - service repair manual 2007-2008 year


Search            


Content   ..  407  408  409  410   ..


Honda Element. Manual - part 409


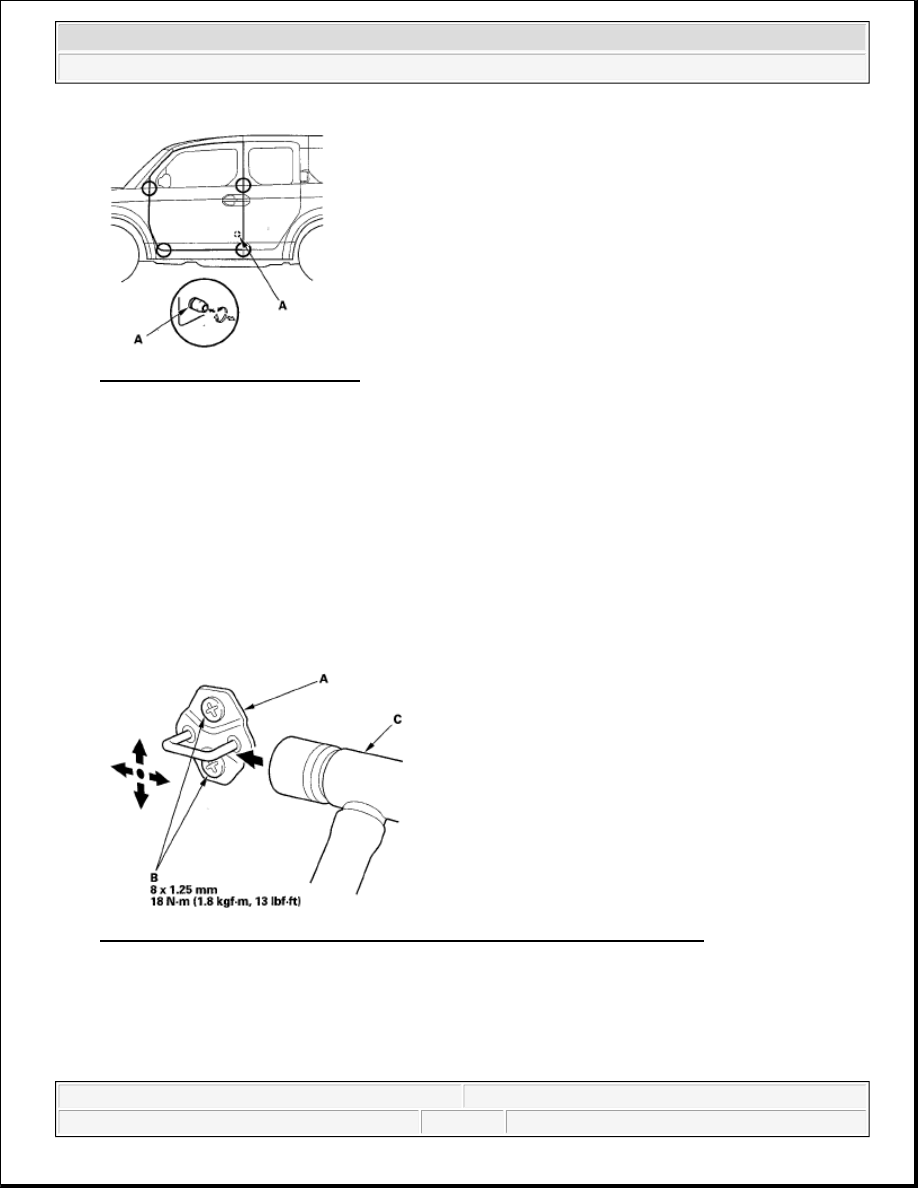
Fig. 34: Identifying Door Cushion 
Courtesy of AMERICAN HONDA MOTOR CO., INC. 

5. Apply touch-up paint to the hinge mounting bolts, and around the hinges.  

6. Check for water leaks (see step 7 ).  

7. Test-drive and check for wind noise.  

FRONT DOOR STRIKER ADJUSTMENT 

Make sure the door latches securely without slamming it. If necessary, adjust the striker (A): The striker nuts 
are fixed, but the striker can be adjusted slightly up or down, and in or out. 

1. Loosen the screws (B). 

Fig. 35: Identifying Front Door Striker Adjustment With Torque Specification 
Courtesy of AMERICAN HONDA MOTOR CO., INC. 

2. Wrap the striker with a shop towel, then adjust the striker by tapping it with a plastic hammer (C). Do not 

tap the striker too hard.  

3. Lightly tighten the screws.  

4. Hold the outer handle out, and push the door against the body to be sure the striker allows a flush fit. If 


2007 Honda Element EX 

2007-08 ACCESSORIES AND EQUIPMENT Doors - Element


the door latches properly, tighten the screws and recheck. 

REAR DOOR PANEL REMOVAL/INSTALLATION 

Special Tools Required  

KTC trim tool set SOJATP2014 *  

Trim pad remover, Snap-on A 177A or equivalent, commercially available 

* Available through the American Honda Tool and Equipment Program; call 888-424-6857 

SRS components are located in this area. Review the SRS component locations (see COMPONENT 
LOCATION INDEX
 ) and the precautions and procedures (see PRECAUTIONS AND PROCEDURES ) 
before doing repairs or service. 

1. Using the appropriate tool from the KTC trim tool set, pry out on the upper portion of the cover (A) to 

release the upper hook (B), and pull up the cover to release the lower hooks (C), then remove the cover, 
and remove the screws securing the inner handle (D). 

Fig. 36: Removing Screws Securing Inner Handle 
Courtesy of AMERICAN HONDA MOTOR CO., INC. 

2. Pull out on the front edge of the inner handle (A), and pull the inner handle forward to release the hook 

(B). 

NOTE:

Use the appropriate tool from the KTC trim tool set to avoid damage when 
prying components.


2007 Honda Element EX 

2007-08 ACCESSORIES AND EQUIPMENT Doors - Element


Fig. 37: Pulling Out On Front Edge Of Inner Handle 
Courtesy of AMERICAN HONDA MOTOR CO., INC. 

3. Disconnect the inner handle cable (C), then remove the inner handle.  

4. Pull out on the speaker cover (A) to detach the hooks (B) and clips (C), then remove the cover. 

Fig. 38: Identifying Hooks And Clips 
Courtesy of AMERICAN HONDA MOTOR CO., INC. 

5. Remove the screws (D), then remove the speaker (E) (for some models), and disconnect its connector (F). 

6. Remove the screw (G).  

7. From under the armrest, using the appropriate tool from the KTC trim tool set, pry out the lid (A), and 

remove the screw. 


2007 Honda Element EX 

2007-08 ACCESSORIES AND EQUIPMENT Doors - Element


Fig. 39: Prying Out Lid 
Courtesy of AMERICAN HONDA MOTOR CO., INC. 

8. Pull out on the bottom of the lower anchor cap (A) to release the hooks (B), and pull down on the cap to 

release the hooks (C), then remove the cap from the door panel (D). 

Fig. 40: Pulling Out On Bottom Of Lower Anchor Cap 
Courtesy of AMERICAN HONDA MOTOR CO., INC. 

9. Remove the door panel (A) with as little bending as possible to avoid creasing or breaking it. 

-1 Pull the door weatherstrip (B) out as necessary.  

-2 Release the clips that hold the door panel with a commercially available trim pad remover (C).  

-3 Pull out on the top of the door panel to release the hooks (D) from the rear door trim (E).  

-4 Pull the door panel upward. 


2007 Honda Element EX 

2007-08 ACCESSORIES AND EQUIPMENT Doors - Element


Content   ..  407  408  409  410   ..