Honda Element. Manual - part 348


  Index      Honda     Honda Element - service repair manual 2007-2008 year


Search            


Content   ..  346  347  348  349   ..


Honda Element. Manual - part 348


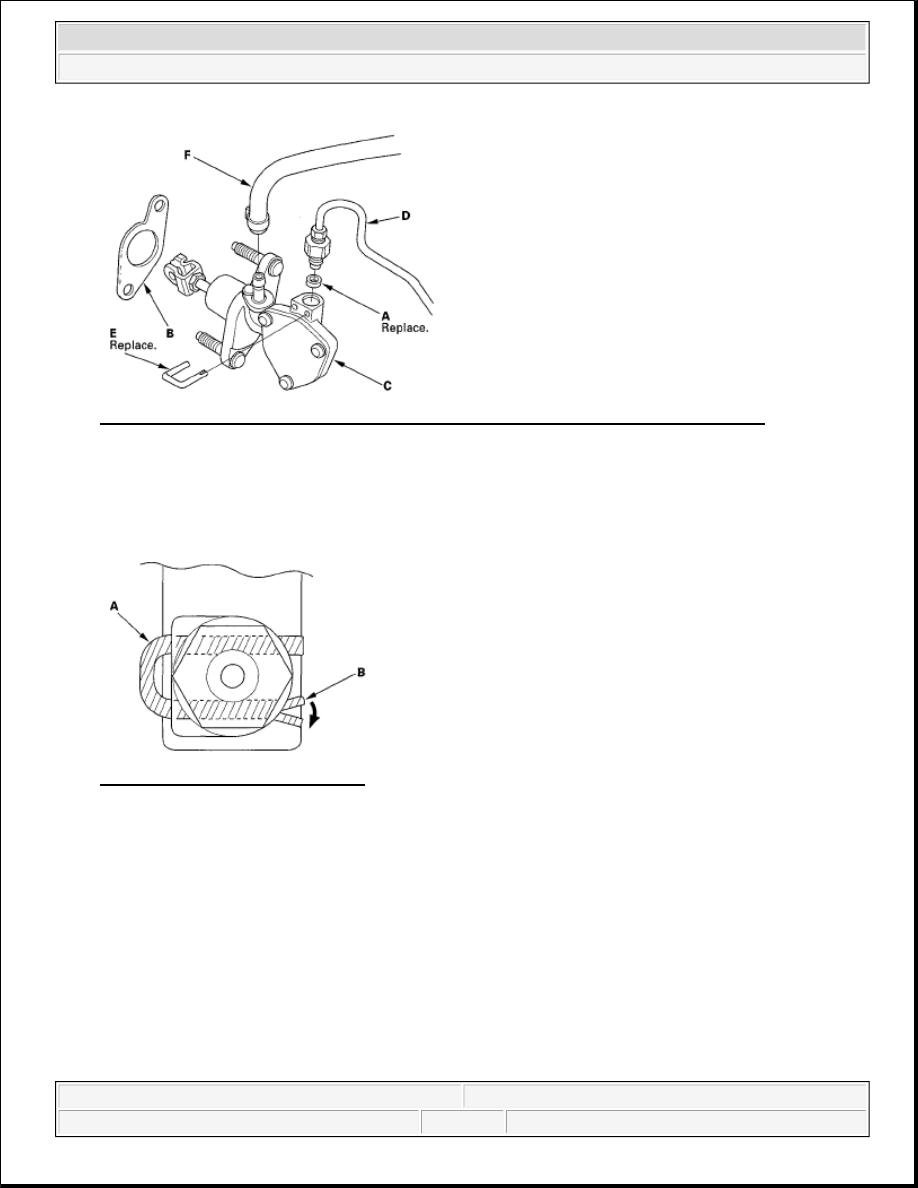
Fig. 12: Identifying O-Ring, Clutch Master Cylinder Seal And Clutch Master Cylinder 
Courtesy of AMERICAN HONDA MOTOR CO., INC. 

14. Install the clutch line (D), then install the new retaining clip (E). Connect the reservoir hose (F).  

15. To prevent the retaining clip (A) from coming off, pry apart the tip of the retaining clip (B) with a 

screwdriver. 

Fig. 13: Identifying Retaining Clip 
Courtesy of AMERICAN HONDA MOTOR CO., INC. 

16. Install the clutch master cylinder (A). 


2007 Honda Element EX 

2007-08 TRANSMISSION Clutch - Element


Fig. 14: Identifying Clutch Master Cylinder With Torque Specifications 
Courtesy of AMERICAN HONDA MOTOR CO., INC. 

17. Install the clutch line bracket (B).  

18. Install the reservoir mounting bolt (C).  

19. Make sure the hose clamps (A) are positioned on the master cylinder (B) and reservoir (C) as shown. 

Fig. 15: Identifying Hose Clamps, Master Cylinder And Reservoir 
Courtesy of AMERICAN HONDA MOTOR CO., INC. 

20. Install the master cylinder mounting nuts (A). 


2007 Honda Element EX 

2007-08 TRANSMISSION Clutch - Element


Fig. 16: Identifying Master Cylinder Mounting Nuts With Torque Specification 
Courtesy of AMERICAN HONDA MOTOR CO., INC. 

21. Apply grease to the clevis pin (B), and slide it into the yoke, then install a new lock pin (C).  

22. Adjust the clutch pedal, clutch pedal position switch, and clutch interlock switch (see CLUTCH 

PEDAL, CLUTCH PEDAL POSITION SWITCH, AND CLUTCH INTERLOCK SWITCH 
ADJUSTMENT
 ).  

23. Bleed the clutch hydraulic system (see CLUTCH HYDRAULIC SYSTEM BLEEDING ).  

24. Install the air cleaner assembly (see AIR CLEANER REMOVAL/INSTALLATION ).  

25. Install the battery base (see step 50 on ENGINE INSTALLATION ).  

26. Install the battery. Clean the battery posts and cable terminals. Connect the positive cable to the battery 

first, then connect the negative cable, and apply multipurpose grease to prevent corrosion.  

27. Check the clutch operation, and check for leaks.  

28. Enter the anti-theft code for the audio unit, and set the clock.  

29. Do the power window control unit reset procedure (see RESETTING THE POWER WINDOW 

CONTROL UNIT ).  

30. Test-drive the vehicle.  

SLAVE CYLINDER REPLACEMENT 

1. Make sure you have the anti-theft code for the audio unit.  

2. Disconnect the negative cable from the battery, then disconnect the positive cable.  

3. Remove the battery.  

4. Remove the air cleaner assembly (see AIR CLEANER REMOVAL/INSTALLATION ). 

NOTE:

Use fender covers to avoid damaging painted surfaces.  

Do not spill brake fluid on the vehicle; it may damage the paint. If brake 
fluid does contact the paint, wash it off immediately with water.  


2007 Honda Element EX 

2007-08 TRANSMISSION Clutch - Element


5. Remove the battery base (see step 10 on ENGINE REMOVAL ).  

6. Remove the clutch line bracket (A). 

Fig. 17: Identifying Clutch Line Bracket 
Courtesy of AMERICAN HONDA MOTOR CO., INC. 

7. Remove the mounting bolts (A) and the slave cylinder (B). 

Fig. 18: Identifying Mounting Bolts And Slave Cylinder 
Courtesy of AMERICAN HONDA MOTOR CO., INC. 

8. Remove the roll pins (C). Disconnect the clutch line (D), and remove the O-ring (E). Plug or wrap the end 

of the clutch line with a shop towel to prevent brake fluid from coming out.  

9. Install the slave cylinder in the reverse order of removal. Install a new O-ring (A). 


2007 Honda Element EX 

2007-08 TRANSMISSION Clutch - Element


Content   ..  346  347  348  349   ..