Honda Element. Manual - part 331


  Index      Honda     Honda Element - service repair manual 2007-2008 year


Search            


Content   ..  329  330  331  332   ..


Honda Element. Manual - part 331


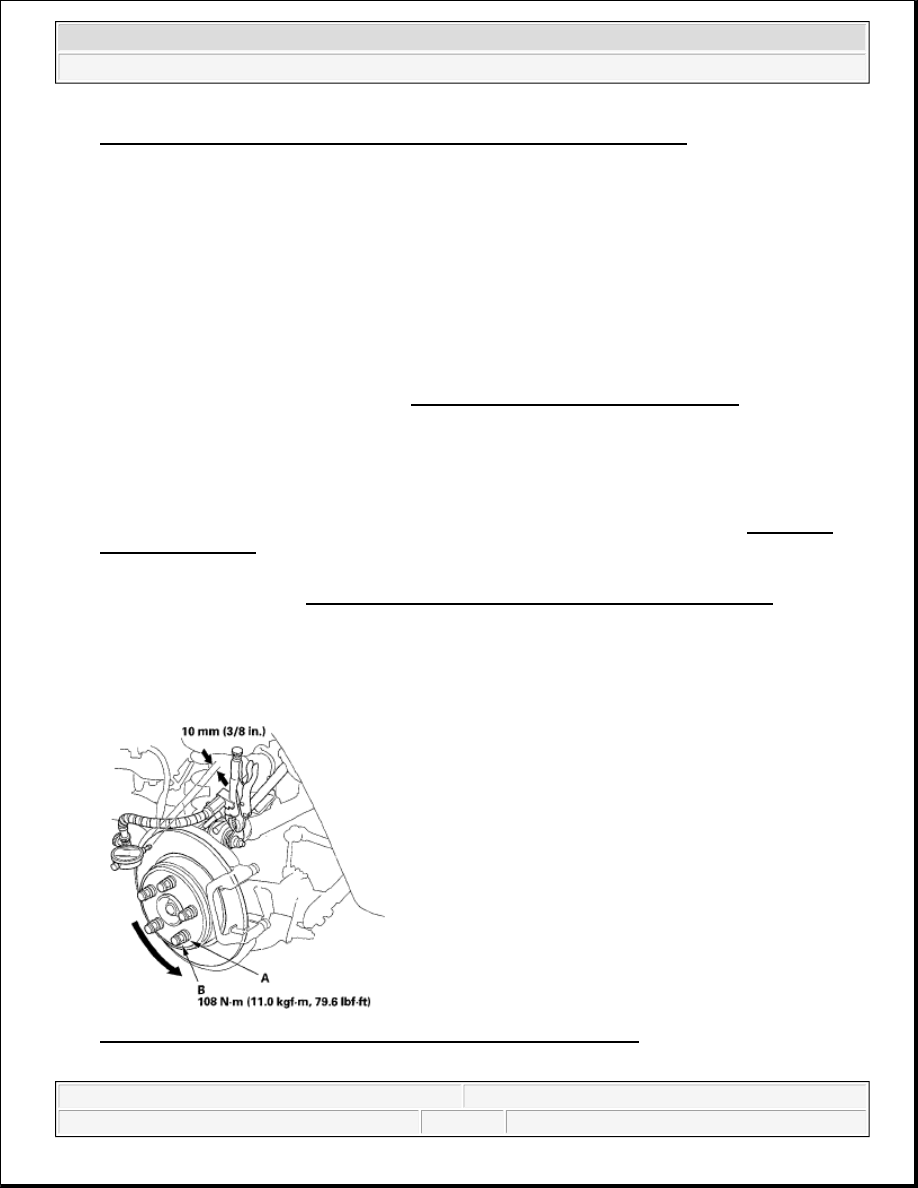
Fig. 53: Identifying Flange Bolts And Caliper Pin With Torque Specification 
Courtesy of AMERICAN HONDA MOTOR CO., INC. 

17. Clean the mating surfaces of the brake disc/drum and the inside of the wheel, then install the rear wheels. 

18. Press the brake pedal several times to make sure the brakes work. 

19. Add brake fluid as needed.  

20. After installation, check for leaks at hose and line joints or connections, and retighten if necessary. Test-

drive the vehicle, then check for leaks (see BRAKE HOSE AND LINE INSPECTION ).  

REAR BRAKE DISC INSPECTION 

RUNOUT 

1. Raise the rear of the vehicle, and support it with safety stands in the proper locations (see LIFT AND 

SUPPORT POINTS ).  

2. Remove the rear wheels.  

3. Remove the brake pads (see REAR BRAKE PAD INSPECTION AND REPLACEMENT ).  

4. Inspect the brake disc/drum surface for damage and cracks. Clean the brake disc/drum thoroughly, and 

remove all rust.  

5. Install suitable flat washers (A) and wheel nuts (B), and tighten the wheel nuts to the specified torque to 

hold the brake disc/drum securely against the hub. 

Fig. 54: Checking Rear Brake Disc Runout With Torque Specification 
Courtesy of AMERICAN HONDA MOTOR CO., INC.

NOTE:

Engagement may require a greater pedal stroke immediately after the 
brake pads have been replaced as a set. Several applications of the brake 
pedal will restore the normal pedal stroke.


2007 Honda Element EX 

2007-2008 BRAKES Conventional Brake Components - Element


6. Set up the dial gauge against the brake disc/drum as shown, and measure the runout at 10 mm (3/8 in.) 

from the outer edge of the brake disc/drum. 

Brake disc/drum runout: Service limit: 0.04 mm (0.0016 in.)  

7. If the brake disc/drum is beyond the service limit, refinish the brake disc/drum with a commercially 

available on-car brake lathe. 

Max. refinishing limit: 7.5 mm (0.30 in.)  

THICKNESS AND PARALLELISM 

1. Raise the rear of the vehicle, and support it with safety stands in the proper locations (see LIFT AND 

SUPPORT POINTS ).  

2. Remove the rear wheels.  

3. Remove the brake pads (see REAR BRAKE PAD INSPECTION AND REPLACEMENT ).  

4. Using a micrometer, measure the brake disc/drum thickness at eight points, about 45° apart and 10 mm 

(3/8 in.) in from the outer edge of the brake disc/drum. Replace the brake disc/drum if the smallest 
measurement is less than the max. refinishing limit. 

Brake disc/drum thickness:  

Standard: 8.9-9.1 mm (0.35-0.36 in.)  

Max. refinishing limit: 7.5 mm (0.30 in.)  

Brake disc/drum parallelism:  

0.015 mm (0.0006 in.) max.  

NOTE:

If the brake disc/drum is beyond the service limit for refinishing, 
replace it (see REAR BRAKE DISC REPLACEMENT ).  

A new brake disc/drum should be refinished if its runout is greater 
than 0.04 mm (0.0016 in.).  

NOTE:

This is the maximum allowable difference between the thickness 
measurements.


2007 Honda Element EX 

2007-2008 BRAKES Conventional Brake Components - Element


Fig. 55: Checking Brake Disc/Drum And Parallelism 
Courtesy of AMERICAN HONDA MOTOR CO., INC. 

5. If the brake disc/drum is beyond the service limit for parallelism, refinish the brake disc/drum with a 

commercially available on-car brake lathe. 

REAR BRAKE DISC REPLACEMENT 

1. Raise the rear of the vehicle, and support it with safety stands in the proper locations (see LIFT AND 

SUPPORT POINTS ).  

2. Remove the rear wheel.  

3. Remove the brake hose bracket mounting bolt (A). 

Fig. 56: Identifying Brake Hose Bracket Mounting Bolt, Brake Caliper Bracket Mounting Bolts 
And Caliper Assembly With Torque Specifications
 
Courtesy of AMERICAN HONDA MOTOR CO., INC.

NOTE:

If the brake disc/drum is beyond the service limit for refinishing, replace it 
(see REAR BRAKE DISC REPLACEMENT ).

NOTE:

Keep any grease off the brake disc/drum and brake pads.


2007 Honda Element EX 

2007-2008 BRAKES Conventional Brake Components - Element


4. Remove the brake caliper bracket mounting bolts (B), then remove the caliper assembly (C) from the 

knuckle. To prevent damage to the caliper assembly or brake hose, use a short piece of wire to hang the 
caliper assembly from the undercarriage. Do not twist the brake hose excessively.  

5. Release the parking brake.  

6. Remove the brake disc/drum flat screws (A). 

Fig. 57: Identifying Brake Disc/Drum With Brake Disc/Drum Flat Screws With Torque 
Specification
 
Courtesy of AMERICAN HONDA MOTOR CO., INC. 

7. Remove the brake disc/drum (B) from the rear hub. 

8. Install the brake disc/drum in the reverse order of removal. 

9. Clean the mating surfaces of the brake disc/drum and the inside of the wheel, then install the rear wheel.  

REAR BRAKE CALIPER OVERHAUL 

NOTE:

It may be necessary to back-off the parking brake adjuster nut (C) to 
remove the brake disc/drum from the rear hub (see step 7 ).  

If the brake disc/drum has stuck to the rear hub, screw two 8 x 1.25 
mm bolts (D) into the brake disc/drum to push it away from the rear 
hub. Turn each bolt 90 degrees to prevent the brake disc/drum from 
binding.  

After installation, check the parking brake, and adjust it necessary 
(see PEDAL FREE PLAY ).  

NOTE:

Before installing the brake disc/drum, clean the mating surfaces of the rear 
hub and the inside of the brake disc/drum.

CAUTION: Frequent inhalation of brake pad dust, regardless of material composition, 


2007 Honda Element EX 

2007-2008 BRAKES Conventional Brake Components - Element


Content   ..  329  330  331  332   ..