Honda Civic. Manual - part 774


  Index      Honda     Honda Civic - service repair manual 2006-2009 year


Search            


Content   ..  772  773  774  775   ..


Honda Civic. Manual - part 774


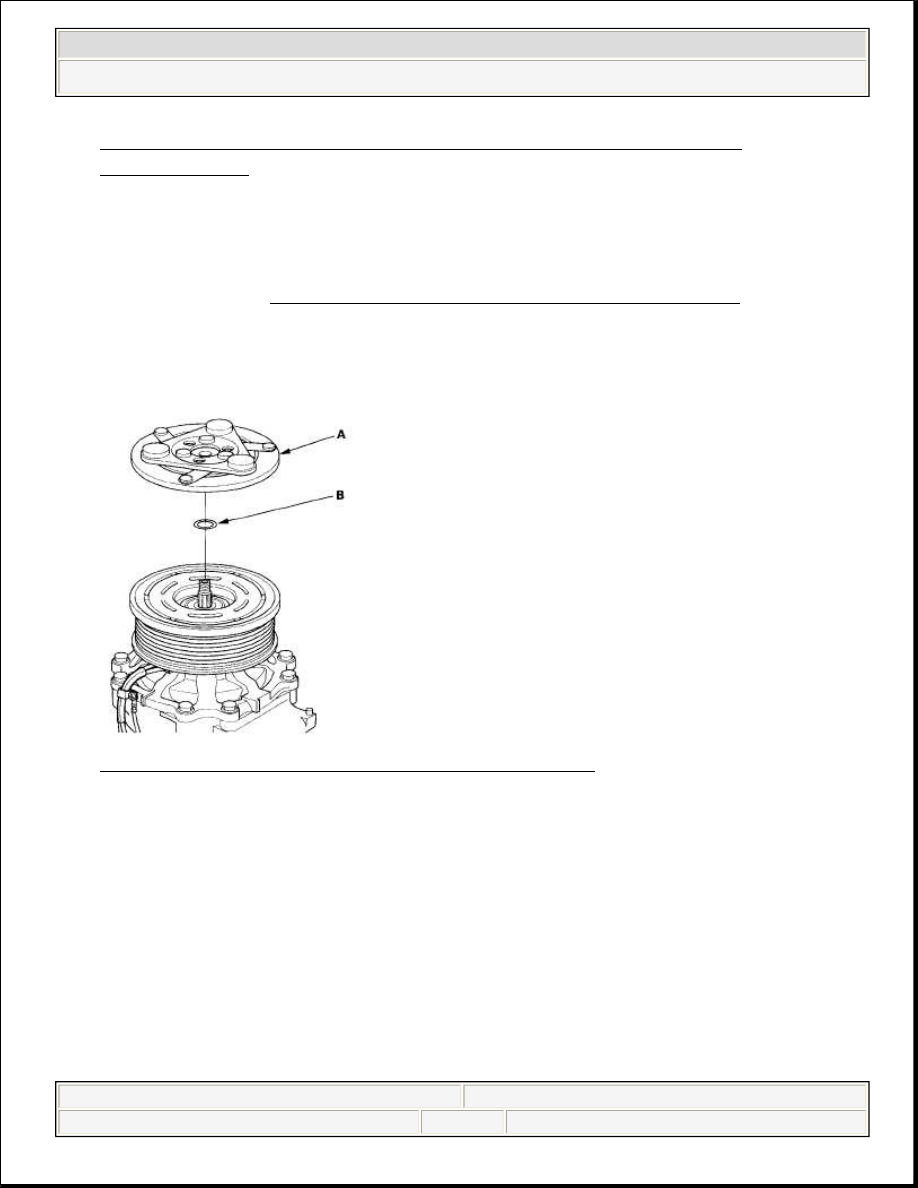
Fig. 103: Removing Center Nut Holding Armature Plate (With 
Specifications)
 

2. Remove the armature plate (A) and shim(s) (B), taking care not to lose the 

shim(s). If the clutch needs adjustment, increase or decrease the number and 
thickness of shims as necessary, then reinstall the armature plate, and recheck 
its clearance (see A/C COMPRESSOR CLUTCH OVERHAUL ). 

Fig. 104: Removing Armature Plate and Shim(s) 

3. If you are replacing the field coil, remove the snap ring (A) with snap ring 

pliers, then remove the rotor pulley (B). Be careful not to damage the rotor 
pulley and A/C compressor. 

NOTE:

The shims are available in four thicknesses: 0.1 mm, 0.2 
mm, 0.4 mm, and 0.5 mm.


2008 Honda Civic EX 

2006-08 HVAC Heating/Air Conditioning - Civic (All Except Hybrid)


Fig. 105: Removing Snap Ring And Rotor Pulley 

4. Remove the bolt and holder (A), then disconnect the field coil connector (B). 

Remove the snap ring (C) with snap ring pliers, then remove the field coil (D). 
Be careful not to damage the field coil and A/C compressor. 

Fig. 106: Removing Field Coil (With Specifications) 

5. Reassemble the clutch in the reverse order of disassembly, and note these 

items: 


Install the field coil with the wire side facing down, and align the boss on 
the field coil with the hole in the A/C compressor.  


Clean the rotor pulley and A/C compressor sliding surfaces with contact 
cleaner or other non-petroleum solvent.  


Install new snap rings, note the installation direction, and make sure they 
are fully seated in the groove.  


Make sure that the rotor pulley turns smoothly after it's reassembled.  


Route and clamp the wires properly or they can be damaged by the rotor 


2008 Honda Civic EX 

2006-08 HVAC Heating/Air Conditioning - Civic (All Except Hybrid)


pulley.  

A/C COMPRESSOR THERMAL PROTECTOR REPLACEMENT 

1. Remove the bolt and the holder (A). Disconnect the field coil connector (B), 

then remove the thermal protector (C). 

Fig. 107: Removing Thermal Protector (With Specifications) 

2. Replace the thermal protector (A) with a new one, and apply silicone sealant 

(B) to the bottom of the thermal protector. 

Fig. 108: Applying Silicone Sealant To Bottom Of Thermal Protector 

3. Install the thermal protector in the reverse order of removal.  

A/C COMPRESSOR RELIEF VALVE REPLACEMENT 

1. Recover the refrigerant with a recovery/recycling/charging station (see 


2008 Honda Civic EX 

2006-08 HVAC Heating/Air Conditioning - Civic (All Except Hybrid)


REFRIGERANT RECOVERY ).  

2. Remove the relief valve cover (A), the relief valve (B), and the O-ring (C). 

Plug the opening to keep foreign matter from entering the system and the A/C 
compressor oil from running out. 

Fig. 109: Removing Relief Valve Cover, Relief Valve And O-Ring (With 
Specifications)
 

3. Clean the mating surfaces.  
4. Replace the O-ring with a new one at the relief valve, and apply a thin coat of 

refrigerant oil before installing it.  

5. Remove the plug, and install and tighten the relief valve.  
6. Charge the system (see SYSTEM CHARGING ).  

A/C CONDENSER REPLACEMENT 

1. Recover the refrigerant with a recovery/recycling/charging station (see 

REFRIGERANT RECOVERY ).  

2. Remove the front bumper (see FRONT BUMPER 

REMOVAL/INSTALLATION ).  

3. Remove the bolts, then disconnect the discharge hose (A) from the A/C 

condenser. 


2008 Honda Civic EX 

2006-08 HVAC Heating/Air Conditioning - Civic (All Except Hybrid)


Content   ..  772  773  774  775   ..