Honda Civic. Manual - part 654


  Index      Honda     Honda Civic - service repair manual 2006-2009 year


Search            


Content   ..  652  653  654  655   ..


Honda Civic. Manual - part 654


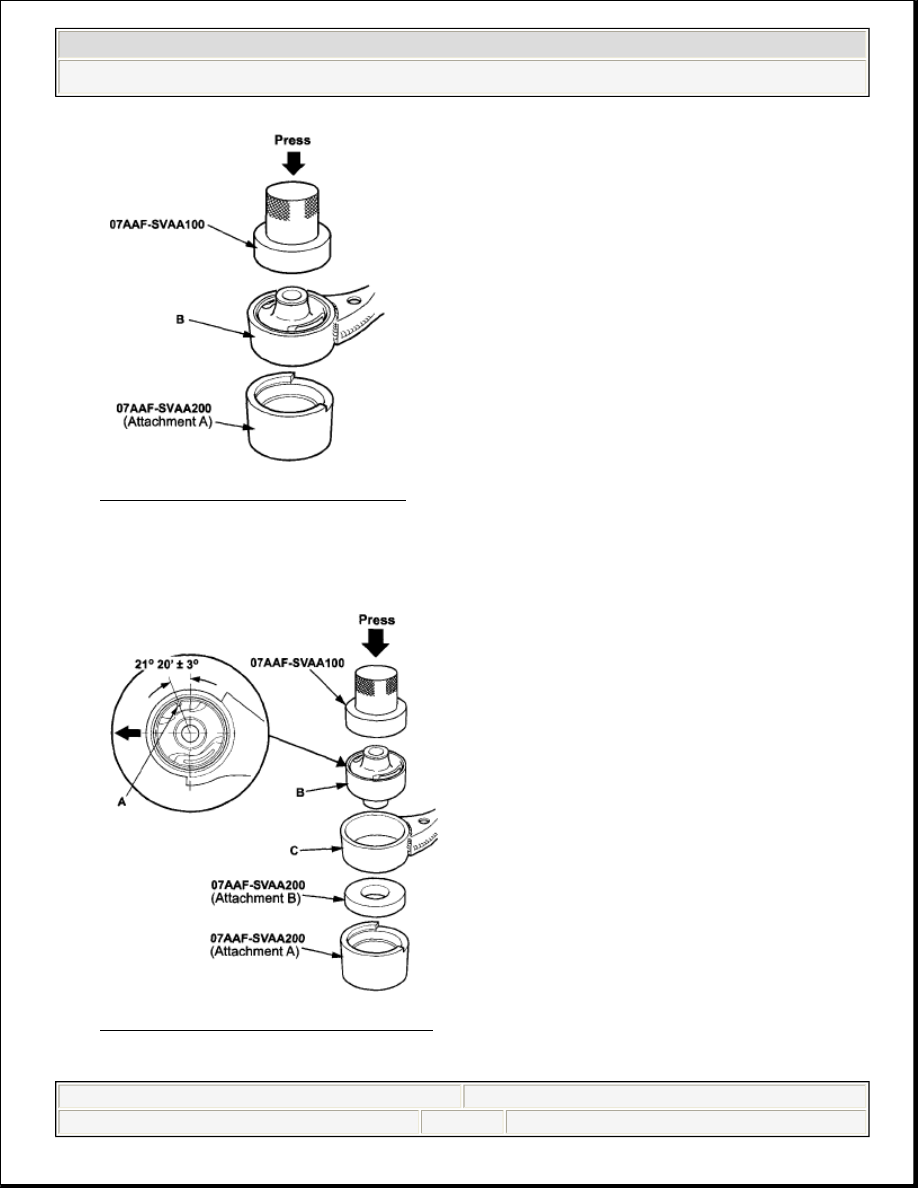
Fig. 27: Pressing Out Bushing 

2. Clean the mating surface of the new bushing and the lower arm.  
3. Position the tab (A) of the bushing (B) with the lower arm (C) as shown. 

Fig. 28: Identifying Tab Position 

4. Using a hydraulic press, bushing driver, and receiver set attachments, press in 


2008 Honda Civic GX 

2006-08 SUSPENSION Front Suspension Civic (All Except Hybrid)


the bushing into the lower arm.  

5. Using a yellow oil-based paint marker, paint a mark (A) around the hole (B) 

near the front bushing (C). Also paint a mark around the hole on the bottom 
side of the lower arm in the same area. 

Fig. 29: Identifying Paint Marks On Lower Arm 

STABILIZER LINK REMOVAL/INSTALLATION 

1. Raise the front of the vehicle, and support it with safety stands in the proper 

locations (see LIFT AND SUPPORT POINTS ).  

2. Remove the front wheel.  
3. Remove the self-locking nut (A) and the flange nut (B) while holding the 

respective joint pin (C) with a hex wrench (D), then remove the stabilizer link 
(E). 

NOTE:

These marks are used to identify a lower control arm 
that has had the bushing replaced. Do not replace the 
bushing in a lower arm with there paint marks; you 
must replace the lower arm.


2008 Honda Civic GX 

2006-08 SUSPENSION Front Suspension Civic (All Except Hybrid)


Fig. 30: Identifying Self-Locking Nut (With Torque Specifications) 

4. Install the stabilizer link on the stabilizer bar (F) and lower arm (G) with the 

joint pins set at the center of their range of movement. 

5. Install a new self-locking nut and a new flange nut, and lightly tighten them.  
6. Place a jack under the lower arm, and raise the suspension to load it with the 

vehicle's weight.  

7. Tighten the self-locking nut and flange nut to the specified torque values while 

holding the respective joint pin with a hex wrench.  

8. Reinstall all removed parts and test-drive the vehicle.  
9. After 5 minutes of driving, torque the self-locking nut again to the specified 

torque value.  

STABILIZER BAR REPLACEMENT 

1. Raise the front of the vehicle, and support it with safety stands in the proper 

locations (see LIFT AND SUPPORT POINTS ).  

2. Remove the front wheels.  
3. Disconnect both stabilizer links from the stabilizer bar (see STABILIZER 

LINK REMOVAL/INSTALLATION ).  

NOTE:

The stabilizer link has a paint mark (H). Align the paint 
mark on the stabilizer link facing rearward.


2008 Honda Civic GX 

2006-08 SUSPENSION Front Suspension Civic (All Except Hybrid)


4. Remove the flange bolts (A) and the bushing holders (B), then remove the 

bushings (C) and the stabilizer bar (D) from the front suspension subframe (E). 

Fig. 31: Identifying Flange Bolts And Bushing Holders 

5. Install the stabilizer bar in the reverse order of removal, and note these items: 


Note the right and left direction of the stabilizer bar.  


Align the paint marks (F) on the stabilizer bar with the sides of the 
bushings.  


Note the fore/aft direction of the bushing holders.  


Refer to STABILIZER LINK REMOVAL/INSTALLATION to 
connect the stabilizer bar to the links .  


Before installing the wheel, clean the mating surface of the brake disc and 
inside of the wheel.  


Check the wheel alignment, and adjust it if necessary (see WHEEL 
ALIGNMENT
 ).  

DAMPER/SPRING REMOVAL AND INSTALLATION 

REMOVAL 


2008 Honda Civic GX 

2006-08 SUSPENSION Front Suspension Civic (All Except Hybrid)


Content   ..  652  653  654  655   ..