Great Wall Hover. Manual - part 65


  Index      Great Wall     Great Wall Hover - service repair manual


Search            copyright infringement  


Content   ..  63  64  65  66   ..


Great Wall Hover. Manual - part 65


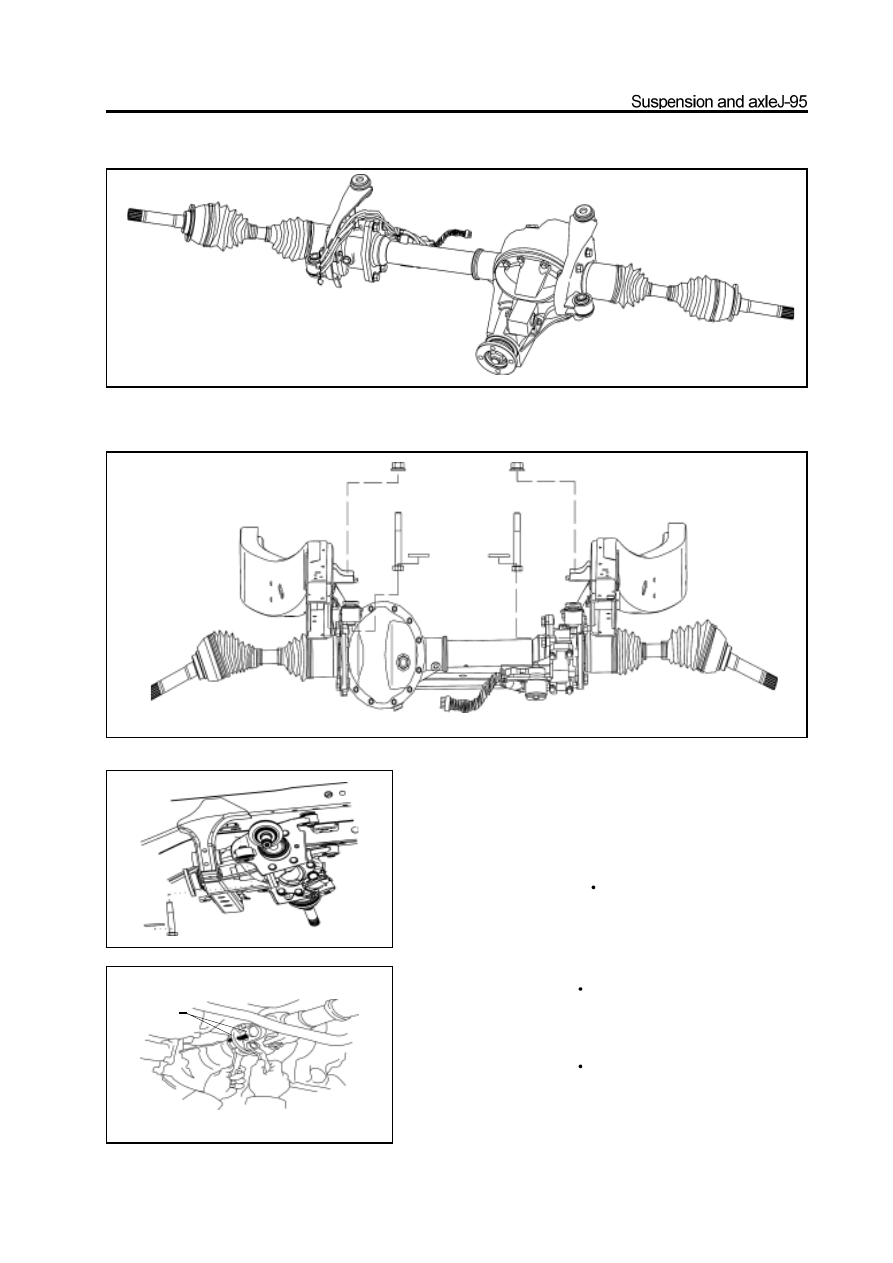
Installation of front reducer assembly

1. Install the front drive shaft assembly on the reducer assembly (Refer to “Assembly of Front

Drive Shaft”)

assembly mark

2. Use the jack to support the front drive axle, insert the

hanger plank bolt with washer and tighten it to the speci-

fied torque.

Remarks: Do not insert the previous two bolts in reverse direction.

Specified torque : 200-220N

m

3. Use the bolt to connect the front drive axle flange to

the drive shaft according to the mark made before

disassembly, and tightens it to the specified torque.

Specified torque : 73-83N

m

4. Install the beam under the front drive axle; tighten

the connecting bolt of the beam to the specified torque.

Specified torque : 73-83N

m

5. Connect the power sire connector of the electric

clutch to the power output wire of the car.

Axle drving assembly

Removal of semiaxle

1. Remove the wheel.

2. Disconnect the manual brake pull-wire from the

    carriage; loose the small bracket.

3. Remove the brake caliper; remove the brake disc .

4. Remove the rear halfaxle assembly from the rear

    axle housing

a.  Use the bolt to connect the special tools to the semiaxle flange

  surface.

b.  Use the hammer of special tools to remove the rear axle.

brake caliper assembly

brake disc

circlip

oil seal base

bearing

oil seal

oil seal pressing block

parking brake assembly

rear axle

m:   Specified torque

Used component which can not be used any more.

pull-wire assembly

5. Remove the circlip from the halfaxle assembly.

Use the circlip pliers to remove the circlip.

limitation

limitation

Check and repair of rear axle components

1. Check the rear axle and flange for wear, damage

and run-out.

Max. Run-out of axle:   2mm

Max. Run-out of flange:   0.2mm

It should replace the rear axle if the rear axle or flange is worn or

damaged, or the measured run-out is beyond the specified value.

2. Check the external oil seal

    a. Check for the wear or damage; especially for the lip of oil seal.

    b. Replace it if necessary.

3. Check the bearing and oil seal holder

Check for wear and damage, replace it if necessary.

4. Remove the bearing and oil seal holder

    a. Move the brake and oil seal pressing block to the limit position

       along flange direction; move the external oil seal to the limit

       position of oil seal.

    b. Place the hook of the special tools in sequence, the position is

        shown as figure; make the hook holds the bearing tightly; then

        use the bolt to connect the hook to the hammer fixedly;  at last,

        place it on the pad with halfaxle spline end facing ground.

    c. Hold the hammer to beat downwardly with force for several

        times to remove the bearing and oil seal holder.

Caution:   Do not damage the oil seal .

5. Install the new external oil seal

a. Clean the semiaxle.

b. Coat the lip of external oil seal with proper HP-R grease.

Caution: When install the oil seal, the lip of oil seal must not

contact the semishaft to avoid scratching the oil seal .

6. Replace the bearing and oil seal holder

a. Heat the oil seal pressing block in 22# engine oil to 100

.

Caution: The end of oil seal pressing block with larger chamfer

faces the halfaxle spline. Install it immediately after taken out.

b. Use the hydraulic press to install the new bearing and new oil

    seal pressing block by press.

7. Install the circlip

Use the circlip pliers to install the new circlip in the slot of semiaxle.

8. Check the inner oil seal for wear or damage.

9. Remove the inner oil seal

Use the special tools to remove the inner oil seal.

10. Install the new inner oil seal

a. Coat the lip of oil seal with proper HP-R grease.

b. Use the special tools to knock in the new oil seal.

Installation of rear axle

1. Install the halfaxle assembly in the axle housing

a. Use the kerosene to clean the semiaxle and inner oil seal holder.

b.  Assemble the halfaxle spline and halfaxle gear spline firstly,

    then use the brass rod to beat knock the halfaxle assembly into

    the axle housing.

Caution:  Protect the lip of inner external oil seal and pull-wire

assembly during assembly; do not damage the oil sleeve

assembly; align the brake bolt with the flange bolt of rear axle.

Tightening force:   95-105N

m

2. Install the rear brake disc

3. Install the brake caliper

Tightening force:   95-105N

m

4. Connect the manual brake wire.

5. Install the wheel.

6. Discharge the air of brake system by test.

special tools

special tools

brake disc

axle housing

flange

halfaxle

assembly


Content   ..  63  64  65  66   ..