Freightliner Cascadia. Manual - part 10
 

  Index      Freightliner     Freightliner Cascadia - service manual


Search            


Content   ..  8  9  10  11   ..


Freightliner Cascadia. Manual - part 10


3.

Remove the reservoir lid (see

Fig. 3

and install

the pressure bleed adaptor on the reservoir.

4.

Bleed the hydraulic system as follows.

4.1

Open the bleed valve on the bleed tank
to pressurize the reservoir.

4.2

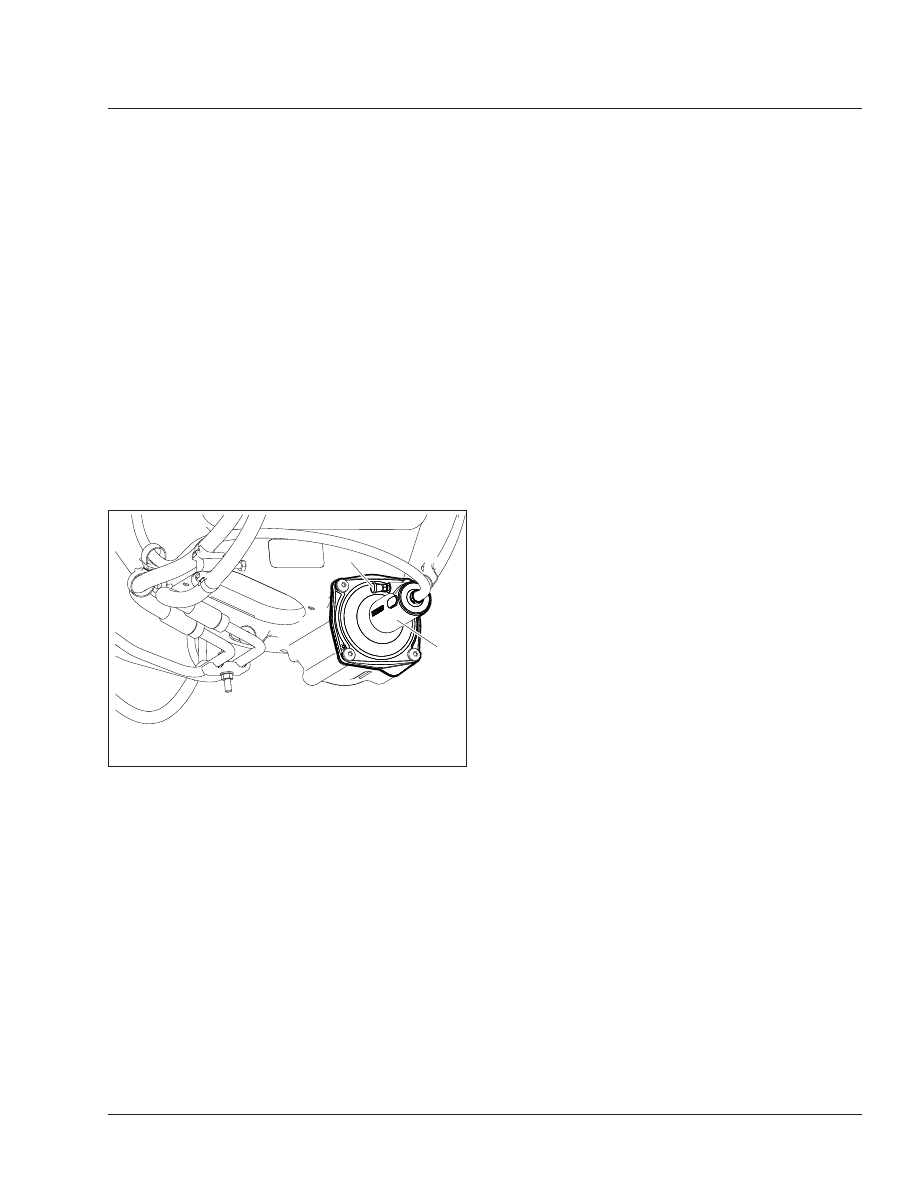
Remove the cap from the bleed valve of
the slave cylinder. See

Fig. 4

On the

valve, install a transparent drain hose
connected to a catch bottle. The hose
needs to fit the bleed valve tight enough
so it does not fall off when fluid is
pumped out.

4.3

Open the bleed valve on the slave cylin-
der.

4.4

When the draining fluid is clear and free
of air bubbles, close the bleed valve.

5.

Check the fluid level in the reservoir. If neces-
sary, add or drain fluid to bring the fluid level to
between the MIN and MAX lines marked on the
side of the reservoir.

6.

Install the reservoir lid.

7.

Disconnect the transparent hose. Tighten the
bleed screw 88 lbf·in (1000 N·cm) and install the
cap on the slave cylinder bleed valve.

8.

Depress the clutch pedal a few times. There
should be resistance over the full pedal stroke.

Manual Bleeding

1.

Park the vehicle on a level surface, shut down
the engine, and set the parking brake. Chock the
tires and open the hood.

NOTE: The hydraulic system holds approxi-
mately 0.5 quart (0.5 liter) of fluid. It may need
to be refilled during the bleeding process to pre-
vent air from re-entering the system.

2.

Remove the reservoir lid and fill the reservoir
(see

Fig. 3

with new DOT 4 brake fluid from a

tightly sealed container.

3.

Remove the cap from the bleed valve of the
slave cylinder. See

Fig. 4

On the valve, install a

transparent drain hose connected to a catch
bottle. The hose needs to fit the bleed valve tight
enough so it does not fall off when fluid is
pumped out.

NOTE: The following steps require two people—
one in the cab to work the clutch pedal, and one
to open and close the bleed valve and watch
the fluid.

4.

Bleed the system, as follows.

4.1

Open the bleed valve.

4.2

Depress the clutch pedal until it stops.

4.3

Close the bleed valve.

4.4

Return the pedal to the upper position.

4.5

Repeat the previous steps until the fluid is
clear and free of air bubbles.

4.6

Depress the clutch pedal. There should
be resistance over the full pedal stroke.

5.

Check the fluid level in the reservoir. If neces-
sary, add or drain fluid to bring the fluid level to
between the MIN and MAX lines marked on the
side of the reservoir. Install the reservoir lid.

6.

Disconnect the transparent hose. Tighten the
bleed valve 88 lbf·in (1000 N·cm) and install the
cap on the slave cylinder bleed valve.

11/30/2010

f250682

1

2

1.

Bleed Valve

2.

Slave Cylinder

Fig. 4, Slave Cylinder, Hydraulic Clutch Control

Clutch

25

25/3

25–04 Clutch Replacement,

Detroit

Automated

Transmissions

Replace the clutch assembly for a Detroit Automated
transmission at 750,000-mile (1 200 000-km) inter-
vals. Follow the procedure published on the Detroit
Diesel Customer Support Network (DDCSN):

www.ddcsn.com

Clutch

25

25/4

MOP Number

Detroit

Automated Transmission Air Filter Replacement . . . . . . . . . . . . . . . . . . . . . . . . . . . . . . . . . . . . . 26–03

Detroit

Automated Transmission Fluid Change and Magnetic Plug Cleaning. . . . . . . . . . . . . . . . . . . . . . 26–01

Detroit

Automated Transmission Fluid Level Inspection . . . . . . . . . . . . . . . . . . . . . . . . . . . . . . . . . . . . . 26–02

Eaton Fuller Manual Transmission Air Filter/Regulator Check, Cleaning, or

Replacement. . . . . . . . . . . . . . . . . . . . . . . . . . . . . . . . . . . . . . . . . . . . . . . . . . . . . . . . . . . . . . . . . . . . . 26–06

Eaton Fuller Transmission Fluid Change and Magnetic Plug Cleaning . . . . . . . . . . . . . . . . . . . . . . . . . . . 26–04

Eaton Fuller Transmission Fluid Level Inspection. . . . . . . . . . . . . . . . . . . . . . . . . . . . . . . . . . . . . . . . . . . 26–05

Safety Precautions . . . . . . . . . . . . . . . . . . . . . . . . . . . . . . . . . . . . . . . . . . . . . . . . . . . . . . . . . . . . . . . . . 26–00

Transmission

26

Index, Alphabetical

26–00 Safety Precautions

Safety Precautions in this section apply to all
procedures within this group.

DANGER

When working on the vehicle, shut down the en-
gine, set the parking brake, and chock the tires.
Before working under the vehicle, always place
jack stands under the frame rails to ensure the
vehicle can not drop. Failure to follow these steps
could result in serious personal injury or death.

26–01 Detroit

Automated

Transmission Fluid
Change and Magnetic
Plug Cleaning

NOTICE

Operating a transmission with the fluid level
higher or lower than recommended can result in
transmission damage. Do not overfill the transmis-
sion. Overfilling will force fluid out of the case
through the main shaft openings.

Do not mix types or brands of fluid, because of
possible incompatibility. Do not use fluid addi-
tives, friction modifiers, or extreme-pressure gear
fluids.

IMPORTANT: Drain the transmission when the
fluid is warm. If not already warm, run the en-
gine until the transmission fluid reaches operat-
ing temperature. Shift the transmission to neu-
tral (N) and shut down the engine.

1.

Apply the parking brakes, and chock the rear
tires. Place a large drain pan under the transmis-
sion.

2.

Clean the area around the fill plug, then remove
it from the side of the gear case. Remove the
drain plug from the bottom of the case. See

Fig. 1

.

3.

Clean the fill plug and the drain plug.

4.

Remove the oil pump screen and check it for
debris. See

Fig. 2

Clean the screen, if needed,

then install it with a new seal washer. Tighten the
plug 90 lbf·ft (120 N·m).

5.

Install a new seal on the drain plug, then install
the plug and tighten it 45 lbf·ft (60 N·m).

NOTICE

Detroit transmissions use synthetic lubricant that
meets the requirements of the MB 235.11 specifi-

03/31/2014

f270167

1

2

1.

Drain Plug

2.

Fill Plug

Fig. 1, Drain and Fill Plugs, Detroit Automated

Transmissions

02/21/2014

f261459

1

2

3

4

1.

Spring

2.

Screen

3.

Seal Washer

4.

Plug

Fig. 2, Oil Pump Screen, Detroit Automated

Transmissions

Transmission

26

26/1


Content   ..  8  9  10  11   ..