Dodge Sprinter. Manual - part 94
 

  Index      Dodge     Dodge Sprinter / Mercedes-Benz - service repair manual 2006 year


Search            


Content   ..  92  93  94  95   ..


Dodge Sprinter. Manual - part 94


(3) Connect the other lead to the other end of the

circuit being tested. Low or no resistance means good
continuity.

TESTING FOR A SHORT TO GROUND

(1) Remove the fuse and disconnect all items

involved with the fuse.

(2) Connect a test light or a voltmeter across the

terminals of the fuse.

(3)

Starting at the fuse block, wiggle the wiring

harness about six to eight inches apart and watch
the voltmeter/test lamp.

(4)

If the voltmeter registers voltage or the test

lamp glows, there is a short to ground in that gen-
eral area of the wiring harness.

TESTING COMPONENTS FOR A SHORT TO
GROUND ON A FUSE POWERING SEVERAL
LOADS

(1) Refer to the wiring diagrams and disconnect or

isolate all items on the suspected fused circuit.

(2) Replace the blown fuse.
(3) Supply power to the fuse by turning ON the

ignition switch or re-connecting the battery.

(4) Start connecting the items in the fused circuit

one at a time. When the fuse blows the component
with the short to ground has been isolated.

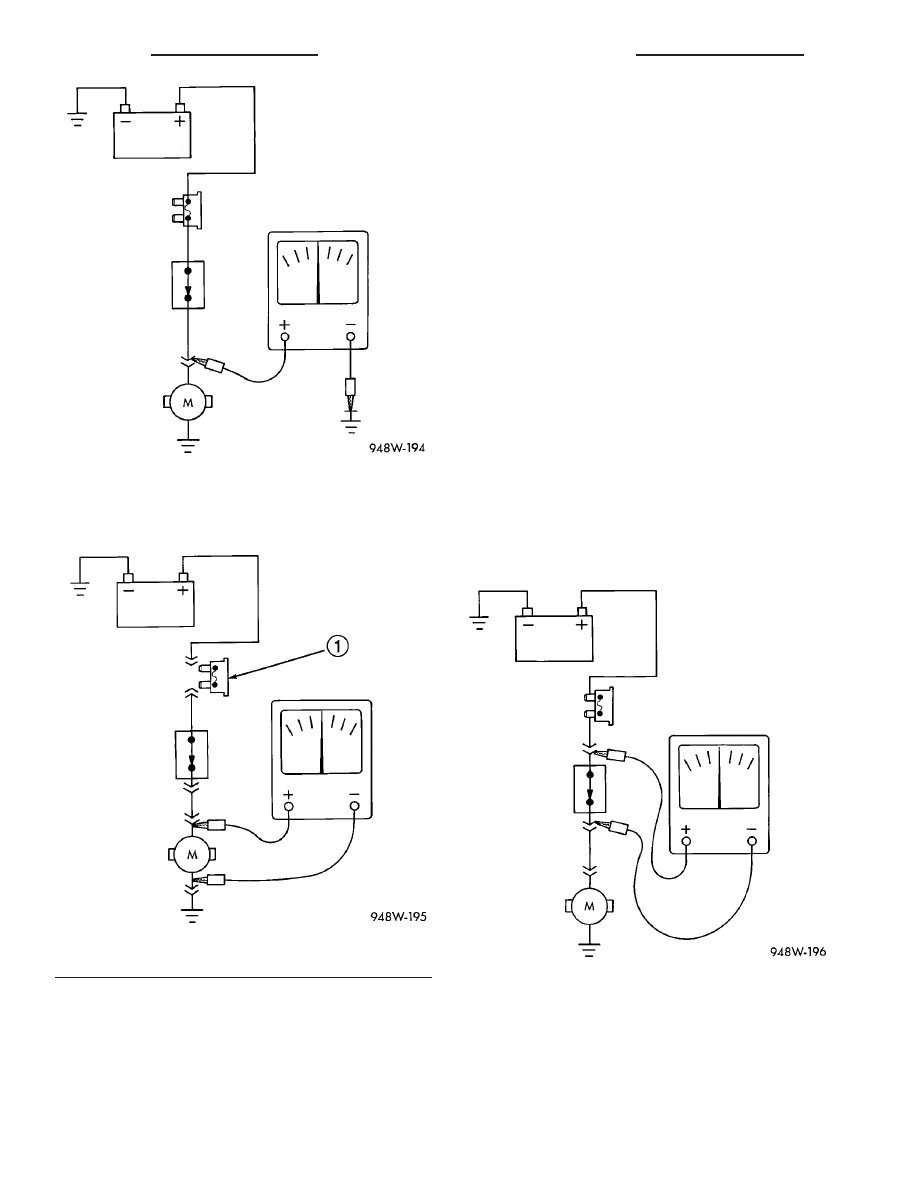
TESTING FOR A VOLTAGE DROP

(1) Connect the positive lead of the voltmeter to

the side of the circuit closest to the battery (Fig. 8).

(2) Connect the other lead of the voltmeter to the

other side of the switch, component or circuit.

(3) Operate the item.
(4) The voltmeter will show the difference in volt-

age between the two points.

Fig. 6 Testing for Voltage Potential

Fig. 7 Testing for Continuity

1 - FUSE REMOVED FROM CIRCUIT

Fig. 8 Testing for Voltage Drop

8W - 01 - 8

8W-01 WIRING DIAGRAM INFORMATION

VA

CONNECTOR

REMOVAL

(1) Disconnect battery.
(2) Release Connector Lock (Fig. 9).
(3) Disconnect the connector being repaired from

its mating half/component.

(4) Remove the dress cover (if applicable) (Fig. 9).

(5) Release

the

Secondary

Terminal

Lock,

if

required.

(6) Position the connector locking finger away from

the terminal using the proper special tool. Pull on
the wire to remove the terminal from the connector.

INSTALLATION

(1) Insert the removed terminal in the same cavity

on the repair connector.

(2) Repeat steps for each terminal in the connec-

tor, being sure that all wires are inserted into the
proper cavities. For additional connector pin-out
identification, refer to the wiring diagrams.

(3) When the connector is re-assembled, the sec-

ondary terminal lock must be placed in the locked
position to prevent terminal push out.

(4) Replace dress cover (if applicable).
(5) Connect connector to its mating half/compo-

nent.

(6) Connect battery and test all affected systems.

DIODE

REMOVAL

(1) Disconnect the battery.
(2) Locate the diode in the harness, and remove

the protective covering.

(3) Remove the diode from the harness, pay atten-

tion to the current flow direction (Fig. 10).

INSTALLATION

(1) Remove the insulation from the wires in the

harness. Only remove enough insulation to solder in
the new diode.

(2) Install the new diode in the harness, making

sure current flow is correct. If necessary, refer to the
appropriate wiring diagram for current flow (Fig. 11).

(3) Solder the connection together using rosin core

type solder only. Do not use acid core solder.

(4) Tape the diode to the harness using electrical

tape. Make sure the diode is completely sealed from
the elements.

(5) Re-connect the battery and test affected sys-

tems.

Fig. 9 REMOVAL OF DRESS COVER

1 - DRESS COVER
2 - CONNECTOR LOCK
3 - CONNECTOR

Fig. 10 DIODE IDENTIFICATION

1 - CURRENT FLOW
2 - BAND AROUND DIODE INDICATES CURRENT FLOW
3 - DIODE AS SHOWN IN THE DIAGRAMS

Fig. 11 Diode Identification

1 - CURRENT FLOW
2 - BAND AROUND DIODE INDICATES CURRENT FLOW
3 - DIODE AS SHOWN IN THE DIAGRAMS

VA

8W-01 WIRING DIAGRAM INFORMATION

8W - 01 - 9

TERMINAL

REMOVAL

(1) Follow steps for removing terminals described

in the connector removal section.

(2) Cut the wire 6 inches from the back of the con-

nector.

INSTALLATION

(1) Select a wire from the terminal repair kit that

best matches the color and gage of the wire being
repaired.

(2) Cut the repair wire to the proper length and

remove one–half (1/2) inch of insulation.

(3) Splice the repair wire to the wire harness (see

wire splicing procedure) .

(4) Insert the repaired wire into the connector.
(5) Install the connector locking wedge, if required,

and reconnect the connector to its mating half/compo-
nent.

(6) Re-tape the wire harness starting at 1–1/2

inches behind the connector and 2 inches past the
repair.

(7) Connect battery and test all affected systems.

WIRE

STANDARD PROCEDURE

WIRE SPLICING

When splicing a wire, it is important that the cor-

rect gage be used as shown in the wiring diagrams.

(1) Remove one-half (1/2) inch of insulation from

each wire that needs to be spliced.

(2) Place a piece of adhesive lined heat shrink tub-

ing on one side of the wire. Make sure the tubing will
be long enough to cover and seal the entire repair
area.

(3) Place the strands of wire overlapping each

other inside of the splice clip (Fig. 12).

(4) Using crimping tool, Mopar p/n 05019912AA,

crimp the splice clip and wires together (Fig. 13).

(5) Solder the connection together using rosin core

type solder only (Fig. 14).

CAUTION: DO NOT USE ACID CORE SOLDER.

(6) Center the heat shrink tubing over the joint

and heat using a heat gun. Heat the joint until the
tubing is tightly sealed and sealant comes out of both
ends of the tubing (Fig. 15).

Fig. 12 1 SPLICE BAND

1 - SPLICE BAND

Fig. 13 2 CRIMPING TOOL

1 - CRIMPING TOOL

Fig. 14 3 SOLDER SPLICE

1 - SOLDER
2 - SPLICE BAND
3 - SOLDERING IRON

Fig. 15 4 HEAT SHRINK TUBE

1 - SEALANT
2 - HEAT SHRINK TUBE

8W - 01 - 10

8W-01 WIRING DIAGRAM INFORMATION

VA

8W-02 COMPONENT INDEX

Component

Page

A/C Auxiliary Fan . . . . . . . . . . . . . . . . . . . . . 8W-42
A/C Auxiliary Fan Relay . . . . . . . . . . . . . . . . 8W-42
A/C Compressor Clutch . . . . . . . . . . . . . . . . . 8W-42
A/C Compressor Clutch Relay . . . . . . . . . . . . 8W-42
A/C Roof Auxiliary Fan . . . . . . . . . . . . . . . . . 8W-42
A/C Roof Auxiliary Fan Relay . . . . . . . . . . . . 8W-42
Accelerator Pedal Position Sensor . . . . . . . . . 8W-30
Additional Heat Exchanger . . . . . . . . . . . . . . 8W-42
Additional Heat Exchanger Relay . . . . . . . . . 8W-42
Additional Heat Exchanger Switch . . . . . . . . 8W-42
Air Outlet Temperature Sensor . . . . . . . . . . . 8W-42
Airbag Control Module . . . . . . . . . . . . . . . . . 8W-43
Airbag Squibs . . . . . . . . . . . . . . . . . . . . . . . . 8W-43
Ambient Temperature Sensor . . . . . . . . . . . . 8W-42
Anti Icing Switch . . . . . . . . . . . . . . . . . . . . . 8W-42
Ash Receiver Lamp . . . . . . . . . . . . . . . . . . . . 8W-44
Automatic Temperature Control Module . . . . 8W-42
Auxiliary Heater Control . . . . . . . . . . . . . . . . 8W-42
Battery . . . . . . . . . . . . . . . . . . . . . . . . . . . . . 8W-20
Battery Relay-Auxiliary . . . . . . . . . . . . . . . . 8W-20
Battery-Auxiliary . . . . . . . . . . . . . . . . . . . . . 8W-20
Beam Select Switch . . . . . . . . . . . . . . . . . . . . 8W-50
Blower Motor Resistor Block . . . . . . . . . . . . . 8W-42
Blower Motor-Front . . . . . . . . . . . . . . . . . . . . 8W-42
Blower Stage I Diode . . . . . . . . . . . . . . . . . . . 8W-42
Body Plug Connector . . . . . . . . . . . . . . . . . . . 8W-11
Boost Pressure Sensor . . . . . . . . . . . . . . . . . . 8W-30
Boost Pressure Servomotor . . . . . . . . . . . . . . 8W-30
Boost Pressure Solenoid . . . . . . . . . . . . . . . . 8W-30
Brake Fluid Level Switch . . . . . . . . . . . . . . . 8W-35
Brake Lamp Switch . . . . . . . . . . . . . . . . . . . . 8W-35
Brake Lamp Switch 4 Pole . . . . . . . . . . . . . . 8W-35
Brake Pressure Sensor . . . . . . . . . . . . . . . . . 8W-35
Brake Wear Sensors . . . . . . . . . . . . . . . . . . . 8W-35
CTEL Antenna Connector . . . . . . . . . . . . . . . 8W-55
CTEL Connector . . . . . . . . . . . . . . . . . . . . . . 8W-55
Cabin Heater Assembly . . . . . . . . . . . . . . . . . 8W-42
Cabin Heater Module . . . . . . . . . . . . . . . . . . 8W-42
Camshaft Position Sensor . . . . . . . . . . . . . . . 8W-30
Center High Mounted Stop Lamp . . . . . . . . . 8W-51
Central Timer Module . . . . . . . . . . . . . . . . . . 8W-45
Cigar Lighter . . . . . . . . . . . . . . . . . . . . . . . . . 8W-41
Cigar Lighter Lamp . . . . . . . . . . . . . . . . . . . 8W-44
Circulation Pump . . . . . . . . . . . . . . . . . . . . . 8W-42
Circulation Pump Diode . . . . . . . . . . . . . . . . 8W-42
Circulation Pump Relay-Cabin Heater

Module . . . . . . . . . . . . . . . . . . . . . . . . . . . 8W-42

Clockspring . . . . . . . . . . . . . . . . . . . . . . . 8W-41, 43
Controller Antilock Brake . . . . . . . . . . . . . . . 8W-35
Courtesy Lamps . . . . . . . . . . . . . . . . . . . . . . 8W-44
Crankcase Heater . . . . . . . . . . . . . . . . . . . . . 8W-30
Crankshaft Position Sensor . . . . . . . . . . . . . . 8W-30

Component

Page

Cylinder Lock Switch-Driver . . . . . . . . . . . . . 8W-61
D+ Relays . . . . . . . . . . . . . . . . . . . . . . . . 8W-10, 11
Data Link Connector . . . . . . . . . . . . . . . . . . . 8W-18
Daytime Running Lamp Relays . . . . . . . . . . . 8W-50
Differential Lock Solenoid Valve . . . . . . . . . . 8W-31
Dome Lamp . . . . . . . . . . . . . . . . . . . . . . . . . . 8W-44
Door Jamb Switch-Rear . . . . . . . . . . . . . . . . . 8W-61
Door Jamb Switches . . . . . . . . . . . . . . . . . . . 8W-44
Door Jamb Switches-Sliding . . . . . . . . . . . . . 8W-61
Door Lock Motor/Ajar Switch Assemblies . . . 8W-61
Dosing Pump . . . . . . . . . . . . . . . . . . . . . . . . . 8W-42
EGR Valve . . . . . . . . . . . . . . . . . . . . . . . . . . . 8W-30
Electrohydraulic Control Unit . . . . . . . . . . . . 8W-31
Engine Control Module . . . . . . . . . . . . . . . . . 8W-30
Engine Control Relay . . . . . . . . . . . . . . . . . . 8W-31
Engine Coolant Level Switch . . . . . . . . . . . . . 8W-30
Engine Coolant Temperature Sensor . . . . . . . 8W-30
Engine Oil Sensor . . . . . . . . . . . . . . . . . . . . . 8W-30
Evaporator Temperature Sensor . . . . . . . . . . 8W-42
Fan Stage 1 Relay . . . . . . . . . . . . . . . . . . . . . 8W-42
Fog Lamp Relay . . . . . . . . . . . . . . . . . . . . . . 8W-50
Fog Lamp Switch . . . . . . . . . . . . . . . . . . . . . 8W-50
Fuel Injectors . . . . . . . . . . . . . . . . . . . . . . . . 8W-30
Fuel Level Sensor . . . . . . . . . . . . . . . . . . . . . 8W-30
Fuel Pressure Sensor . . . . . . . . . . . . . . . . . . 8W-30
Fuel Pressure Solenoid . . . . . . . . . . . . . . . . . 8W-30
Fuel Pump . . . . . . . . . . . . . . . . . . . . . . . . . . . 8W-30
Fuel Pump Relay . . . . . . . . . . . . . . . . . . . . . . 8W-30
Fuel Quantity Control Valve . . . . . . . . . . . . . 8W-30
Fuel Shutdown Solenoid . . . . . . . . . . . . . . . . 8W-30
Fuel Temperature Sensor . . . . . . . . . . . . . . . 8W-30
Fuse Blocks . . . . . . . . . . . . . . . . . . . . 8W-10, 11, 30
Fuse/Relay Block . . . . . . . . . . . . . . . . . . . . . . 8W-11
Fused Ignition Switch Run-Start Relay . . . . . 8W-11
Fuses . . . . . . . . . . . . . . . . . . . . . . . . . 8W-10, 11, 42
Generator . . . . . . . . . . . . . . . . . . . . . . . . . . . 8W-20
Glow Plug Control Module . . . . . . . . . . . . . . 8W-30
Glow Plugs . . . . . . . . . . . . . . . . . . . . . . . . . . 8W-30
Grounds . . . . . . . . . . . . . . . . . . . . . . . . . . . . 8W-15
Hazard Warning Switch . . . . . . . . . . . . . . . . 8W-52
Headlamp Adjust Switch . . . . . . . . . . . . . . . . 8W-50
Headlamp Assemblies . . . . . . . . . . . . . . . 8W-50, 52
Headlamp Switch . . . . . . . . . . . . . . . . . . . . . 8W-50
Heated Seat Modules . . . . . . . . . . . . . . . . . . 8W-63
Heated Seat Switches . . . . . . . . . . . . . . . . . . 8W-63
Heater Timer-Auxiliary . . . . . . . . . . . . . . . . . 8W-42
High Idle Switch . . . . . . . . . . . . . . . . . . . . . . 8W-30
High Pressure Switch . . . . . . . . . . . . . . . . . . 8W-42
Hood Ajar Switch . . . . . . . . . . . . . . . . . . . . . 8W-39
Horn . . . . . . . . . . . . . . . . . . . . . . . . . . . . . . . 8W-41
Horn Relay . . . . . . . . . . . . . . . . . . . . . . . . . . 8W-41
Horn Switch . . . . . . . . . . . . . . . . . . . . . . . . . 8W-41

VA

8W-02 COMPONENT INDEX

8W - 02 - 1


Content   ..  92  93  94  95   ..