Dodge Durango (HB). Manual - part 1410


  Index      Dodge     Dodge Durango (HB) - service repair manual 2005 year


Search            


Content   ..  1408  1409  1410  1411   ..


Dodge Durango (HB). Manual - part 1410


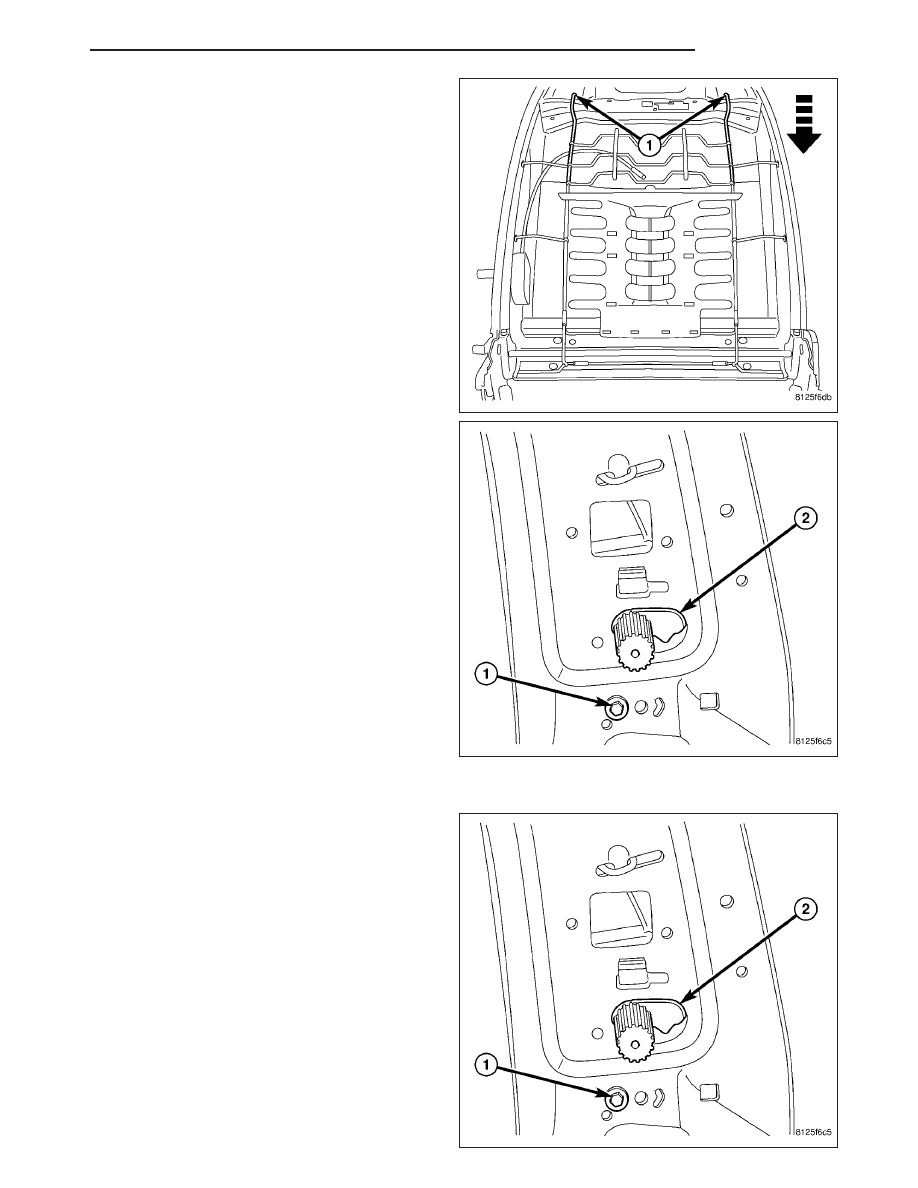
5. Pull the upper support wires (1) down and release

the lumbar mat from the seat back frame.

6. Remove the rivet (1) and remove the lumbar mech-

anism (2).

INSTALLATION

1. Before proceeding with the following repair proce-

dure, review all warnings and cautions. (Refer to
23 - BODY/SEATS - WARNING)

2. Install the lumbar mechanism (2) and install a new

rivet (1).

HB

SEATS

23 - 153

3. Place lumbar mat onto seat back frame and insert

the upper support wires (1) into the frame.

4. Squeeze the lower support wires (1) together and

insert into the lower frame.

5. Squeeze the side support wires together and insert

them into the sides of the seat back frame.

6. Install the seat back cushion/cover. (Refer to 23 -

BODY/SEATS/SEAT BACK CUSHION / COVER -
FRONT - INSTALLATION)

23 - 154

SEATS

HB

CUSHION/COVER-CUSHION - FRONT

REMOVAL

1. Before proceeding with the following repair proce-

dure, review all warnings and cautions. (Refer to
23 - BODY/SEATS - WARNING)

2. Move the seat to the forward position and discon-

nect and isolate the batter negative cable.

3. Remove the bolts (2) and the clamps (1) and

remove the seat cushion.

4. Disconnect the electrical connector, if equipped.

5. Separate the j-straps (1 & 2) and seat cushion

cover and foam.

INSTALLATION

1. Before proceeding with the following repair proce-

dure, review all warnings and cautions. (Refer to
23 - BODY/SEATS - WARNING)

2. Position the cushion cover and foam over the seat

pan and connect the j-straps (1 & 2).

HB

SEATS

23 - 155

3. Position the seat cushion assembly onto the seat

frame and install the clamps (1).

4. Connect the wire harness to the seat cushion pan,

if equipped.

5. Install the bolts (2) and tighten to 10 N·m (90 in.

lbs.).

6. Connect battery negative cable.

ADJUSTERS-FRONT

REMOVAL

1. Before proceeding with the following repair procedure, review all warnings and cautions. (Refer to 23 - BODY/

SEATS - WARNING)

2. Remove the seat cushion as necessary. (Refer to 23 - BODY/SEATS/SEAT CUSHION / COVER - FRONT -

REMOVAL)

Power

1. Remove the seat risers. (Refer to 23 - BODY/

SEATS/SEAT RISER - FRONT - REMOVAL)

2. Remove the bolts and nuts (2 & 4) and separate

the height adjuster assembly from the length
adjuster assembly (3).

NOTE: Bolt (4) is a different size from the other
three bolts (2). Note the location for proper
installation.

23 - 156

SEATS

HB


Content   ..  1408  1409  1410  1411   ..