Dodge Durango (HB). Manual - part 1308


  Index      Dodge     Dodge Durango (HB) - service repair manual 2005 year


Search            


Content   ..  1306  1307  1308  1309   ..


Dodge Durango (HB). Manual - part 1308


NOTE: Before final assembly of transmission cen-
terline, the 2C/4C clutch components should be
installed into position and measured as follows:

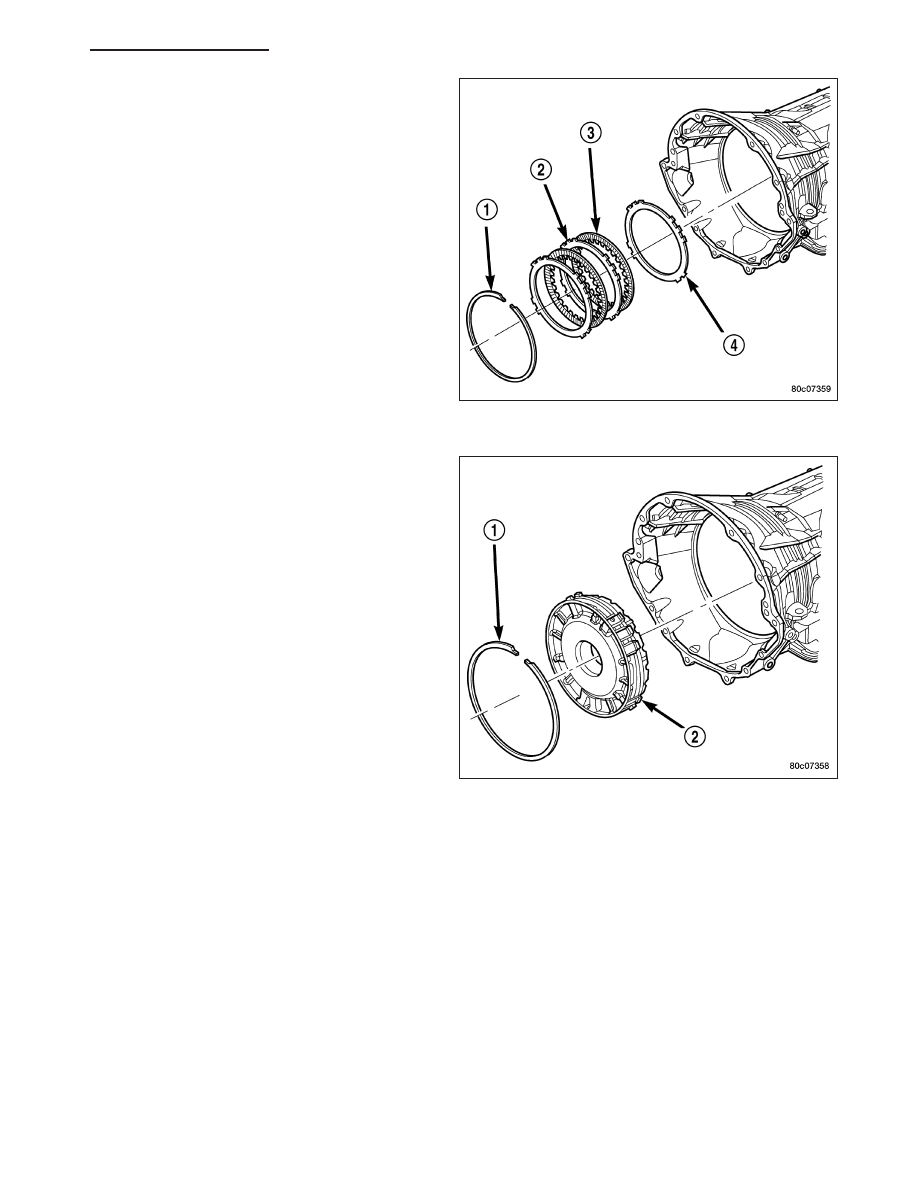
9. Install the 2C reaction plate (4) into the transmis-

sion case.

10. Install the 2C clutch pack (2, 3) into the transmis-

sion case.

11. Install the flat 2C clutch snap-ring (1) into the

transmission case.

12. Install the 4C retainer/bulkhead (2) into the trans-

mission case. Make sure that the oil feed holes
are pointing toward the valve body area.

13. Install the 4C retainer/bulkhead tapered snap-ring

(1) into the transmission case. Make sure that the
open ends of the snap-ring are located in the
case opening toward the valve body area.

14. Using a feeler gauge through the opening in the

rear of the transmission case, measure the 2C
clutch pack clearance between the 2C reaction
plate and the transmission case at four different
points. The average of these measurements is the
2C clutch pack clearance. The correct clutch
clearance is 0.455-1.335 mm (0.018-0.053 in.).
The reaction plate is not selective. If the clutch
pack clearance is not within specification, the
reaction plate, all the friction discs, and steels
must be replaced.

15. Remove the 4C retainer/bulkhead and all of the

2C clutch components from the transmission case.

HB

AUTOMATIC TRANSMISSION 545RFE - SERVICE INFORMATION

21 - 637

16. Install the low/reverse clutch assembly (1). Make

sure that the oil feed hole points toward the valve
body area and that the bleed orifice is aligned
with the notch in the rear of the transmission
case.

17. Install the snap-ring (2) to hold the low/reverse

clutch retainer into the transmission case. The
snap-ring is tapered and must be installed with
the tapered side forward. Once installed, verify
that the snap-ring is fully seated in the snap-ring
groove.

18. Air check the low/reverse clutch and verify correct

overrunning clutch operation.

19. Install the number 12 thrust bearing (3) over the

output shaft and against the rear planetary gear
set. The flat side of the bearing goes toward the
planetary gearset and the raised tabs on the inner
race should face the rear of the transmission.

21 - 638

AUTOMATIC TRANSMISSION 545RFE - SERVICE INFORMATION

HB

20. Install the reverse/input planetary assembly (1) through the low/reverse clutch assembly.

21. Install the park sprag gear (1) onto the output

shaft.

22. Install the snap-ring (1) to hold the park sprag

onto the output shaft.

HB

AUTOMATIC TRANSMISSION 545RFE - SERVICE INFORMATION

21 - 639

23. Install the 2C reaction plate (4) into the transmis-

sion case.

24. Install the 2C clutch pack (2, 3, 4) into the trans-

mission case.

Install Reaction Annulus and Carrier

1 - THRUST BEARING NUMBER 8

5 - THRUST BEARING NUMBER 7

2 - THRUST BEARING NUMBER 9

6 - THRUST PLATE (SELECT)

3 - REACTION PLANETARY CARRIER

7 - THRUST BEARING NUMBER 6

4 - REACTION SUN GEAR

8 - REACTION ANNULUS

21 - 640

AUTOMATIC TRANSMISSION 545RFE - SERVICE INFORMATION

HB


Content   ..  1306  1307  1308  1309   ..