Dodge Dakota (R1). Manual - part 787


  Index      Dodge     Dodge Dakota (R1) - service repair manual 2000 year


Search            


Content   ..  785  786  787  788   ..


Dodge Dakota (R1). Manual - part 787


(14) Install cowl grille and wipers.
(15) Install rear view mirror.
(16) After urethane has cured, remove tape strips

and water test windshield to verify repair.

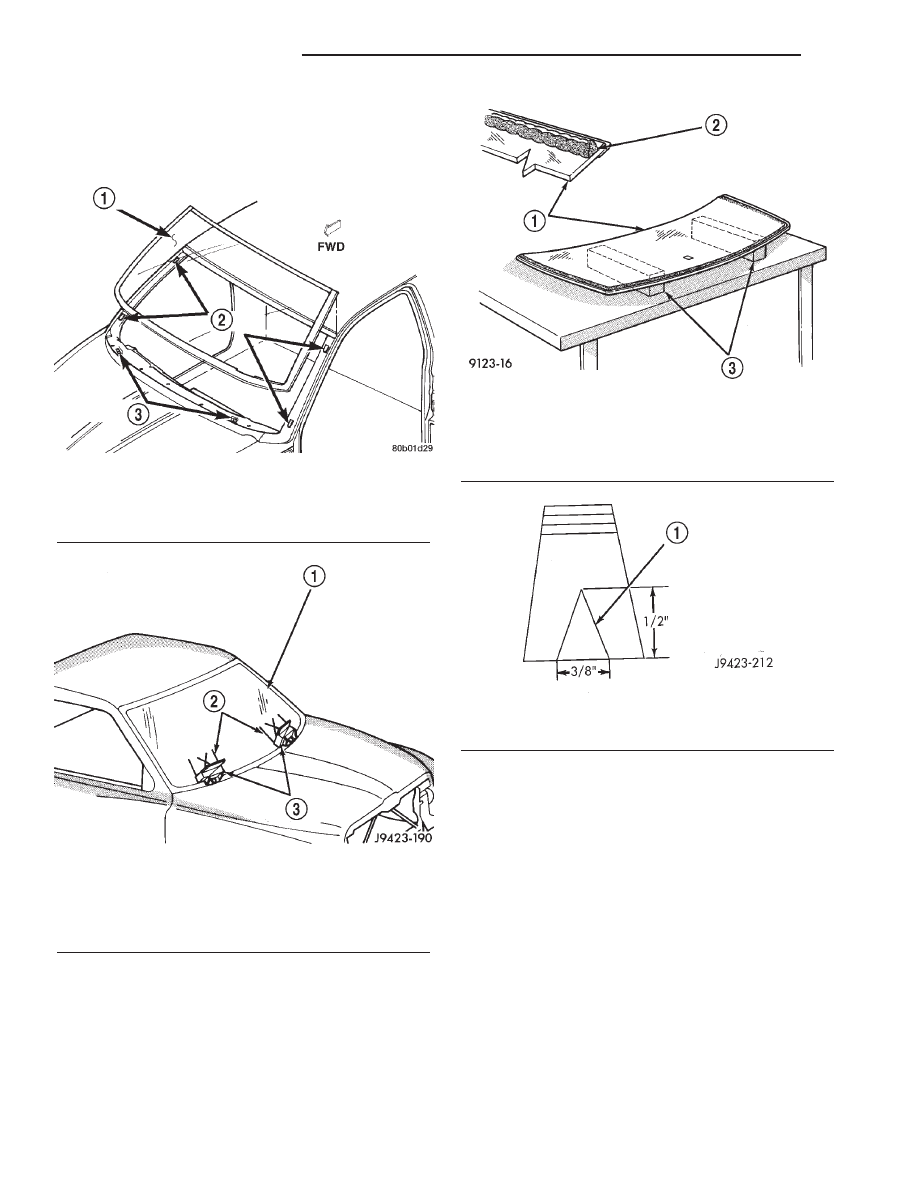
Fig. 6 Support Spacers

1 - WINDSHIELD
2 - SPACERS
3 - SUPPORTS

Fig. 7 Center Windshield and Mark at Support

Spacers

1 - WINDSHIELD
2 - INDEX MARKS
3 - SUPPORT SPACERS

Fig. 8 Work Surface Set up and Molding Installation

1 - WINDSHIELD AND MOULDINGS
2 - URETHANE BEAD AROUND GLASS 7mm (.3 in.) FROM
EDGE
3 - BLOCKS

Fig. 9 Applicator Tip

1 - APPLICATOR TIP

23 - 136

STATIONARY GLASS

AN

WINDSHIELD (Continued)

WEATHERSTRIP/SEALS

TABLE OF CONTENTS

page

page

WEATHERSTRIP/SEALS

REMOVAL . . . . . . . . . . . . . . . . . . . . . . . . . . . . . 137
INSTALLATION . . . . . . . . . . . . . . . . . . . . . . . . . . 137

CARGO BOX SEAL

REMOVAL . . . . . . . . . . . . . . . . . . . . . . . . . . . . . 138
INSTALLATION . . . . . . . . . . . . . . . . . . . . . . . . . . 138

COWL WEATHERSTRIP

REMOVAL . . . . . . . . . . . . . . . . . . . . . . . . . . . . . 138
INSTALLATION . . . . . . . . . . . . . . . . . . . . . . . . . . 138

FRONT DOOR GLASS RUN WEATHERSTRIP

REMOVAL . . . . . . . . . . . . . . . . . . . . . . . . . . . . . 138
INSTALLATION . . . . . . . . . . . . . . . . . . . . . . . . . . 138

FRONT DOOR INNER BELT WEATHERSTRIP

REMOVAL . . . . . . . . . . . . . . . . . . . . . . . . . . . . . 139
INSTALLATION . . . . . . . . . . . . . . . . . . . . . . . . . . 139

FRONT DOOR OUTER BELT WEATHERSTRIP

REMOVAL . . . . . . . . . . . . . . . . . . . . . . . . . . . . . 139
INSTALLATION . . . . . . . . . . . . . . . . . . . . . . . . . . 139

FRONT DOOR 2ND WEATHERSTRIP

REMOVAL . . . . . . . . . . . . . . . . . . . . . . . . . . . . . 139

FRONT DOOR WEATHERSTRIP

REMOVAL . . . . . . . . . . . . . . . . . . . . . . . . . . . . . 139

INSTALLATION . . . . . . . . . . . . . . . . . . . . . . . . . . 139

QUARTER VENT GLASS WEATHERSTRIP

REMOVAL . . . . . . . . . . . . . . . . . . . . . . . . . . . . . 140
INSTALLATION . . . . . . . . . . . . . . . . . . . . . . . . . . 140

REAR DOOR GLASS RUN WEATHERSTRIP

REMOVAL . . . . . . . . . . . . . . . . . . . . . . . . . . . . . 140
INSTALLATION . . . . . . . . . . . . . . . . . . . . . . . . . . 140

REAR DOOR INNER BELT WEATHERSTRIP

REMOVAL . . . . . . . . . . . . . . . . . . . . . . . . . . . . . 140
INSTALLATION . . . . . . . . . . . . . . . . . . . . . . . . . . 140

REAR DOOR OUTER BELT WEATHERSTRIP

REMOVAL . . . . . . . . . . . . . . . . . . . . . . . . . . . . . 141
INSTALLATION . . . . . . . . . . . . . . . . . . . . . . . . . . 141

REAR DOOR SECONDARY WEATHERSTRIP

REMOVAL . . . . . . . . . . . . . . . . . . . . . . . . . . . . . 141
INSTALLATION . . . . . . . . . . . . . . . . . . . . . . . . . . 141

REAR DOOR WEATHERSTRIP

REMOVAL . . . . . . . . . . . . . . . . . . . . . . . . . . . . . 141
INSTALLATION . . . . . . . . . . . . . . . . . . . . . . . . . . 141

ROOF RAIL WEATHERSTRIP/RETAINER

REMOVAL . . . . . . . . . . . . . . . . . . . . . . . . . . . . . 141
INSTALLATION . . . . . . . . . . . . . . . . . . . . . . . . . . 142

WEATHERSTRIP/SEALS

REMOVAL

(1) Remove push-in fasteners attaching hood seal

to inner hood panel (Fig. 1).

(2) Separate hood seal from vehicle.

INSTALLATION

(1) Position hood seal on inner hood panel.
(2) Install push-in fasteners attaching hood seal to

inner hood panel.

Fig. 1 Hood Seal

1 - INNER HOOD PANEL
2 - HOOD PANEL

AN

WEATHERSTRIP/SEALS

23 - 137

CARGO BOX SEAL

REMOVAL

(1) From under the vehicle, use a trim panel

removal tool and remove the push-in fasteners
attaching the cargo box seal to the cargo box (Fig. 2).

(2) Separate the seal from the cargo box.

INSTALLATION

(1) Position the seal on the cargo box
(2) Install the push-in fasteners attaching the

cargo box seal to the cargo box (Fig. 2).

COWL WEATHERSTRIP

REMOVAL

(1) Grasp cowl seal and pull seal from flange (Fig.

3).

(2) Separate cowl seal from vehicle.

INSTALLATION

(1) Position cowl seal on flange and press into

place.

FRONT DOOR GLASS RUN
WEATHERSTRIP

REMOVAL

(1) Remove door trim panel.
(2) Remove water dam as necessary to access

lower glass run channels.

(3) Remove the bolts attaching the glass run chan-

nels.

(4) Remove glass.
(5) Pull the glass run weatherstrip and run chan-

nels from the window opening (Fig. 4).

(6) Pull the glass run weatherstrip from the run

channels.

INSTALLATION

(1) Install the glass run weatherstrip in the run

channels.

(2) Install the glass run weatherstrip in the win-

dow opening.

(3) Position the run channels in the door.
(4) Install glass.
(5) Install the glass run channels.
(6) Install inner belt weatherstrip.
(7) Install outer belt weatherstrip.
(8) Install door trim panel.

Fig. 2 Cargo Box Seal

1 - CARGO BOX
2 - BOX SEAL
3 - PUSH-IN FASTENER
4 - CARGO BOX SEAL

Fig. 3 Cowl Seal

1 - COWL TO HOOD SEAL
2 - COWL

23 - 138

WEATHERSTRIP/SEALS

AN

FRONT DOOR INNER BELT
WEATHERSTRIP

REMOVAL

(1) Remove screws attaching trim panel to door.
(2) Lift trim panel up and over inner belt seal.
(3) Peel seal from door (Fig. 4).

INSTALLATION

(1) Slide seal into position on door.
(2) Position trim panel over inner belt seal and

install screws.

FRONT DOOR OUTER BELT
WEATHERSTRIP

REMOVAL

(1) Lower glass.
(2) Lift rearward corner of weatherstrip and slide

weatherstrip rearward (Fig. 4).

INSTALLATION

(1) Lightly lubricate weatherstrip with silicone and

slide weatherstrip behind mirror.

(2) Push weatherstrip down to seat onto door.

FRONT DOOR 2ND
WEATHERSTRIP

REMOVAL

The secondary seal is attached with two sided

adhesive tape.

(1) Separate the secondary seal and the tape from

the inner door panel (Fig. 4).

FRONT DOOR WEATHERSTRIP

REMOVAL

(1) Remove A-pillar trim.
(2) Remove cowl panel and sill cover.
(3) Remove upper turning loop anchor bolt.
(4) Pull B-pillar trim/quarter panel trim outward

to access weatherstrip.

(5) Pull weatherstrip from pinch flange around

door opening (Fig. 5).

INSTALLATION

(1) Position the weatherstrip on the pinch flange

around door opening and press into place.

(2) Press into place B-pillar trim/quarter panel

trim.

(3) Install upper turning loop anchor bolt.
(4) Install cowl panel and sill cover. Ensure the

clips attaching the sill cover to the door sill are fully
seated.

(5) Install A-pillar trim.

Fig. 4 Front Door Weatherstrip/Seals

1 - B-PILLAR SECONDARY SEAL
2 - GLASS RUN WEATHERSTRIP
3 - INNER BELT WEATHERSTRIP
4 - SECONDARY SEAL
5 - OUTER BELT WEATHERSTRIP

Fig. 5 Door Seal

1 - DOOR SEAL

AN

WEATHERSTRIP/SEALS

23 - 139


Content   ..  785  786  787  788   ..